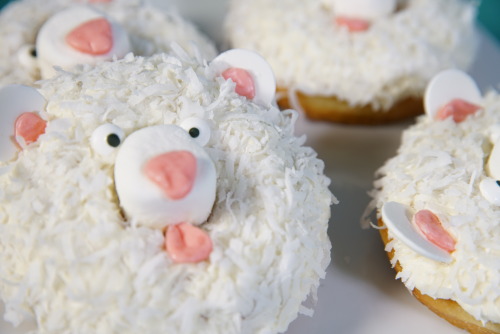
4. Make two little slits where you’d like your bear’s ears to be, and insert white candy melts until they are submerged half way.
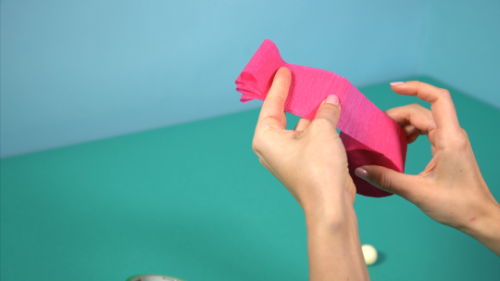
5. Unwrap a Starburst candy and, using your fingers, flatten it out.
6. Cut a tongue, nose, and two small half-circles for the ears.
7. Using a little frosting, attach the tongue just below the marshmallow, the nose on top of the marshmallow (in line with the nose), and one half-circle on each ear.
8. Finish by attaching two eyes just above the marshmallow.
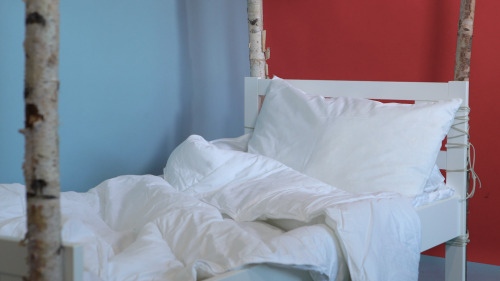
How to Give a Little Girl’s IKEA Bed a Canopy Fit for a Young Lady
As a parent, it’s alarming to realize how quickly your children outgrow everything from their clothing to the furniture they use. Constantly trying to keep up can you leave you and your wallet exhausted.
We’ve got a great IKEA hack that will slow things down a little bit!
Turn your little girl’s bed into a canopy bed with just a few birch poles and a piece of fabric. She’ll feel all grown up, and you’ll feel like you just bought yourself a little more time.
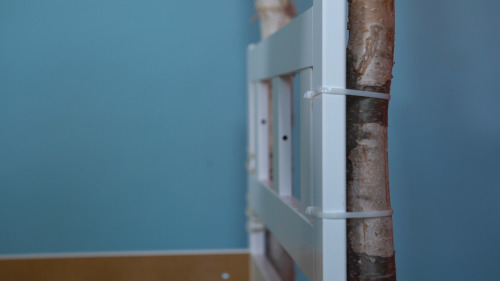
2. Attach a pole to each corner of the bed with a layer of Liquid Nails and zip ties. Use at least three zip ties per pole, spaced a few inches apart — especially one at the top of the frame and one at the foot.
3. Wrap the points at which you secured the pole with a zip tie with white suede lacing, and tie off in a knot.
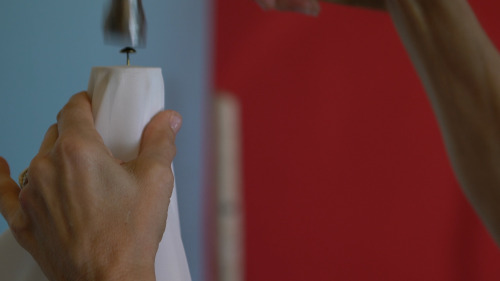
4. Using upholstery tacks, fold your fabric in two and hammer two corners of the fabric into the tops of two poles at the foot of the bed.
5. Hammer the remaining two corners of the doubled fabric into the top of the remaining two poles, keeping a nice, loose drape.
6. Toss a handful of leaves in between the two layers of draped canopy, and scatter them across the fabric to mimic natural leaf fall. Your little girl will be able to look up and feel as if she’s in an enchanted forrest.
How to DIY a Chocolate Flower Bouquet - The Ultimate All-in-One Gift
Chocolates and flowers often go hand-in-hand when it comes to gift giving, so why not combine the two and make the ultimate all-in-one present?
Whether you like milk, dark, or white chocolate, you’re sure to love these sweet flowers. So, get out the lollipop sticks, some colorful crepe paper, and a decorative jar, and whip up a big bouquet — we’re sure they’ll be your favorite flower from now on!
Materials:
White chocolate truffles, such as Lindt’s Lindor truffles
Lollipop sticks
Crepe paper streamer, pink
Masking or washi tape, green
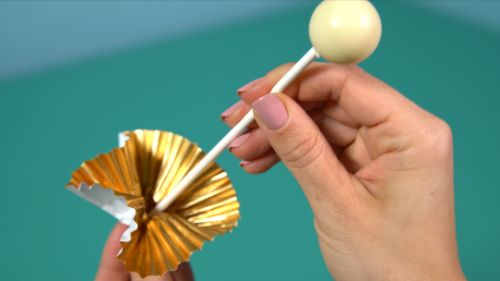
Cupcake liners, gold
Glass jar
Floral oasis
Tools:
Wooden skewer
Scissors
Instructions:
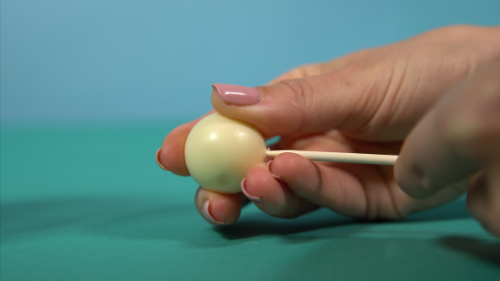
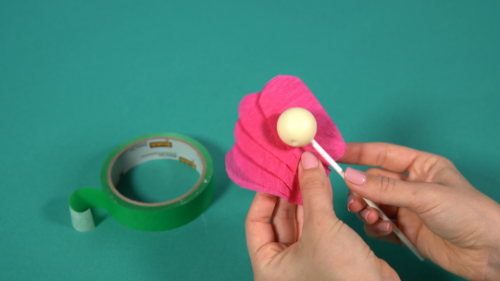
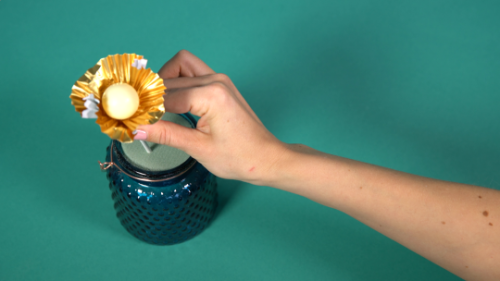
1. Unwrap a truffle and, using the tip of the wooden skewer, poke a hole in it.
2. Remove the skewer and insert a lollipop stick into the hole.
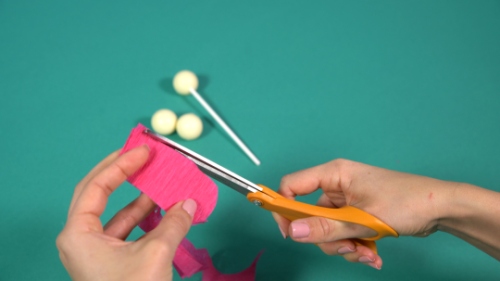
3. Accordion-fold the crepe streamer at a 3-inch lengths until you have about seven layers, then cut the stack from the roll.
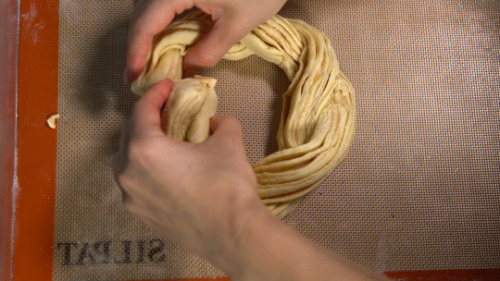
This Cinnamon-Sugar Pastry Wreath Is Sure to Impress
When you’re having people over for brunch, or simply treating your loved ones to something special, you want to serve up a treat that has a bit of a “wow factor.”
What you don’t want to do is spend forever slaving away in the kitchen!
This pastry wreath looks intricate and time-consuming, but the reality is: It couldn’t be simpler. A little store-bought puff pastry, some cinnamon sugar, and a creative twist, and brunch goes from ho-hum to yum!
1 package puff pastry, 2 sheets
½ stick unsalted butter, melted
½ cup cinnamon sugar
Pastry brush
Set oven to 400°.
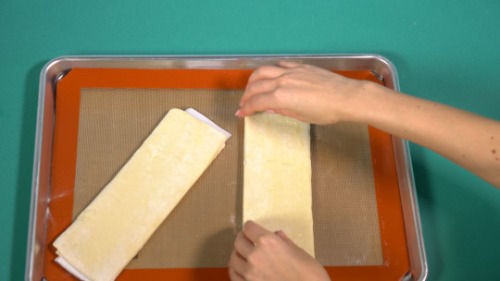
1. Lay out 2 sheets of puff pastry, side by side and slightly overlapping.
2. Brush the edge where the pastry sheets overlap with butter, to seal the seam.
3. Brush both sheets with melted butter.
4. Sprinkle all but 2 tablespoons of cinnamon sugar onto the buttered surface.
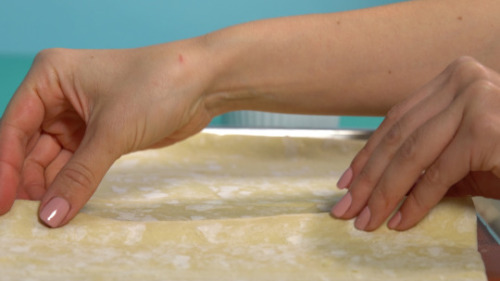
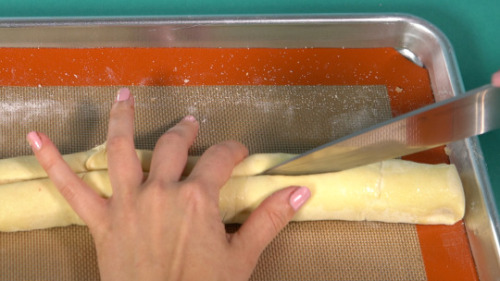
5. Roll the pastry into a log along the long edge.
How to Make Chemical-Free, All-Natural Food Coloring You Can Feel Good About
Food coloring seems to find its way into most kids’ foods and decorated pastries these days, and though it can go a long way toward making treats and sweets look more appealing, we don’t love the idea of frequent chemical consumption.
After all, the most beautiful colors are found in nature.
Beets
Spice/coffee grinder
1. Wash and peel the beets.
2. Cut off the tops and tails of the beets, cut them in half, and slice them very thinly.
3. Lay the beet slices on baking sheet and bake at 200 °F until completely dehydrated — about 3 hours. Alternatively, if you have a dehydrator, by all means use it.
4. Grind the dehydrated beet chips in the coffee or spice grinder until very, very fine.
At this point, you can use the beet powder as an all-natural, loose powder blush, or mix it with a few of drops of vodka to make a chemical-free food coloring.
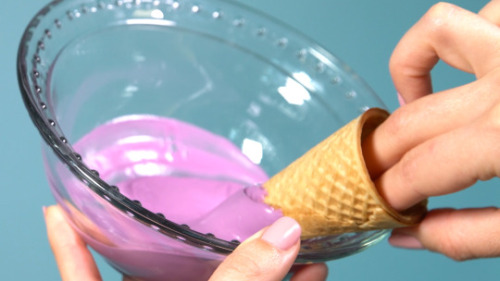
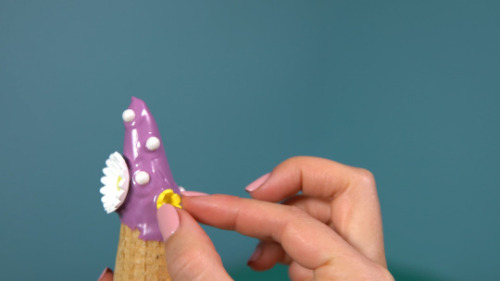
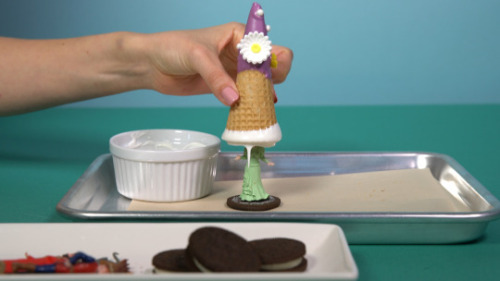
These DIY sugar cone confections are sweet, festive, and lots of fun. When cracked open, they reveal a little trinket that kids will delight over, making them the perfect birthday party favor.
Sugar cones
Chocolate candy melts in two colors
Sugar decorations: flowers, balls, or sprinkles
Oreos
Toys and trinkets small enough to fit inside the cones
1. Melt one color of candy melt in the microwave at 50 percent power until completely smooth.
2. Dip and swirl the top half of the sugar cone in the melted chocolate and stand it upright on a parchment-lined baking sheet.
3. While still wet, decorate the chocolate-covered half of the cone with sugar decorations.
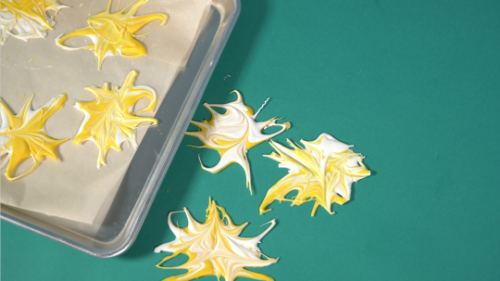
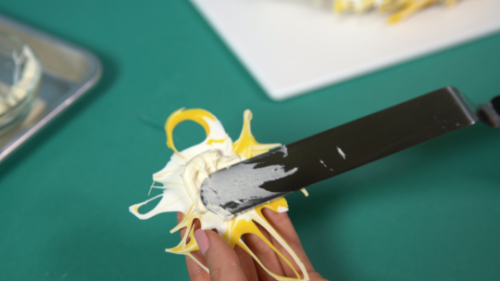
Decorate Like a Cake Boss With This Super-Simple Technique
If you think impressive cake decorating is beyond your skill set, think again! This super-simple and relatively quick cake-decorating technique is the key to making a big impression without having to be a total whiz in the kitchen.
We chose to decorate with white and yellow, but feel free to mix it up! Go simple with milk and white chocolate, or get crazy with the multitude of colors available at the craft and baking stores.
Candy melts, yellow and white
Layer cake, iced with vanilla buttercream
Vanilla buttercream
Parchment paper
Wooden skewer
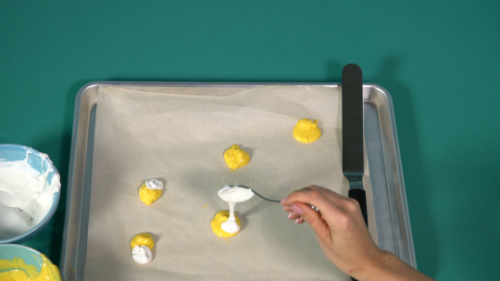
1. Melt yellow and white candy melts, separately, at 50 percent power in the microwave, until completely smooth.
2. On a parchment-lined baking sheet, spoon mounds of white and yellow candy melts on top of each other, leaving about two inches between each multicolor mound.
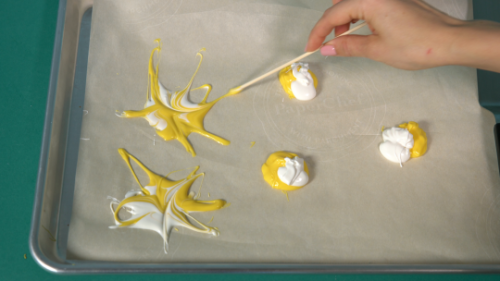
3. Pull the wooden skewer through each mound, to marbleize the melts and create “sunburst” shapes.
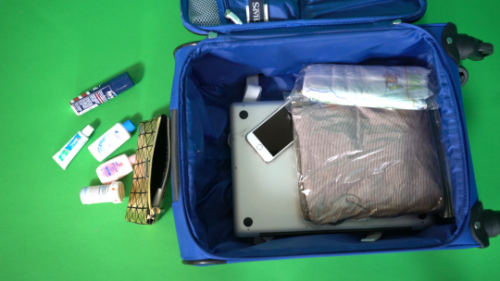
How to Keep Calm and Carry On When You’re Stranded Without Your Checked Bags
These days, it feels like a miracle when you and your luggage arrive at your destination together. Whether your bags are delayed or lost, you’re left stranded and heading to the store to stock up on all those things you thought would arrive when you did.
With this is mind, we suggest you get smart about packing your carry-on!
Hard case vs. soft case
If you want to be sure there’s room for your carry-on, go soft!
Materials:
Soft-case bag
Instructions:
Purchasing a soft, fabric carry-on case is very advantageous. A soft case ensures flexibility, which makes squeezing into the tightest and smallest of overhead compartments a breeze.
Keep your most used belongings handy
Make it easy to find things when you need them!
Materials:
Carry-on case with outside pockets
Instructions:
Make sure to carry your most used and important items in the outside pockets of your carry-on. Things like your passport, itinerary, and charge cables for computers and phones need to be accessible and readily available. A big pocket for your computer is also very handy, as you’re likely to be pulling it out for security on a number of occasions.
This trick has been around for centuries. The smooth, delicate texture of silk prevents those wrinkles and “sheet lines” that seem to take the better part of your day to get rid of.
Materials:
Silk pillowcases
Instructions:
Slip the silk pillowcases right over your pillows. The silk needs to be able to slide and move so it doesn’t make a pleat against your face.
Sleep on a pillow throne
Sleeping with an elevated head prevents the puffiness and swelling that often happens during the night. The pillow “throne” will also make it more difficult to sleep on your side or face, which often leads to lines and creases.
Materials:
4 pillows
Instructions:
Put two pillows behind your head to comfortably prop up your entire torso. Slide a pillow along both sides of your body and fit them up under your armpits like the arms of a chair.
When you sleep with cool air circulating, you can slip into deeper, more reposeful sleep much more easily and then wake up looking more rested. So open a window and grab an extra blanket.
Materials:
Warm socks
Warm blankets
Hat
Instructions:
Keep windows open or a cooling fan on, then wrap up with socks, a warm blanket, and, if it’s really cold, a hat.
10 Simple Ways to Trick Yourself Into Being a Morning Person (Yes, Really!)
Morning people — they’re a rare breed. For most, it’s hard to imagine waking up before the alarm goes off and charging into the day with gusto. (Only morning people use the word “gusto,” anyway!)
Mornings are usually filled with repetitive slaps of the snooze button, slow and heavy shuffling toward the shower, and the grownup equivalent of yelling out, “Just five more minutes, Mom!”
They’re a drag.
Although getting yourself up and ready for work or school is never going to be a breeze, there are a few ways to make it a lot easier.
So wake up, sleepyhead, it’s time to get up — and here are 10 ways to make that happen.
Open your curtains the night before
It’s much easier to wake up in a brightly lit room than in a dark cave. When the sun hits your face, you’re far more likely to toss off the covers than when you’re cloaked in dozy darkness.
If you wake up before the alarm goes off, get up!
Your body is telling you it’s ready to start the day and that you’ve completed the most recent sleep cycle. Forcing your brain to power back down sets you up for a rude awakening when your body isn’t allowed to complete the oncoming cycle.
Freeze cubes of prepped fruit and veggies for smoothies
A green juice or smoothie is a great way to start the day, but nobody wants to spend their first waking moments with a peeler in hand.
Prepare your fruits and vegetables ahead of time. Create individual sandwich bags with everything you need to make a smoothie, or freeze portions in ice cube trays. No chopping or peeling makes it easy to whip up an energy-boosting breakfast.
Wake up at the same time every day, regardless of when you went to sleep
Your body needs a routine, and when you force yourself to wake up at the same time every day, you’ll create an internal rhythm.
Set up a reward system
Give yourself an incentive to get ready with tasty treats or luxurious beauty products. It’s much easier to get out of bed when there’s a reward at the end of the tunnel. Get yourself showered, dressed, and ready to go, and then indulge in something that makes you happy.
Let’s face it: We’re all just kids who need a treat for good behavior.
Sign up for an early workout class with a strict cancellation policy
Many workout facilities employ a 24-hour cancellation policy for their early-morning classes. So sign up the night before and go first thing. After all, nobody likes to pay a cancellation fee!
Every time you hit the snooze button, your body falls back into a disrupted sleep cycle, which leads to a panicked feeling when the alarm sounds as well as groggy aftereffects.
Shut down electronics an hour before bedtime
LED lighting, bright screens, and overstimulation do not prepare you for restful sleep. Your mind needs time to power down.
Keep a box of mints in your nightstand
Pop a mint in your mouth as soon as you wake up. It will stimulate your senses and actually trick your brain into thinking that food is imminent. It’s an especially good idea if you have company!
Drink a big glass of water before bedtime
A hydrated body sleeps better and wakes up well rested. Plus, you know it’s good for you.