How to sculpt a reptilian creature using ZBrush, Maya and Substance 3D
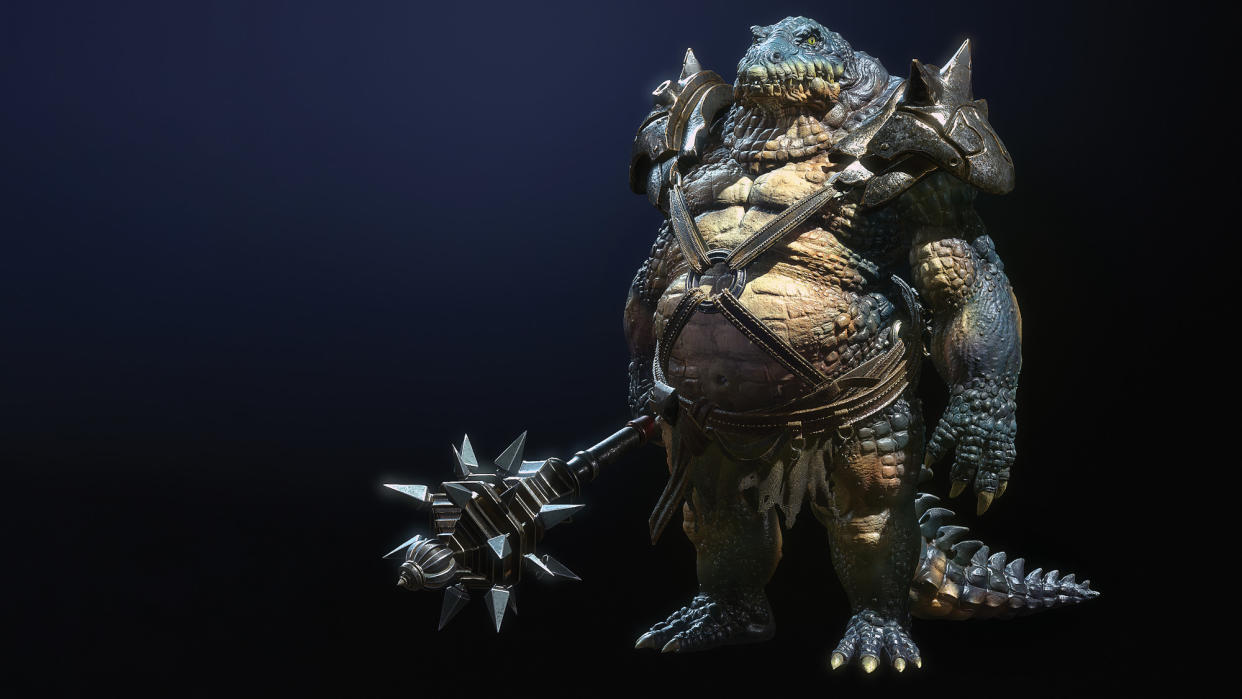
In this tutorial, I’m going to show you how I used a suite of 3D software to bring a character to life. Meet Crocodylus! He’s a creation of mine from the Mesozoic Era, and is inspired by the crocodiles found in the East Kalimantan province of my home country, Indonesia.
The 3D character pipeline involves several stages, each with its own set of tools and techniques. One of the most popular used for the sculpting phase is ZBrush, which formed the basis for Crocodylus. For more on this software, see our guide to ZBrush: everything you need to know, and our ZBrush 2023 review covers the latest updates. If you need to upgrade your kit read our guide to the best drawing tablets and the best laptops for game development.
ZBrush's feature set includes digital sculpting tools that simulate the behaviour of clay, allowing artists to sculpt intricate little touches, add textures, and create detailed models. It offers various brushes, masking tools, and features like DynaMesh and ZRemesher, which help in manipulating and refining the geometry of the model.
This tutorial isn’t just for the more experienced 3D artists out there, as my goal is to help inspire newer artists to delve into the captivating world of character design
ZBrush is a boon for creativity, helping artists to transform their imagination into reality. It forms one of the key tools I used to create my fearsome character alongside other vital software in Maya, which was used for my retopology, Substance 3D Painter for the texturing work, and then Marmoset Toolbag for creating the final render.
To complete the project, I then took my render into Photoshop for some final post-production touch-ups, bringing out its best. Though there wasn’t much to be done, it helped to make the character a little more snappy.
This tutorial isn’t just for the more experienced 3D artists out there, as my goal is to help inspire newer artists to delve into the captivating world of character design and modelling work too. If you visit my Instagram profile, you’ll also find a timelapse video of my work on the character. Hopefully you’ll be able to learn some new techniques here, so let’s get stuck into the process of creating Crocodylus!
ZBrush/Maya/Substance 3D tutorial: sculpt a creature
Here are the steps I took to bring Crocodylus to life. For all the assets you need to recreate the character for yourself, head to the 3D World download page.
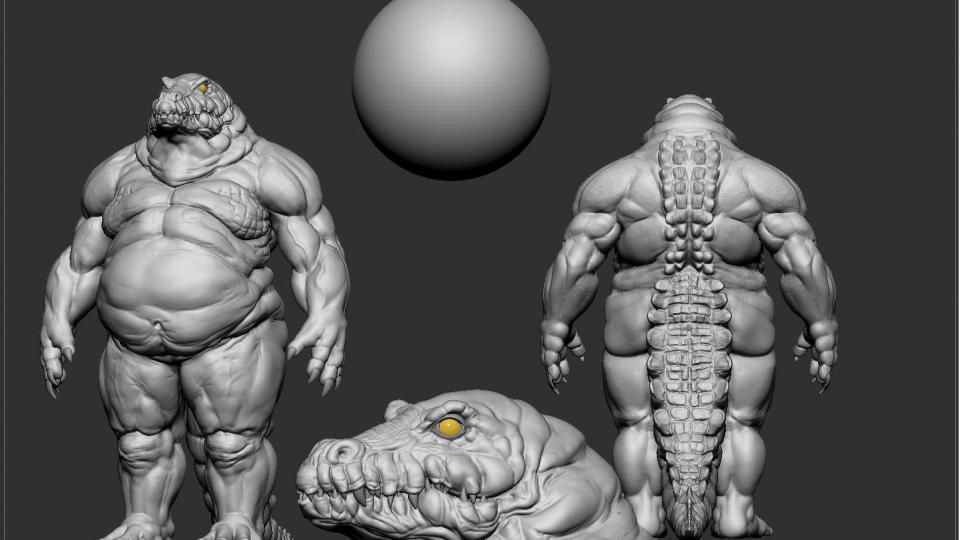
01. Sculpt the body
(Image: © Richard Jusuf)
Start off with a basic sphere with DynaMesh on, and at a high resolution. Now sculpt the shape and volume of your character, and don’t forget to turn the Symmetry on. For this I’ll generally use the basic brushes such as Move, Clay, ClayBuildup and Dam Standard. After you’re done, run a first pass in ZRemesher to clean up the topology. I target a polycount of 5 at first, but you can go lower if you need to. Remember to do this step-by-step.
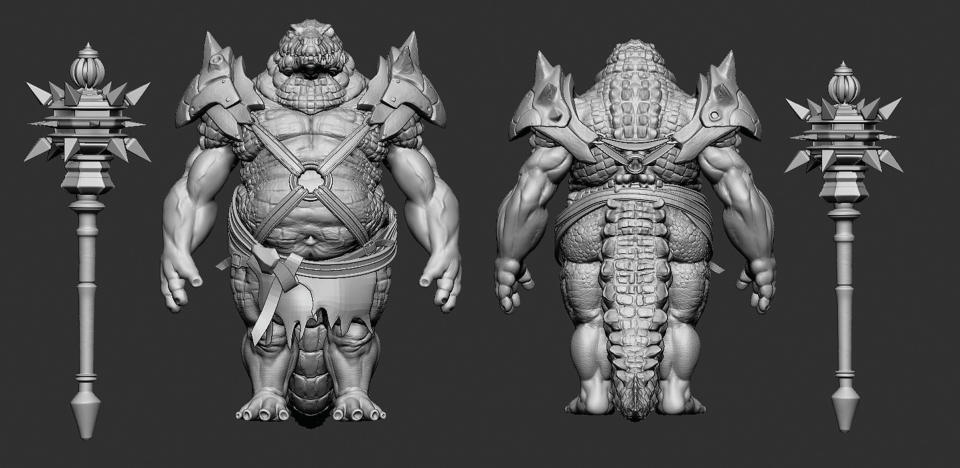
02. Add the armour and weapon
(Image: © Richard Jusuf)
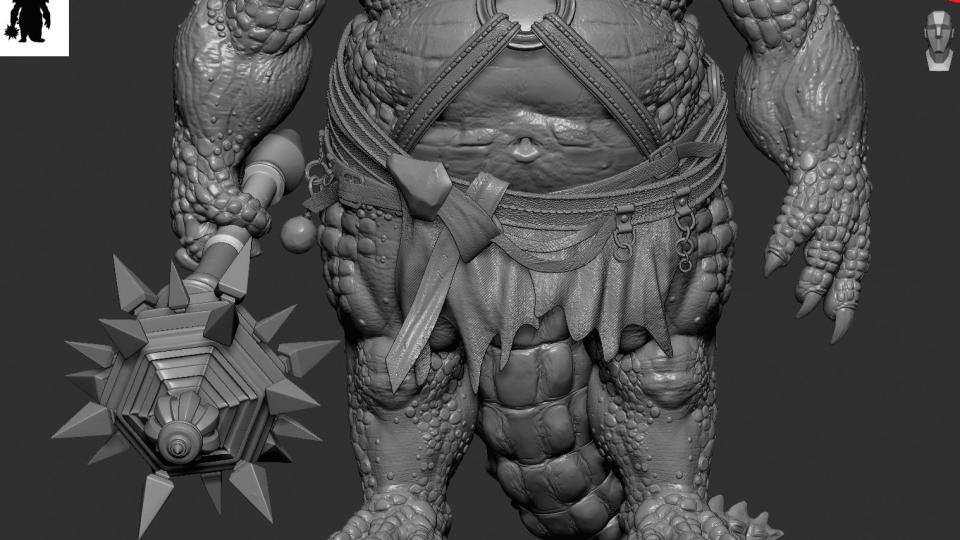
Masking is the key here. Create a rough mask all around the body and then Extract to get the basic shape. You can make adjustments with the brush tools. This is the easiest way to create elements like the armour, cloth, and so on. Hit Accept, and with the Move brush go around the model to get the shape you need. Since the weapon is hard surface, I used Maya to get the basic shape and then brought it into ZBrush for the fine details, such as the corrosion on the metal.
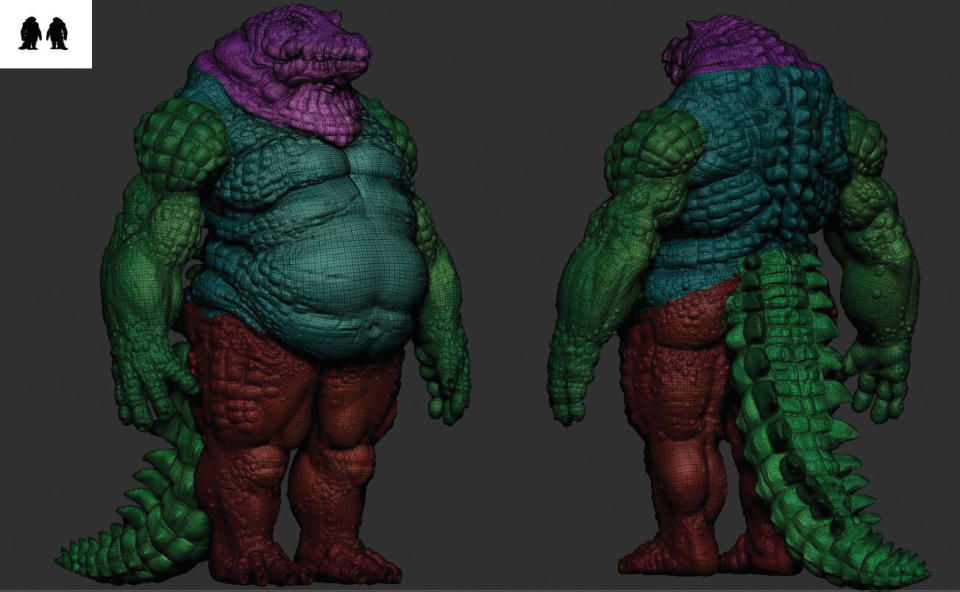
03. Get ready with Polygroup
(Image: © Richard Jusuf)
In ZBrush, the Polygroup feature lets you organise and manage different groups of polygons within a mesh. These groups can be selected, masked, hidden, or manipulated independently to enable easier and more precise sculpting, painting and other operations.
They streamline the workflow, especially working on complex surfaces or with multiple parts in a single mesh. Commonly I use ‘Group by Mask’, or ‘Group by UV’ when you have the UV. To select a Polygroup hit Ctrl+Shift and click on it, or head over to the Polygroup menu to find various selection options.
04. Prepare for the reptopology in Maya
(Image: © Richard Jusuf)
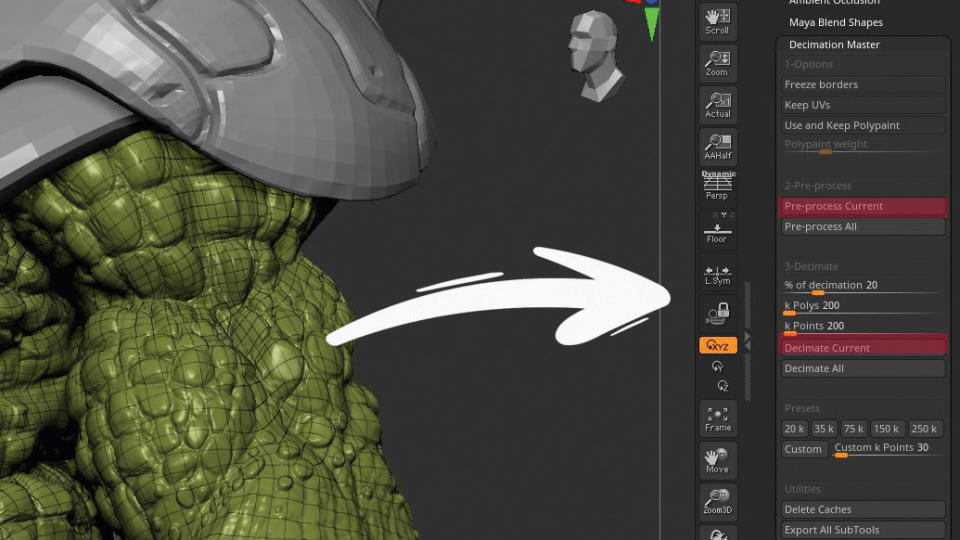
It’s best to retopologise before you begin to create the details so that you can get going with clean topology, which makes it easier to enhance your intricate touches. With that done, follow over to Zplugin > Decimation Master and click Preprocess Current, followed by Decimation Current when that has been completed.
This is particularly useful when you have a high-resolution model with an excessive number of polygons and want to either optimise it for performance, or export to other software. This part is boring, but it’s important for cleaning up your topology so it’s production-ready.
05. UV the low-poly
(Image: © Richard Jusuf)
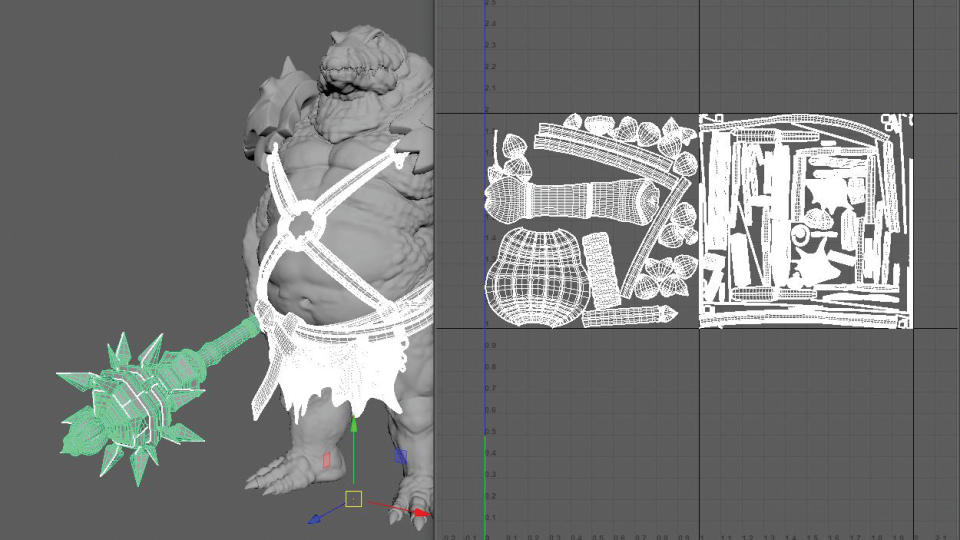
In order to UV-map a low-polygon model in Maya, we need to unwrap its surface and create a 2D representation to enable the textures to be applied accurately. UV each part of your model, but remember that you must decide each group you want to combine into a single UV layout. I’ll generally separate the head, body, weapons and armour. Practice and experimentation will help refine your UV mapping.
06. Reproject the high-poly
(Image: © Richard Jusuf)
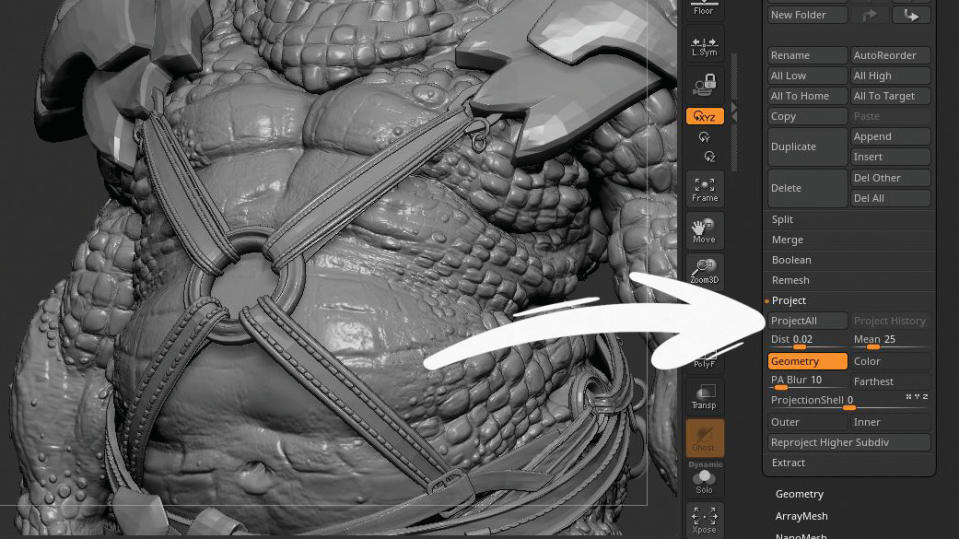
Now we have to project the lowpoly we made in Maya with the high-poly in ZBrush, as we need our high-poly to have the UVs for baking. Export from Maya as an OBJ, making sure you have your group ready. In the SubTool tab click Project and be careful to project each division from the low-poly to the high-poly.
07. Sculpt the details
(Image: © Richard Jusuf)
ZBrush provides a plethora of tools and techniques to sculpt intricate details. Experimentation and familiarity with these tools will greatly enhance your ability to create stunning, detailed models. For this job you can use brushes like the Standard, Dam Standard, ClayBuildup, and Inflate/Deflate.
I also use the Alpha map for tiny details such as the pores and skin texture. Load the alphas from the Alpha palette or make and import your own specific details. Always remember to sculpt the correct anatomy before you move on to the alpha and detailing.
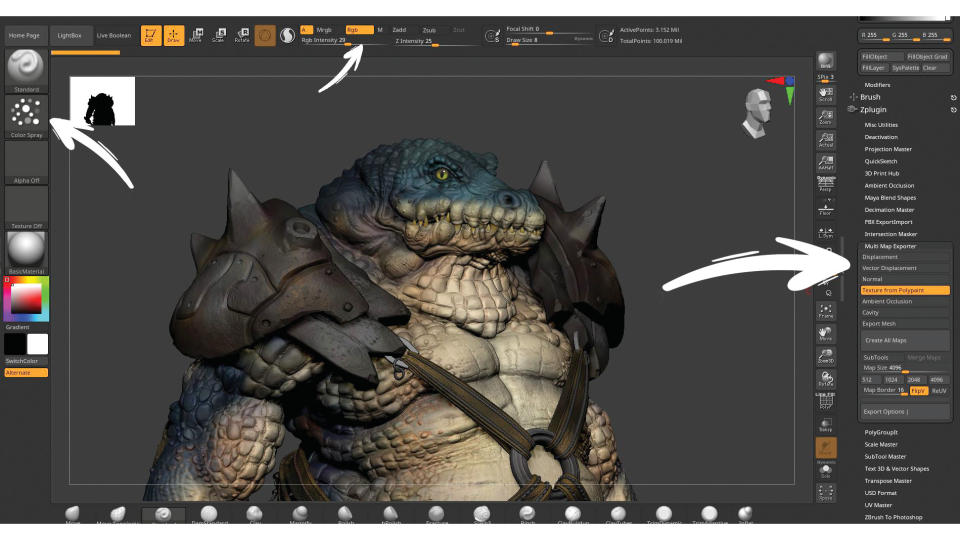
08. Get started with the Polypaint tool
(Image: © Richard Jusuf)
Polypaint in ZBrush is a feature that allows you to paint directly onto the surface of your models. It’s a powerful tool for adding colour, texture and fine details. You can choose Standard brush, then change the stroke to Color Spray with a low RGB Intensity of around 20-30. I find that Polypaint is great to get a base colour down before moving into Substance 3D Painter, where I’ll paint over again for a better result.
09. Make the pose

(Image: © Richard Jusuf)
When you’re happy with your Polypainting work, you can continue to posing the character. The reason we do this after the Polypainting is because we need the symmetry, but if you’re willing to do without that for a personal project you can skip that job.
To make the pose go to your Zplugin tab and hit TPoseMesh. Mask the area you want to move and click ‘TPose > SubT’. ZBrush will then generate all the SubTools you moved with TPoseMesh.
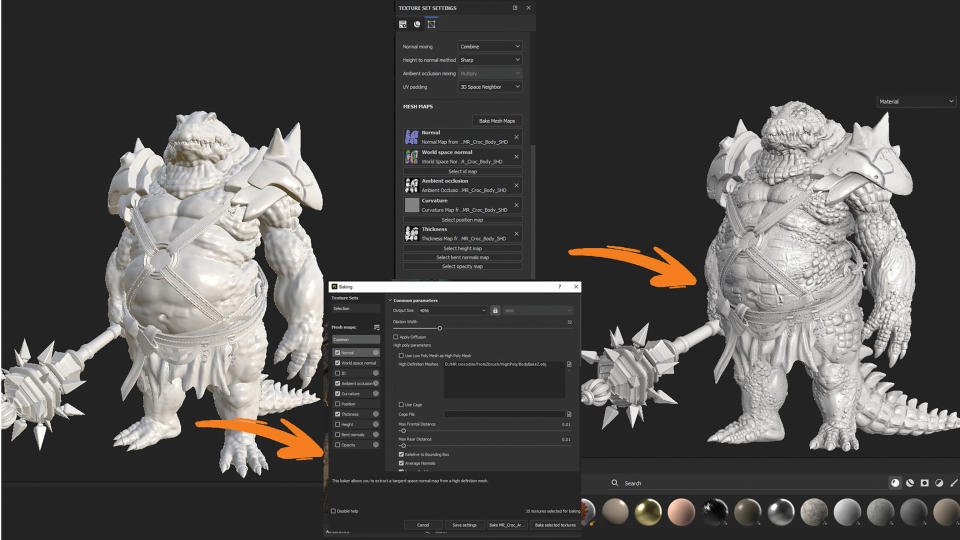
10. Substance 3D Painter and Mesh Baking
(Image: © Richard Jusuf)
With your mesh saved as either an FBX or OBJ file with a 2K or 4K resolution, switch to Substance 3D Painter, click Import>New Project and import the low-poly mesh into the file selection. After you create the project, click any texture set then select the Bake Mesh Map button and load up the high-poly. One important note before you bring the highpoly in for baking is to follow the Decimation process as I outlined in Step 04. Select everything you need and don’t forget to turn on Keep UV and Keep Polypaint in the Decimation Master tab.
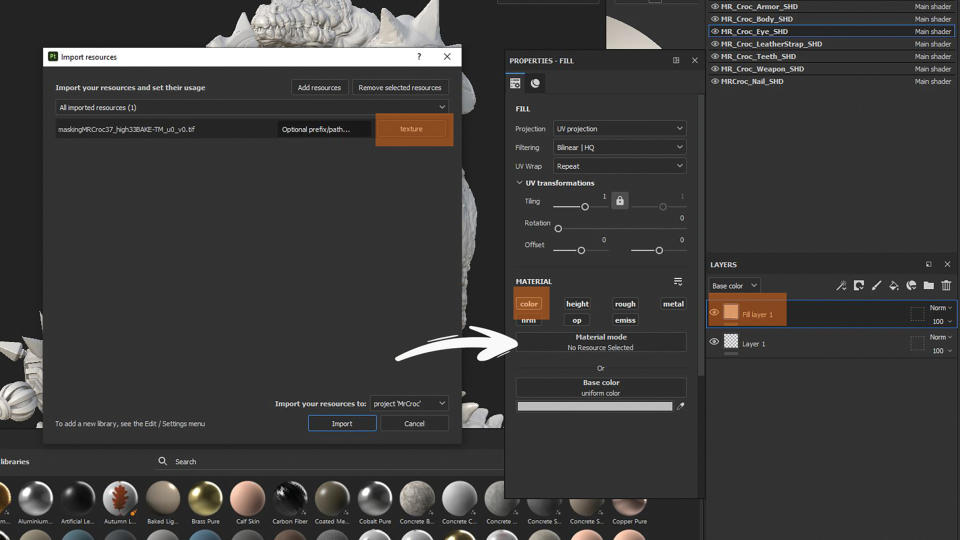
11. Add base colour
(Image: © Richard Jusuf)
Once you’ve got your low-poly bake, it’s time to start with the base colour texture. First, import the base colour you made into Polypaint to Substance 3D Painter. Create a fill layer with just a Color node and import all the textures. Follow this step for the whole texture set list based on how many Material Sets you assigned in Maya.
12. Refine texture in Substance

(Image: © Richard Jusuf)
You can make further refinements and enhancements to the texture using Substance 3D Painter’s wide array of tools and features. These include placing additional details, tweaking your colours, applying masks, adding in effects and more. While you already have you’re base colour set, you can start to apply more paint with the brush in Substance 3D Painter.
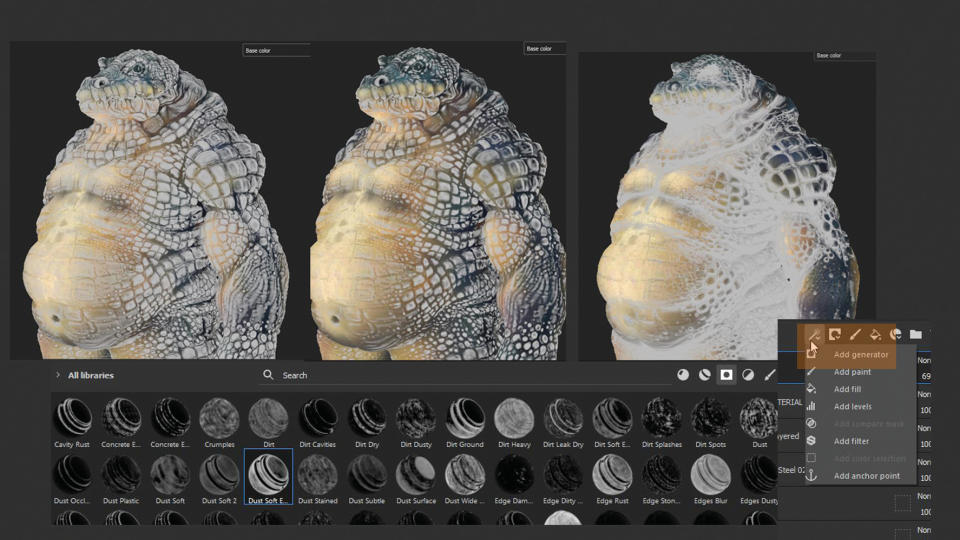
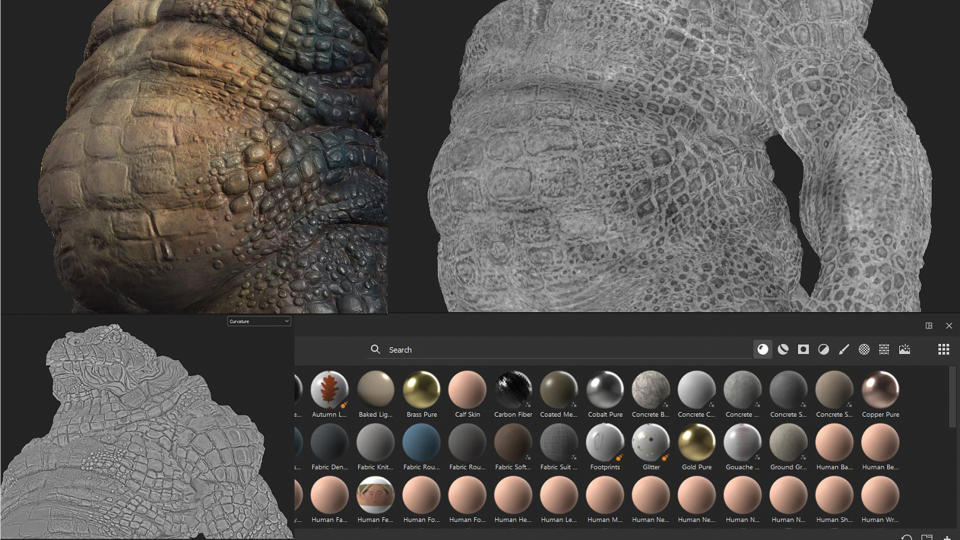
13. Use masking and generators
(Image: © Richard Jusuf)
In Substance 3D Painter, masks and generators are powerful features that allow for precise control and creation of texture details. By effectively combining masking techniques to control where effects are applied, and generators to create diverse textures and details like dirt, the software offers a robust workflow for creating intricate and realistic textures for your models. Apply generators to masked areas to add specific effects or textures, creating variations and detailed elements on the model’s surface. The mask and generator settings can control the intensity, scale and placement of effects.
14. Create custom materials
(Image: © Richard Jusuf)
Substance 3D Painter follows the Physically Based Rendering (PBR) workflow. These PBR materials are typically composed of Base Color (Albedo), Metallic, Normal and Roughness maps, and sometimes extra maps for Height, Ambient Occlusion, and so on. Combining different materials and layering using masks is an excellent way to make unique-looking textures, while creating the final rendered appearance at the same time.
This means that materials are created to simulate real-world properties and how they respond to light. You can create custom materials by combining different channels such as the Base Color, Roughness, Metallic, Normal, Height and more. These channels define different aspects of the material’s appearance.
15. Export the texture

(Image: © Richard Jusuf)
Exporting textures from Substance 3D Painter is a crucial step once you’ve finished creating and refining your materials. After the export, you’ll have separate texture maps – in formats like PNG, TIFF, and the like – for each selected channel of your texture sets. These exported textures can then be used across various 3D software, game engines or render platforms to apply the materials and textures to your models.
You can choose your output directory, as well as the output template like Unreal Engine, the file type and size, and also the padding based on the project you‘re working on.
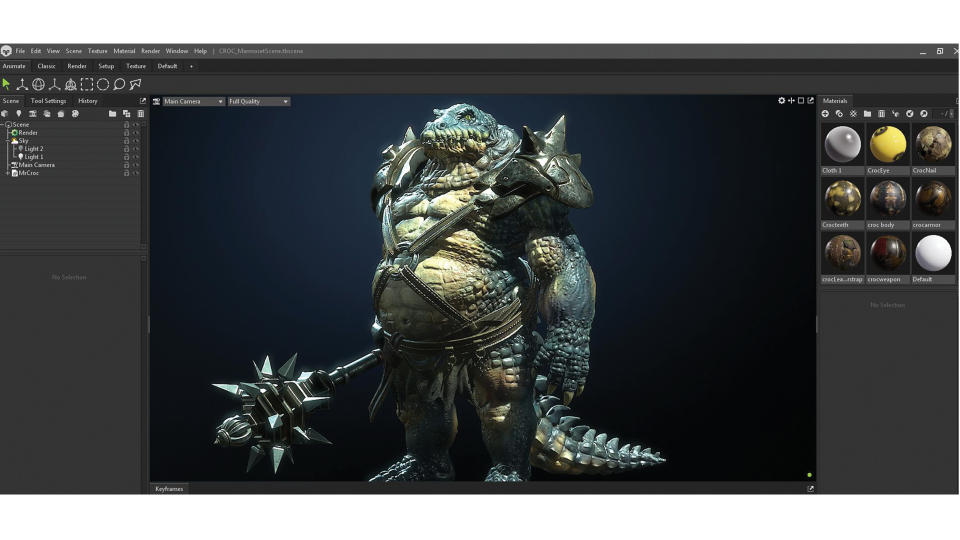
16. Render in Marmoset
(Image: © Richard Jusuf)
With your work in Substance 3D Painter now complete, open up Marmoset Toolbag and start a new project. Import your model into the scene by either dragging and dropping the file into the Viewport, or by using the Import option from the menu. Now apply the materials to your model within Marmoset Toolbag. You can use the materials you exported from Substance 3D Painter or create new ones within Marmoset.
Assign the texture maps you exported from Substance Painter (the Base Color, Normal, Metallic, Roughness, and so on) to their respective material channels in Marmoset. You can do this by loading up the textures into the appropriate slots in the Material Editor, and also add light and sky for the lighting setup.
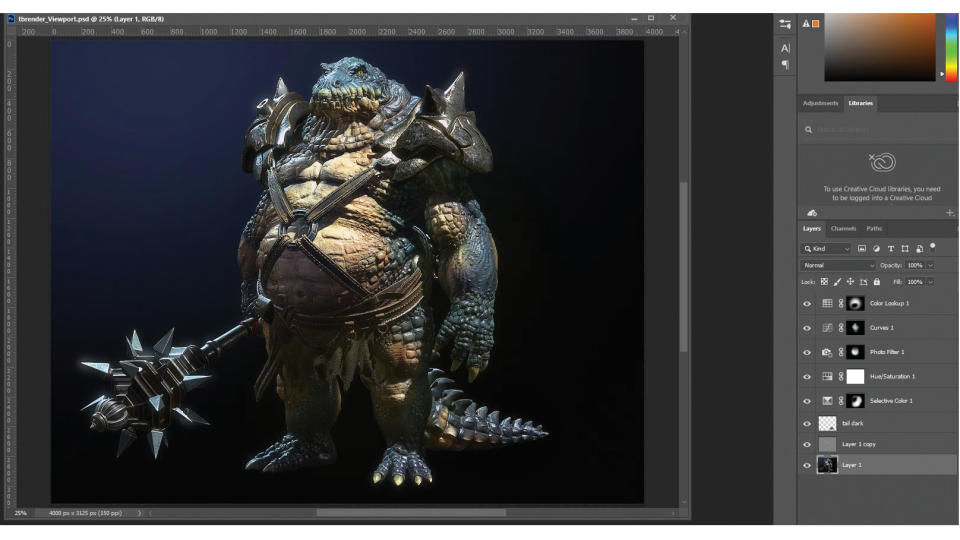
17. Post-production in Photoshop
(Image: © Richard Jusuf)
When you’re happy with your render, hit F10 in Marmoset and set the directory file. Utilising Photoshop for post-production enables you to refine and polish your rendered images to improve their visual impact, and ensure the final result matches with your creative vision.
Post-production is a powerful tool for taking your renders to the next level of quality and visual appeal, so why not bring them all over to your software of choice. For my project there wasn’t much do in this step, so I just tweaked the Curve, Selective Color, and Color Lookup adjustment layers to change to the intensity.
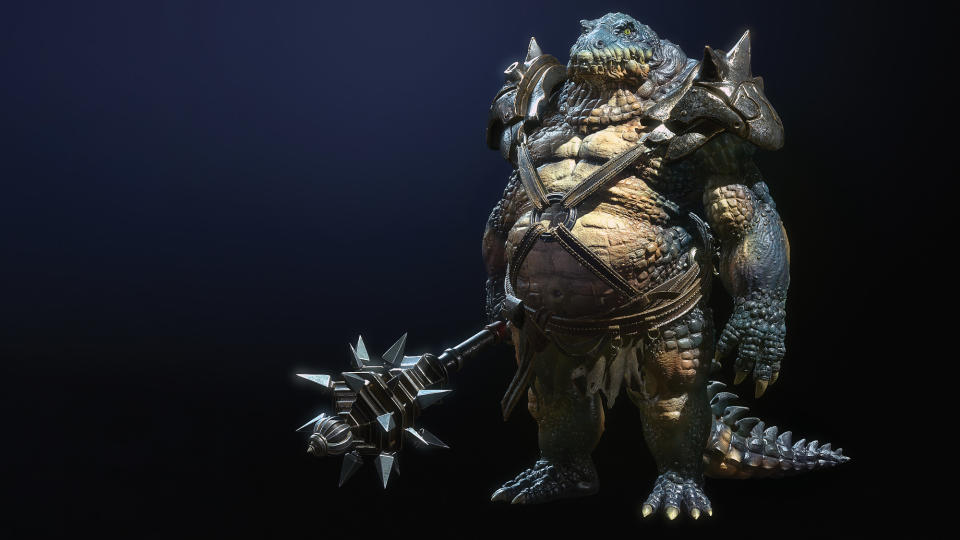
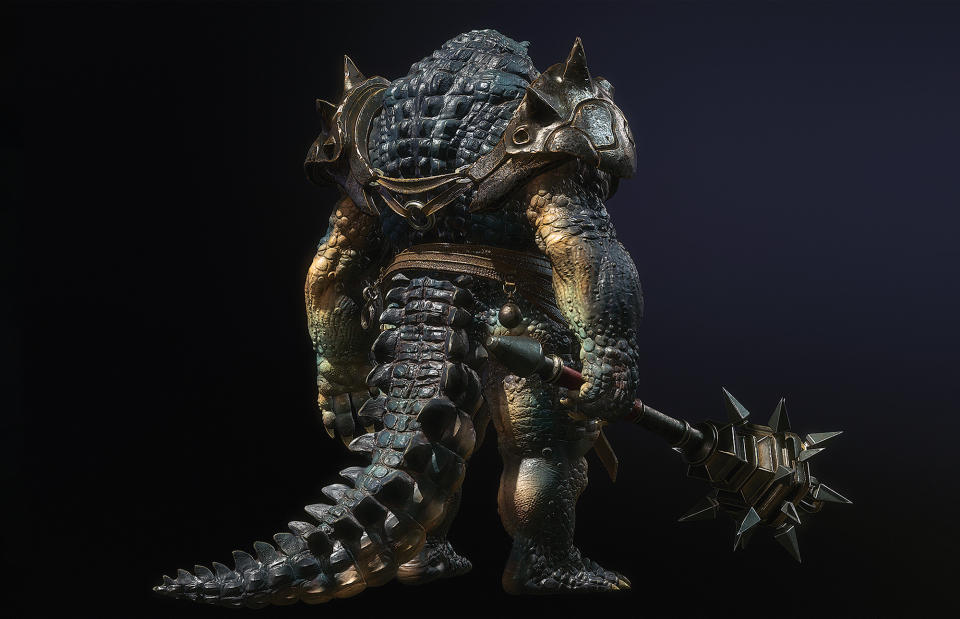
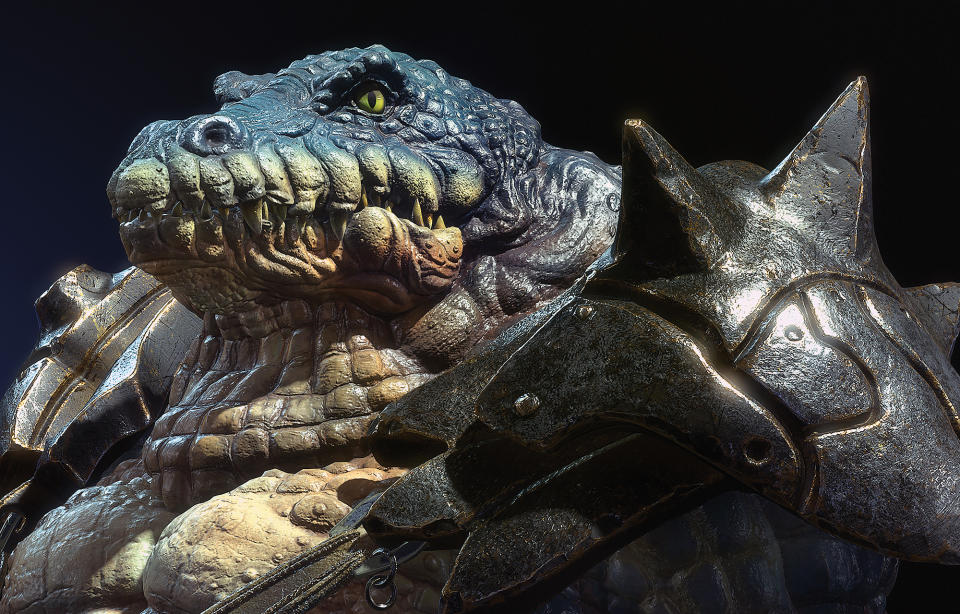
The final render of Crocodylus.
ZBrush character sculpting: pro tips
Here are a few key tips and things to keep in mind when hopping between software to create a character:
01. High-res sculpts
Working on a high-resolution sculpt by starting with a lower Subdivision level such as 1 or 2 is a common and effective approach in digital sculpting, especially in programs like ZBrush. This method offers several advantages for maintaining your shape and is much easier to control.
02. Enhance detail
Applying techniques like masking, Cavity maps, and employing deformations such as Inflate in ZBrush can enhance a sculpt. This enables artists to emphasise or modify specific areas based on the details extracted from the Cavity map.
03. Control the Roughness texture
Combining different maps from various software can enhance the quality and realism of your materials in 3D modelling. When you merge a Cavity map from ZBrush and a Roughness map from Substance 3D Painter, you can create more detailed and visually compelling materials.
Get more software tutorials in 3D World
This content originally appeared in 3D World magazine, the world's leading CG art magazine. 3D World is on sale in the UK, Europe, United States, Canada, Australia and more. Limited numbers of 3D World print editions are available for delivery from our online store (the shipping costs are included in all prices). Subscribe to 3D World at Magazines Direct.

