How to Make a Yule Log That's So Fancy You'll Call It a Bûche de Noël
Is a bûche de Noël the most technically advanced dessert you can make for Christmas? Actually, no. The edible chocolate ribbon on this gift box cake—and basically anything involving elaborate sugar work—is totally trickier. In fact, making a gorgeous bûche de Noël (also known as a Yule log cake) is actually pretty easy, even if it's kinda time consuming. So hey, congratulations on taking the easy way out!
Ok, ok, you likely aren't wondering how to make a Yule log because you wanted the easiest, quickest Christmas dessert; you're making it because you wanted an impressive one. And this cardamom-scented roulade with pistachio custard, chocolate Swiss meringue buttercream, cocoa-dusted meringue mushrooms, pistachio "moss," and a chocolate coating that mimics the peeling bark of a sycamore or pine stump is a stunner.
Cardamom-Pistachio Bûche de Noël

The earthy green swirl and flaky chocolate coating are "really reminiscent of something you’d find in nature" says this recipe's developer Samantha Seneviratne. And the mushrooms are a sweet craft project: tune out the world and fixate on them all by yourself—or grab a friend or a child, tell Alexa or Siri to blast some Christmas pop, and get those toadstools done in tandem.
Here's how to put your whole Yule log together:
1. Make the Mushroom Caps
You might have thought the first part of making a bûche de Noël would be to make the cake. But actually, the first step is to make the meringue mushrooms which will surround your log and provide the enchanting ambiance that you're going for. You want to make the mushrooms first because they'll need at least four hours in your oven to become dry and stable. That means you want them baked and cooled before the cake goes in—luckily our recipe cross-tester Sohla El-Waylly says you can make the mushrooms up to three days in advance. (The cake, on the other hand, should be baked the day you want to serve it.)
To make the mushrooms, you'll whip together a French meringue using egg whites, sugar, salt, and cream of tartar (an acidic ingredient that gives the egg whites stability) until it's thick, glossy, and holds a peak straight up. Samantha also tosses a little cardamom into the meringue to give it a bit more flavor.
Wondering if you can sub in lemon juice for cream of tartar? We don't recommend it. The final step of mushroom making is to dry them out; introducing any extra liquid into the mix can complicate that process.
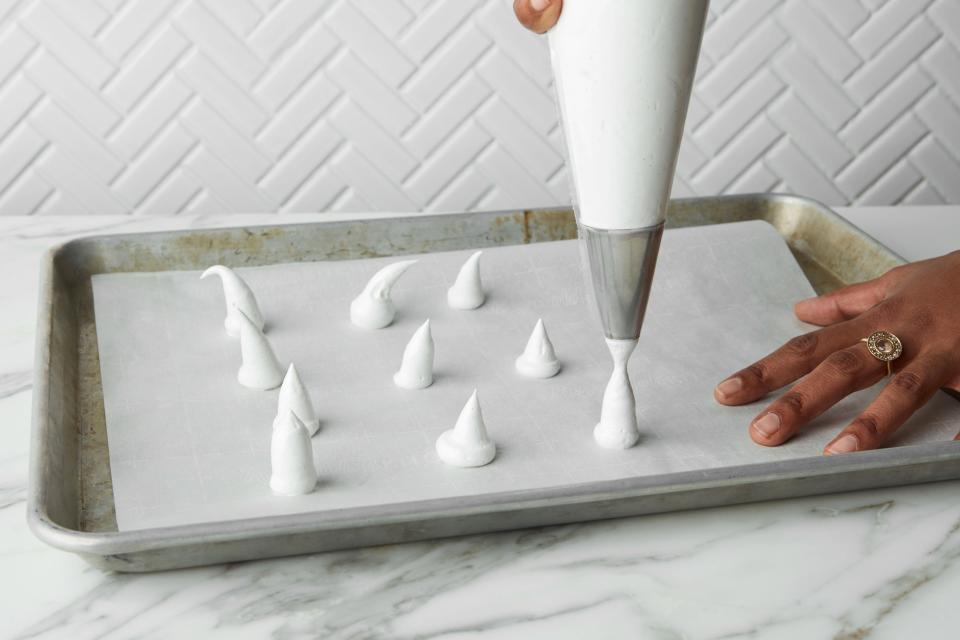
To shape the mushroom caps, stuff the meringue into a piping bag (a reusable one is even better, because the Earth) fitted with a 1/2-inch round pastry tip. Can you do this with a zip-top bag with the corner snipped off and no pastry tip? Sure. But the results won't look quite as clean and polished, and that's just the stupid truth.

Buche Technique - Meringue Mushrooms Caps - Step 1 - INSET
Photo by Joseph De Leo, Food Styling by Samantha SeneviratneWith one hand guiding the pastry tip, pointed down, and one hand gently squeezing from the upturned bottom of the pastry bag, hold the bag vertically and pipe a one- to one-and-a-half-inch circle onto a sheet of parchment set on a rimmed baking sheet. NOTE: Do not grease the parchment. Quickly pull up, stopping your squeeze, to pipe the meringue in the shape of a Hershey's Kiss. Continue until you have 12 kisses. Here's the great part: they don't have to match! In fact, a little variation in size is preferred since they'll more closely resemble mushrooms growing in the wild.

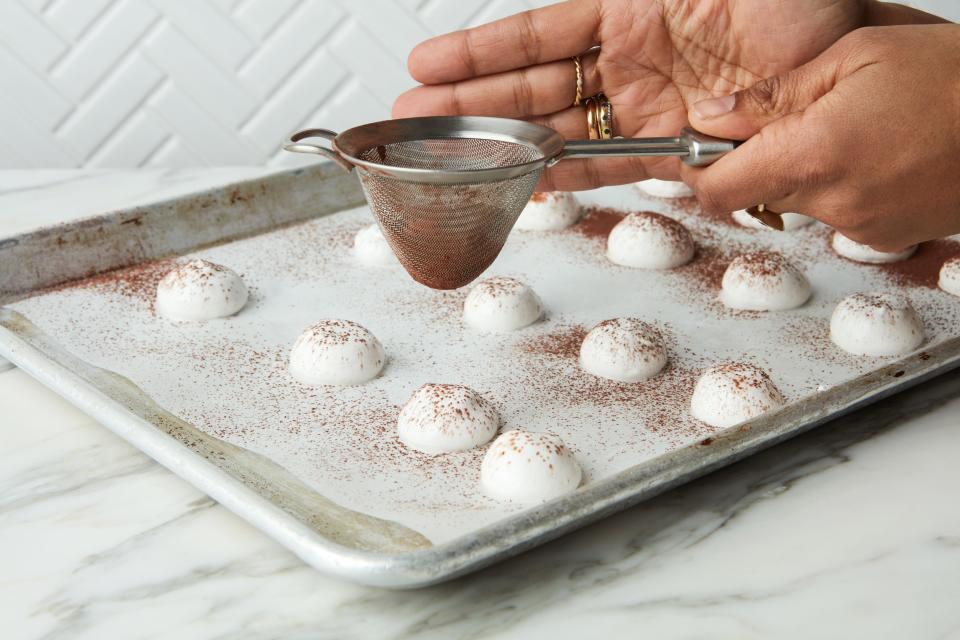
Buche Technique - Meringue Mushrooms Caps - Step 2 - INSET
Photo by Joseph De Leo, Food Styling by Samantha SeneviratneWith a damp finger, tamp town the tips of the kisses to make them slightly rounded—this rounded hill will be the top of each mushroom. Place a small amount of cocoa powder in a fine-mesh sieve. Lightly dust the caps with cocoa powder by barely tapping the side of the sieve as you glide it over the sheet pan of caps.
Buche Technique - Meringue Mushrooms Caps - Step 3 - Inset
Photo by Joseph De Leo, Food Styling by Samantha Seneviratne2. Make the Mushroom Stems
Piping the stems is a similar process, but requires a slightly different motion. Place the opening of the pastry tip onto the parchment and squeeze the base of the bag while pulling up to make a 1 1/2-inch stem with a point. Again, don't worry if they don't look perfect. All wonky mushroom stems are equally beautiful to us. Continue to pipe stems until you have 12. Don't tamp down the tips on these.
Buche Technique - Meringue Mushrooms Stems - INSET
Photo by Joseph De Leo, Food Styling by Samantha SeneviratneIf you have any extra meringue, feel free pipe more stems and caps until it's all used up. Bake the caps and stems in a low oven set to 250°F for two hours, then open the oven door to allow steam to escape while the oven stays on. Leave propped open for 10 minutes. Then turn the oven off, close the door, and let the caps and stems dry out in the oven for at least two more hours or up to overnight.
Once dry, the stems and caps can be stored in air-tight containers at room temperature for several days. (Unless you're making them in a humid environment, in which case it's best to use them right away.)
3. Assemble the Mushrooms
Melt a small amount of chocolate in a double boiler, or in the microwave in 10-second intervals, stirring between each interval until completely melted. Scrape each cap and stem off the parchment using a small offset spatula. Using a paring knife, poke a small hole into the base of each cap, twisting the tip of the knife gently to make the hole round-ish.
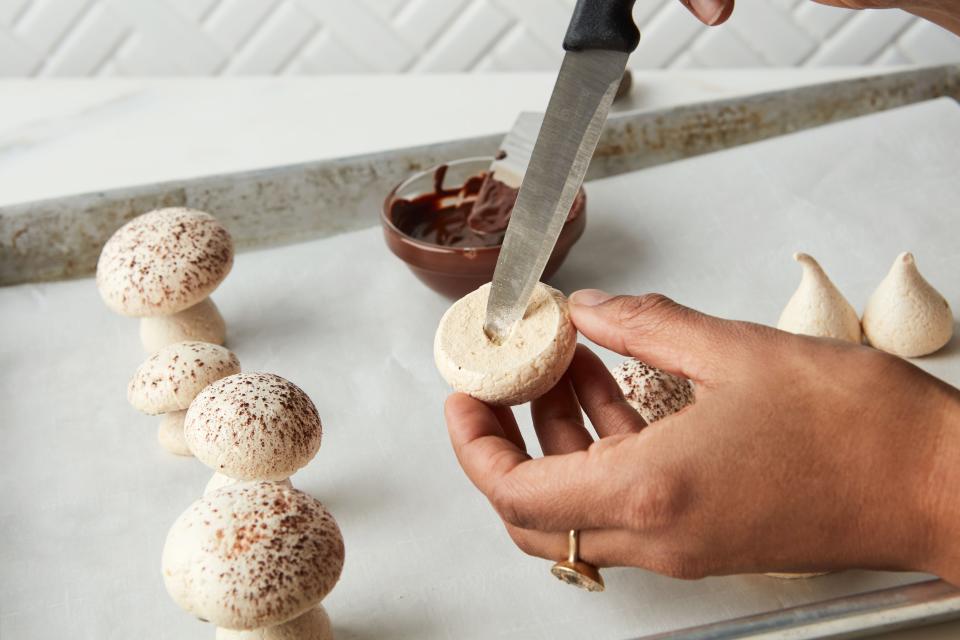
Buche Technique - Meringue Mushrooms - Step 4 - INSET
Photo by Joseph De Leo, Food Styling by Samantha SeneviratneUsing the offset spatula again, spread a thin layer of melted chocolate on the base of a mushroom cap. Dip the pointy tip of a mushroom stem into the chocolate and insert the stem tip into the cap base. Invert and set assembled mushroom down so it stands on its stem. Continue with the remaining caps and stems until all are assembled, reheating chocolate if necessary. Let chocolate firm up completely, about one hour. Do not try to rush these by placing them in the fridge, which could soften the meringues.
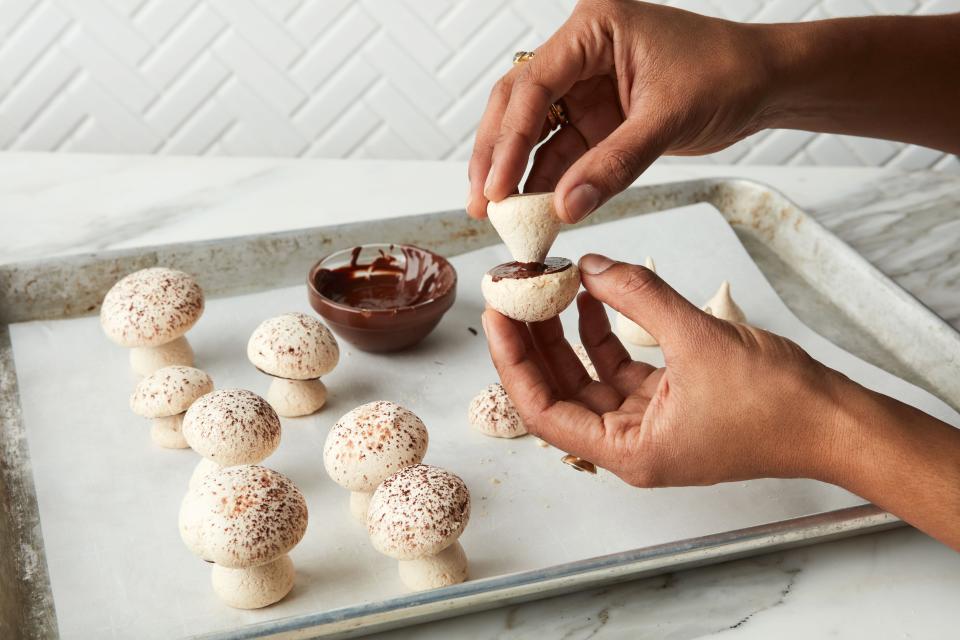
Buche Technique - Meringue Mushrooms - Step 5 - INSET
Photo by Joseph De Leo, Food Styling by Samantha Seneviratne4. Make the Filling
Since you'll want to have all components ready before it's time to assemble your cake, you'll want to prepare the filling and buttercream up to a day or two before serving.
You'll start the custard by simmering pistachios in milk until the nuts are softened, and then puréeing the two together. Then you'll whisk in egg yolks, sugar, and salt. The mixture cooks over medium-low heat until it thickens slightly. (Keep stirring so that it doesn't congeal on the bottom!) If you want to take the custard's temperature, remove it from the heat so that it doesn't overcook. An instant-read thermometer should read between 175°F and 180°F when it's ready to go. Add in the almond extract and 1 1/2 teaspoons gelatin that's been bloomed in 2 tablespoons cold water. The gelatin will help the custard keep its shape when you slice into the Yule log. If the custard is looking less than perfectly smooth, pass it through a fine mesh strainer, pressing on the mix with a spatula; otherwise just transfer the filling to a small bowl. Place plastic wrap or waxed paper directly on the surface of the custard and chill until cold.
5. Make the Buttercream
The buttercream is made by first making a Swiss meringue. First, you'll whisk egg whites and sugar over a double boiler—to do this, you may want to simply set your electric stand mixer's bowl on top of a pot of simmering water. Note, the water should not touch the bottom of the bowl. Stir the egg whites constantly with a whisk. Don't worry, you do not have to vigorously whisk them at this point. Just keep them moving. After five minutes, pinch the egg whites. They should be frothy, but are they grainy? If so, that means the sugar isn't fully dissolved yet. Keep whisking until the sugar is dissolved, checking every 30 to 60 seconds.
Next, really whisk the warm egg white mixture—a stand mixer is your best friend here, but a good hand-held mixer works too. You could also do this with a manual whisk, but you'll want a friend to trade off with you, otherwise you will be whisking all alone for a long time and your arm—not to mention your ego—simply may not be able to take it.
If you're using electric, whisk on medium speed and feel the base of the bowl occasionally. You're basically whisking until the bowl has cooled to room temperature. You'll go for about ten minutes. Once the mixture is cool, glossy, and fluffy, turn the machine to low and add room-temperature butter one tablespoon at a time until fully incorporated. If your mixture breaks (i.e. looks curdled), don't despair. Just keep whisking and adding, it will eventually come back together. If you find that your egg whites are too warm and the butter is melting, stop the machine and transfer the bowl to the fridge for about 10 minutes, then continue. If the mixture seems like it's getting too thick for the whisk, switch to a paddle attachment.
A note about room-temperature butter: You should be able to pick up a stick of butter and bend it easily until it breaks apart. You should be able to easily pinch through a pat of room-temperature butter. If you cannot pick up the butter because it is too soft—or if you pinch it and it slides down your arm in a drippy mess—then it is too warm and you should chill the butter for 10 minutes before continuing.
Meanwhile, melt the chocolate and let it cool. Add the cooled chocolate and vanilla extract to the buttercream and continue beating until fully incorporated. At this point you can frost the cake or chill the buttercream for up to two days. If chilled, bring the buttercream to room temperature and beat with the paddle attachment until it looks fluffy before using.

Don't make us bake without these five things.
6. Bake the Cake
Before you get baking, double-check the size of the pan you're working with. This particular recipe is made in a half-sheet pan, which is a very different size than a traditional jelly roll pan. Using a pan that's the wrong size could make the cake too thick to roll or too thin to bake properly. Grease the pan with butter, then line with parchment and grease the parchment with butter too. You do not want the cake to get stuck.
The cake is a sponge—a classic choice for a bûche de Noël—but Samantha added a hint of cardamom to give it a bit of floral, festive, spiced flavor. "Pistachios and chocolate complement the cardamom beautifully," she notes.
You'll begin by whipping egg yolks with water until the mixture is doubled in volume. One cup of sugar goes in while you're at it, plus a splash of vanilla.
In a separate bowl, whisk together the dry ingredients: the cake flour, the baking powder, the kosher salt, and the cardamom. Fold the sifted dry ingredients into the egg yolk mixture, and then fold in 6 egg whites that have been whipped to medium peaks with sugar and a touch of cream of tartar. Pour the batter into the prepared pan and use that trusty offset spatula again to spread it into an even layer. Give the pan a little shake to help even out the batter and then slide it straightaway into the oven.
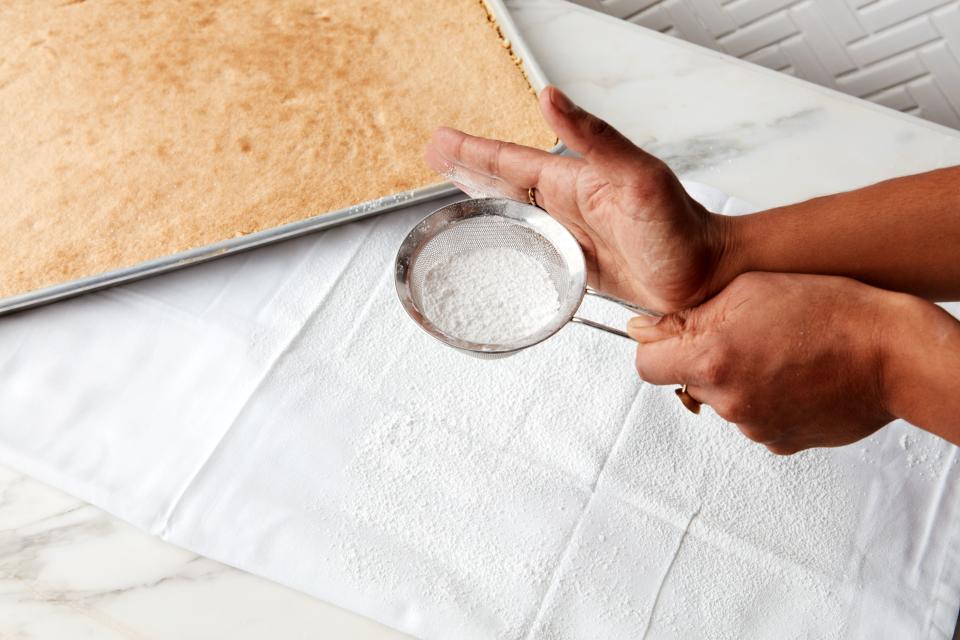
Buche Technique - Dusting Sugar - INSET
Photo by Joseph De Leo, Food Styling by Samantha Seneviratne7. Prep the Cooling Station and Cool the Cake
Using a fine-mesh sieve, dust a large tea towel—one larger than the cake, and please don't use terrycloth or anything with loose fibers—with powdered sugar. Be generous: you don't need mounds of sugar, but you also shouldn't be able to see the towel beneath the even layer.
Place a cooling rack next to your prepped towel. When the cake comes out of the oven, let it cool for 5 minutes, then run a paring knife around the perimeter just to make sure it isn't stuck to the sides of the pan. Set the pan beside the sugared towel. Quickly and confidently, lift the edge of the pan furthest from the towel and bring it up and over, inverting the cake onto the towel as if you were closing a book. Enjoy the puffs of sugar floating in the air.
Lift the pan away and remove the parchment. Dust the top side of the cake with a very light coating of powdered sugar and then fold the edge of the towel over one long side of the cake. Begin to roll the cake tightly, spiraling the towel inside, until the cake is an 18-inch cardamom-towel burrito. Transfer the burrito to the cooling rack and let it cool completely.
If the cake cracks while you're rolling it, Samantha says "don't stress—the whole thing's going to get covered up with buttercream in the end and no one will ever know."

Buche Technique - Rolling Cake - INSET
Photo by Joseph De Leo, Food Styling by Samantha Seneviratne8. Make the Brandy Soak, Chocolate Bark, and Pistachio Moss
A soak is not just a way to introduce more flavor into a cake—though that is surely a bonus—but, it also ensures a moist cake. Our recipe uses brandy, but you could easily swap in rum—or, if you don't want to use alcohol in your bûche de Noël, unsweetened apple juice or white grape juice—either will play well with the flavors here.
Making the soak is as simple a warming sugar and water until the sugar is dissolved and then adding 1/3 cup of whichever flavorful liquid you choose. Set it aside to cool while the cake cools.
Next up: How to make a Yule log really come alive. The bark is our favorite part. To make it, melt 8 ounces chocolate in a double boiler or in the microwave for 10-second intervals, stirring after each interval until completely melted. Use the offset spatula to spread the chocolate thinly on a sheet of parchment set in a rimmed baking sheet. Dust chocolate with 2 tablespoons cocoa powder and then refrigerate or freeze until solid.
To make the moss, place 2 ounces raw pistachios in a food processor and pulse until powdery—toasting the pistachios will make them darker and not quite as vibrant, so we prefer raw nuts for this.
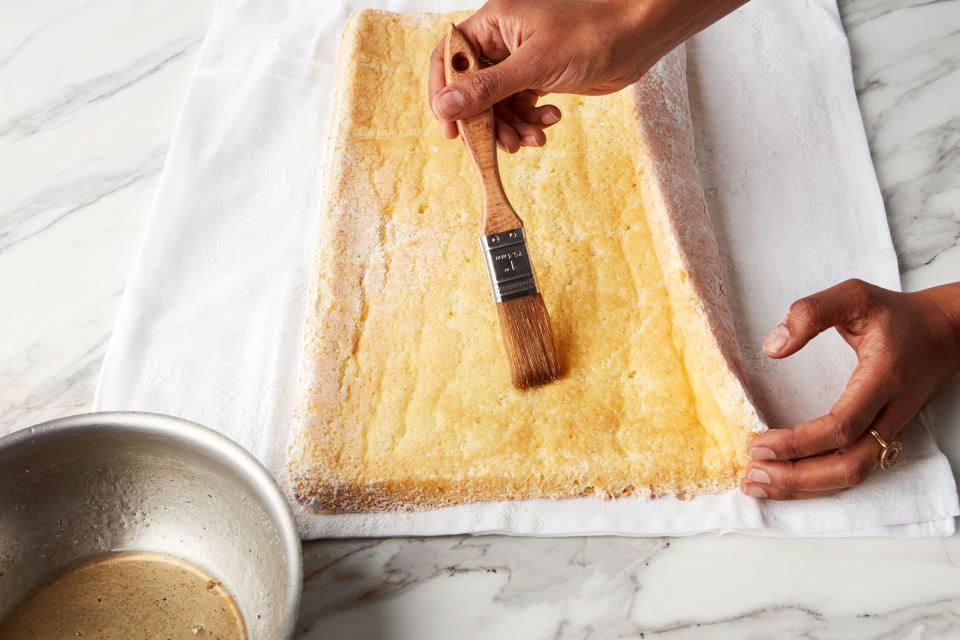
Buche Technique - Brushing Syrup - INSET
Photo by Joseph De Leo, Food Styling by Samantha Seneviratne9. Assemble the Cake
Once the cake is completely and totally cool, unroll the burrito slowly. Brush the surface with the brandy soak until the entire surface is coated with one layer of the syrup. Whisk the pistachio filling briefly to invigorate it and then spread in an even layer, leaving a 1/2-inch border on the edges. Re-roll the cake starting at the same long edge you first rolled it up with, this time leaving the towel behind.
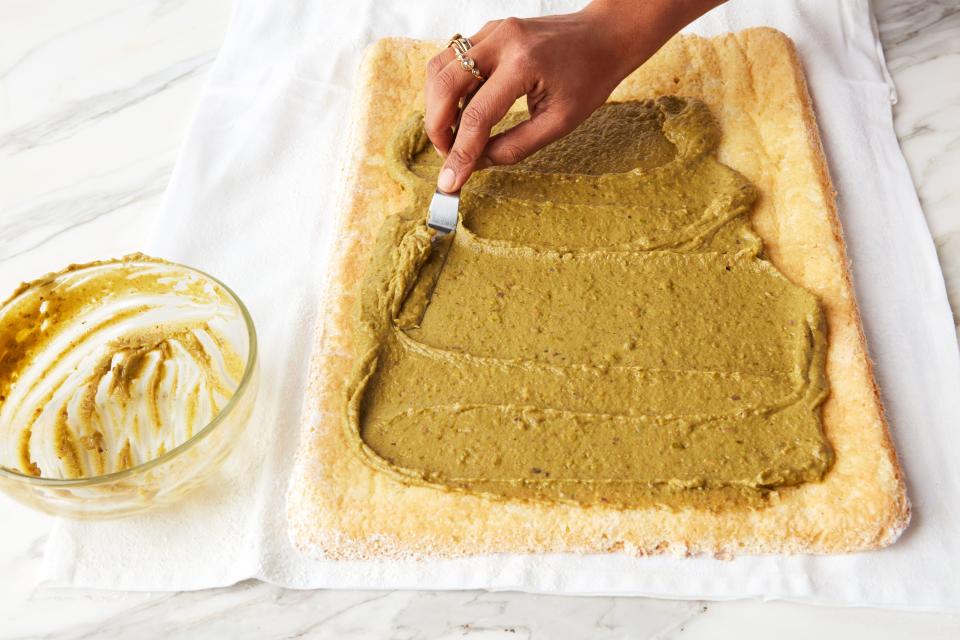
Buche Technique - Speading Filling - INSET
Photo by Joseph De Leo, Food Styling by Samantha Seneviratne10. Create the Branches
Trim about 1/2 inch off each end of the cake to create smooth, clean, even surfaces. Eat those trimmed ends. Eyeball about three inches into one side of the cake roll and slice at an angle. Repeat on the other side. Set the end pieces aside.
Transfer the log to a serving platter and frost with the buttercream, leaving the swirled ends exposed. Choose the end piece with the prettiest swirl and place that piece on top of the cake, off-center, with the angled end facing up. This is your first branch. Place the other end piece on one side of the cake with the angled end facing the log and the blunt end facing the same general direction as the end of the cake log.
Frost the two end pieces, leaving the swirled ends exposed.
11. Decorate the Yule Log
Break the chocolate bark into shards and adhere them to the cake, pressing them gently into the frosting and overlapping slightly. Break them into shorter pieces to adhere to the branches. Place mushrooms on and around the cake—remember, mushrooms grow in clusters, so put several on one spot and several in another and maybe a lone one peeking from the crevice of the branch on top.
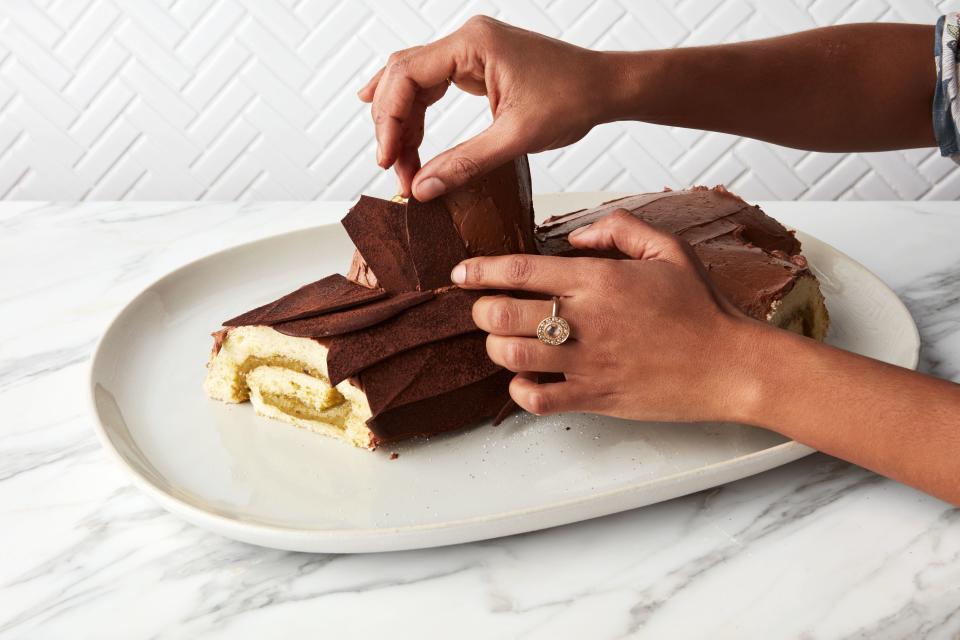
Buche Technique - Decorating Log - Inset
Photo by Joseph De Leo, Food Styling by Samantha SeneviratneUse a spoon to sprinkle ground pistachios around the cake to resemble moss. Finally, use a fine-mesh sieve and a small amount of powdered sugar and dust the top to resemble newly fallen snow.
Bûche de Noël - HERO
Photo by Joseph De Leo, Food Styling by Samantha Seneviratne12. Slice the Cake
Let the cake sit at room temperature for at least 30 minutes before slicing so that the chocolate bark isn't rock solid. Add a mushroom and a little moss to each plate and enjoy!
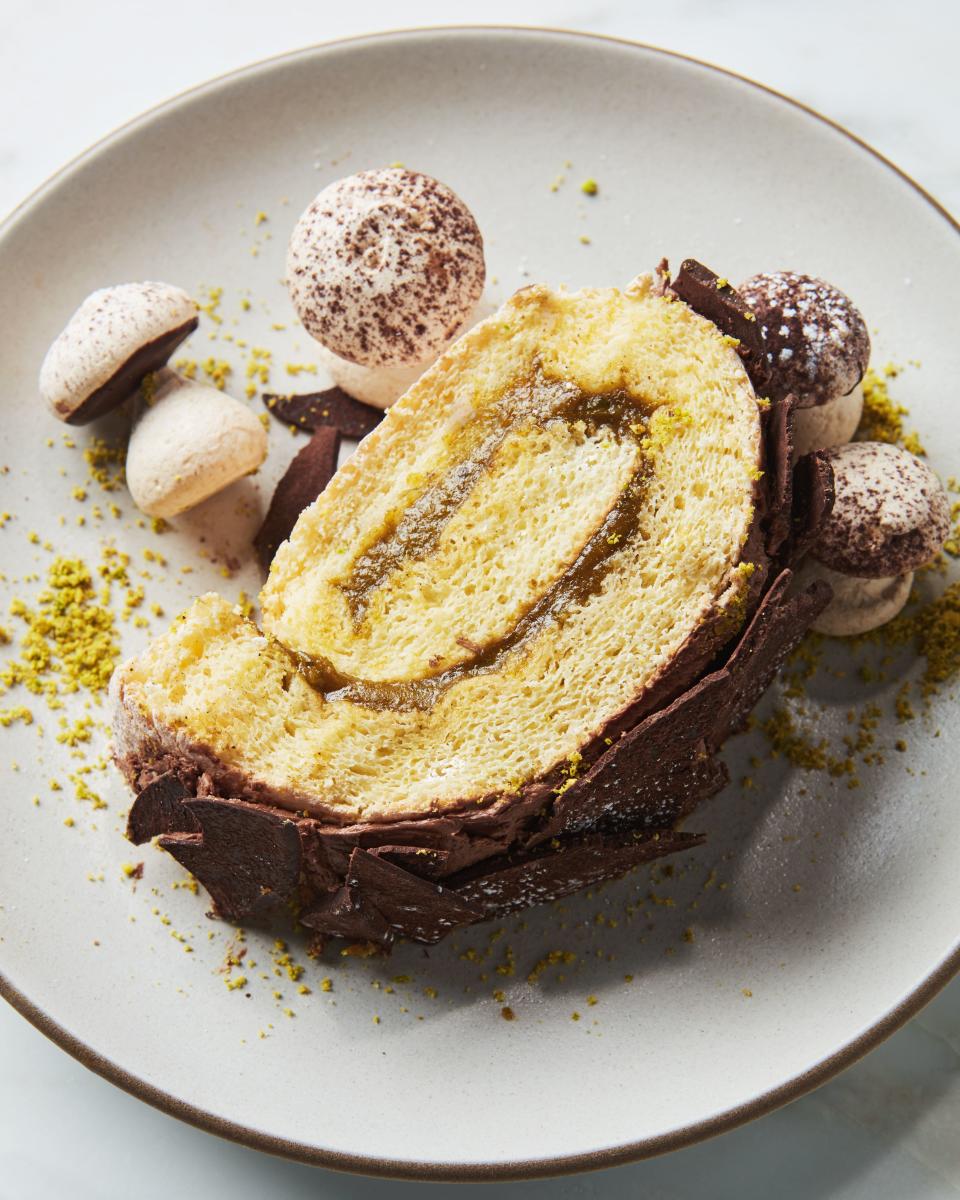
Buche de Noel slice - IG
Photo by Joseph De Leo, Food Styling by Samantha SeneviratneCardamom-Pistachio Bûche de Noël
Originally Appeared on Epicurious

