So You Want to Carry Your Camera Into the Backcountry
The Arena Media Brands, LLC and respective content providers to this website may receive compensation for some links to products and services on this website.
I’ve had more “Man I really wish I had my camera right now!” moments in the backcountry than anywhere else. It feels like every tour has one moment of perfect light, perfect scenery, or perfect action that just begs for a photo beyond a quick phone snap. I learned long ago that the slight weight and efficiency penalty of hauling a camera around in my touring bag was heavily outweighed by the FOMO I felt when I skied without one. So I’ve been wandering around in the woods with a camera for years now and have some thoughts to share.
I’d say that my “career” as a professional photographer has done a little better than break even. I’ve managed to pay for my gear and travel and some beer by selling photos, but they’re definitely not my livelihood. So none of this will be news to the real pro ski photographers. Instead it's meant to help stoked amateurs, like myself, skip some of the mistakes I made.
The Safety Talk
This is part of our Intro to Backcountry Month - Presented by BCA, and it’s always worth talking about the extra little bit of risk that taking photos in the backcountry brings. Kodak courage is real. No photo is worth risking your life, or your cruciate ligaments in the backcountry. Make careful choices. If you’re shooting photos from a “safe” zone, make sure that it’s actually safe, not just a placebo patch of trees midslope. Do your best to communicate well and move efficiently. Carry radios. Use them. Be very clear and specific when telling skiers where to go. Don’t blame them for missing the shot, allow them to make the decisions that make the line work for them.
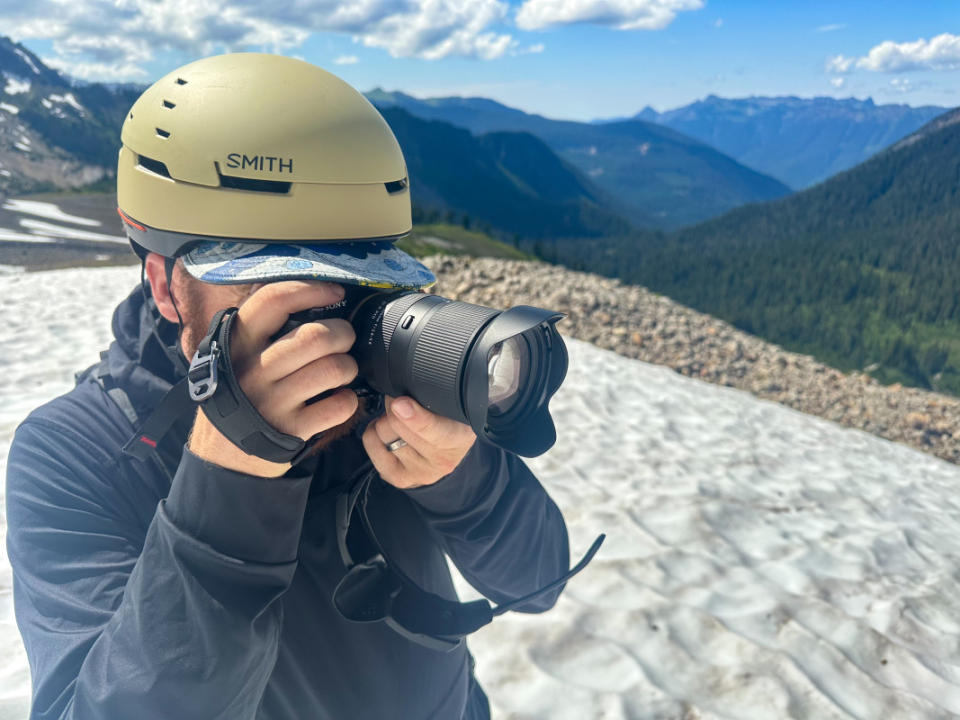
The biggest thing I focus on when I’m taking photos in the backcountry is moving as efficiently and invisibly as possible. I try to ski as much like I would without the camera, without making anyone wait for me to get set up. That way we can minimize our time spent in risky environments. So a lot of these tips will focus on tools to maximize that efficiency.
The Camera Gear
This is actually going to be a very short section since I don’t feel qualified to give definitive advice on which system you should be shooting with. There are a bunch of brands making great cameras and lenses for shooting skiing right now. It’s not about the tool, but how you use it. I’ve shot a bunch of different systems over the years, and been able to adapt to all of them.
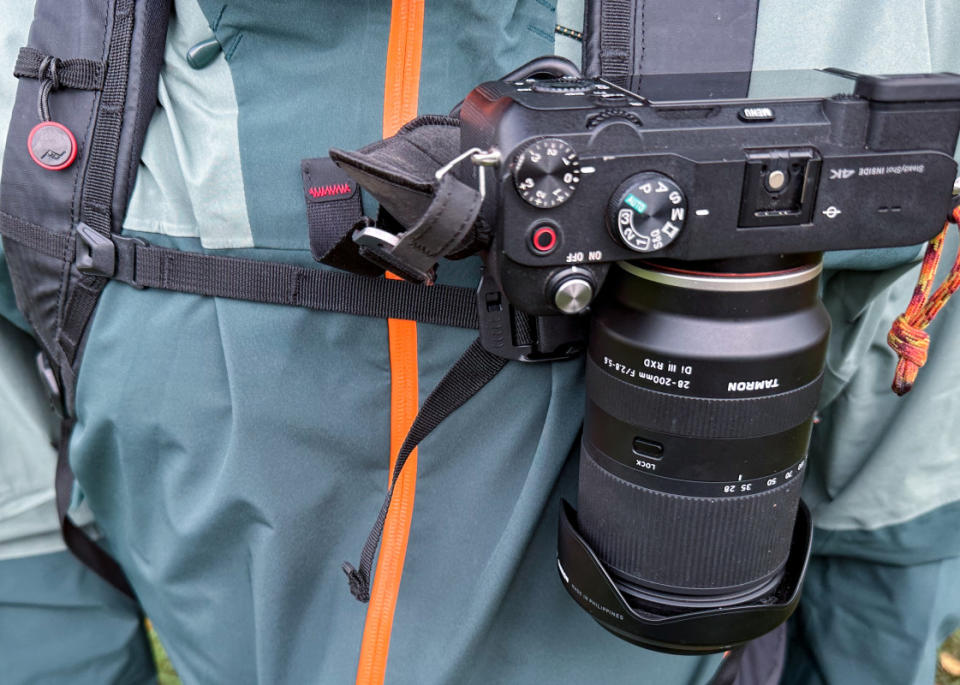
This winter I’ll probably end up shooting with either a Sony A6000 with the kit 18-55 mm lens, or a Sony A7C with a Tamron 28-200 mm. There are “better” cameras and lenses out there, and there are hundreds of websites dedicated to pixel-peeping, so feel free to go nerd out there. Instead, let’s focus on the ski-specific parts of this equation.
The Pack
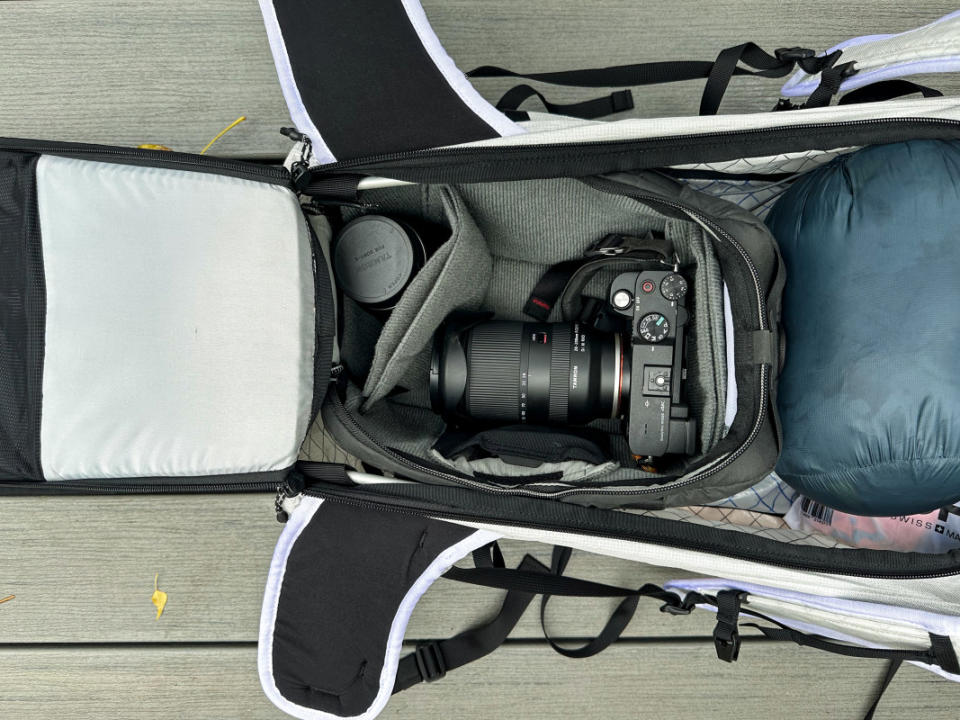
Camera-specific packs are an elusive siren, seducing naive souls into high-dollar, low versatility purchases. I’ve spent time touring in a few dedicated camera backpacks, and have always ended up going back to stuffing my gear into a good touring-specific pack. Unless you’re carrying a lot of camera gear, it’s probably a better call to pack your camera inside a good backcountry bag.
That choice also aligns with my personal credo when I’m shooting in the backcountry: Be a good partner and decision maker first, and a photographer second. If you’re not making your living from these photos, you probably don’t need a photo-specific pack. Instead, look for a good backcountry pack that can fit your camera.
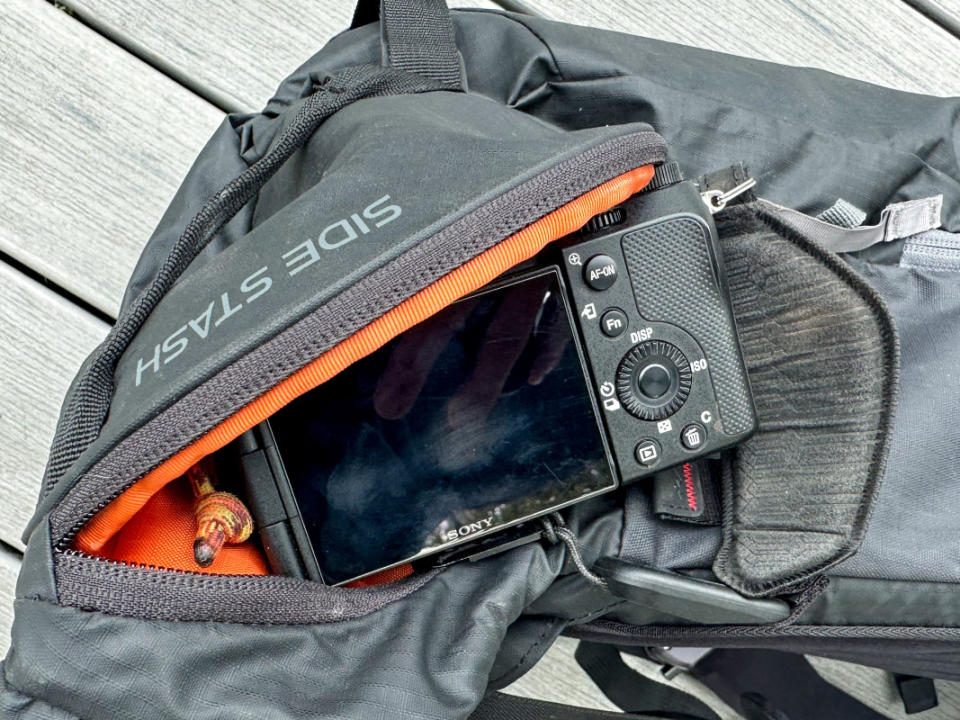
For a long time the Thule Upslope 35L was my favorite photography pack. The waistband pockets are big enough to fit a full frame camera and lens, and hold it accessible without taking the pack off. But the more recent version of that pack, that’s airbag compatible, doesn’t fit my back as well, so I’ve moved on. Right now I’m using the BCA Stash Pro 22L since its Side Stash pocket perfectly fits my A7C and two lenses. I like to have my camera accessible with one zip, without having to take my pack all the way off my back. So a side pocket like the Stash Pro’s, or a back panel zip like the Raide LF 40L are a must.
I just don’t have the patience for a roll-top pack when I’m shooting photos–it leads to too much fumbling around mid-slope, which is exactly what I’m trying to avoid.
So, when I’m shopping for a camera bag for skiing, I’m actually shopping for a ski bag that can fit a camera. I prioritize finding a backpack that fits my back comfortably, that keeps my gear organized, and has a pocket that allows me to keep my camera accessible.
The Bag Within the Bag
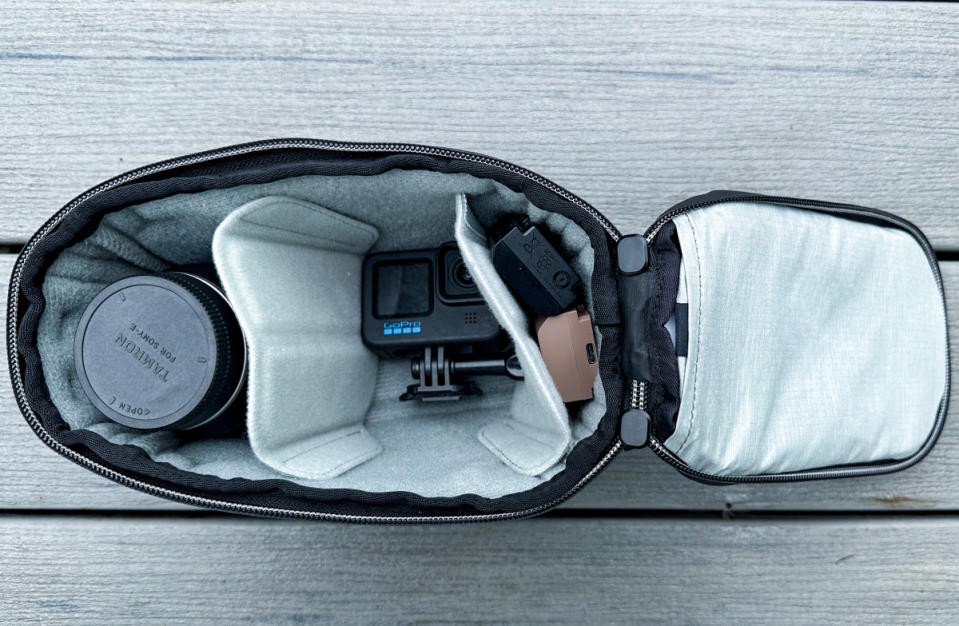
Instead of using a camera-specific bag, I like to use a low-profile camera bag that fits my body and one lens. I’ve used cheap ones from Amazon in the past, but this year I’m lucky enough to be using the Camera Pod from Hyperlight Mountain Gear.
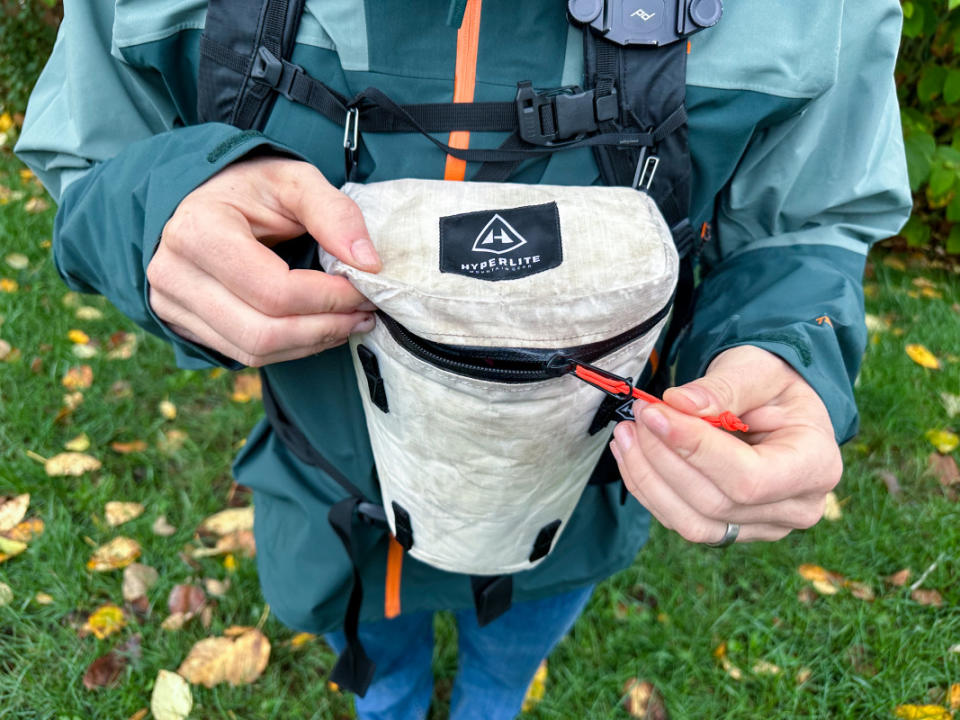
It’s not a necessity, but it is really nice to use. I’m using the Large version which fits the A7C and 28-200 nicely. It’s really light, nicely padded, and really weatherproof. My one note is that it lacks internal pockets, so if you want to store a spare battery or memory card with your camera, you’re out of luck.

The Pod is really easy to stash inside your pack, or clip to the outside or shoulder straps, which makes keeping your camera at hand more convenient. I’ll probably end up running it strapped to my chest most days.
Accessories
These are the bits and bobs that have made the most difference to me. Most of them are made by Peak Designs. Full disclosure: I briefly worked at a PR firm that represented Peak, but I was familiar with the brand well before that, and have used them extensively. Their products are some of the few things that I fully endorse, without reservation.
Their Cube system is great for folks hauling more gear around in the backcountry than I do. It effectively lets you transform any pack with a back panel opening into a customizable camera bag. For me, I generally just use their cubes while traveling, although their new extra small cube will probably find its way into my touring pack most days this winter.
The real killer element from Peak is their Capture Clip. I talked about it a little in my “What’s in Your Pack?” piece, but it’s worth reiterating. I’ve had a Capture Clip on every ski pack I’ve owned since 2016. They’re a little spendy, but they’re simple, easy to use, and just plain work, for years. I still use the first one I got, seven years ago.
I generally run a Capture Clip on the left shoulder strap of my bag so that I can use my dominant right hand to maneuver my camera. I’m also a big fan of the Creator Bundle that Peak sells for the Capture Clip. It allows you to attach lights, a POV camera, or even your phone to that same mount point. I’m a big fan of running a shoulder-mounted light here at night, or a GoPro or Insta360 when I’m feeling self-obsessed.
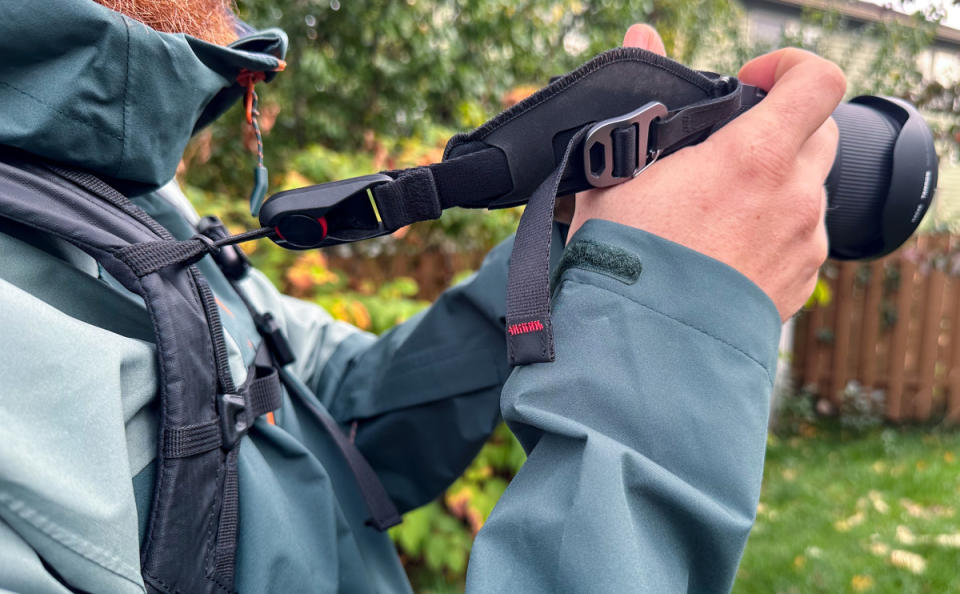
I’ve gone back and forth with my camera strap system. For me, a camera strap has to do two things. One, it needs to allow me to secure the camera to my pack or body so I can move around using my hands. And two, it needs to be low enough profile that it never flops around in front of the lens when I’m shooting. So in the past I’ve used small webbing loops on my camera, clipped to carabiners on my pack. That allows me to drop the camera and let it hang, or shoot in high-exposure situations without worrying about dropping it. However, this spring I became a convert to another Peak Designs product, the Clutch camera strap. All of Peak’s straps work with their anchor system, which allows you to quickly swap straps out, even while wearing gloves. But I don’t want to swap straps out–instead, I want a tether, and the Clutch provides exactly that.
Usually the Clutch locks into an anchor hanging off of the plate for the capture clip on the bottom of the camera. But I girth-hitched another anchor onto the right shoulder strap of my pack. Then, I can slide the Clutch off of the lower anchor, and instead clip it directly to my pack. This effectively gives me a leash that allows me to move the camera around and shoot one-handed, without worrying about what happens if I drop it. Yes, we are in the weeds here, but I’m really, really stoked about how this combination of Clutch and anchors will allow me to shoot in no-fall zones.
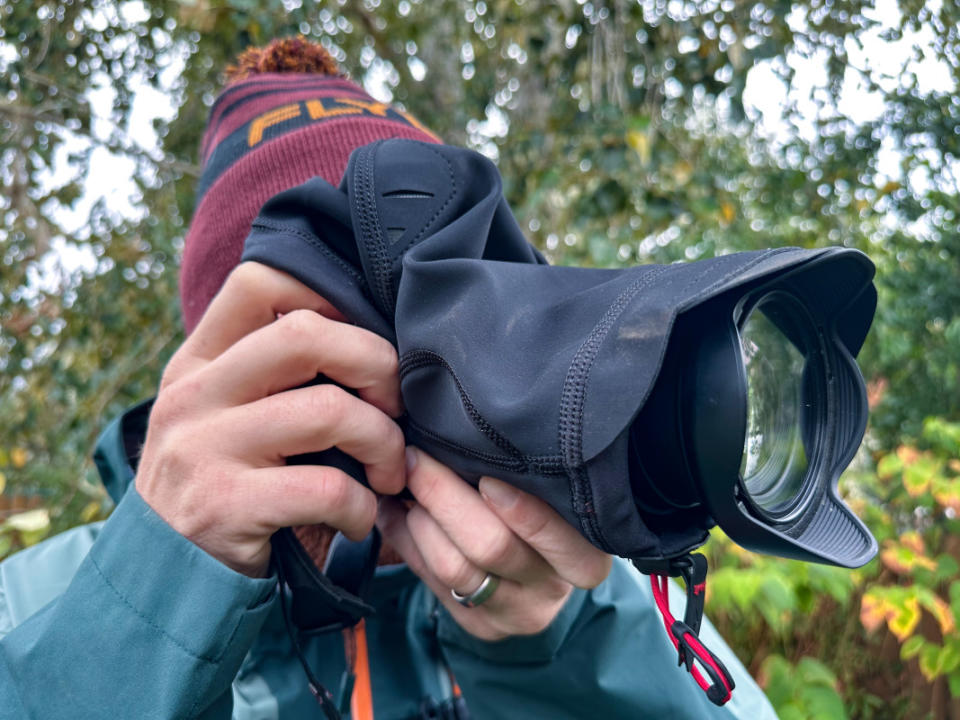
Finally, my last Peak Design shoutout: their Shell covers do a nice job of keeping moisture off your camera when it’s dumping. I rarely use mine, but it’s always in my pack, ready to whip out if conditions get rough. Yes, you could use a plastic bag. No, it’s nowhere near as convenient.
Tips
Again, I’m not here to tell you how to take good pictures, but instead to share things that have helped me. The most obvious is battery life. Batteries don’t like the cold. If it’s really cold out and I’m planning on shooting all day, I’ll stash my spare batteries in a pocket of a base layer so my body heat keeps them warm. I also always have a portable battery bank in my pack, and I like to have a cord that allows me to charge my camera too. A couple of small hand warmer packets can also go a long way to bring back a battery from the dead.
Carry extra memory cards. Keep track of what’s formatted and what isn’t. Carry a blower and use it; keeping your lens clean is easier than photoshopping out blobs. UV filters are nice for protecting expensive elements. If you buy a jacket with big zippered front pockets, you can often slip the camera directly into one of those for short stints between photo spots. Just be aware of the dangers of your body heat fogging up the lens or sensor.
But really, the biggest thing I’ve learned over a bunch of days carrying a camera around in the backcountry is that efficiency is king. If you want to get good photos, safely, the easiest path is to get good at taking photos without affecting the group’s travel plans.
That efficiency starts with your own body. If the group is already waiting for you to catch up due to your lack of fitness, they’re going to be even less stoked about waiting for you to get your camera out.
It continues with your ski gear. When I’m out with the express purpose of shooting photos I’m more likely to reach for lighter, more efficient gear. Weight saved on your feet pays for the camera in your pack. And you’re not going to be sending as hard anyway with your expensive camera in your pack.
We’ve already talked about practicing transitions in a safe space, building a system that allows you to go from skiing to skinning and back quickly. The same is true for getting your camera out. Figure out your system and process and follow it. Always open and close your zippers in the same order. Build habits that will protect you from leaving a pocket open and filling it with snow. Move with purpose. Make a plan and use it. Nobody wants to stand around in the cold while you fumble through your kit, dropping bits and bobs.
Too often carrying a camera in the backcountry transforms us into liabilities, slowing down the group and exposing it to more danger. Do your absolute best to be an asset.

