How to tune up your Windows 11 laptop for this back-to-school season
As the new school year approaches, it is important to ensure your laptop is ready to tackle the challenges ahead.
On Windows 11, the system offers many tools and settings to fine-tune your laptop (tablet or desktop computer), regardless of the hardware configuration. For example, you have tools to optimize and free up storage space, improve battery life, boost performance, and settings to ensure your device is secure and provides the features to stay productive.
This how-to guide will walk you through recommendations to tune up your computer for the next back-to-school season.
How to free up space on Windows 11
As part of the back-to-school process, you want to ensure your laptop has enough space for all your files (documents, pictures, and videos) and allow the system to operate at optimal performance.
On Windows 11, you can use various tools, such as "Cleanup recommendations" and "Storage Sense," to delete unnecessary files and apps from the system drives as well as external hard drives to free up space.
Free space manually
To free up drive space manually using Cleanup recommendations, use these steps:
Open Settings.
Click on System.
Click the Storage page on the right side.
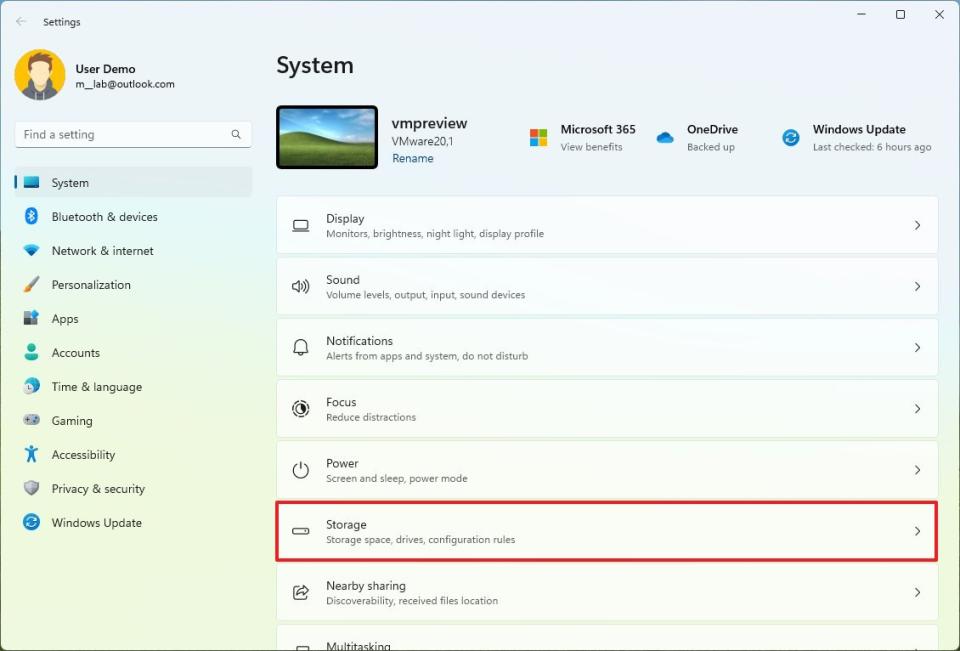
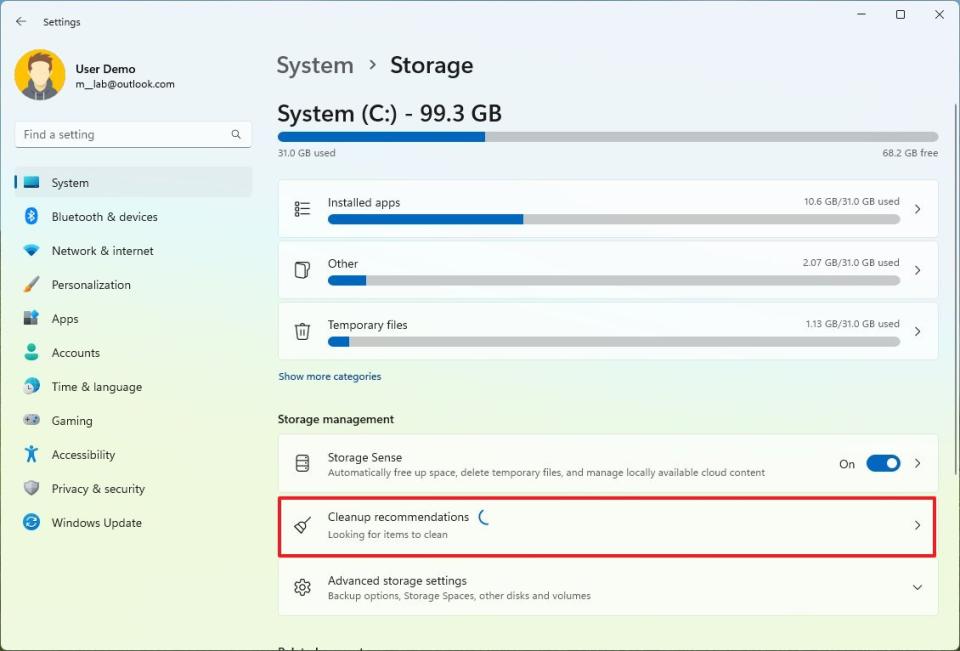
Under the "Storage management" section, click the Cleanup recommendations setting.
Click on the "Temporary files" setting and check the items to delete to free up space.
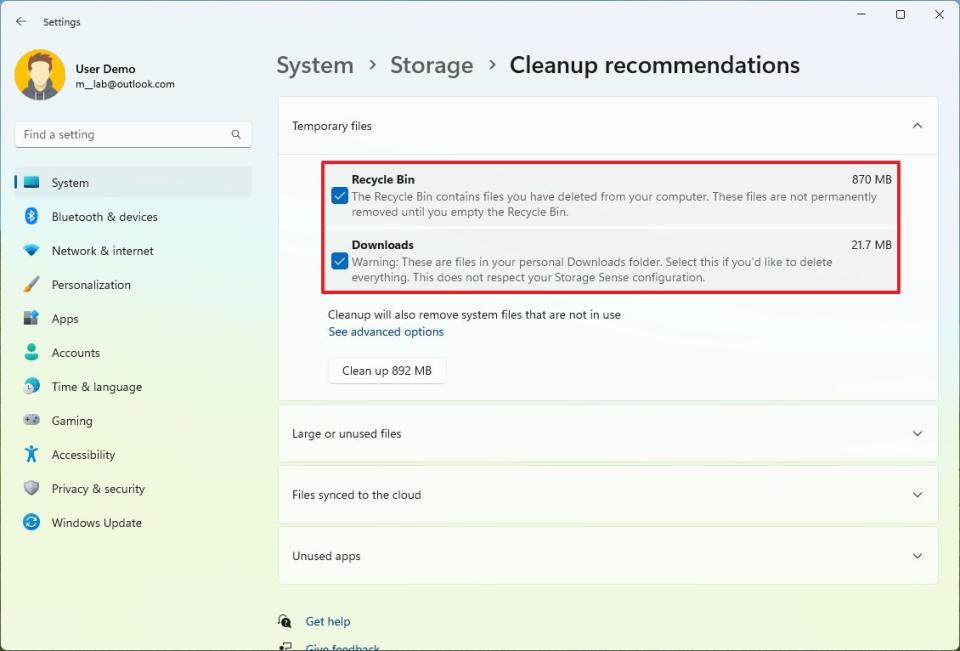
Click the Clean up button.
Click the "Large or unused files" setting and choose the files to remove from the system (if applicable).
Click the Clean up button.
Click the "Files synced to the cloud" setting and choose the files already synced to the cloud you want to delete from your computer (if applicable).
Click the Clean up button.
Click the "Unused apps" setting and select the apps the system may want you to consider removing to free up drive storage (if applicable)
Click the Clean up button.
(Optional) Click on the "Temporary files" setting and click on See advanced options.
Check the components to clean up and free up space.
Click the Remove files button.
Once you complete the steps, the system will delete the selected contents to free up space on the computer.
Free space automatically
To configure Storage Sense to delete junk files from your computer, use these steps:
Open Settings.
Click on System.
Click the Storage page on the right side.
Under the "Storage management" section, click the Storage Sense setting.
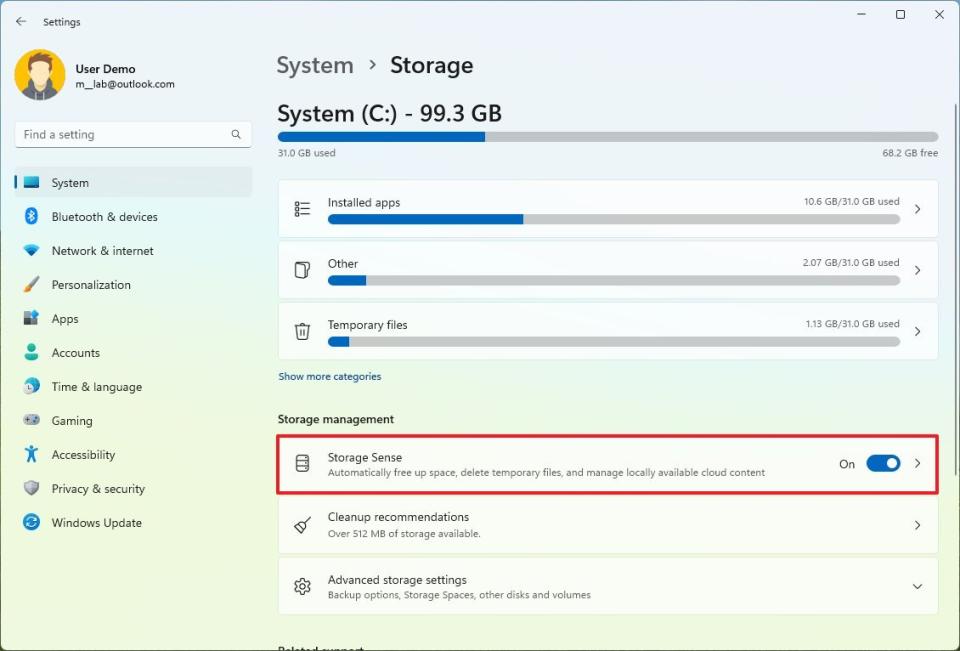
Under the "Storage management" section, click the Storage Sense setting.
Check the "Keep Windows running smoothly" option.
Turn on the "Automatic User content cleanup" toggle switch.
Under the "Configure cleanup schedules" section, choose the "During low free disk space" option from the "Run Storage Sense" setting.
Choose the "1 day" option to remove the most deleted files from the "Delete files in my recycle bin if they have been there for over" setting.
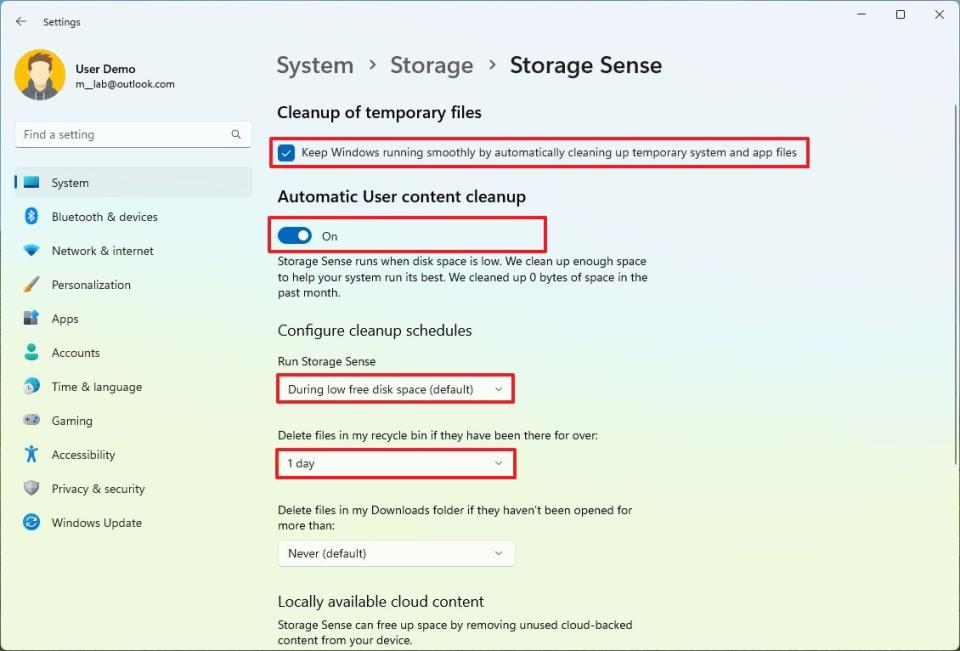
Quick note: If you want to keep deleted files available for recovery a little longer, choose the "30 days" or "60 days" option.
Carefully choose when the system should delete files from the Downloads folder in the "Delete files in my Downloads folder if they haven't been opened for more than" option.
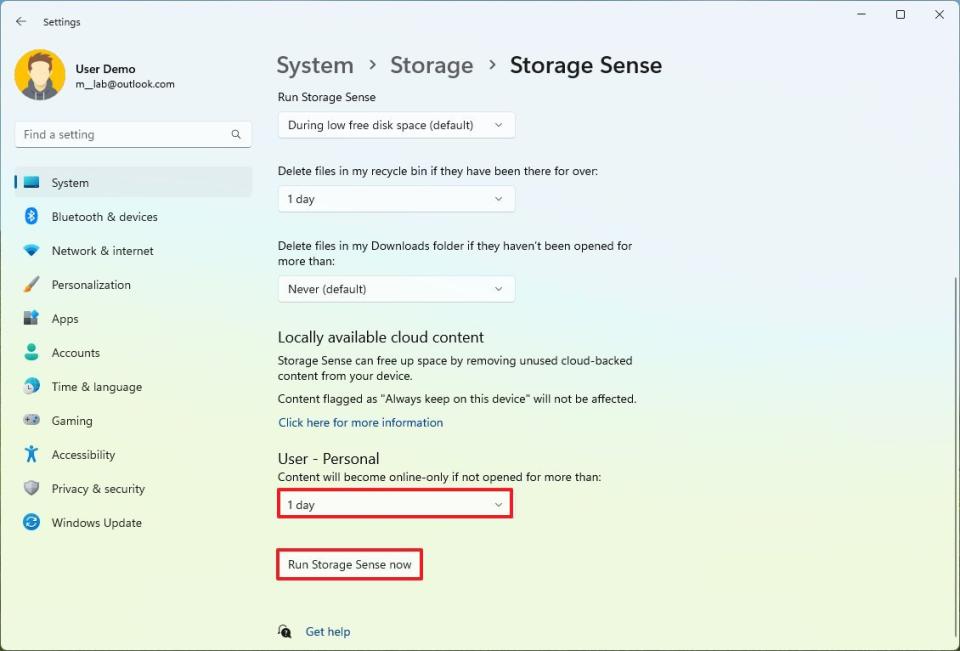
Under the "Locally available cloud content" section, choose when the system should delete files already synced to OneDrive.
Quick note: You can safely choose the "1 day" option since the system only deletes the version of the files available locally. You will continue to have access to the files from OneDrive.
(Optional) Click the "Run Storage Sense now" button.
After you complete the steps, as you start running out of space or depending on your configuration, Storage Sense will run automatically to optimize the storage space on Windows 11.
If the device is still without enough storage space, you can use this roundup of tips to clean up even more storage.
How to uninstall non-essential apps on Windows 11
One way to free up space and minimize issues, errors, and distractions is by uninstalling unused apps and games. Some apps may even run in the background when not in use, which can slow down device performance. Removing these apps can help keep your computer operating at its best.
To uninstall non-essential apps and games from Windows 11, use these steps:
Open Settings.
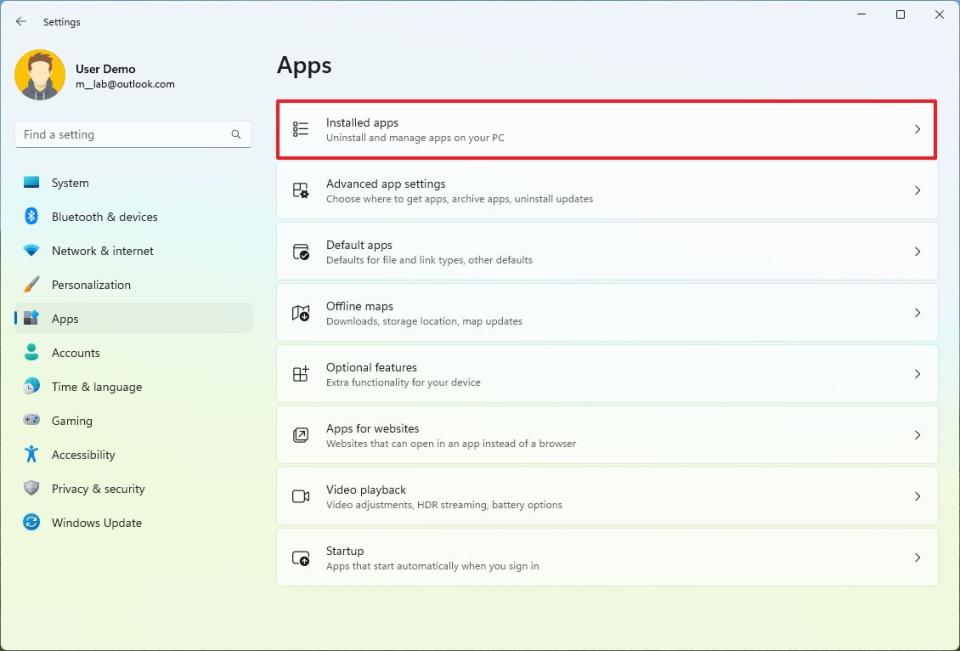
Click on Apps.
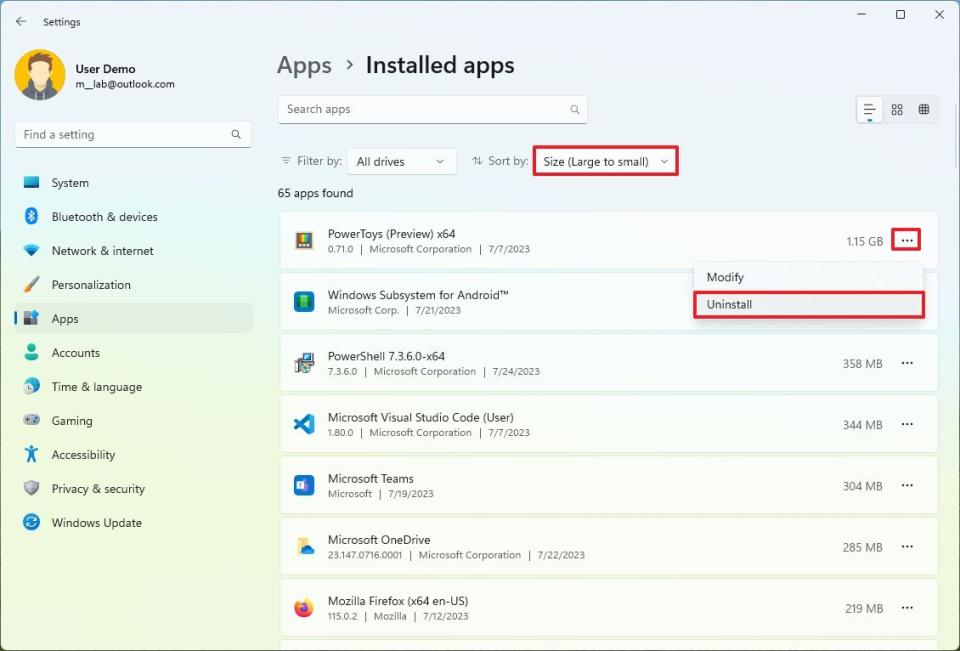
Click the Installed apps page on the right side.
Select the app to uninstall.
Quick tip: Use the "Sort by" setting and select the "Size" option to view the apps using the most space.
Click the Uninstall button.
Click the Uninstall button again.
Continue with the on-screen directions (if applicable).
Once you complete these steps, you may need to repeat the instructions to uninstall other apps and games as necessary.
How to improve performance on Windows 11
On Windows 11, the system offers various settings and tools to improve the overall performance. For instance, you can manage the apps that load a startup to speed up startup times and prevent apps you don't need from running unnecessarily, wasting resources and energy.
If your computer has a traditional hard drive with rotating platters, Windows 11 offers a defragmentation tool that can rearrange the bits on the disks to enhance the device's performance. However, this recommendation isn't for you if your laptop has a solid-state drive (SSD).
Change startup settings
On Windows 11, apps can automatically launch at startup, which can be convenient, but they can also slow down your computer, drain the battery, and even interfere with other programs. If you have several apps configured to launch automatically, you should review them and deactivate non-essential ones.
To turn off apps to launch at startup, use these steps:
Open Settings.
Click on Apps.
Click the Startup page on the right side.

Turn off the toggle switch for the app to disable at startup.
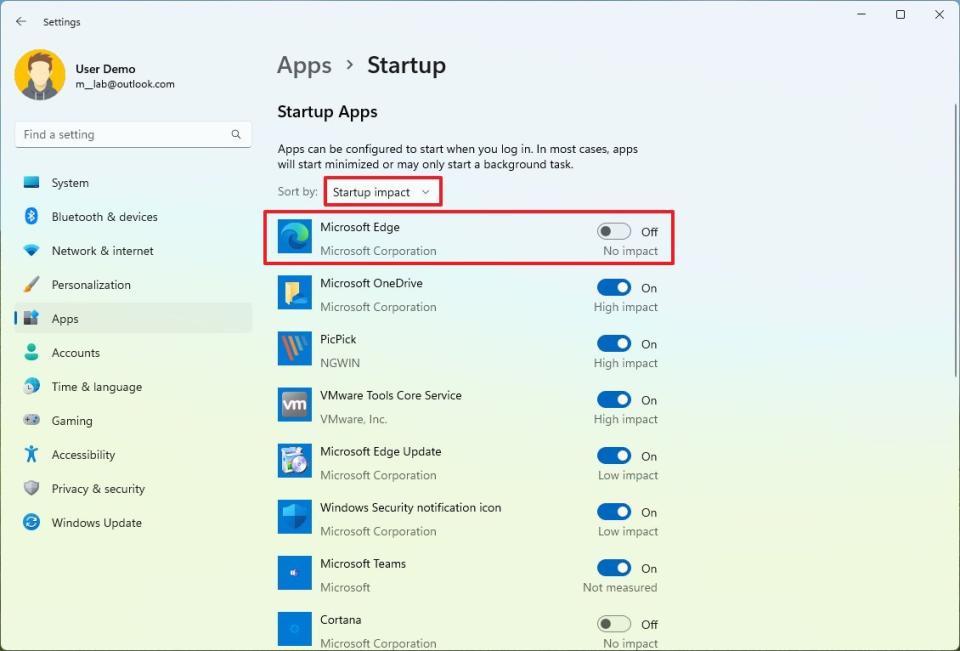
Quick tip: Use the "Sort by" setting and choose the "Startup impact" option to view the apps by performance impact. Although the fewer the apps during startup, the better, usually, you do not want to turn off Microsoft services.
After completing the steps, depending on how apps impact the system, you should notice the laptop significantly faster during startup.
Optimize drives
Windows 11 includes a defragmentation tool that can be used to improve the performance of laptops with hard drives. However, this tool is not necessary for laptops with SSDs.
When using traditional rotating platters hard drives, the data can become fragmented over time. This means that the data is not stored in contiguous blocks, which can slow down the performance of the hard drive. The defragmentation tool reorganizes the data on the hard drive so that it is stored in contiguous blocks, which can improve performance.
Solid-state drives, on the other hand, store data in flash memory. Flash memory does not suffer from fragmentation as hard drives do, so there is no need to defragment an SSD.
To defrag a drive on Windows 11, use these steps:
Open Settings.
Click on System.
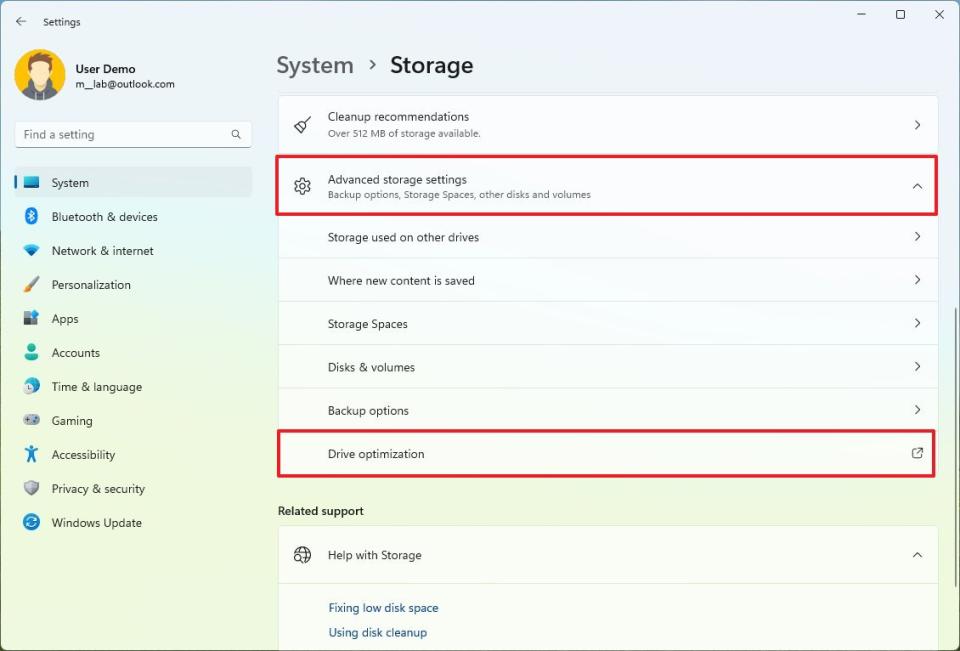
Click the Storage page on the right side.

Click on Advanced storage settings.
Select the Drive optimization setting.
Choose the C: drive (or the drive to optimize).
Click the Optimize button.
Click the Close button.
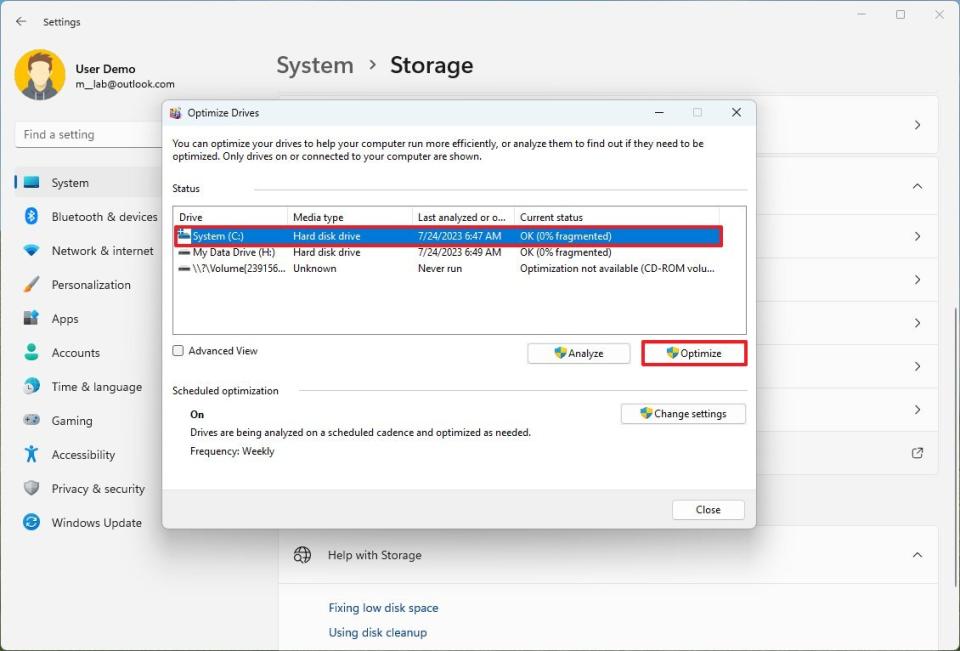
Once you complete the steps, the tool will reorganize the drive blocks of data to improve the overall system performance on Windows 11.
How to repair drive errors on Windows 11
On Windows 11, similar to previous versions, performance tends to degrade, and errors and strange behaviors will appear as time goes on due to many factors, including applications and custom customizations. The Check Disk tool is a tool that can scan and repair logical issues to restore the system's health.
To repair storage problems on Windows 11, use these steps:
Open File Explorer.
Click on This PC from the left navigation pane.
Under the "Devices and drives" section, right-click the drive with the Windows 11 installation and choose the Properties option.
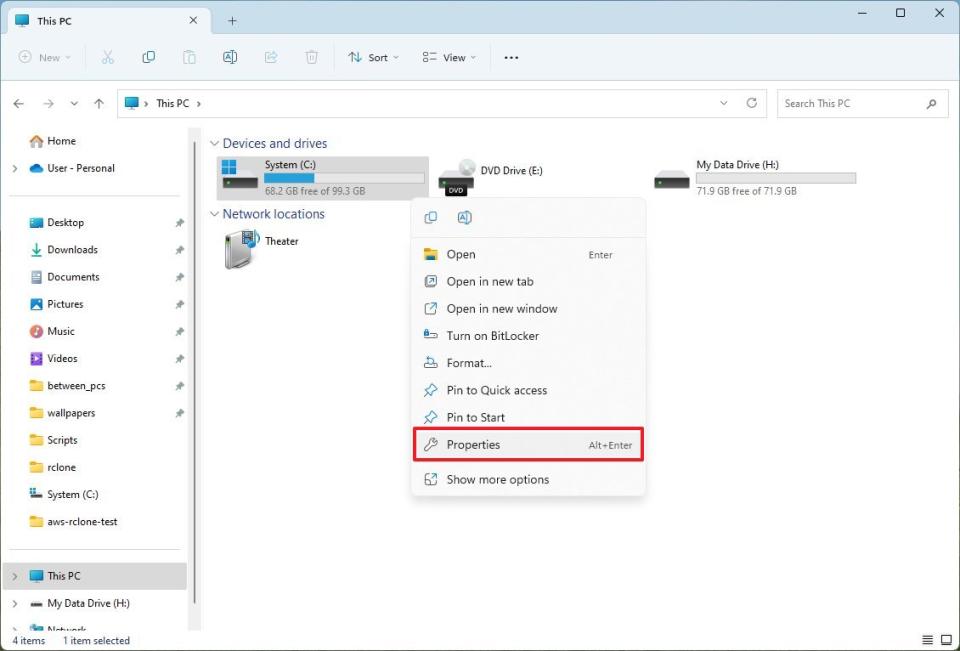
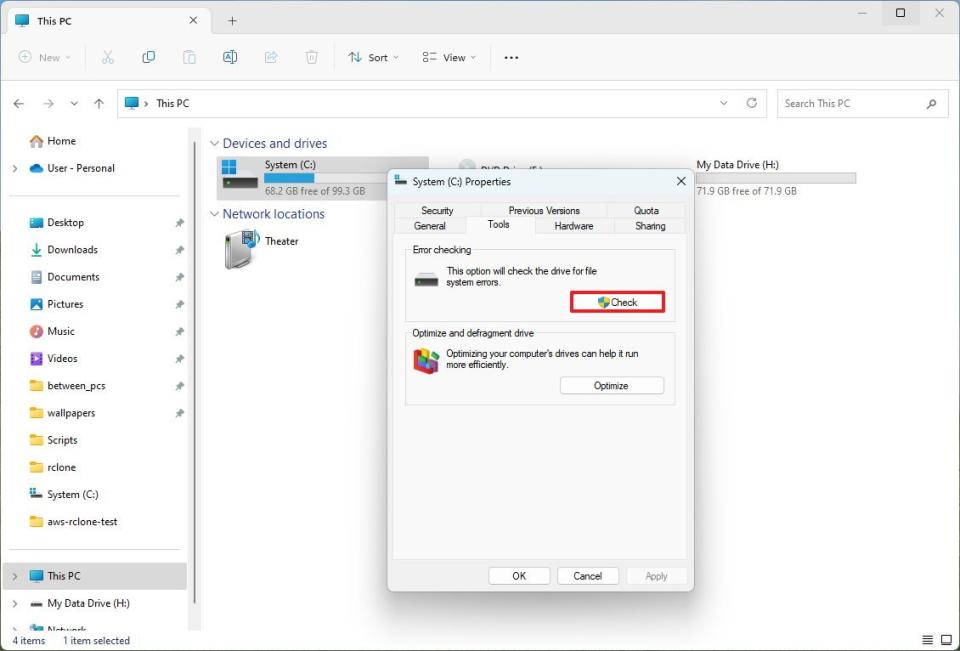
Click the Tools tab.
Under the "Error checking" section, click the Check button.
Click the Scan drive option.
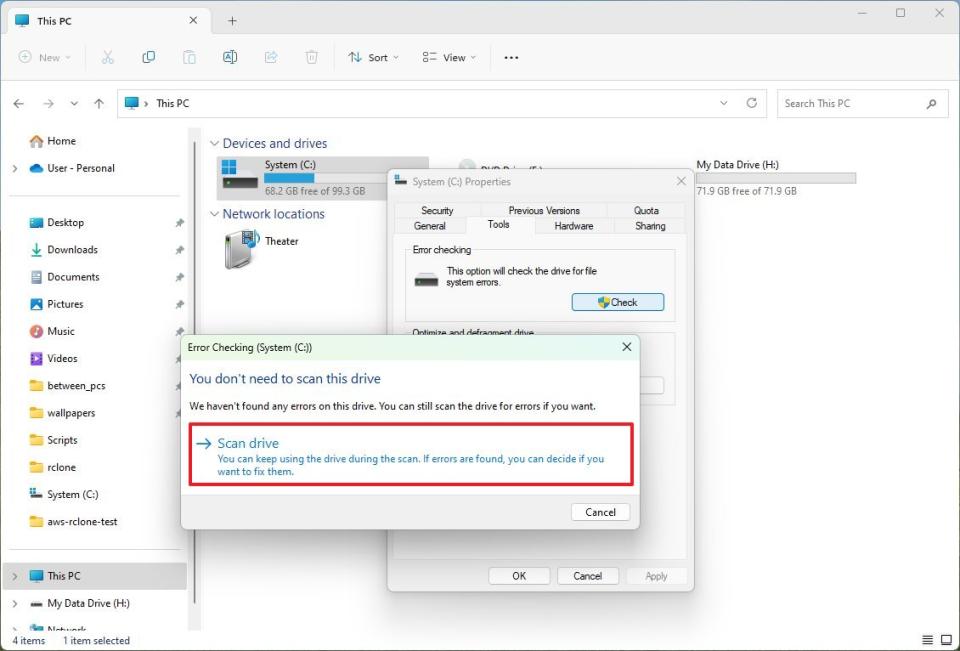
Click the Show Details option to open the Event Viewer for more information about the scan.
Close the Event Viewer.
Click the Close button.
After completing the steps, the tool will automatically scan, detect, and repair any logical problems.
If you're still experiencing issues, you can use more advanced tools to fix this problem on Windows 11.
How to backup laptop on Windows 11
As you prepare your computer for the new school year, consider creating a full backup to protect the installation and files from hardware failure, software-related problems, viruses like ransomware, and theft.
Microsoft no longer maintains the System Image Backup feature, but you can still use the tool to create backups. (As a deprecated feature, the company can remove it in future releases.)
To create a full backup of a laptop (connect an external drive), and use these steps:
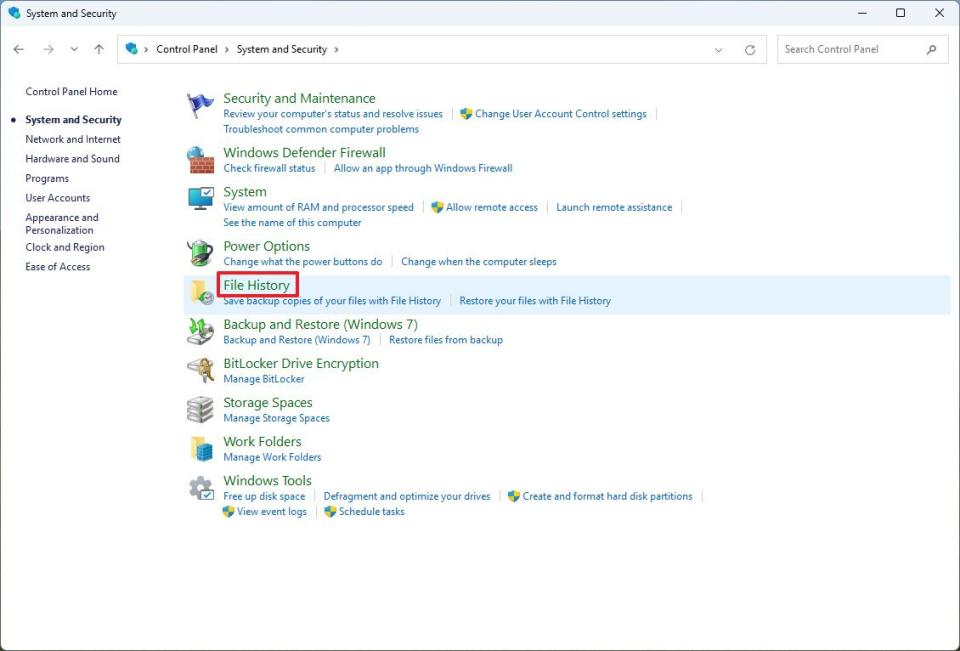
Open Control Panel.
Click on System and Security.
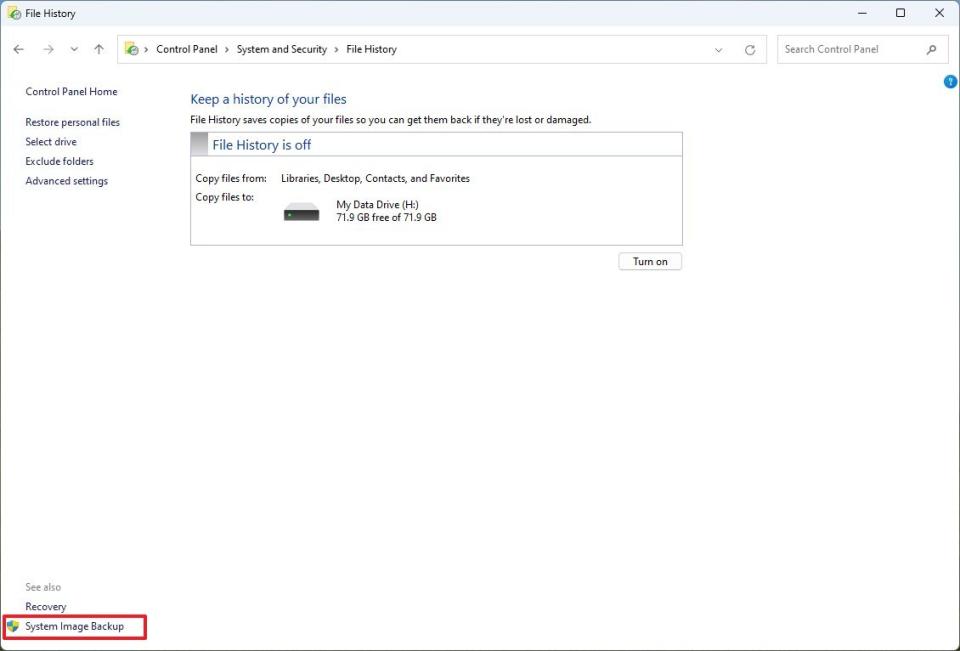
Click on File History.
Click the System Image Backup option from the left navigation pane.
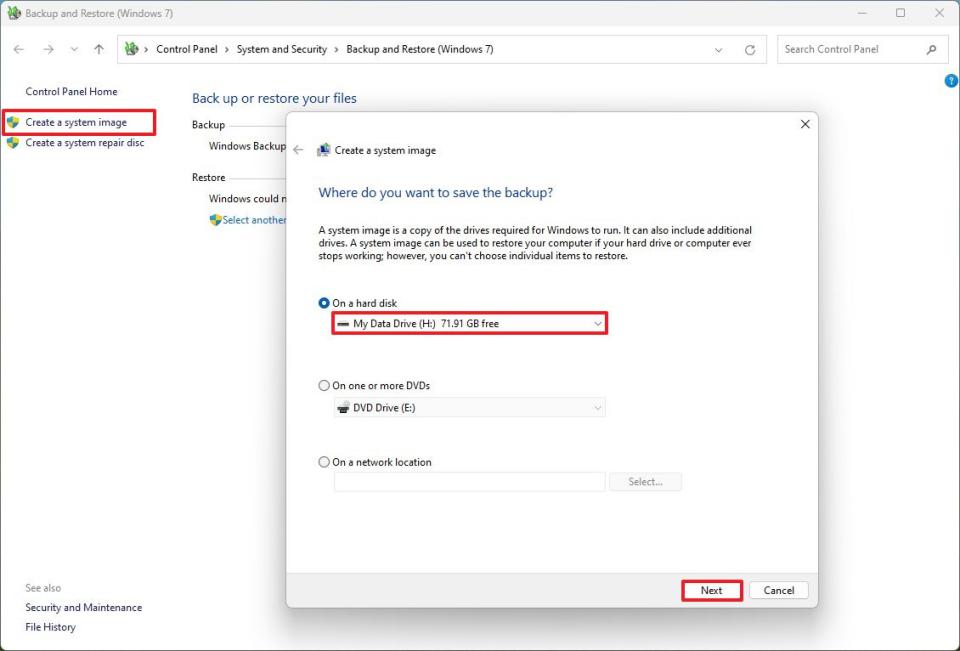
Click the Create a system image option from the left navigation pane.
Choose the drive to export the backup.
Click the Next button.
Click the Start backup button.
Once you complete the steps, the tool will create a backup, and you'll be prompted to create a system repair disc to restore the backup. However, you can skip this step since you can use a bootable USB flash drive to access the same Windows Recovery Environment (WinRE).
When using this tool, consider you can only recover the system since the last created backup. As such, it's essential to be proactive and create backups periodically.
How to protect files with OneDrive on Windows 11
Although it's not required, it's recommended to use a cloud storage service (such as OneDrive) to back up your school files to the cloud and make them available across your devices. This is also another way to protect your files if your computer is ever lost or damaged.
Configure OneDrive
To set up OneDrive on your computer, use these steps:
Open Start.
Search OneDrive and click the top result to open the app.
Quick Tip: If the client isn't installed, download the OneDrive client from Microsoft, and double-click the file to install it.
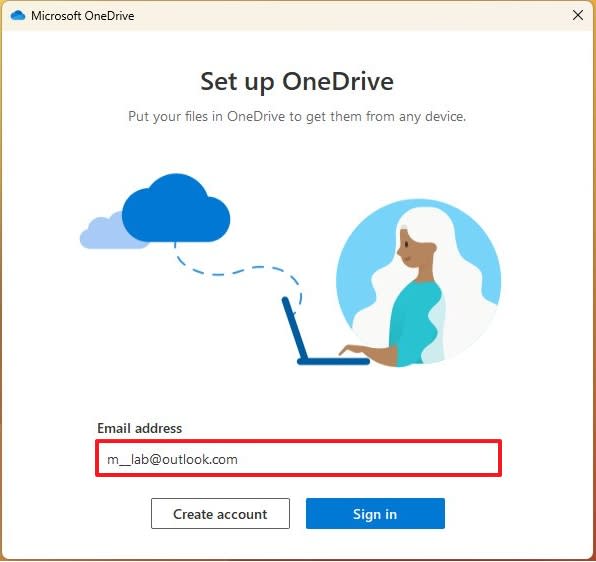
Confirm your Microsoft account email address.
Click the Sign in button.
Confirm your Microsoft account password.
Click the Sign in button.
Click the Next button.
Turn on the toggle switch for the local folders you want to back up to the cloud, including "Documents," "Pictures," and "Desktop."
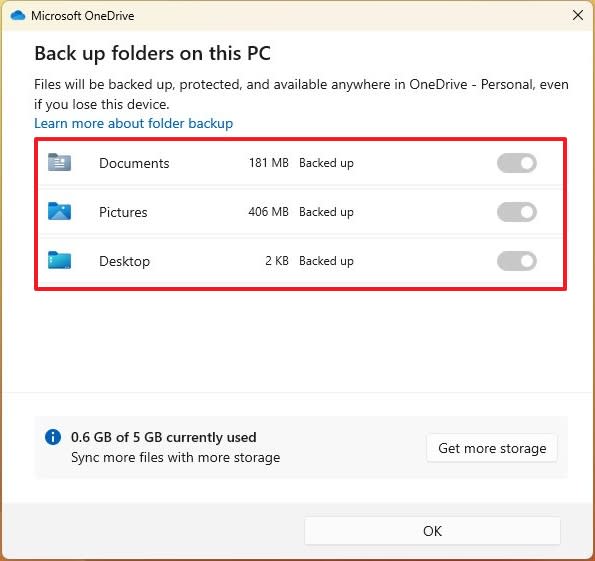
Click the Save changes button.
Click the Not now button.
Click the Next button.
Click the Next button again.
Click the Next button one more time.
Click the Later button.
Click the Open my OneDrive folder button.
After you complete the steps, files in the local folders will sync automatically to the OneDrive account, and they'll be available anywhere, including from another Windows 11 computer, macOS, iOS, and Android devices connected with the same Microsoft account.
OneDrive backup
In the case that you don't see the file backup prompt, you can manage the backup settings from the OneDrive application.
To back up your profile folders to OneDrive, use these steps:
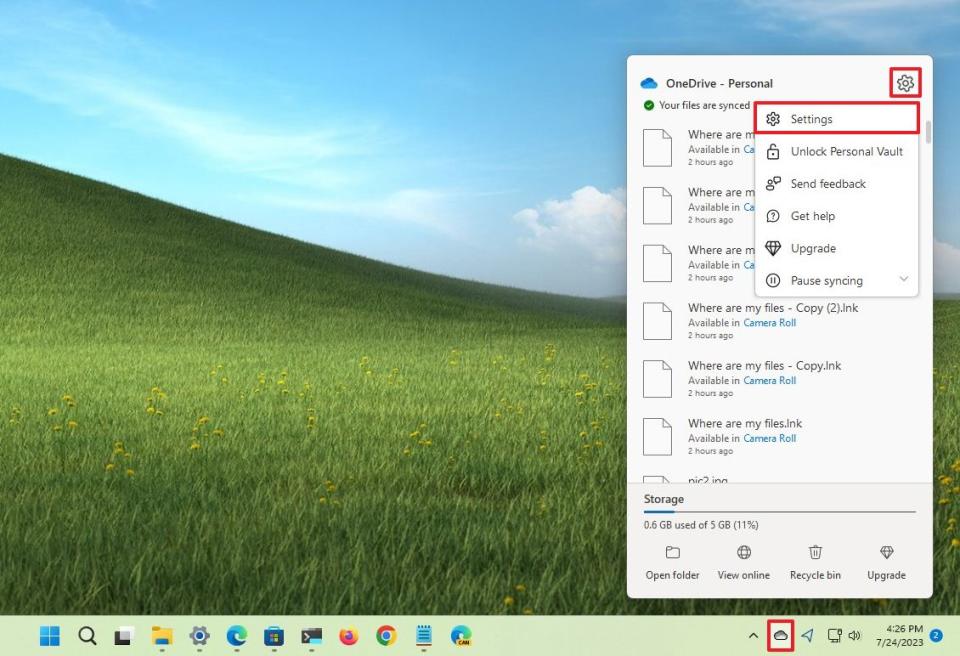
Click the OneDrive icon from the Taskbar.
Click the Help & Settings (gear) button and choose the Settings option.
Click on Sync and backup.
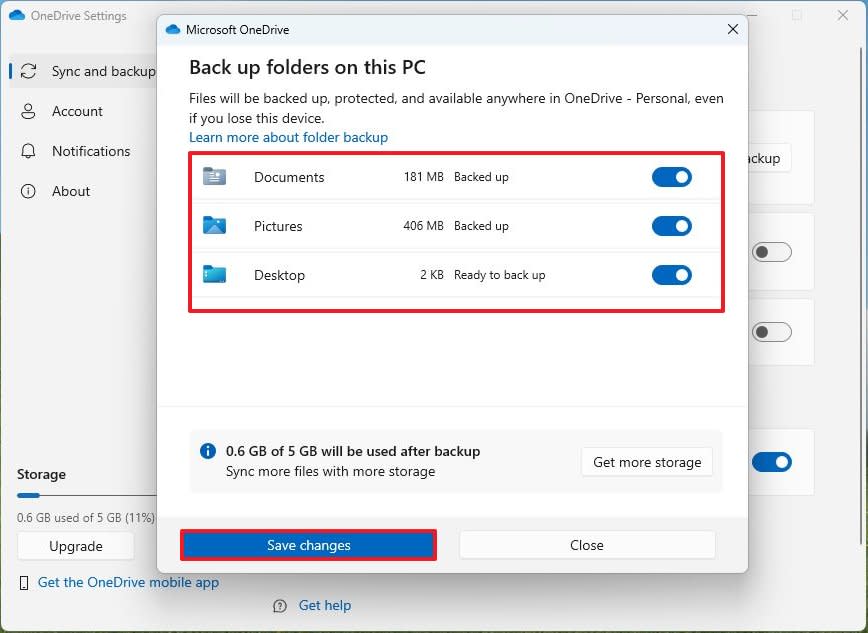
Click the Manage backup button for the "Back up important PC folders to OneDrive" setting.

Turn on the toggle switch for the local folders you want to back up to the cloud, including "Documents," "Pictures," and "Desktop."
Click the Save changes button.
Once you complete the steps, documents and other files stored in any profile folders will upload to OneDrive automatically.
The free version of OneDrive only gives you 5GB of storage. If you have a lot of files, you should consider getting a Microsoft 365 subscription, which unlocks 1TB of OneDrive storage and access to the suite of Office apps and many other benefits.
How to protect laptop from malware on Windows 11
Windows 11 has a built-in antivirus solution called Microsoft Defender Antivirus, which is more than enough protection against many malware types and hackers. However, you can also use third-party antivirus solutions if you prefer. The best antivirus solution for you depends on your individual needs and preferences.
Run full malware scan
Microsoft Defender Antivirus is the default anti-malware solution that protects your laptop and files on Windows 11. Although it's always running in the background, performing a full malware scan is still recommended, especially if your computer is acting up or performing poorly.
To perform a full malware scan on Windows 11, use these steps:
Open Start.
Search for Windows Security and click the top result to open the app.
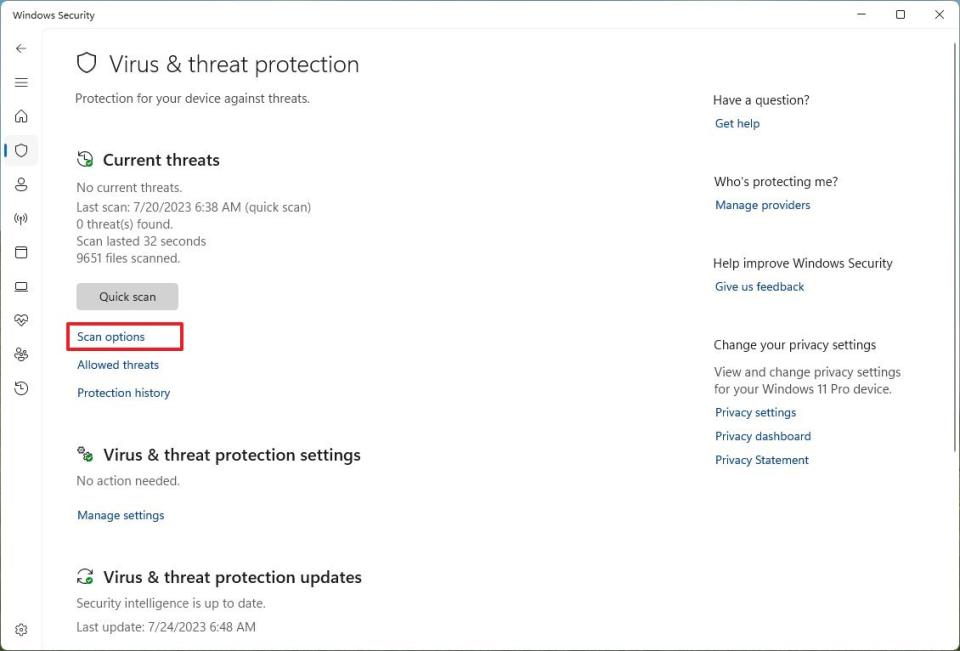
Click on Virus & threat protection.
Under the "Current threats" section, click the Scan options button.
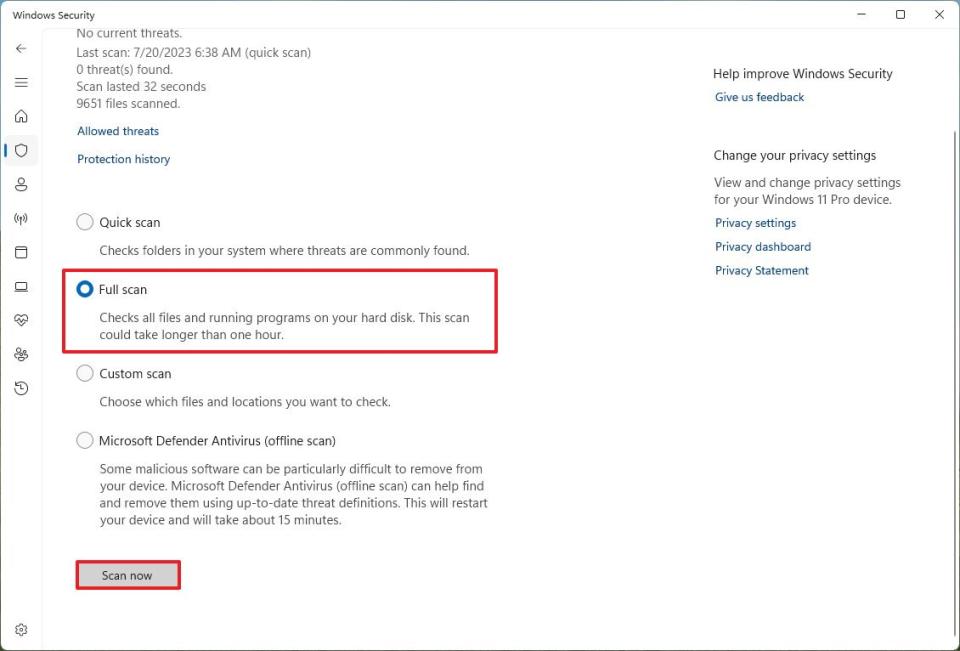
Select the Full scan option.
Click the Scan now button.
Once you complete the steps, the antivirus will perform a scan to detect and remove viruses as necessary.
Configure firewall
Microsoft Defender Firewall is a built-in firewall that helps to protect your computer from unauthorized access. It's enabled by default on Windows 11, but you can always check to ensure it is running. The firewall works by blocking incoming connections that are not authorized to prevent hackers and other malicious actors from gaining access to your device and files.
To enable the Windows 11 firewall, use these steps:
Open Start.
Search for Windows Security and click the top result to open the app.
Click on Firewall & network protection.
Click the Restore settings button (or the Turn on button for the active network).
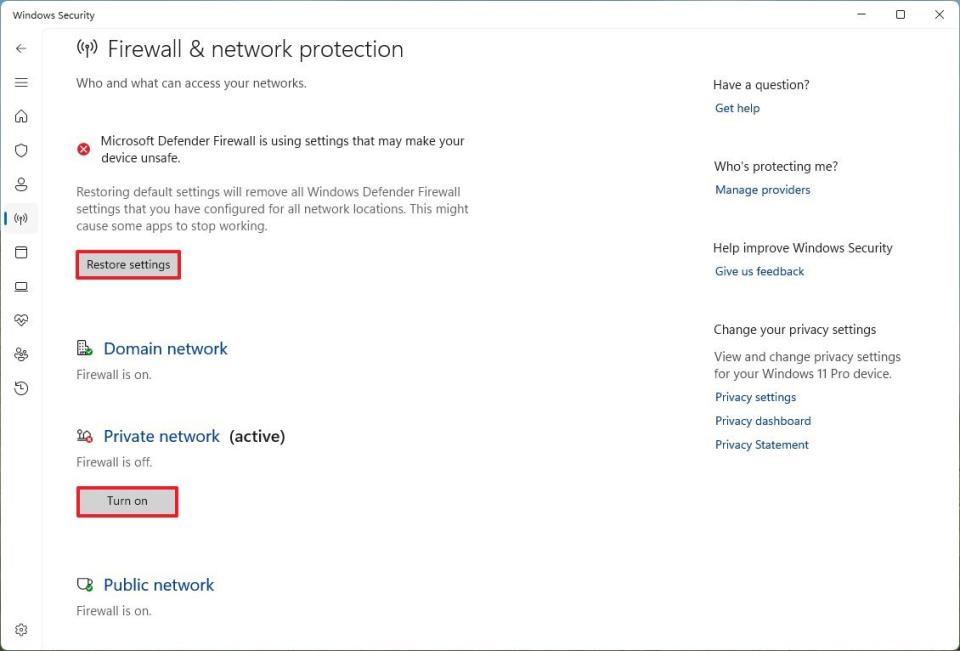
After you complete the steps, the firewall will protect your laptop and data from online threats.
If the default antivirus and firewall aren't for you, you can check these best antivirus software recommendations to protect your computer.
How to upgrade to latest version of Windows 11
If you have had the same installation for a long time, one of the best ways to prepare your computer for the new school year is to upgrade to the latest version of Windows 11. When you upgrade your device, you can access the latest features and enhancements to improve productivity and efficiency.
Warning: The upgrade process to a newer version of Windows 11 is a non-destructive process, but creating a backup is always recommended before proceeding. You have been warned.
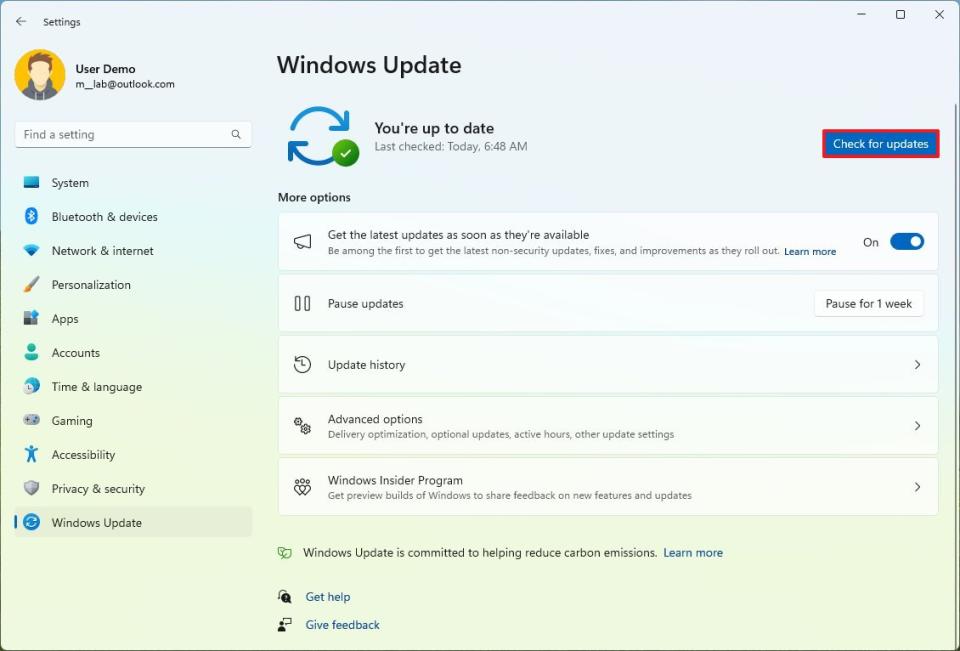
Windows Update process
To upgrade through Windows Update, use these steps:
Open Settings.
Click on Windows Update.
Click the "Check for updates" button.
Click the "Download and install now" button.
Click the Restart now button.
Once you complete the steps, Windows Update will install the latest operating system version on your school laptop.
Installation Assistant process
If it's not possible to upgrade using the Windows Update settings, you can try the Installation Assistant tool. However, this tool will proceed with the upgrade using reinstallation of the operating system, which is not necessary if the device is running Windows 11 version 21H2 or 22H2.
To install the latest version of Windows 11 with the Installation Assistant, use these steps:
Under the "Windows 11 Installation Assistant" section, click the Download Now button.
Double-click the Windows11InstallationAssistant.exe file to launch the tool.
Click the Accept and install button.

After you complete the steps, the Installation Assistant will upgrade the laptop to the latest release of Windows 11, preserving your files, apps, and most settings.
How to optimize laptop battery life on Windows 11
Laptop batteries can run out quickly, especially when working on a school project. However, there are several features you can use to make a single charge last longer. These features include choosing the correct power mode, configuring the battery saver feature, adjusting brightness, and more.
Change power modes
To change the power mode on Windows 11, use these steps:
Open Settings.
Click on System.
Click the Power (or Power & battery) page on the right side.

In the "Power mode" setting, select the power mode:
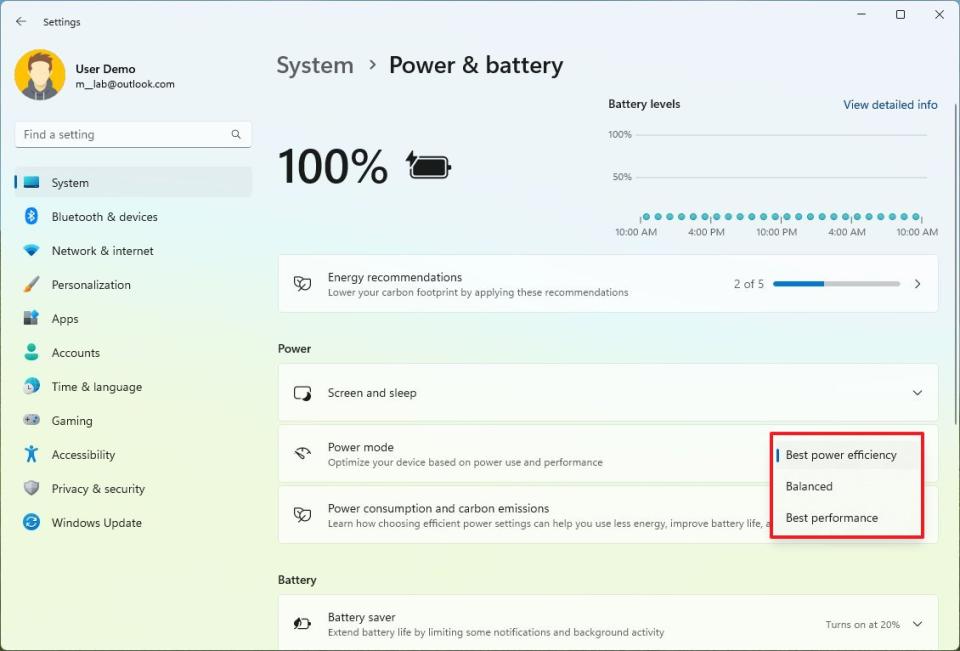
Best power efficiency – conserves energy by reducing the device performance when possible.
Balanced – automatically balances performance with energy consumption on capable hardware.
Best performance offers the most system performance but uses more energy.
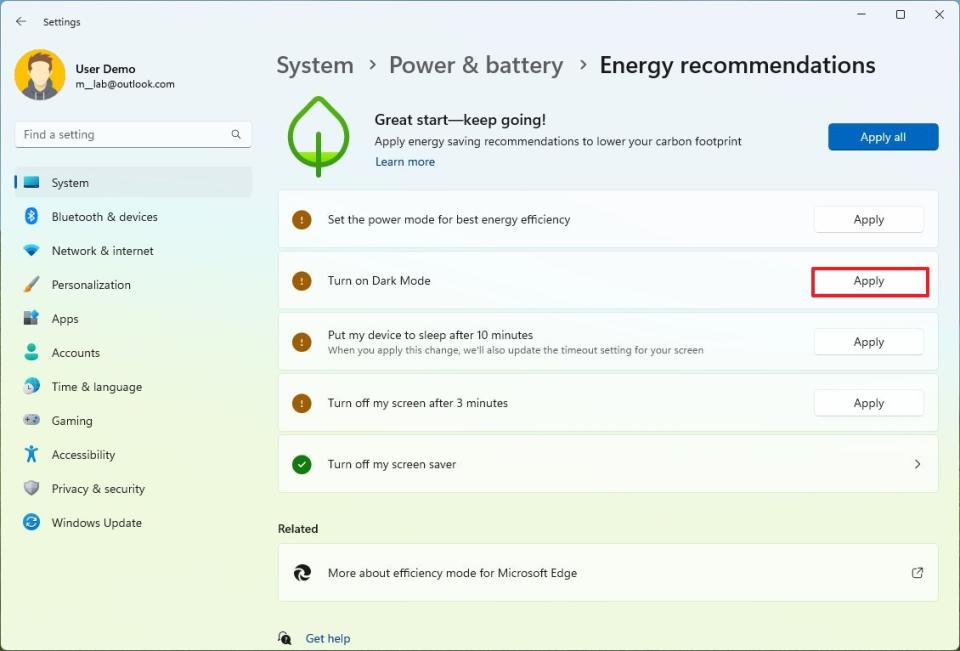
(Optional) Click the Energy recommendations setting.
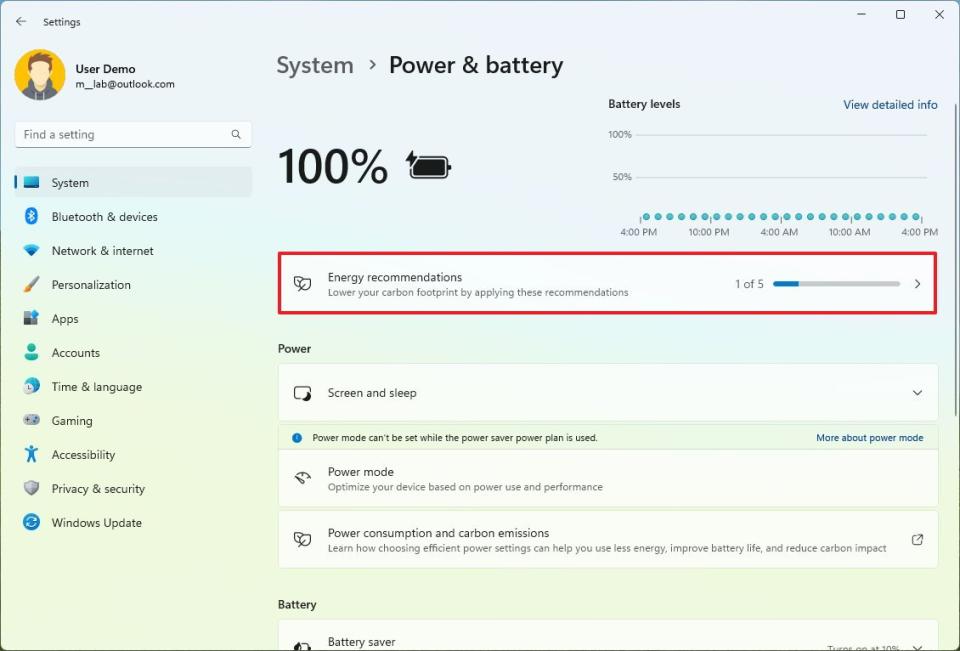
Review the recommendations to save energy and click the Apply button when applicable.
Once you complete the steps, Windows 11 will enforce the selected power profile to optimize your laptop's battery life.
Configure Battery saver
To configure the Battery saver mode on your school laptop running Windows 11, use these steps:
Open Settings.
Click on System.
Click the Power (or Power & battery) page on the right side.
Under the "Battery" section, choose when the battery saver feature should be enabled automatically with the "Turn battery saver on automatically at" setting.
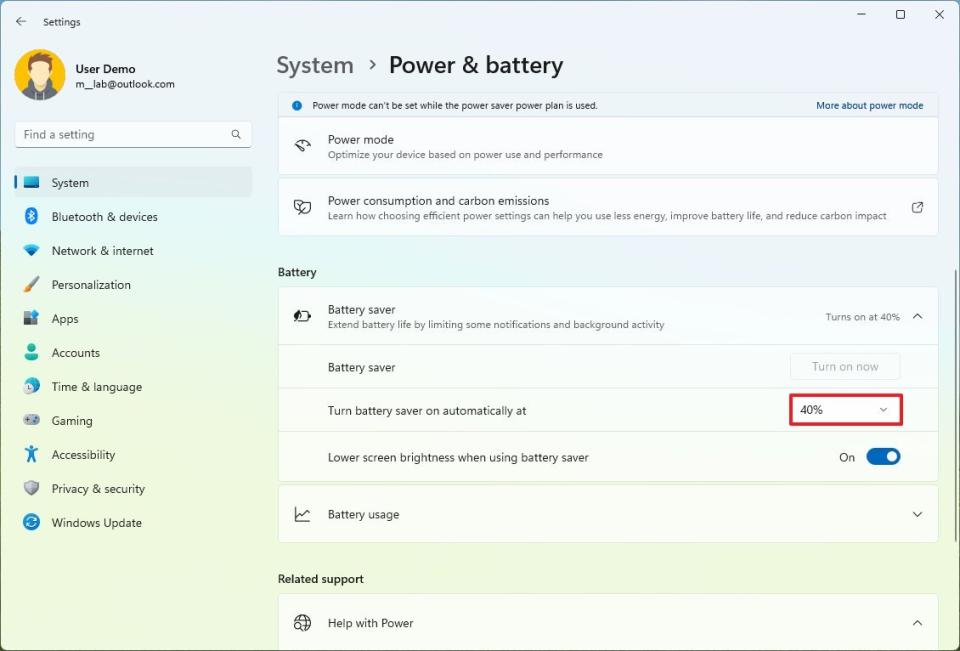
Quick tip: The higher the level, the sooner the battery saver will enable and extend the laptop's battery life.
(Optional) Turn on the "Lower screen brightness when using batter saver" toggle switch to conserve even more energy.
(Optional) Click the "Turn on now" button in the "Battery saver" setting to enable the feature on demand.
After you complete the steps, the feature will help expand the battery's life. If you use "Battery saver," brightness will be set to a lower setting, and some features will be turned off, throttled, or behave differently.
Change video playback settings
If the device isn't receiving power and you need to watch a video to complete a school project, you can change the video playback settings to make the laptop play the video entirely on a single charge.
To change the video playback settings of your computer, use these steps:
Open Settings.
Click on Apps.
Click the Video playback page on the right side.
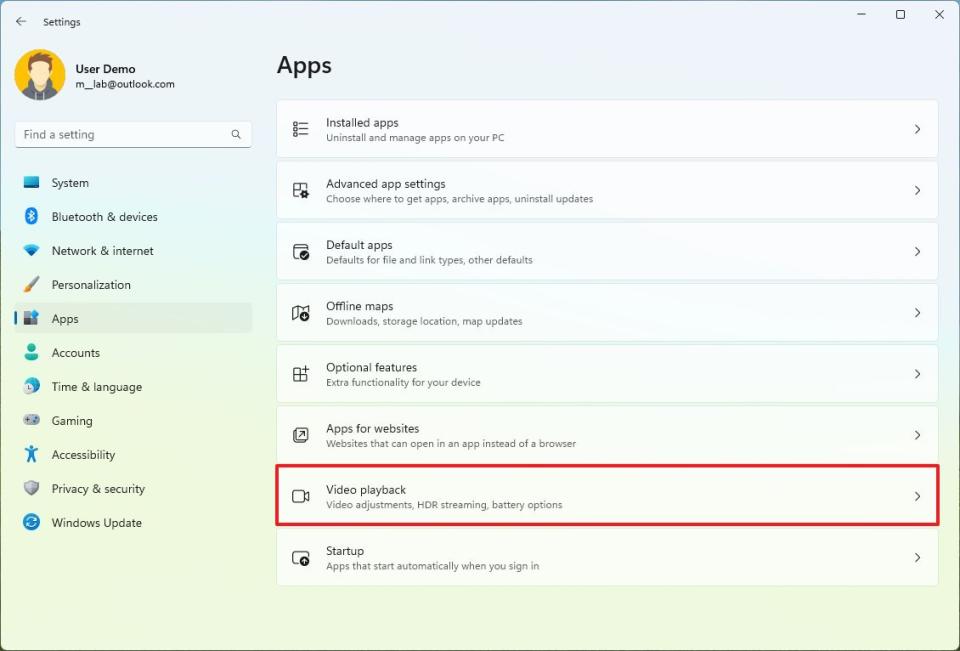
Turn on the "Save network bandwidth by playing video at a lower resolution" toggle switch.
Choose the "Optimize for battery life" option from the "Battery options" setting.

Once you complete the steps, the battery should last longer when watching videos on Windows 11.
Change sleep settings
The computer monitor is one of the components that uses the most energy. You can always prolong the battery life of your laptop by adjusting the brightness of the screen, selecting the correct screen and sleep timers, and tweaking other settings.
To change when the screen should turn off and when the device should sleep to conserve battery, use these steps:
Open Settings.
Click on System.
Click the Power (or Power & battery) page on the right side.
Under the "Power" section, click the "Screen and sleep" setting.
Choose how long the laptop should wait before turning off the screen when on battery or plugged in.
Choose how long the laptop should wait before going to sleep when on battery or plugged in.
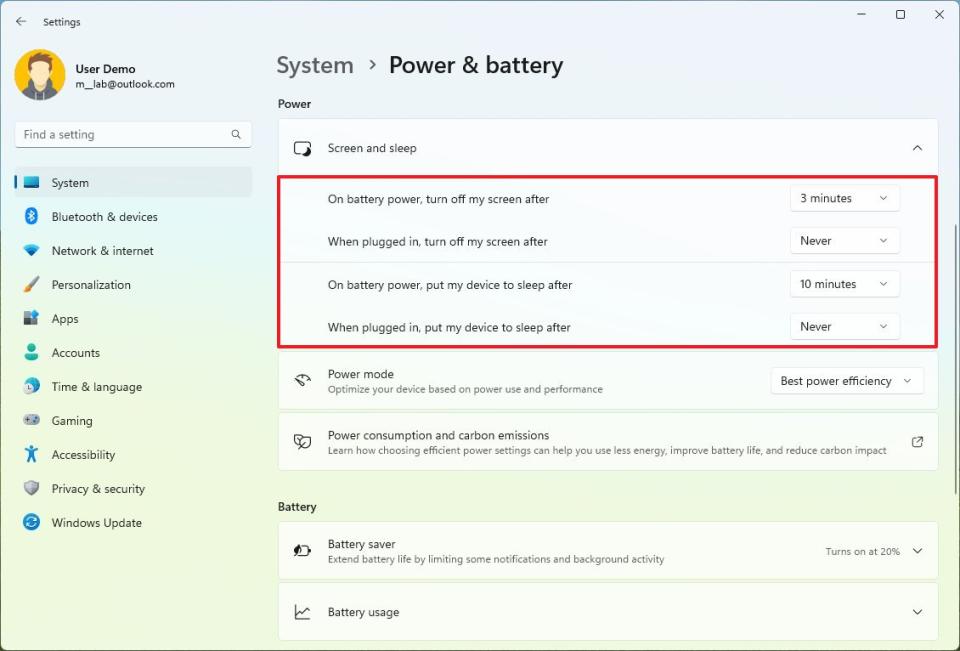
Quick note: Usually, it's recommended to set the timers to "3" minutes on battery settings and "5" minutes for the plugged-in settings.
Once you complete the steps, the settings will apply to help extend the battery life of your laptop.
Change brightness
To reduce the brightness on Windows 11, use these steps:
Open Settings.
Click on System.
Click the Display page on the right side.
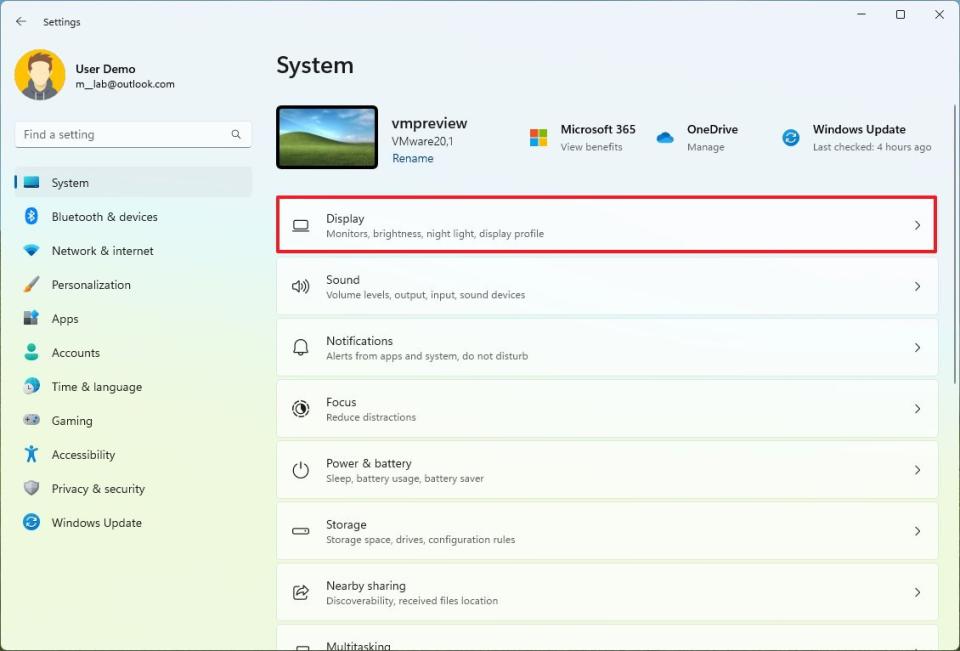
Adjust the brightness using the "Brightness" slider.
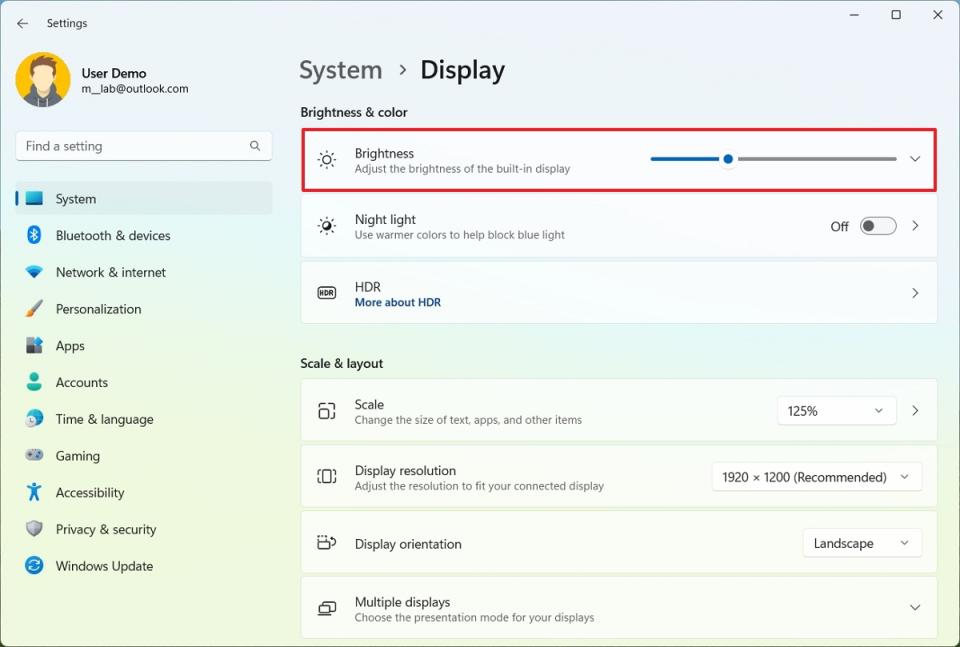
After you complete the steps, the brightness on the screen will lower, helping to minimize the energy usage impact.
Enable dark mode
To enable the dark mode on Windows 11, use these steps:
Open Settings.
Click on Personalization.
Click the Colors page on the right side.
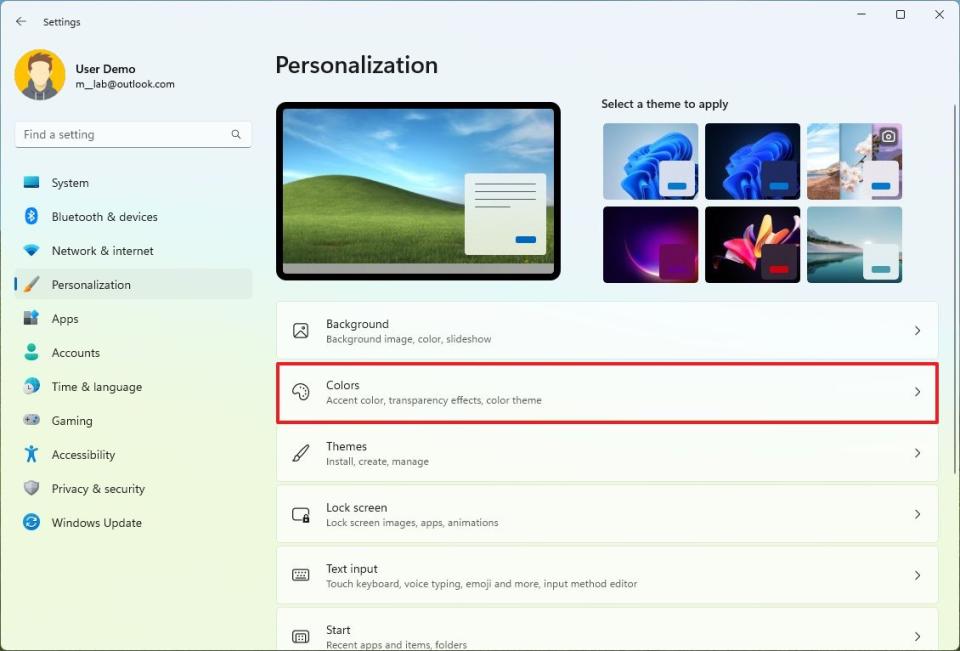
Select the Dark option from the "Change your mode" setting.
(Optional) Turn off the Transparency effects toggle switch.
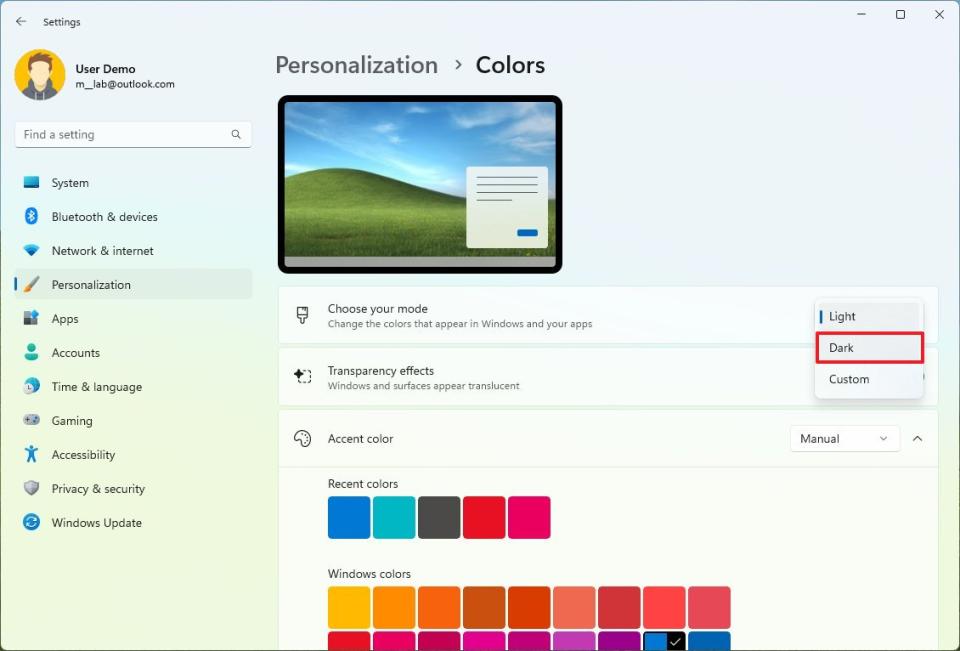
Once you complete the steps, the desktop components (Start menu, Taskbar, File Explorer, and supported apps) will start using the dark color mode, and the system transparency effects will be turned off to help optimize battery life.
Enable airplane mode
To enable Airplane on Windows 11, use these steps:
Open Settings.
Click on Network & internet.
Turn on the Airplane mode toggle switch on the right side.

After you complete the steps, the network adapter and Bluetooth will turn off to conserve battery life.
Disconnect non-essential peripherals
Laptop batteries can drain quickly, especially when you are using external devices. To extend battery life, disconnect non-essential devices you are not using, including external storage devices, cameras, Bluetooth peripherals, and any other devices that are connected to your device.
Enable hibernation
Hibernation is a power-saving mode that saves everything in the current session to the hard drive and then powers down the system. This allows you to conserve battery power when you don't use your computer. When you power on your laptop again, you can pick up where you left off.
To enable hibernation on Windows 11, use these steps:
Open Control Panel.
Click on Hardware and Sound.
Click on Power Options.
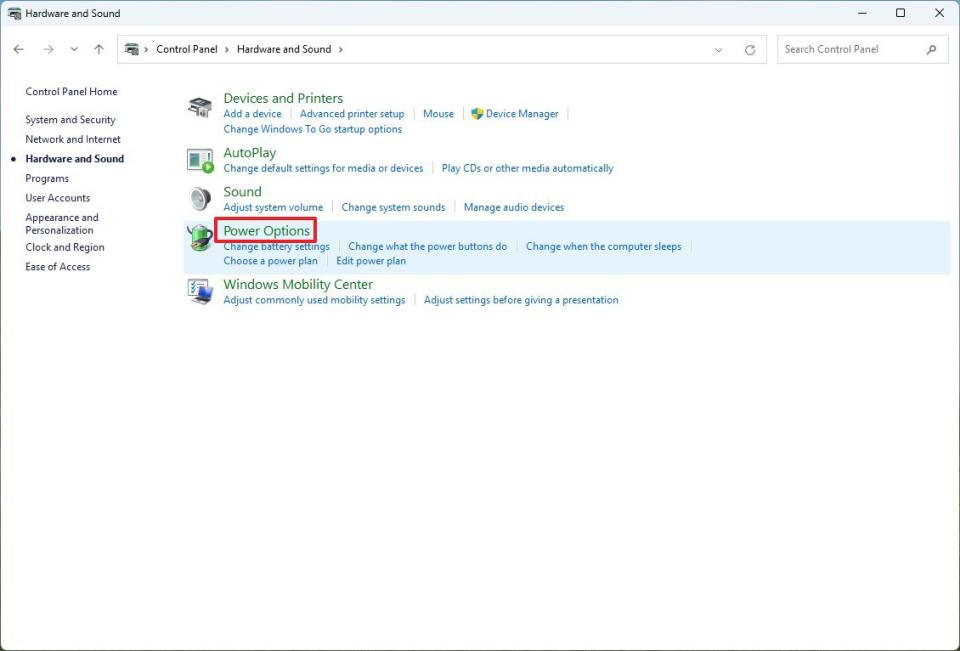
Click the "Choose what the power button does" option.

Click the "Change settings that are currently unavailable" option.
Under the "Shutdown settings" section, check the Hibernate option.
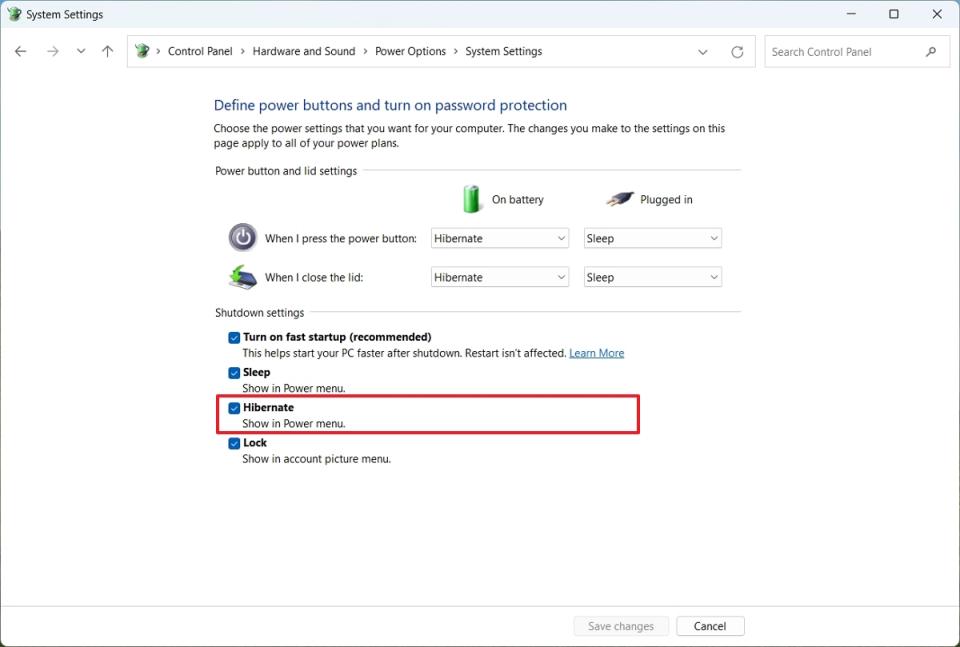
(Optional) Under the "Power button and lid settings" section, select the Hibernate option from the "When I press the power button" setting.
Choose the Hibernate option in the "When I close the lid" setting.
Click the Save Changes button.
Once you complete the steps, the "Hibernation" option will now appear from the Start power menu. When shutting down your device with this option, you can extend the battery life of the laptop, and it'll help you save your current session when running out of battery, and you can't afford to close the apps.
You can try these instructions if the feature isn't available on your device.
How to customize desktop appearance on Windows 11
Windows 11 allows you to customize the appearance of your desktop in many ways.
Change themes
Themes are a great way to keep your computer desktop fresh and interesting. They are small apps that include a collection of wallpapers and specific color settings. You can download tons of themes from the Microsoft Store.
To change the theme on Windows 11, use these steps:
Open Settings on Windows 11.
Click on Personalization.
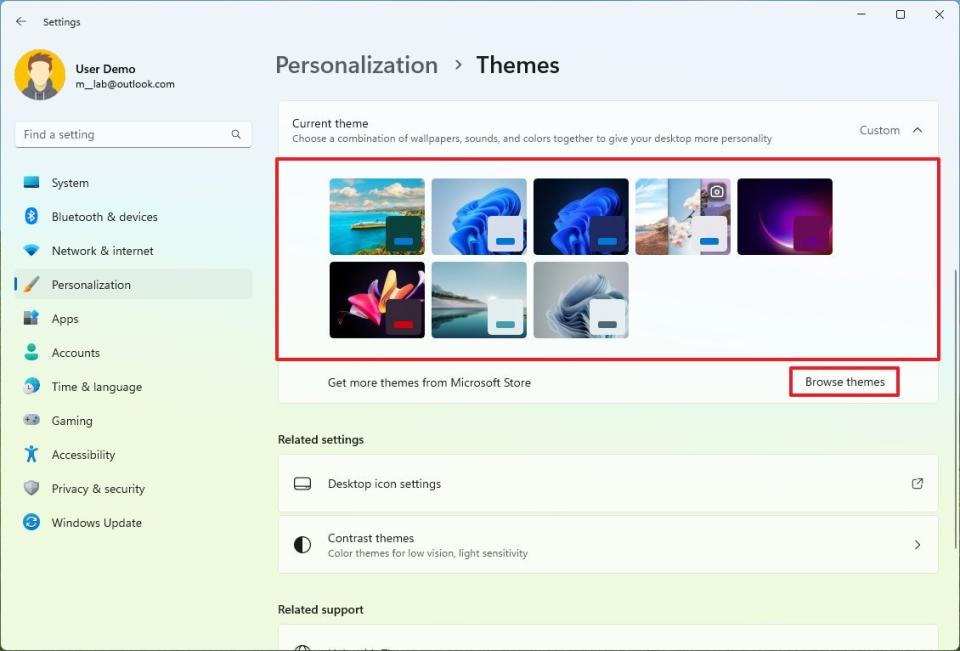
Click the Themes page on the right side.

Choose from one of the available themes to apply to your setup.
(Optional) Click the Browse themes button.
Select one of the available themes from the Microsoft Store.
Click the Get button.
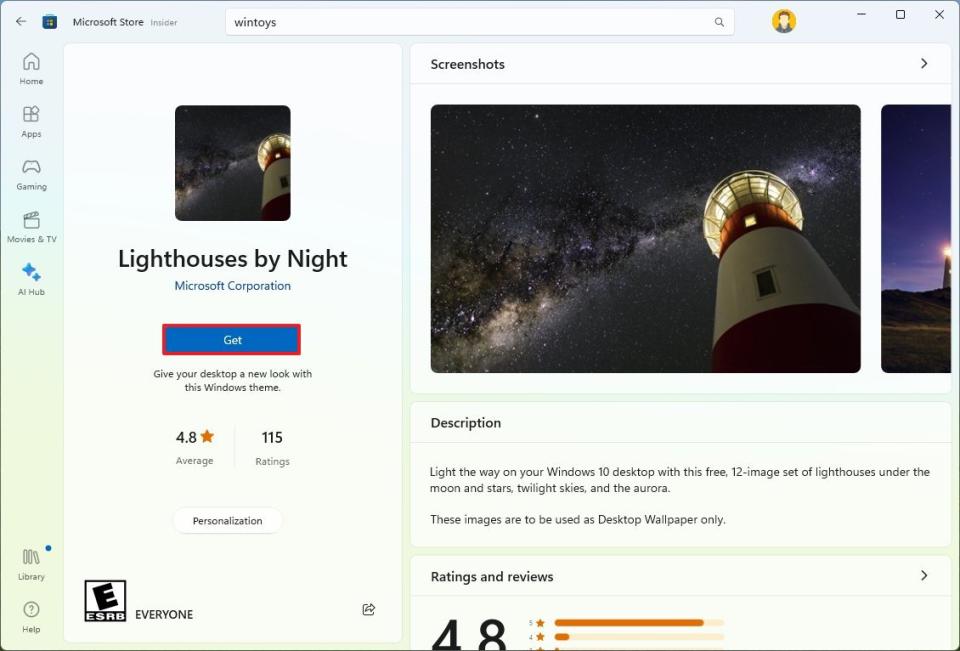
Click the Open button.
Select the theme to apply to your setup.
After you complete the steps, the theme with its wallpapers and colors will apply to your computer.
Pin apps
If you're preparing your computer for school, it's always a good idea to have your frequently used apps at your fingertips for quicker access, and you can do this using pins.
To pin apps to the Start menu or Taskbar on Windows 11, use these steps:
Open Start.
Search for the application, such as Mail, Word, Excel, PowerPoint, and Calculator.
Click the "Pin to taskbar" option from the right side.
Click the "Pin to Start" option from the right side.
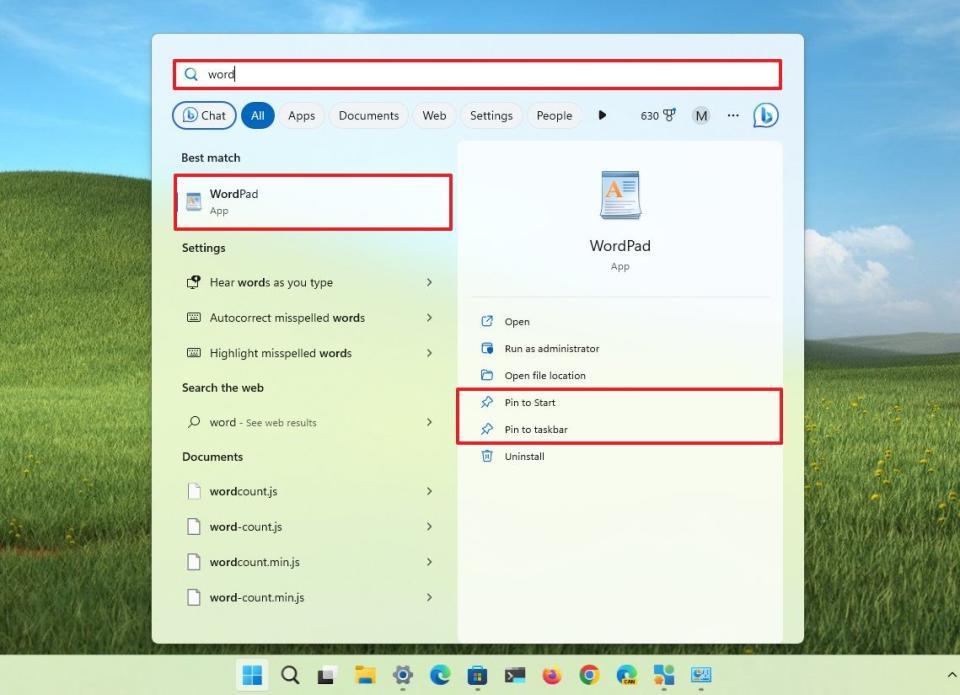
Once you complete the steps, the apps you pinned will appear on the Start menu and Taskbar, depending on your configuration.
Create folders on Start
Folders in the Start menu are a great way to group and organize similar apps.
To create folders in the Start menu, use these steps:
Open Start.
Click and drag the apps together to create a folder.
(Optional) Click the folder.
Click on "Edit name."
Confirm a descriptive name for the folder, such as School apps.
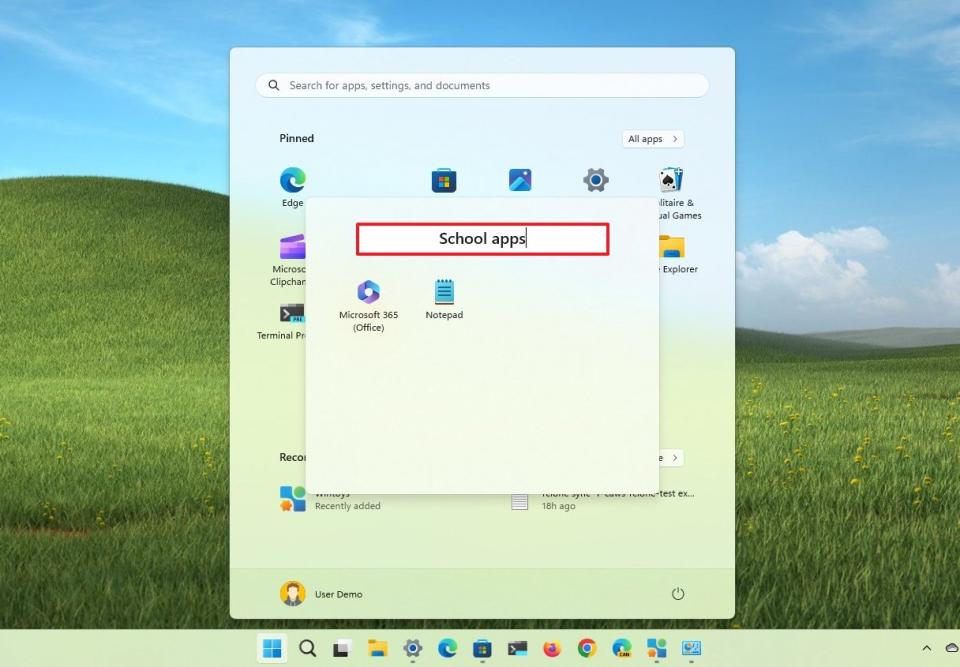
After you complete the steps, you may need to repeat the instructions to create more folders to organize other applications.
Quick desktop cleanup
To hide the desktop icons and files on Windows 11, use these steps:
Right-click on the desktop.
Select the View menu option.
Clear the "Show desktop icons" option.
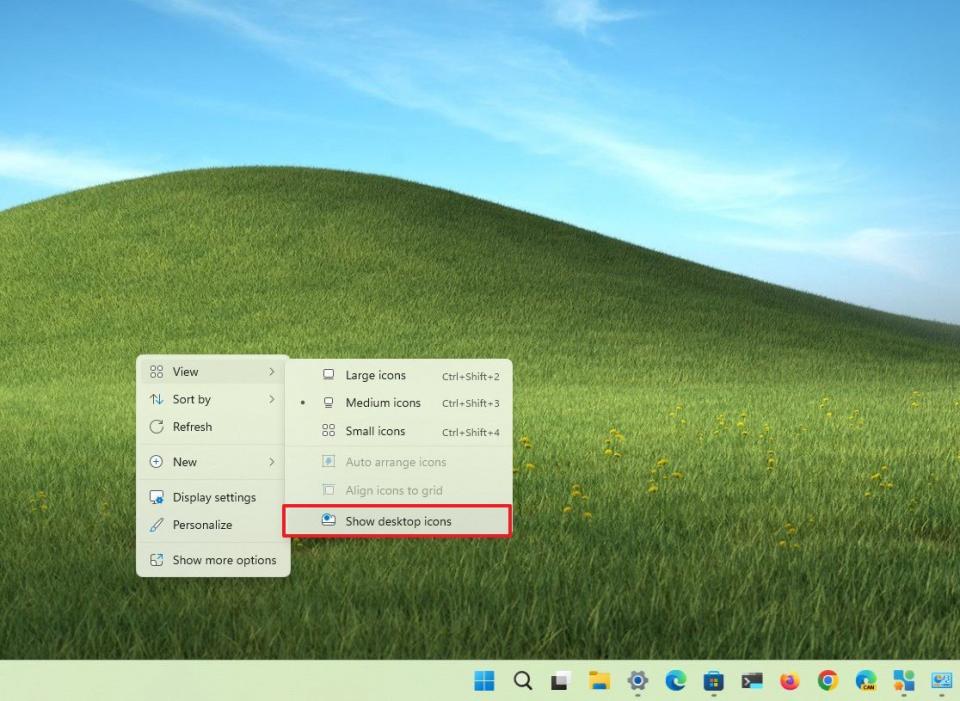
Once you complete the steps, the desktop will appear empty, decluttering the space, but you will still be able to access the files from the "Desktop" location from the left navigation pane on File Explorer.
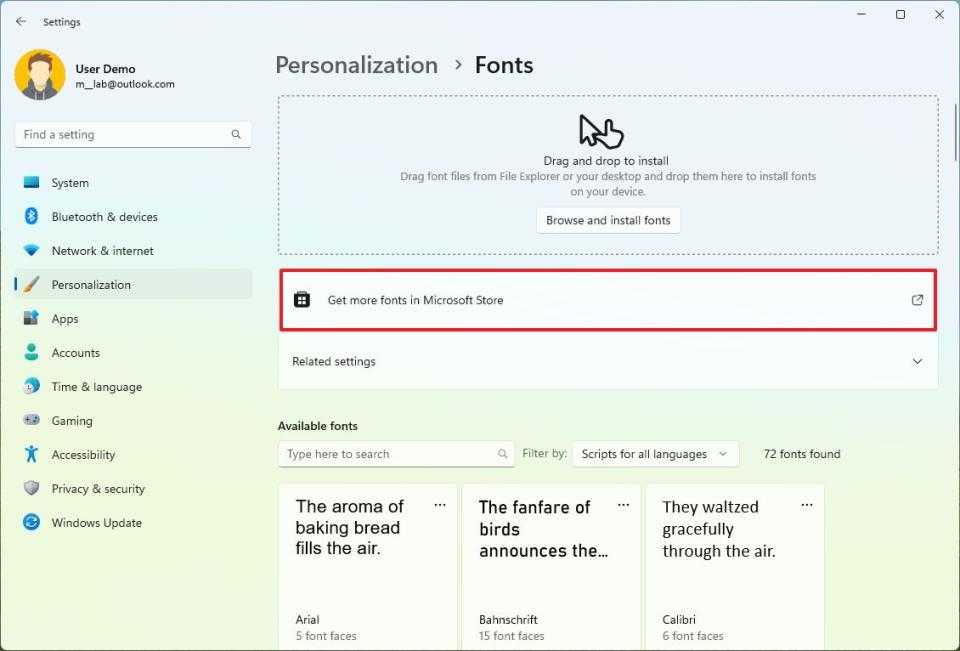
Install fonts
On Windows 11, you can install fonts that you can use on school projects through the Office apps and other programs, such as Adobe Photoshop.
To install new fonts on Windows 11, use these steps:
Open Settings.
Click on Personalization.
Click the Fonts page on the right side.
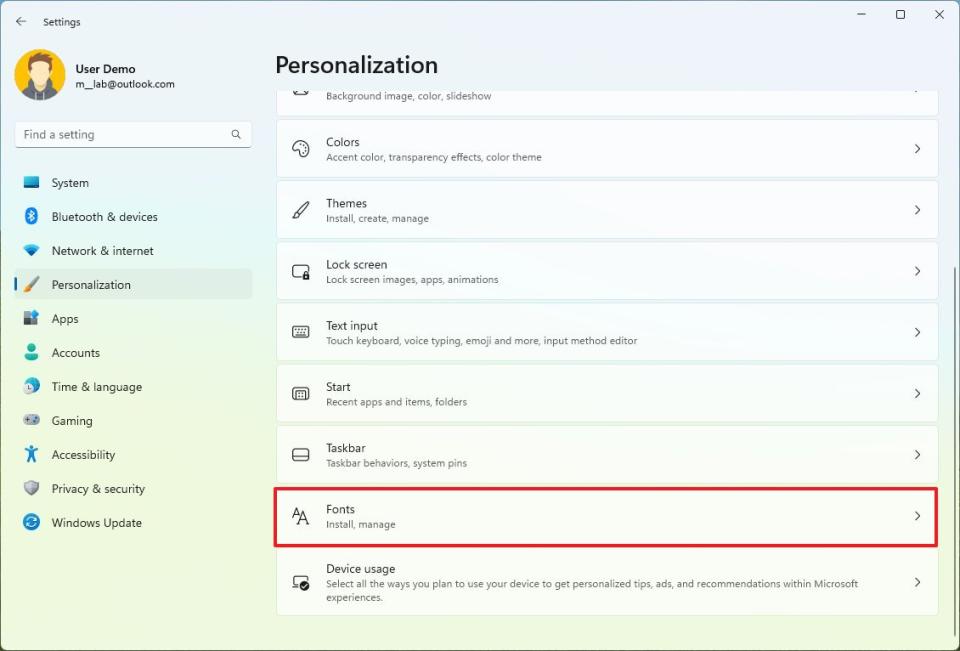
Click the "Get more fonts in Microsoft Store" option.
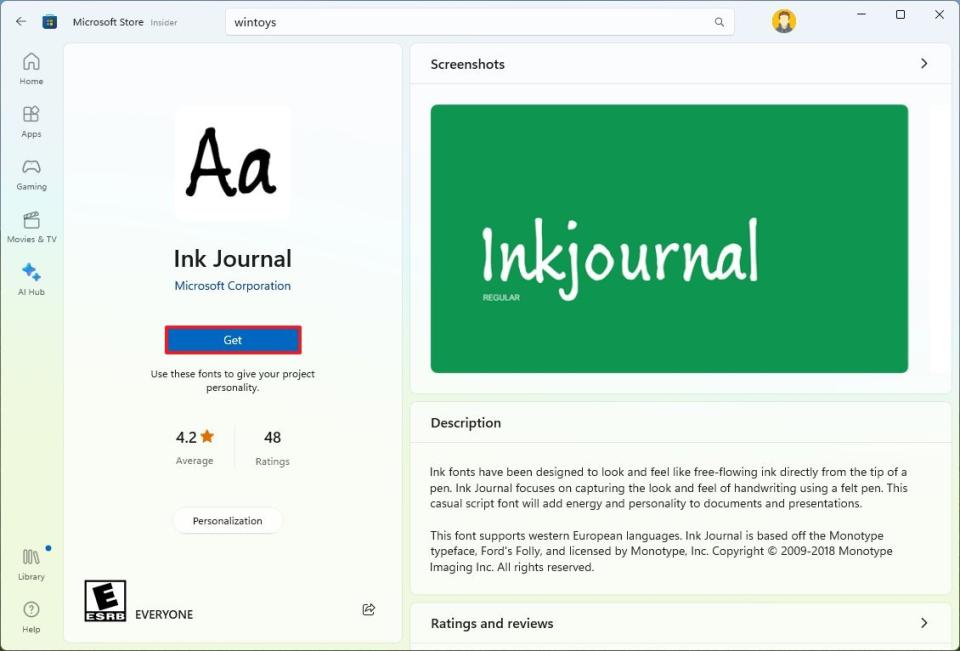
Select the font family.
Quick note: The Microsoft Store includes paid fonts, but many are free to download.
Click the Get button.
After you complete the steps, the fonts will be available for all applications that make use of the system fonts on Windows 11.
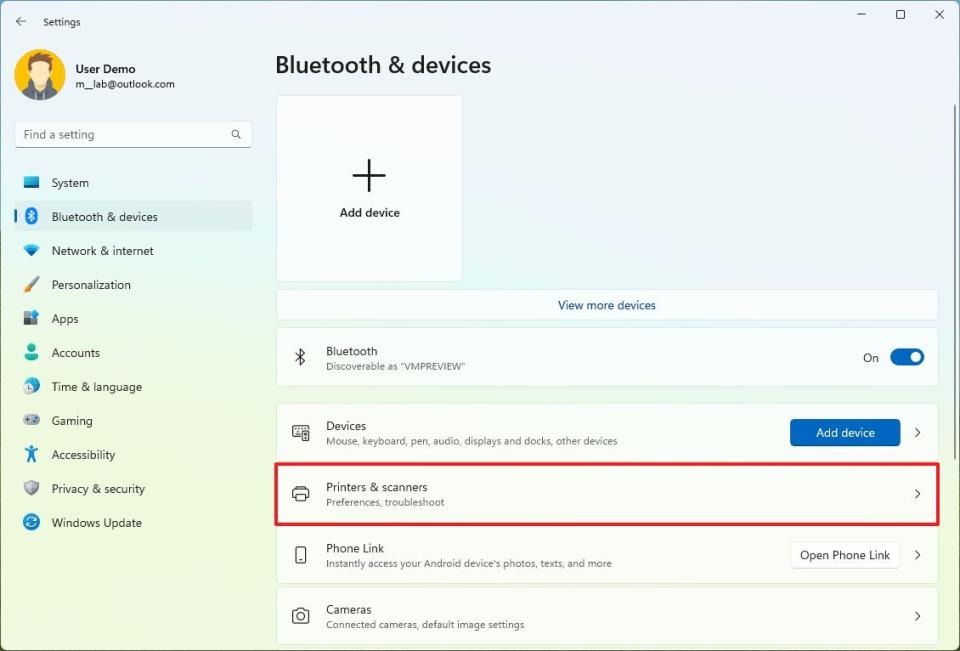
How to set up printer on Windows 11
Printing content on paper is still a thing and understanding the steps to configure a wireless or USB printer on Windows 11 is still relevant.
Install Wi-Fi printer
To install a wireless printer on Windows 11, and use these steps:
Open Settings.
Click on Bluetooth & devices.
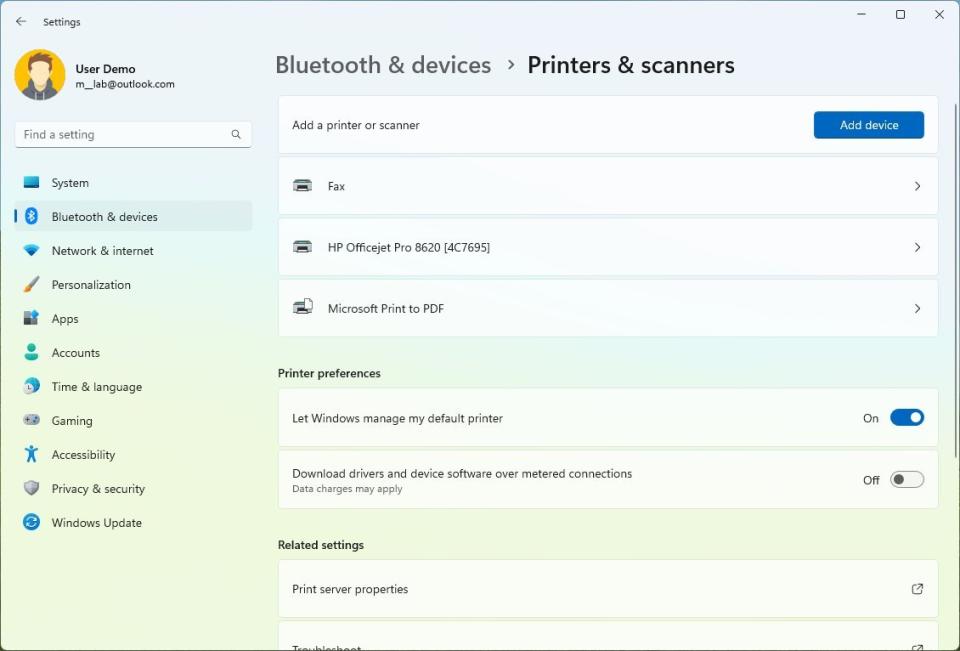
Click the Printers & scanners page on the right side.
Click on the "Add device" button from the "Add a printer or scanner" setting.
Click the Add device button for the printer to install.
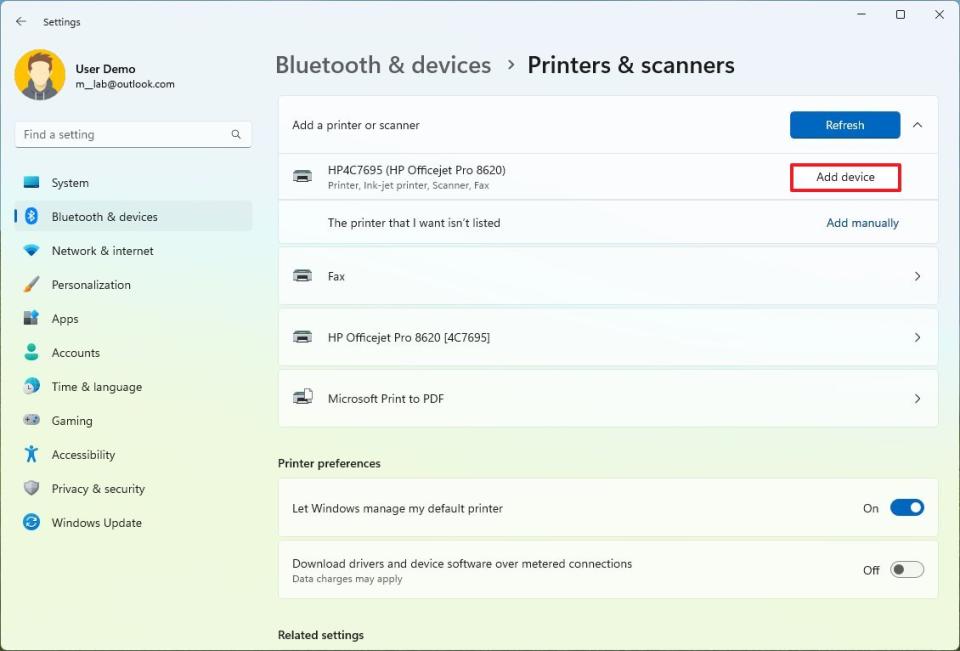
After completing the steps, the system will automatically download and install the required drivers.
Install USB printer
To install a USB printer on Windows 11, use these steps:
Open Settings.
Click on Bluetooth & devices.
Click the Printers & scanners page on the right side.
Connect the printer to the laptop with the USB cable.
Once you complete the steps, the system will automatically detect and install the local printer.
You can use these instructions if you have any problems trying to set up a local printer.
How to install Office apps on Windows 11
Microsoft 365 includes all the Office apps (such as Word, Excel, PowerPoint, and Outlook) students need to stay productive in and out of school.
To set up the Office app on Windows 11, use these steps:
Click the Sign-in button.
Click the Install apps button to download the installer.
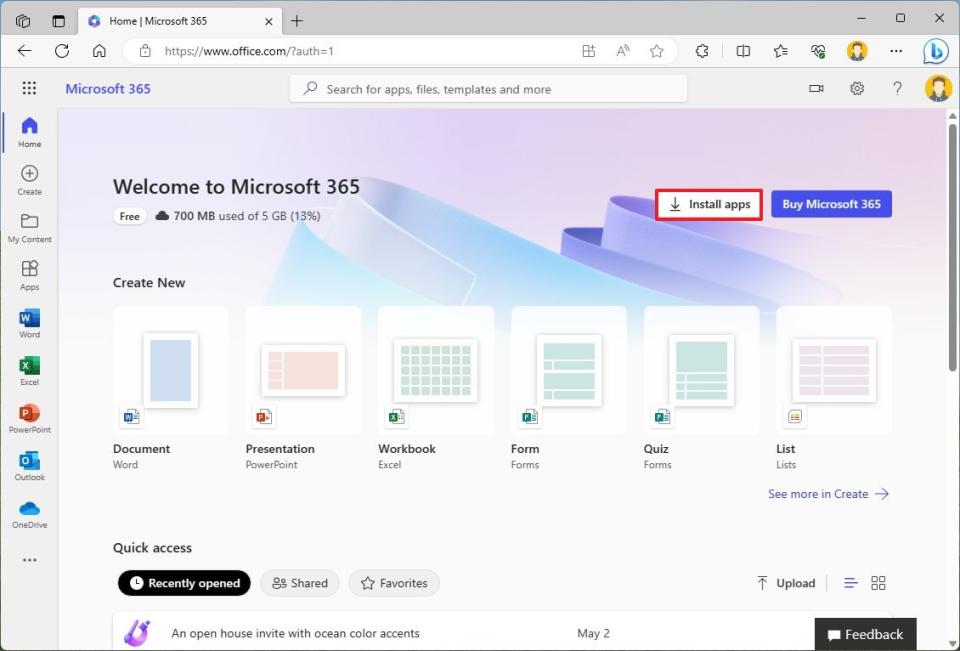
Quick tip: If you do not have a Microsoft 365 subscription, click the Buy Office button to select the best plan. If you choose the Microsoft 365 Family plan, you can share the account with up to six people.
Click the Office apps option.
Double-click the setup file to launch the Office app installer.
After you complete the steps, the setup will install the Office apps, including Word, Excel, PowerPoint, Outlook, Teams, and others.
After you complete the steps, the installer will set up the Office apps, including Word, Excel, PowerPoint, Outlook, Teams, and others.
How to switch to Microsoft Edge on Windows 11
Although Mozilla Firefox and Google Chrome, among others, are great browsers, Microsoft Edge is still arguably the best experience for Windows 11 users. In part, this is because the browser has better power handling to help extend battery life and improve system performance. You even get support for Chrome extensions and pack many useful features.
To switch to Microsoft Edge from the most popular browsers, use these steps:
Open Microsoft Edge.
Click the Settings and more (three-dotted) button.
Select the Settings option.
Click on Profiles.
Click the "Import browser data" option.

Click the Import button for the browser you are switching from, such as Chrome or Firefox.
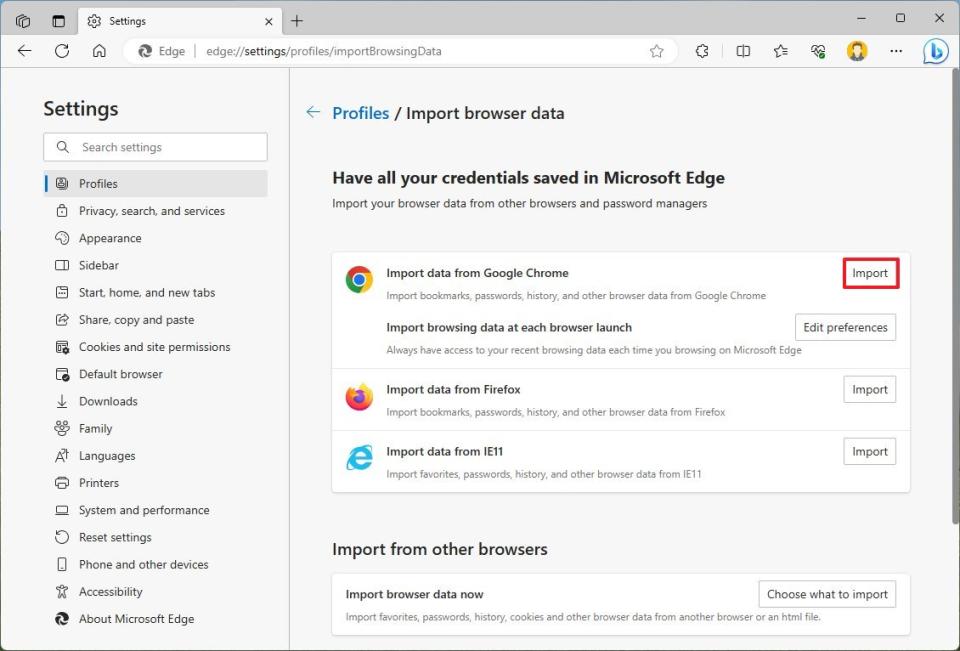
Check the data to import, such as favorites, passwords, personal information, and browser history.
Click the Import button.

(Optional) Click the profile menu from the top-right corner and sign in with your Microsoft account.
Quick note: When signing in with a Microsoft account, the imported settings, along with existing configurations, including account details and passwords, will upload to the cloud into your account.
Once you complete the steps, you can start taking advantage of the Microsoft Edge features.
How to reset laptop running Windows 11
Windows 11 includes the "Reset This PC" feature that lets you quickly wipe out the drive and reinstall the operating system while preserving your files and settings. This is a great way to start fresh if your laptop is running slow, has battery problems, or is otherwise experiencing issues.
To reinstall Windows 1 while preserving files and most settings, use these steps:
Open Settings.
Click on System.
Click the Recovery page on the right side.

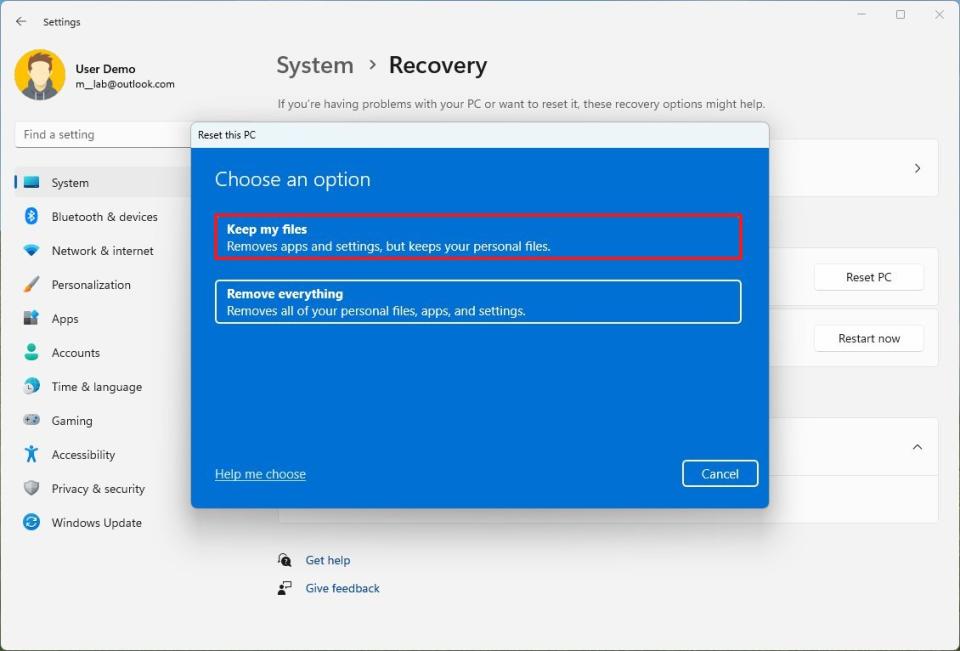
Under the "Recovery options" section, click the Reset PC button in the "Reset this PC" setting.
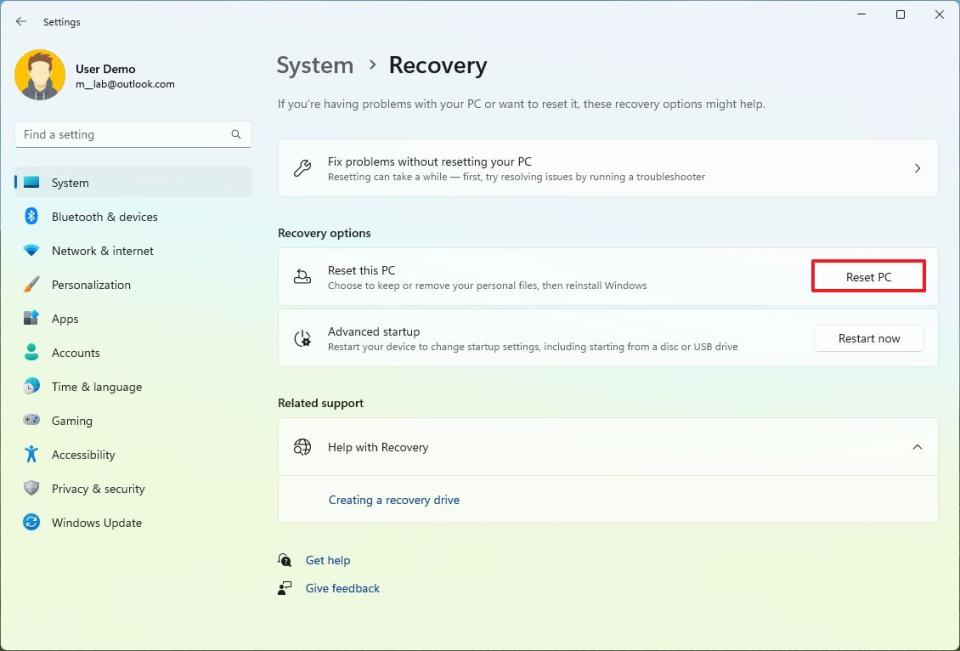
Click the "Keep my files" option.
Select the "Local reinstall" option to reset the computer without losing your files.
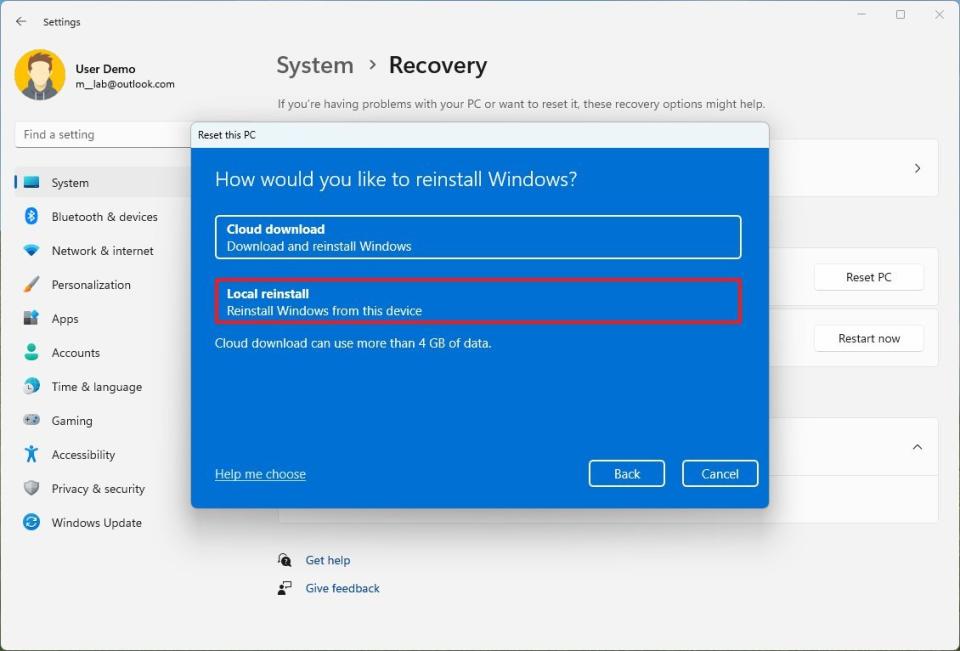
Quick tip: You could use the "Cloud download option" to download and install a fresh copy of the operating system, but using this option, you may lose custom manufacturer configurations and apps.
Click the Next button.
Click the Reset button.
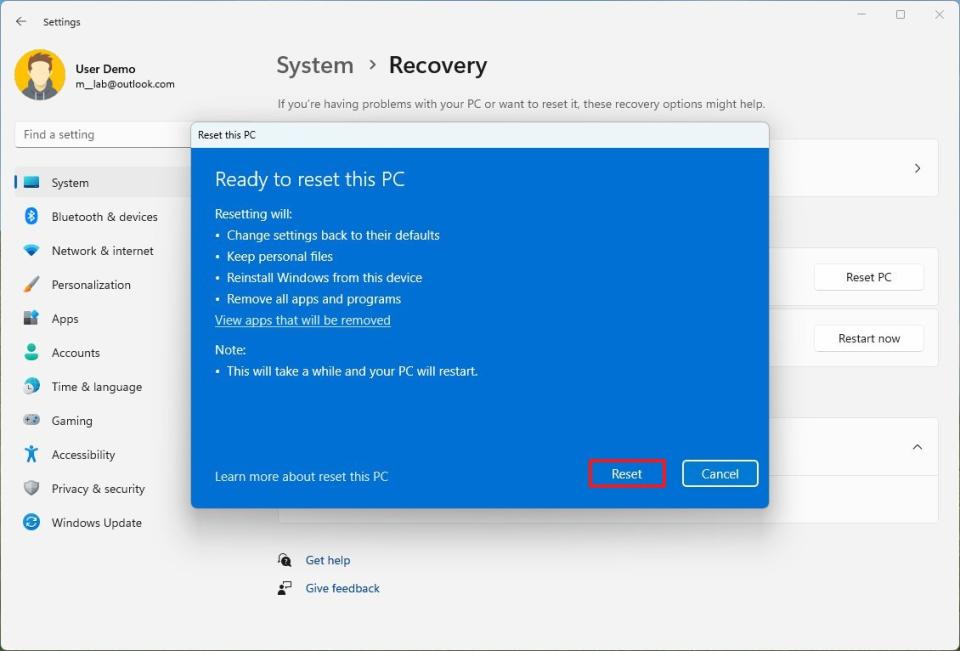
Once you complete the steps, Windows 11 will reset to the factory settings, fixing existing problems and improving performance to get your laptop ready for the new school year.
More resources
For more helpful articles, coverage, and answers to common questions about Windows 10 and Windows 11, visit the following resources:

