How to Get Started Grilling
Tools, equipment, and tips for better barbecuing at home.
With grilling season just around the corner, now's a good time to bone up on your basics so that you'll be ready to fire up that kettle on the first lazy day of summer (or, if you're anything like me, even earlier). Here's our rundown of the fundamentals.
Serious Eats / J. Kenji López-Alt
A List of Grilling Equipment
Serious Eats / Vicky Wasik
There are six key pieces of equipment you'll need for optimal grilling.
A grill. You have two basic options: charcoal or gas. Charcoal produces better flavor and has a much higher maximum heat, while gas is more convenient. Of course, if you have a chimney starter to get your coals going (more on that in a bit), charcoal is a snap to use. The other criteria for a good grill are a large grilling surface, good ventilation design, and, in the case of gas, even heating. Everything else is bells and whistles. We recommend the Weber 22-Inch Original Kettle Grill or the Broil King Signet 320 Propane Gas Grill.
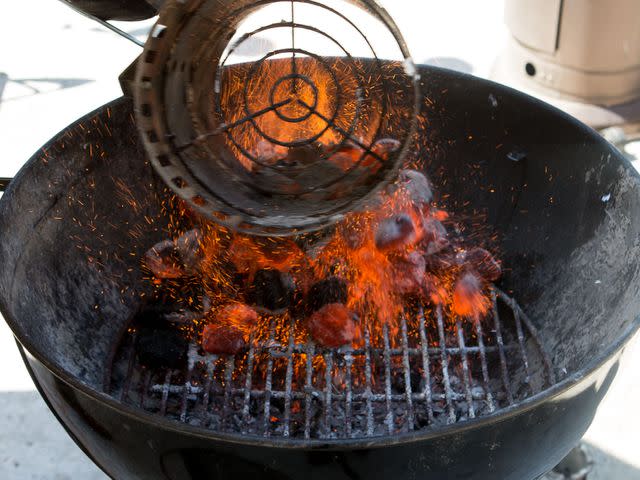
A chimney starter. Forget lighter fluid or—even worse—Match Light coals. Get yourself a chimney starter, and you'll wonder how you ever lit up your coals without one. We recommend the Weber Rapidfire Chimney Starter.
Long-handled tongs. You need tongs with a long enough reach to keep you from burning your hands when you've got a few steaks engulfed in a raging inferno. The 12- or 16-inch locking tongs from OXO are our favorites for their durability, spring-loaded action, and convenient locking feature.
A stiff-bristled grill brush. To maximize the life of your grill, and to ensure that burnt crud from your previous endeavors doesn't taint your food, it's essential to clean your grill before every grilling session. This means a firm-bristled grill brush/scraper. The Bamboo Grill Brush from Weber is sturdy and inexpensive.
Two spatulas. Why two? One flexible slotted fish spatula for delicate work, and one large, long-handled, sturdy turner for more heavy-duty stuff. I like the OXO Good Grips Fish Turner and the Weber Style Professional-Grade Fish Turner.
An instant-read thermometer. Nothing, I repeat nothing, will improve your cooking more dramatically than a good instant-read thermometer. Say good-bye to dry chicken or overcooked steak forever. The best is the Thermapen from ThermoWorks. It's pricey, but worth every pretty penny in the overcooked meat it'll save you from.
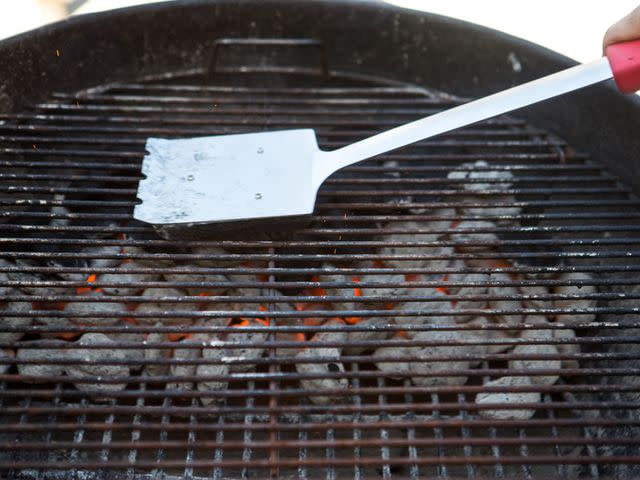
How and When to Clean Your Grill
Serious Eats / Vicky Wasik
A clean grill grate will cook better and last longer, and it won't transfer off flavors to your food.
The key to easy cleaning is to clean your grill at the start of each grilling session, not at the end. Light your coals (or turn on your burners), spread them out, put the grill in place, close the lid, and let your grill heat up for about 10 minutes. This should heat the grates enough that any crusted-on food can be easily removed with a grill brush.
Serious Eats / Vicky Wasik
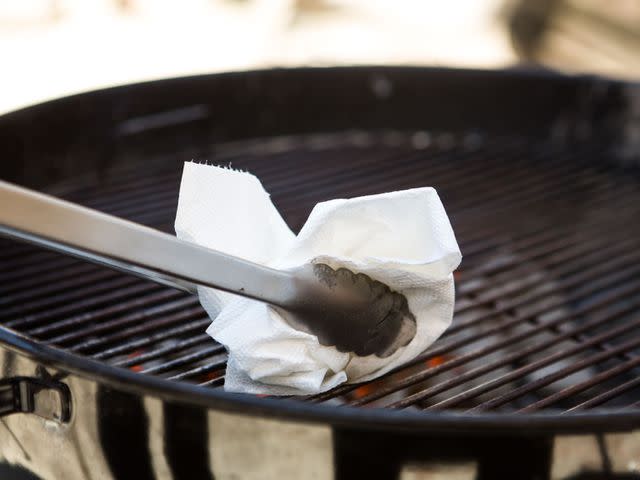
After cleaning the grates, oil them down with a paper towel dipped in oil and held in tongs, and you're ready to cook. At the end of your grill session, give the grates a good once-over with the grill brush, but don't worry about getting them spotlessly clean—a thin layer of grease will actually help protect the grates from the elements, preventing rust from forming.
Finally, make sure to empty your ashes, and keep that grill covered when not in use. Rain is the enemy here!
For more details, check out our article on keeping a clean grill.
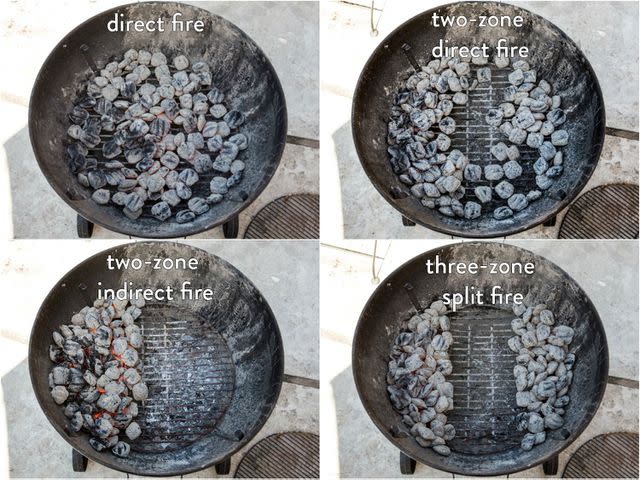
How to Arrange Coals
Serious Eats / Vicky Wasik
The beauty of a coal grill is its versatility. Depending on how the coals are arranged, you can create anything from the raging heat needed to sear a thick ribeye to the cool, indirect heat necessary for smoking a rack of ribs until they're perfectly tender. Here are the types of fires you should know:
Direct fire. All the coals are spread evenly over the coal grate. This is great for searing large quantities of food, like burgers or steaks, for a crowd.
Two-zone direct fire. The coals are arranged in two distinct zones. Most of them sit on one half of the grate, while the other half gets only a thin cover. Use this setup when cooking things like thick steaks, chicken breasts, or pork chops, for which a good sear is necessary at the beginning, followed by a longer period at a gentler heat.
Two-zone indirect fire. All the coals are banked along one side, while the other side is left completely empty. This is what you'll use when cooking larger roasts, whole birds, and the like. Place your food over the indirect zone, cover the grill, and you're good to go. Just make sure to rotate your food so that it cooks evenly.
Three-zone split fire. Similar to a two-zone fire, but instead of the coals piled on one side, the coals are banked against opposite walls, leaving the middle free and clear. This is the fire to use for smaller roasts, like a pork loin, a small chicken, or Cornish hens. With this setup, you can also add an aluminum pan to the center of the grate to catch drippings.
For more details, check out our guide to arranging coals.
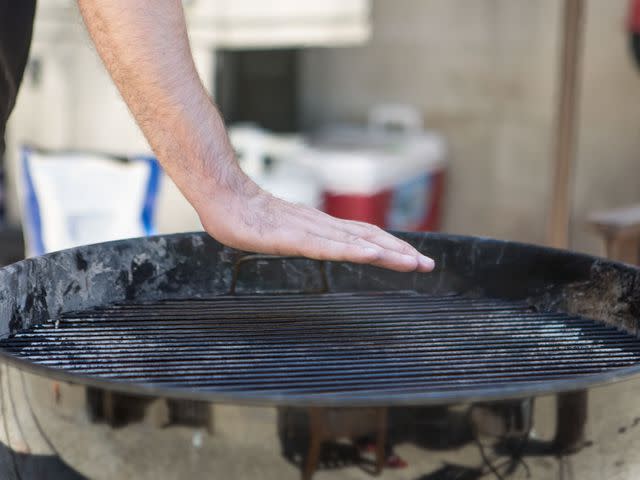
How to Gauge Heat
Serious Eats / Vicky Wasik
Depending on what you're going to cook, you want your coals to be at different heat levels. The most accurate way to gauge heat is with a grill thermometer, but with a bit of practice, you can learn to gauge it with your hand alone. How? Hold your hand a few inches above the grill grate until it feels so hot that it's going to burn off. Depending on how long you held it there, your grill is...
High (one to three seconds; 450 to 650°F/230 to 340°C). In this range, foods will sear in a matter of seconds, making it ideal for getting a crust on a steak, a pork chop, or thin vegetables like asparagus.
Medium-high (four to five seconds; 375 to 450°F/190 to 230°C). As with high heat, you'll develop crust here, but it'll take a little longer to do, allowing your food to cook through a bit while it's crusting over. I like cooking burgers, thicker sliced veggies, or fish at these temperatures.
Medium (six to seven seconds; 325 to 375°F/160 to 190°C). This is what to aim for on the direct side of the grill when using a two-zone indirect setup for indirect grilling. Roasts like chicken, turkey, or prime rib will cook gently through, while still getting hot enough to develop some color and crisp skin on the exterior.
Medium-low (eight to 10 seconds; 250 to 325°F/120 to 160°C). Your coals are getting really low now, and it's time to think about topping them up with some fresh ones.
Low (11 seconds or longer; 225 to 250°F/105 to 120°C). At this stage, you're really slow-cooking (a.k.a. barbecuing). This is where you want to be for things like brisket or ribs.
For more details, check out our guide to gauging the heat of your grill.
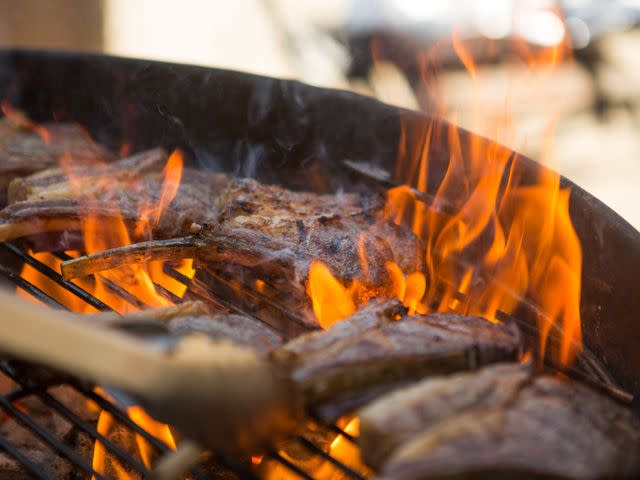
How to Control Flare-Ups
Serious Eats / Vicky Wasik
Flare-ups occur when fat drips out of the food you are cooking, lands on hot coals, and is ignited. It may look cool to see your steaks or burgers engulfed in flames, but this is not desirable. Flare-ups cause acrid, burnt flavors and can deposit soot on the surface of your food. Neither of these is a good thing.
There are a couple of methods to deal with the problem. First off is to use a two-zone fire. Keep a careful eye, and at the first sign of a flare-up, transfer your food over to the cooler side of the grill until the flames settle down. The alternative, if you are using a direct fire, is to cover the grill. Fire needs three things to burn: heat, fuel, and oxygen. Cut off the oxygen supply, and you cut off the flames. Just be careful, because those flare-ups can come right back once you remove the lid.
The one thing not to do is spray your ashes with a squirt bottle. We can't even count the number of times we've seen it recommended in books or on TV shows, but the fact is, it doesn't work. Not only does it extinguish flames, it also causes you to lose heat. Plus, it'll make ashes jump up from your coals, and getting ashes on your food is even less desirable than sooty flare-ups. Just don't do it!
For more details, check out our guide to controlling flare-ups.
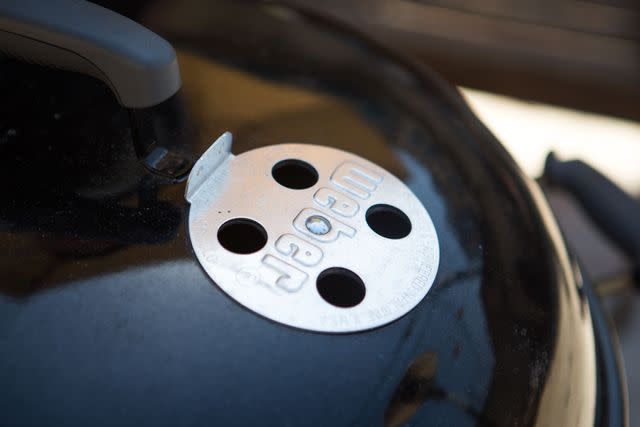
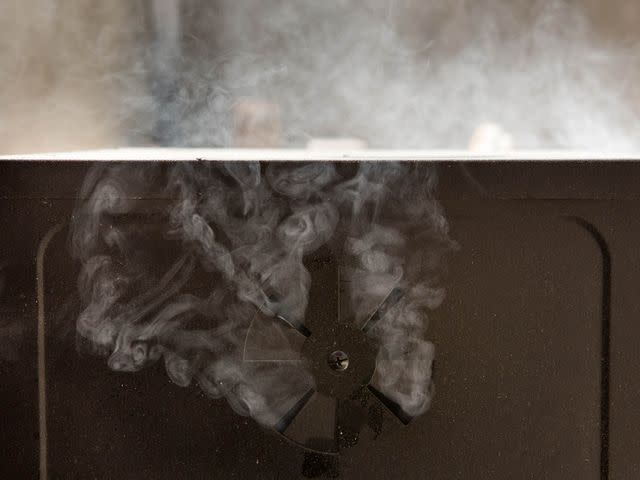
How to Use Grill Vents
Serious Eats / Vicky Wasik
Most grills have vents on both the top and the bottom. When they're opened, the hot air inside the grill will escape through the top vents, creating a negative pressure zone inside the grill that draws cooler air in through the bottom vent. The fresh oxygen that gets drawn in helps keep the fire hot. It may seem counterintuitive, but a grill with open vents actually burns hotter than a grill with the vents closed.
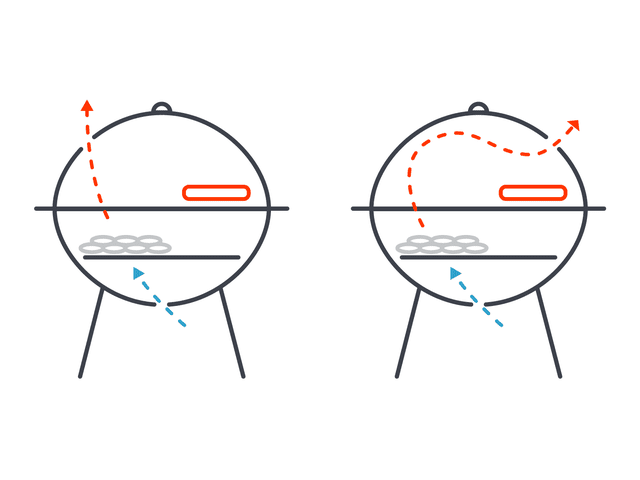
Serious Eats / Vivian Kong
The positioning of the vents also makes a difference, since they affect the convection currents inside. You need to take this into account when using a two-zone fire; whichever side the top vent is opened on will cook faster than the other side.
So, if I've pulled a steak off the hot side of the grill to cook through gently on the cooler side of the grill, I'll position the vent so that it's above the steak, allowing it to finish cooking a little bit faster. If, on the other hand, I'm slow-cooking some ribs, I'll position half-opened vents over the opposite side of the grill. Half-opened in order to keep things relatively cool, and on the opposite side of the ribs to make sure that there are no convection currents overcooking them.
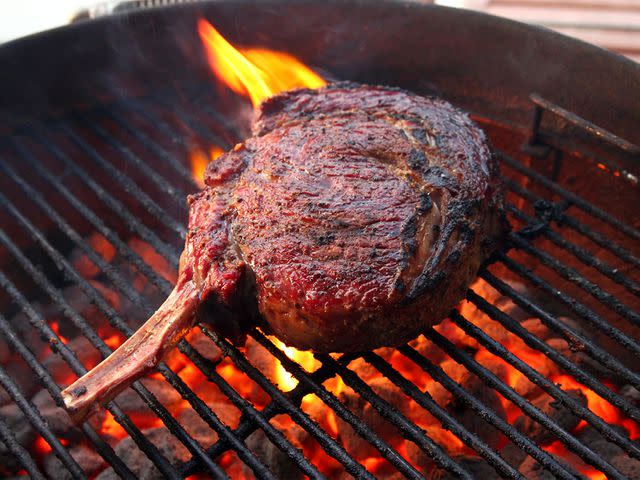
Let Your Meat Rest
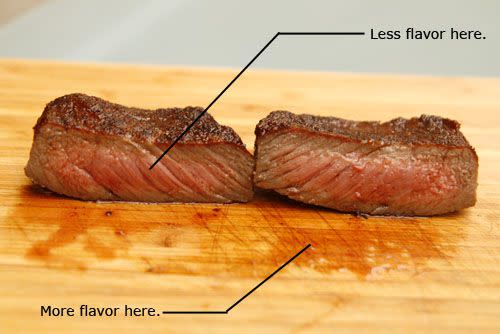
Serious Eats / J. Kenji López-Alt
As tempting as it is to rip into that hot, juicy steak as soon as it comes off the grill, don't do it! As the steak cooks, the muscle fibers on its exterior tighten, squeezing juices out of its surface. This creates an imbalance of juice in the interior, with most of the liquid concentrated at the center of the meat. If you cut the steak open as soon as it comes off the grill, the juice has only one place to go—onto your plate.
On the other hand, allow the steak to rest until its temperature has normalized, and the juices will distribute themselves more evenly throughout its interior. Cut the steak open, and the juice stays put exactly where it's supposed to be: in the meat.
A good rule: For all fast-cooking foods (that is, things like steaks, pork chops, chicken breasts, or roasts), let the meat rest for about one-third of the time it took to cook. For a steak, that can mean a few minutes. For a whole prime rib roast, that can mean up to half an hour, or even longer. Slow-cooked barbecue meats do not need to rest as long, since they've been cooked long enough that muscle fibers have broken down and are no longer actively squeezing juices.
For more details, check out The Food Lab: The Importance of Resting Meat and How to Grill a Gigantic Ribeye Steak.
How to Use Grilling Planks
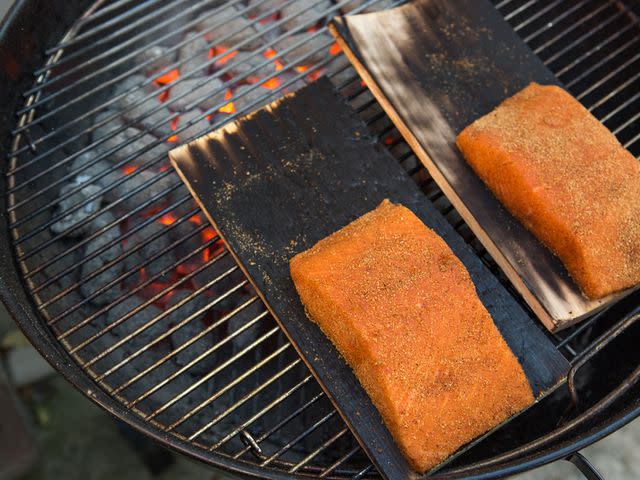
Serious Eats / Vicky Wasik
Planking involves cooking food directly on a piece of hardwood. The goal is to transfer some of the flavor of the wood to the food. The key to planking is choosing the right wood to match your food, and to properly prepare the plank so that it doesn't burn. For delicate foods like fish, go for lighter-flavored woods, like cedar or ash. Maple, apple, and pecan are good choices for more robust meats, like chicken or pork, while oak, hickory, or mesquite can stand up to the stronger flavors of beef, lamb, or game.
To prepare a plank, soak it in cold water for at least an hour in order to allow the water to absorb into the pores. The most common cooking method is to work only on the indirect side of a two-zone indirect fire. This will give you slow, even, gentle heat the whole time, allowing you plenty of time on the grill, which leads to more time for flavors to mingle and marry. This method also allows you to reuse your planks.
The second method is to char the plank over the hot side of the grill first, then transfer it to the cooler side and place your food on it. This will impart a deeper smokiness to your meat.
For more details, check out our guide to planking.
Resources for Smoking Food
Serious Eats / Vicky Wasik
Unfortunately, this is a topic too broad and deep for us to tackle in this post. But guess what? We've got you covered. Check out these three handy guides for everything you need to know about smoking on a kettle grill:
April 2012
Read the original article on Serious Eats.

