How to Use a Speed Square: DIY Guide
Simple Steps for Beginners in Projects at Home
The Spruce / Margot Cavin
Reviewed by Deane BiermeierFact checked by Jillian Dara
A Speed Square, also a rafter or triangle square, covers many uses. Understand how to use a Speed Square and how it can be used in various home improvement DIY projects. Here are a few of those options:
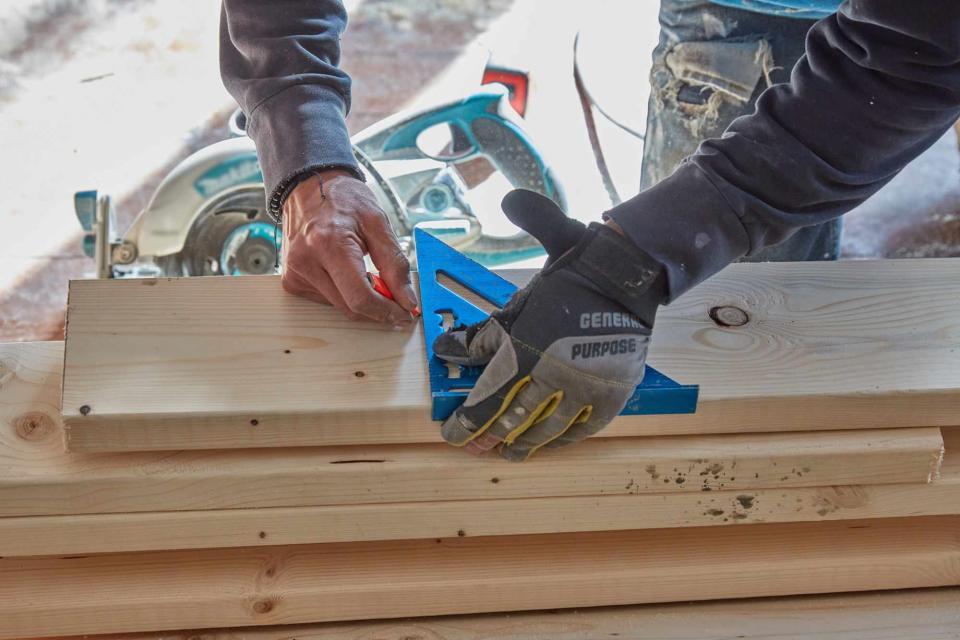
Use it as a saw guide: Lip the Speed Square fence over the side of the board and cut against the square with a circular or power saw.
Marking 90- and 45-degree angles: You can use it as a protractor or miter square; it's also handy for determining a roof's pitch. The common scale on the Speed Square is used to read pitch (rise over run). It does not matter if you are reading inches, feet, or centimeters. As long as your run is a multiple of 12, your rise will be in the common scale.
Square a power saw blade: Unplug the saw and rest the square against the side of the blade to adjust the blade to 90 degrees.
Find the width of a 2 x 4: The diamond-shaped hole is 3 1/2 inches from the end—the true width of 2x4s.
Measure between 0 and 6 inches: Hook the lip of the square over the board. The numbers above the "Swanson Speed Square" insignia will produce the measurement.
Using this guide, decipher the Speed Square's markings and learn the steps for beginners to use a Speed Square at home.
What Is a Speed Square
About a century old, Speed Square is a renowned measuring tool patented and trademarked by the Swanson Company, which still manufactures the tool from its Frankfort, Illinois, headquarters. The Speed Square is a multi-purpose tool for carpenters and can be used to measure lumber and saw cuts, among many other things.
The accompanying 60-page "Swanson's Little Blue Book" is legendary in fine carpentry and roofing trades for helping to translate the Speed Square measurements to real-world applications.
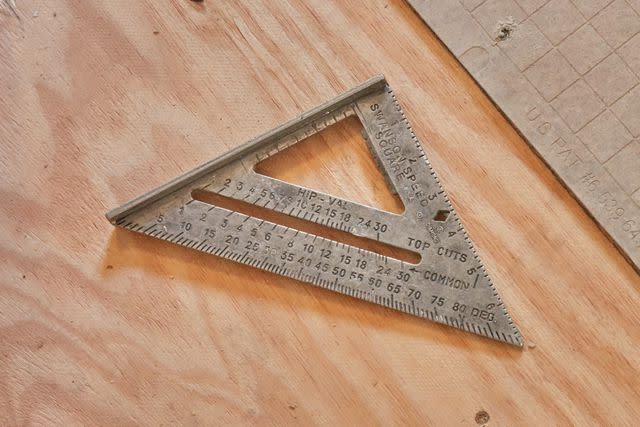
Parts of a Speed Square
They are shaped like triangles, but are called Speed Squares. Here are the parts to know:
Lip, tongue, T-edge, or fence: This part has several names, securing the Speed Square firmly against the measured or marked material. It is located in the bottom-right corner of the triangle and is used for measuring short lengths.
Pivot: On the point of the speed square, a small notch marked "pivot" allows you to mark a desired angle.
Hypotenuse: The triangle's longest side runs along the top right-hand corner.
Markings and Features
Understanding the markings and features can help you use the Speed Square.
T-shaped end: Hang this t-shaped end over the side of a board. Or use it to let the Speed Square stand up by itself.
Numbers 1-6 on the side are inch marks and inch numbers. Note that a Speed Square measures up to 7 inches, not 6 inches. The 7th inch is the very end of the tool and is unmarked.
Diamond-shaped hole: This hole is 3 1/2 inches from the end. It is a helpful, quick measurement since the width of 2x4s is 3 1/2 inches, not 4 inches.
Numbers 5-80 on the long side are angle degree numbers, not inch marks and numbers. Degrees between 0 and 5 are not marked with numbers or degrees above 80 degrees.
Scribe lines: Scribe line notches correspond with ruler edge marking. Using the notches, you secure your pencil and slide the speed square along the length of the lumber, giving you perfect scribe lines.
The Spruce / Margot Cavin
How to Use a Speed Square
How can a single piece of heavy-gauge aluminum with no moving parts attract so many fervent fans? A Speed Square's true secret lies in the dense congregation of information and features packed on its face: a lipped fence, deeply incised numbers, holes, notches, and cut-outs.
These features make this a highly functional yet low-cost scribing, marking, and cutting tool. A Speed Square covers a surprising array of uses. Understanding the basics of what it can do is the first step to using it for various home improvement projects. Here are a few of those options:
Use the Speed Square as a Protractor
Let's say you want to cut two pieces of flat trim or any material each at 45-degree angles. You want to form a 90-degree angle with those pieces. You may need to form angles like this when installing door or window trim, which can be done with a Speed Square.
You can consistently haul out your electric miter saw or hunt for the manual miter box, but with the Speed Square, you can lay the square against the trim and create quick 45-degree pencil marks with the square. Do not cut directly against the square. Instead, remove the square and cut by following the line.
Use a Speed Square to Find a Level
Use the Speed Square as an improvised level for hanging cabinets, installing countertops, doors, windows, or anything in your home that must be dead-level.
If you don't have or can't find your bubble or laser level, you can use the Speed Square for this, but you will need to have a string, twine, or chalk line on hand. Remarkably, a Speed Square can be preferable to a bubble level because you can measure the exact deviation down to the degree.
On the Speed Square, locate the groove marked as 'Pivot." Place the Speed Square on the material with the pivot end up. Drape a string (such as a chalk snap line) over the Speed Square, resting it in the pivot groove. Weight the hanging end of the string with a lightweight such as a bolt. The string will hit the 45-degree mark if the work material is level.
Use a Speed Square to Cut 2x4s Square
Cutting 2x4s is one of the most common activities in home improvement, which you will use for finishing basements, building walls, and similar projects.
The ability to squarely cut 2x4s is a classic Speed Square maneuver and is well worth the tool's price just for this. Rest the square's lipped fence over the 2x4. Hold the square firmly. Cut against the square with a power saw, ensuring that the saw's fence slides along the square's fence. Do not let the saw blade run against the square.
Use a Speed Square to Scribe Lines for Ripping Wood
Cutting laminate or engineered wood floorboards is made easier with a Speed Square. The Speed Square allows you to run long pencil marks parallel to the edge of the board. These marks can be between 3/8 inches to 3 1/2 inches from the board's edge.
Lay the Speed Square on the board, with the lipped fence over the edge. Place your pencil in the Speed Square's so-called Diamond cutout (3 1/2 inches) or one of the ten notches in the triangular cutout (3/8-inch to 3 inches). Use a regular pencil, not a carpenter's pencil. Slide the square down the length of the board, drawing the line as you go.
Use a Speed Square to Square Out Cabinets
You can use a Speed Square to square up a kitchen cabinet against another cabinet or the wall. Bathroom cabinets, too, may be squared.
Because the Speed Square is so versatile, you may forget it is still a square. A Speed Square is best at squaring up smaller, shorter things rather than walls because it is only 7 inches long (though Swanson also does offer a 12-inch version). You need at least a carpenter's square for squaring up walls and rooms. It is a laser level that casts an "X" mark.
Place the Speed Square against the two elements (the wall and the cabinet). If there is a gap, the two aspects are not square.
Use a Speed Square to Square and Guide a Saw Blade
The Speed Square isn't just for squaring up work materials; it can also be used for checking square on tools. Sometimes, you have adjusted your circular power saw so that its blade runs at an angle other than the usual 90 degrees. Changing the saw back to 90 degrees by consulting the saw's markings isn't always accurate, especially for older tools.
With the tool unplugged, rest one side of the Speed Square against the side of the blade. The other side of the square should rest against the bottom of the saw. Readjust the saw so that it is square against both sides of the Speed Square, converting the Speed Square into a saw guide.
Use a Speed Square to Find Roof Pitch
Place the pivot point against the shingles and place a torpedo level on the fat base of the speed square.
Adjust the square until the level is level.
Read the pitch on the side of the speed square, which tells you the vertical rise for every 12 inches of run.
Read the original article on The Spruce.

