This Simple Pushup Tweak Makes Your Shoulders Burn Like Crazy
If you were lucky (or, erm, unlucky) enough to be tagged in that Instagram #pushupchallenge earlier this year, you know: Pushups are no joke.
Whether you challenged friends to bust out 10 pushups left and right or conveniently ignored the notifications, though, there’s no doubt why the trend took hold. Simply put: Pushups are a pretty powerful exercise, says Norma Lowe, CPT, trainer and certified sports nutritionist.
In fact, “the pushup has long been included in fitness assessments as a strong indicator of upper body strength,” she explains. Two other big plusses of the foundational move? No equipment or gym required!
Another perk of pushups? They're easy to modify or switch up to match your fitness level. “There is a pushup variation for everyone, from beginner to advanced,” Lowe says.
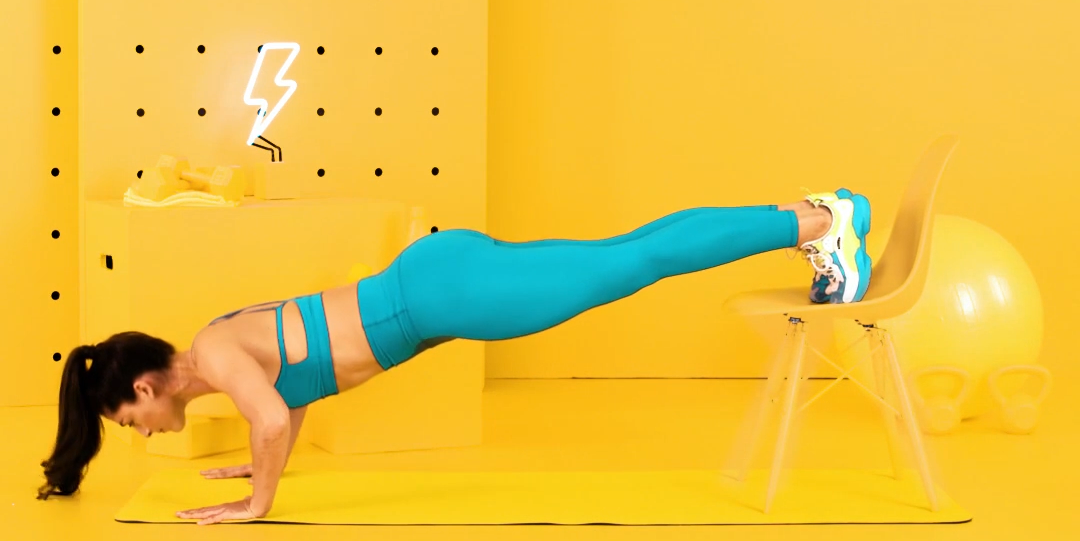
One of her favorites: the decline pushup. Like a traditional pushup, the decline pushup challenges your chest, core, arms, and shoulders. However, instead of churning out reps with your feet planted on the floor, you elevate them on a higher surface. (You’ll need some type of bench, box, or chair to prop them up on.)
This simple tweak makes a big difference in difficulty, which is why Lowe typically recommends decline pushups for more advanced exercisers who can nail traditional pushups.
Ready to give 'em a try? Here’s everything you need to know about decline pushups—plus, how to do them right.
Regular Pushups vs. Decline Pushups: What’s The Difference?
During both traditional and decline pushups, your pectoral (i.e. chest muscles, triceps, back, front deltoids (upper arms and shoulders), upper back (trapezius, serratus), and core muscles are all working, according to Lowe. However, thanks to the more-intense angle of a decline pushup, your upper pectoral muscles and front deltoids bear more of your weight and work extra hard.
Another key difference? That change in angle and weight distribution also means your wrists face an extra challenge, says Lowe. So doing decline pushups can help make them stronger, which in turn can improve your grip strength.
The Benefits Of Decline Pushups
The sweet result of decline pushups' extra intensity: They're poised to make you look strong AF in shoulder-baring tops—and probably make it a heck of a lot easier to lift heavy objects. “There are myriad benefits associated with doing a decline pushup, but the primary one is that it increases upper-body strength, especially in the upper pectorals [chest] and front deltoids [shoulders],” Lowe explains.
The increased emphasis on your upper-body also means your rotator cuff muscles (which keep your shoulder blades stable against your back) and core work overtime—and reap the strength and stability benefits—too, she adds.
How To Perform A Perfect Decline Pushup
So how do you know if you’re ready to start busting out decline pushups? When you're confident in your plank and traditional pushup skills, says Lowe.
The first step: Perfect your plank. “The main requirement for doing a pushup is to be able to maintain the straight-arm plank,” Lowe says. “I always say that the pushup is a moving plank.” If you can hold a solid plank—think long, straight body and fired-up core, glutes, and legs—for at least 30 to 60 seconds, you're ready to start pushing. (Use this quick tutorial to make sure you're solid.)
Post-plank, you’ll need to conquer traditional pushups. “If you can perform 20 standard pushups, the decline variation is a great way to challenge yourself and keep things interesting,” Lowe explains.
Improve those pushup skills with this workout:
Ready to rock and roll? Here’s how to execute the perfect decline pushup.
What you’ll need:
A stable, flat surface at least 12 inches high to rest your feet on
A yoga mat (optional)
Determination (not optional)
How to:
Start in front of the elevated surface on all fours. With fingers facing forward and splayed slightly, press palms into the floor. Hands should be shoulder-width apart or slightly wider.
Carefully extend one leg back to prop one foot at a time onto an elevated surface with legs fully extended. Straighten elbows and engage core, so body forms a long line from top of head to heels. This is your starting position.
Next, inhale deeply and bend elbows to lower chest towards floor with control until arms form 90-degree angles. Keep neck neutral and eyes gazing just past fingertips.
From here, exhale and push through hands to extend arms and return to starting position. That's one rep.
Avoid These Common Decline Pushup Mistakes
As stellar of an upper-body builder it may be, Lowe warns that the decline pushup isn't for everyone—and that you can set yourself up for injury quickly if you’re not careful.
“Proper form cannot be stressed enough with all exercises, but it’s especially important with decline pushups because your shoulders are in a vulnerable position,” she explains.
A few common decline pushup form mishaps that can lead to injuries:
Allowing the hips to rise or dip, which means your core isn't engaged enough
Drooping the head, which means your neck isn't in-line with your body
failing to inhale on the descent and exhale on the ascent, which can take your focus off core engagement
positioning hands too far apart, which can place unnecessary stress on the wrists and elbows
Decline Pushup Modifications And Variations To Try
While decline pushups are a fairly advanced move, one simple adjustment can either make them much easier or more difficult, says Lowe.
“If you’re unable to perform a decline pushup properly, you can modify it by decreasing the height of the decline,” she says. “You can also place your shins on the elevated surface instead of your toes.”
And if you want an extra challenge, increasing the height of your surface can be a solid solution, she adds. Just know that the closer you get to being upside-down, the less burn you’ll feel in your chest, and the more you’ll feel in your shoulders.
Here are four other ways Lowe likes to up the ante with decline pushups:
One-leg decline pushups: On top of adding an extra balance challenge to the move, lifting one leg to perform this variation requires more core activation.
Stability ball decline pushups: Swap your sturdy elevated surface for a stability ball—and feel your core fire up tenfold.
Decline pushup complex: “Try widening your hands slightly, staggering them, turning your fingertips outwards, or turning them inwards for an extra challenge,” recommends Lowe.
While you can do decline pushups at any point in your workouts, Lowe likes to add them to her chest workouts as finishers.
The bottom line: Generally more advanced than traditional pushups, decline pushups increase the load on your upper chest and shoulders, so performing them with proper form is key for avoiding injury.
You Might Also Like

