What Is a Shattered Glass Manicure—and How to Get the Look
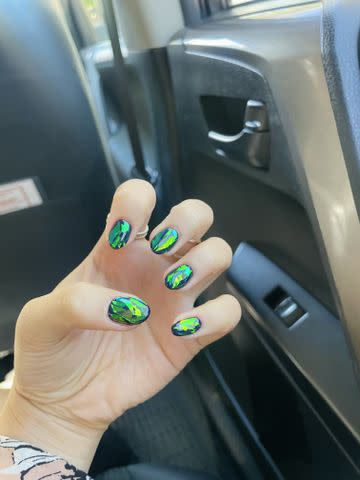
The shards are actually shredded foil.
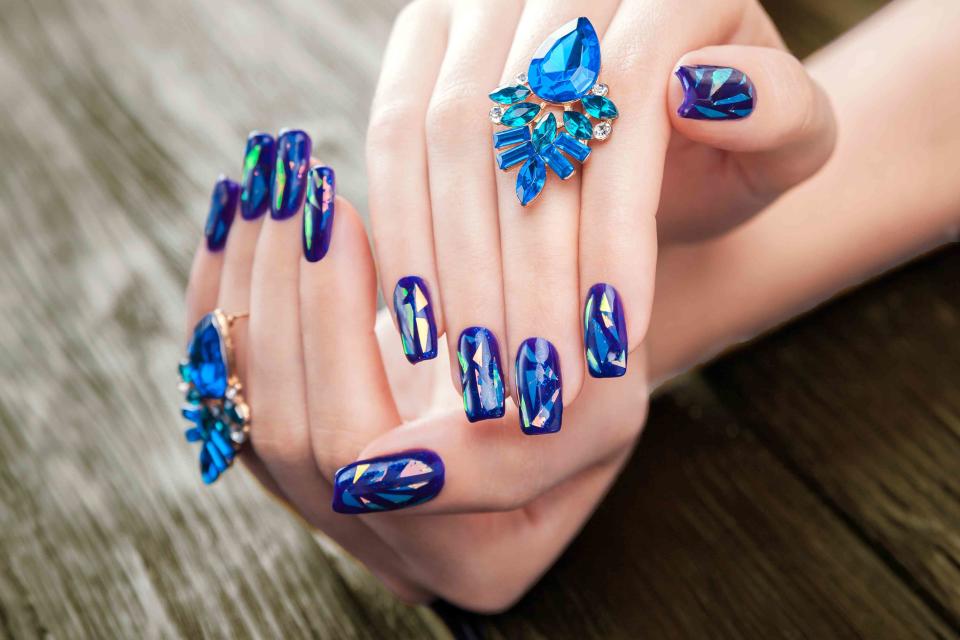
Maryviolet/Getty Images
While there’s a minimalist nail movement happening right now—hello bubble bath nails and lip glass nails—a countertrend featuring bold, playful, and 3D looks is occurring right alongside it. With their sparkly and jagged appearance that guarantees a double take, shattered glass manicures capture all the above. Real Simple spoke to celebrity manicurist Julie Kandelac about this attention-grabbing mani, and she also shared two different ways you can recreate the look—including one you can easily DIY at home.
RELATED: 10 Nail Trends That Nail Experts Say Will Be Huge In 2024
What Is a Shattered Glass Manicure?
True to its name, the shattered glass manicure mimics the appearance of a broken window or mirror. It’s at once bold and eye-catching while still feeling chic and sophisticated.
“This technique involves using holographic or iridescent pieces, such as cellophane, mylar or special nail art foils, to create a shattered glass effect,” Kandelac says. “The name ‘shattered glass’ comes from the similarity of the nail art to broken glass, with the holographic pieces creating the illusion of the shattered fragments.”
She adds that the trend originated in South Korea, like many fun nail trends do, and has circled back into favor several times over the years. This mani also goes by the name “Aurora Nails” given its other-worldly appearance.
How to Do Shattered Glass Nails
There are a few different methods to do shattered glass nails ranging from simple press-ons (like these from Etsy) to nail stickers to using actual polish. We’re giving you the rundown on two different nail polish tutorials.
Gel Nail Polish + Foil
This shattered glass mani is a bit more complex, Kandelac notes, but the results are gorgeous. If you’re a seasoned nail pro then you can pull it off, but you can also ask your nail tech to recreate the look.
Step 1: Apply a Base Coat
“Prep and manicure as usual and apply a base color of gel. You can use any creme color, but a dark one will be the most dramatic,” Kandelac says. “Personally, I think creme (meaning not metallic) shades work best because they'll allow the metallic of the mylar to stand out.”
She says that a deep shade like black base color will allow the undertone of each piece to be true-to-tone, but putting these over a shade like navy, baby pink or lilac is akin to playing with a color wheel! Mylar can have undertones of any color of the rainbow, so flex your creative muscles and mix and match to come up with a cool combo.
Step 2: Apply Foil
“After applying your base color, cut up tiny pieces of mylar transfer foil or some are already cut up for you.” Some good options include the Yokilly Store Holographic Nail Art Foil Transfer Stickers ($6.99, Amazon) and Changar 5 Colors Gradient Aurora Glass Paper Nail Stickers ($8.99, Amazon).
Use a tiny pair of tweezers and strategically place the pieces onto the tacky layer of the cured gel. You can apply a very thin coat of clear gel first if a little more is needed for them to stick.
Step 3: Cure
Cure your nails under an LED lamp and then apply a thick coat of clear builder gel to seal all the pieces. You may need to do a couple coats. Run your finger over the top after curing the first coat to make sure no pieces are sticking out.
Special Effect Nail Polish
For those who want a quick in-and-out nail job, try this simplified variation on the shattered glass manicure. All you need is three different types of polish and you’re good to go.
Start by prepping your nails and then applying a base color of lacquer. Kandelac says that any cream color will work, but that a darker hue will lend a more dramatic effect. For something more subtle, use a lighter shade.
“Allow polish to dry fully and apply a coat of quick dry topcoat to seal the color,” she instructs. “Next, apply a coat of ORLY's Kick Glass opalescent topper ($10.50, Ulta) and allow your nails to dry.”
You can apply a second coat if you’re feeling it. Otherwise, add your topcoat for a glossy finish and allow it to dry.
For more Real Simple news, make sure to sign up for our newsletter!
Read the original article on Real Simple.

