How to Set Up a Prep Station Like a Pro Cook
Work quicker and cleaner with these tried-and-true setups.
When I’m just throwing together a quick breakfast or dinner for myself, all my training goes right out the window. I’ll break down a chicken with a utility knife just because it’s the first thing I pick up, or peel carrots directly on the cutting board instead of into a trash receptacle. My current weird off-hours habit: stirring big pots of stew and mixing bowls full of thick chocolate pudding with the world’s smallest spatula. Why? I don’t know, I just really love my tiny spatula.
Serious Eats / Vicky Wasik
Most days, when I’m simply scrambling eggs or preparing a salad at home, I don’t give a ton of thought to my workspace. But that doesn’t mean there’s never a reason to be better organized.
In a restaurant, you always need an organized and efficient prep space, even if you’re just scrambling eggs, because you’re likely doing it at a much faster pace and higher volume—while also poaching, frying, and over-easy-ing. In a tiny space. With someone yelling at you.
In a professional setting, a good line cook always sets up "stations" specific to the task at hand, regardless of what’s on the menu. When cooking at home, you don’t need to set yourself up as rigorously as someone might in a restaurant kitchen, but there are still plenty of helpful tips to take from professional cooks. Stations make the most sense when preparing large quantities; if you’re just chopping one onion, it’ll take you longer to find and wash the multiple receptacles than to tackle the job. In those cases, don’t overthink it.
But if I find myself making French onion soup for the neighborhood, then a pro setup is worth it. These tricks are especially useful if you’re planning a dinner party for friends or spending the weekend pretending to be on Chopped (everyone does that, right?). If you understand the main goals for any station, then you can create one that works best for you in your kitchen.
The details of every restaurant station are different depending on the job and the cook. If I’m working the grill station, I always keep a brush and oiled rag close by to clean and grease the grates between orders; while I’m on garde-manger duty (that's the cold-dish station), I hoard all the mixing bowls for tossing salads. I’m short, so I rarely make much use of shelves and instead try to position myself next to tall people for strategic assistance. (Yes, people can be part of your station, too.)
These are the three main points to consider for any efficient workspace:
Keep it tight: The less you have to move, the faster you move, so keep all necessary tools close at hand.
Have a landing zone: Keep your cutting board clutter-free by moving prepped stuff out of the way and onto a tray or into a bowl.
Clean as you go: Working over a trash bowl and frequently wiping down with a wet towel makes it easy to move between different tasks and keeps cleanup quick.
Here are some examples of different prep stations, each designed to speed up workflow and cleanup. In all cases, they’re set up the way I would set them up in a restaurant. You don’t have to do it exactly the same way at home—in some cases, setting up one of these stations would take longer than just completing a very basic task—so use this less as a you-must-do-it-this-way rule and more as a starting point for thinking about how to work as efficiently as possible.
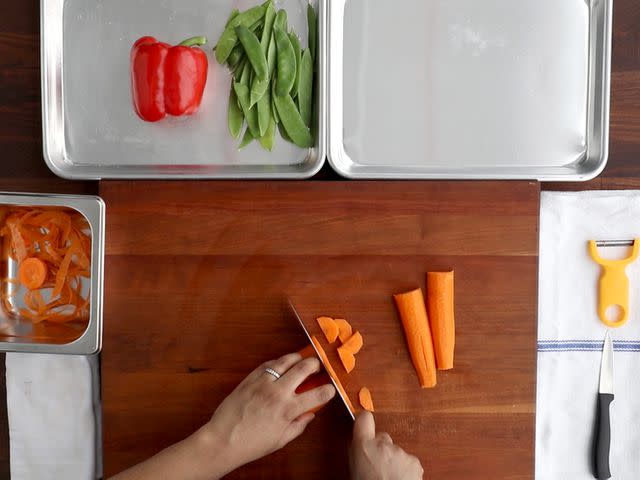
Vegetable Prep Station
With any general prep, it’s important to always start by securing the cutting board with a wet side towel. I like to also keep a folded wet towel nearby for wiping the board and knife down in between tasks. It helps to keep your knives on a dry towel, so that they don’t slide around while you work and the blade doesn’t rest directly against a hard surface.
A scrap container is always handy to peel directly over, so you can keep your board clean without having to make frequent trips to the garbage. (Stainless steel hotel pans are excellent for this purpose.) You could also work with a trash can nearby, but I’ve too often dropped a carrot mid-peel, and prefer to avoid casualties. Keeping your food scraps separate from the general trash also makes it easier to save them for compost or stock.
I also like to have everything I’m about to prep nearby, so I can stay by my cutting board the entire time, instead of popping in and out of the fridge. For a landing zone, I like to have an empty sheet tray close by, but if you’re not prepping a ton of stuff, you can just put your prepped mise en place back onto their original trays.
Pro Tip! A bench scraper, such as OXO's bench scraper, is great for moving stuff off the cutting board.
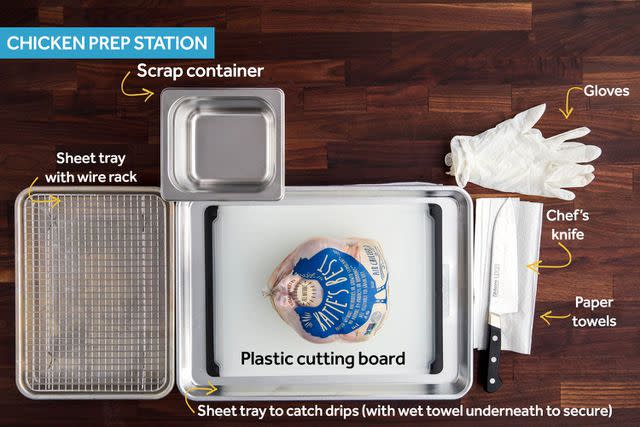
Chicken Prep Station
Serious Eats / Vicky Wasik
Breaking down chickens can be a messy job, especially if you’re doing a few at a time, so I like to set a plastic cutting board—we like OXO's Good Grips plastic boards, but see our review of plastic cutting boards for the complete set of recommendations—in a rimmed half-sheet pan to catch any drips before they run all over my countertop.
Here, I stick with paper towels instead of cloth, for everything from anchoring the boards to setting down the knife, so I can toss them when I’m all done. I always wear gloves when handling raw meat—not so I can avoid washing my hands, but for the better grip it allows me.
With raw chicken, it’s especially important to have a landing zone and scrap container ready before you touch the raw meat. The last thing you want is to reach for anything while handling raw chicken and risk cross-contamination.
Pro Tip! Kitchen shears or poultry shears are always useful to have nearby when prepping chicken, not only to remove the backbone for spatchcocking, but also to clip off wing tips or trim any extra fat around the cavity.
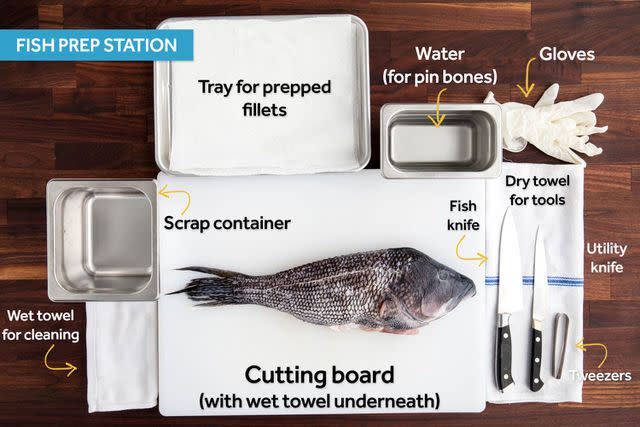
Fish Prep Station
Serious Eats / Vicky Wasik
Preparing fish is not as messy of a task as breaking down chicken, so I skip the protection of a sheet tray and instead simply secure a plastic cutting board with a wet cloth towel.
You’ll need different tools depending on how you're preparing your fish, but it’s useful to have a fillet knife or deba and a utility knife or paring knife, as well as a set of fish tweezers.
A small container with water is great for dipping tweezers into to quickly rinse pin bones off the tips. It’s also good to keep a scrap container nearby to collect the heads and bones for fish stock or fumet. Here again, gloves help me get a secure grip on the fish, while a parchment-lined rimmed baking sheet for the prepped fish keeps the board clean.
Pro Tip! It's helpful to remove fins and tails with kitchen shears or poultry shears before breaking down fish, for easier access to the flesh and to avoid accidentally piercing yourself on the fin bones.
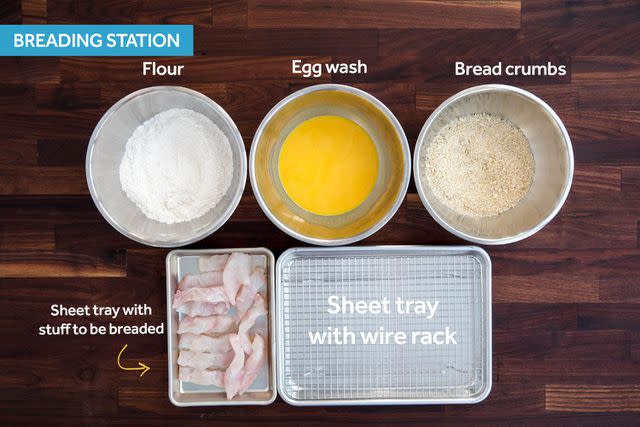
Breading Station
Serious Eats / Vicky Wasik
If you’re anything like me, you know what it feels like to start a recipe with a simple three-step breading procedure, only to lose focus and devolve into a primitive dough-fisted monster. Good breading technique tells you to always keep one hand dry, for flouring and crumb-ing, and another wet, for picking up the un-breaded items and dipping into the egg wash. This divide-and-conquer approach allows you to bread all day without fish-fingering yourself.
You can avoid, or at least minimize, burying your fingers in breading by starting with an organized setup. I line up individual mixing bowls of flour, egg wash, and bread crumbs in one row, so I can cleanly move from left to right. I also keep the stuff I’m about to bread close by, along with a sheet tray fitted with a wire cooling rack, or lined with parchment paper, for the finished breaded items.
Pro Tip! I find it helps me keep my wet hand and dry hand in their respective ingredients if I chant to myself. When you're in this business long enough, you develop weird habits like that.
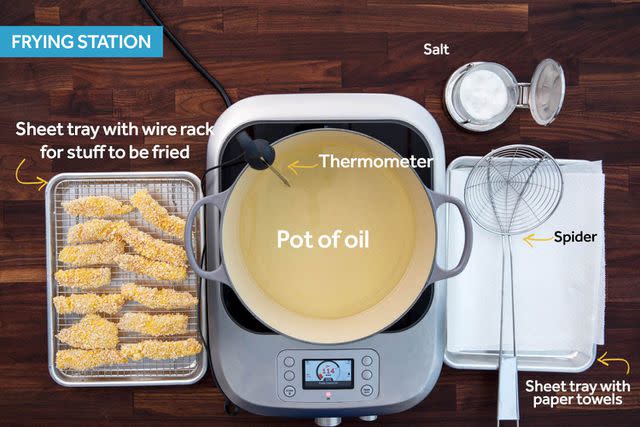
Deep-Frying Station
Serious Eats / Vicky Wasik
Deep-frying at home always has the potential to become very messy, so it’s especially important to keep everything you need close by, with your workflow moving in one direction. I like to set myself up to work from the left to the right, with the stuff to be fried hugging the burner on the left and my landing zone directly to the right of the pot of oil, minimizing oil drips, spills, and burns. If you’re working on a stovetop, this might mean setting up your landing zone on top of the neighboring burner.
A digital clip-on thermometer takes the guesswork out of frying, while a kitchen spider is the best tool for fishing foods out of the pot, allowing them to drain oil back into the pot before you set them over paper towels. Fried foods are best seasoned right out of the oil, so I keep the salt close by to sprinkle on immediately.
Pro Tip! Make sure to always have extra kosher salt on hand to sop up any potential oil spills.
June 2018
Read More
Read the original article on Serious Eats.

