See How an Interior Designer Transformed a “Nightmare Kitchen” — Without a Gut Renovation
ABOUT THIS BEFORE & AFTER
HOME TYPE: House
PROJECT TYPE: Kitchen
STYLE: Parisian, Vintage
SKILL LEVEL: Professional
RENTAL FRIENDLY: No
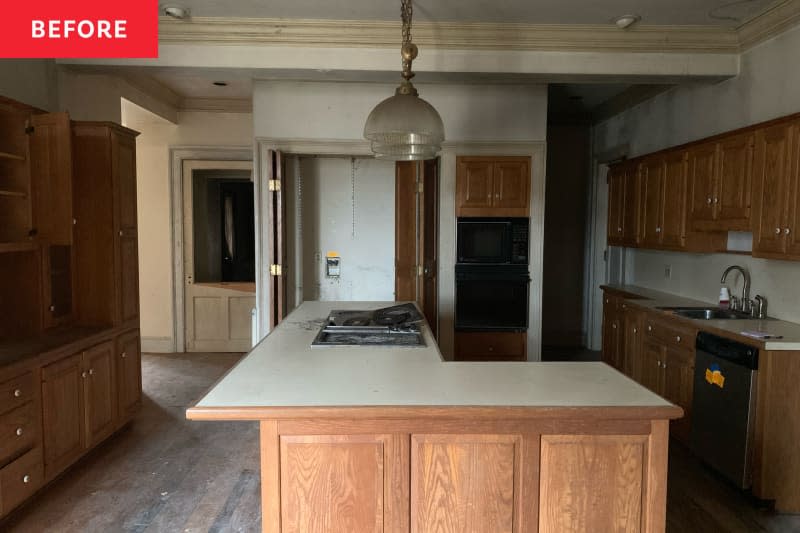
When blogger and DIY designer Jessica Rhodes and her husband bought their third fixer-upper, a New York state Victorian house, the 200-plus-year-old home was more nightmare than dream home. The kind of storybook house that comes with its own name, Danascara had survived an 1870 renovation, fire, foreclosure, and abandonment before the duo bought it in a state of extreme disrepair for $85,000. And they had their work cut out for them.
Renovations on homes like this can swallow bank accounts whole with little to no visible differences — but almost magically, Rhodes used clever tricks and tweaks to spend only $10,000 on the entire kitchen renovation (less than what the average kitchen reno allocates for cabinets alone!). She was kind enough to share her tips for working with existing elements and making a space feel intentional through unique design choices, rather than jumping on whatever’s the hottest trend of the moment. Here’s what she recommends to others looking to do the same.
1. Use pattern to distract.
When a room contains elements you don’t like but can’t really change, using patterns (think: wallpaper, borders, decorative stencil painting, even painting the floor) “can kind of distract the eye and make it feel like they were choices that you made from the beginning,” Rhodes says. The key is to keep colors consistent with what’s there. If you don’t love your countertop, for example, but you can pull shades of, say, brown from it with a wallpaper that you do love, “nobody’s gonna see the countertop anymore.”
2. Color drench.
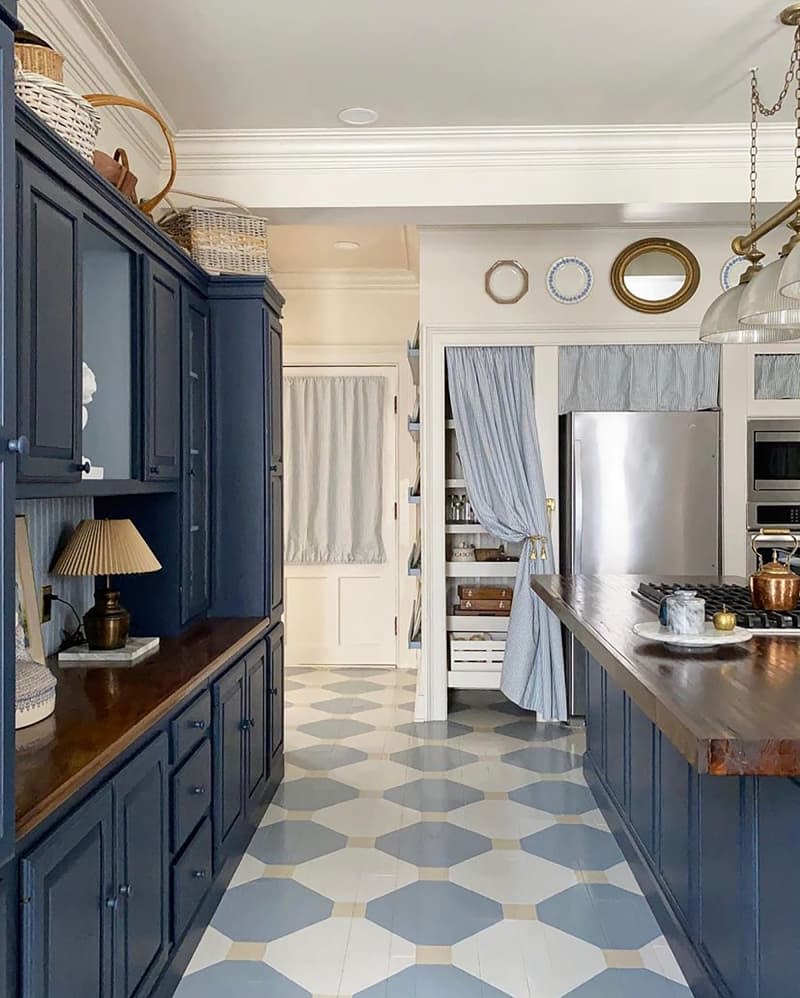
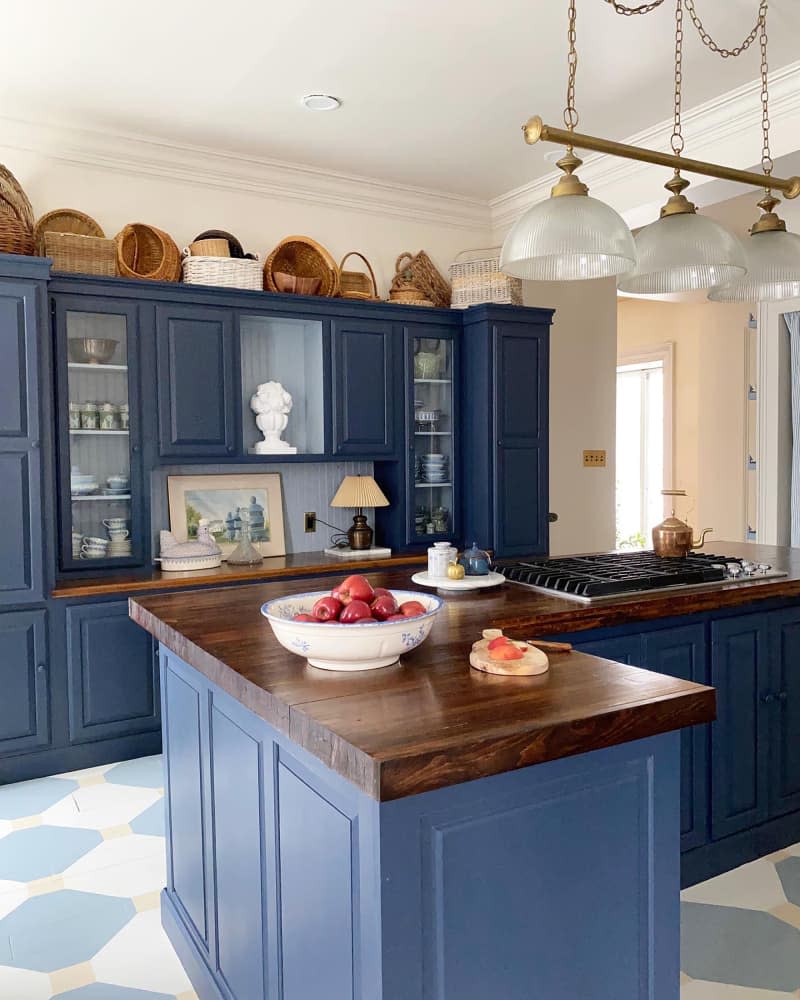
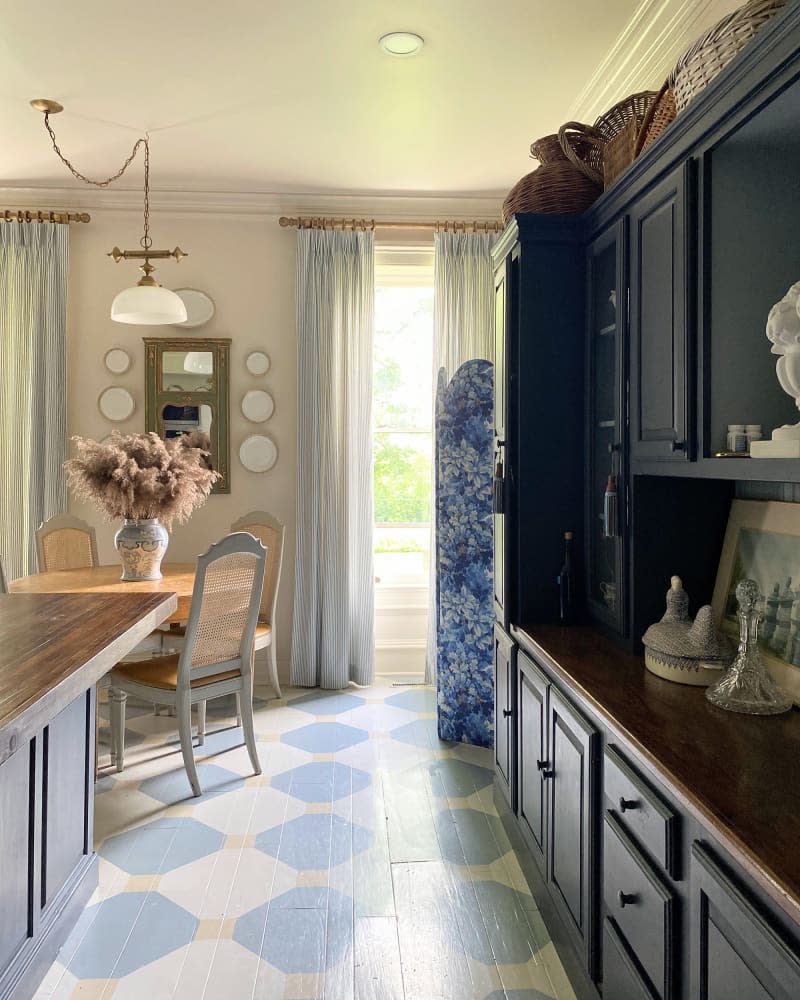
Using a coordinated color palette when painting walls, ceiling, trim, and cabinets can make a space feel more intentional, she says. “I purposely used a really limited color palette in this kitchen to make it all feel more cohesive.” Limiting the colors in play helps tie all the different elements together visually, Rhodes notes. This is an especially good trick “when you have those floating upper cabinets that kind of are just in the middle of the wall. They don’t go all the way to the ceiling and that’s not the most modern look now.” Using warm white on the walls and two shades of blue on cabinets brought the room together beautifully.

3. Make cabinets look like furniture.
Cabinets are one of the biggest-ticket items in a kitchen reno, so keeping what you have can save a ton. Besides painting the 1980s builder-grade cabinets, Rhodes added baseboards and crown molding, and removed the doors of several, adding beadboard painted a lighter color to the backs of those and the glass-front cabinets, “so it looks like there was one continuous back to the cabinet and it was all one piece of furniture.” Boom: Instant upgrade, lending the cabinets a much more custom, high-end look for minimal investment.
4. Paint the floors.
If I’d seen the damaged, engineered hardwood floor in the kitchen, my home renovator inclination would have been to replace it. But that would have required removing all the cabinets, so instead Rhodes chose a large-scale pattern in the same color palette as the rest of the room and painted the floor. Although she says people may think it won’t last, “If you do it right, our floor has lasted for years, and honestly, it’s so durable.”
Besides hiding the imperfections, painting “really ended up being the most special part of the kitchen out of what was the worst part of the kitchen,” she says. The pattern immediately draws the eye, making the floor the focal point of the room.
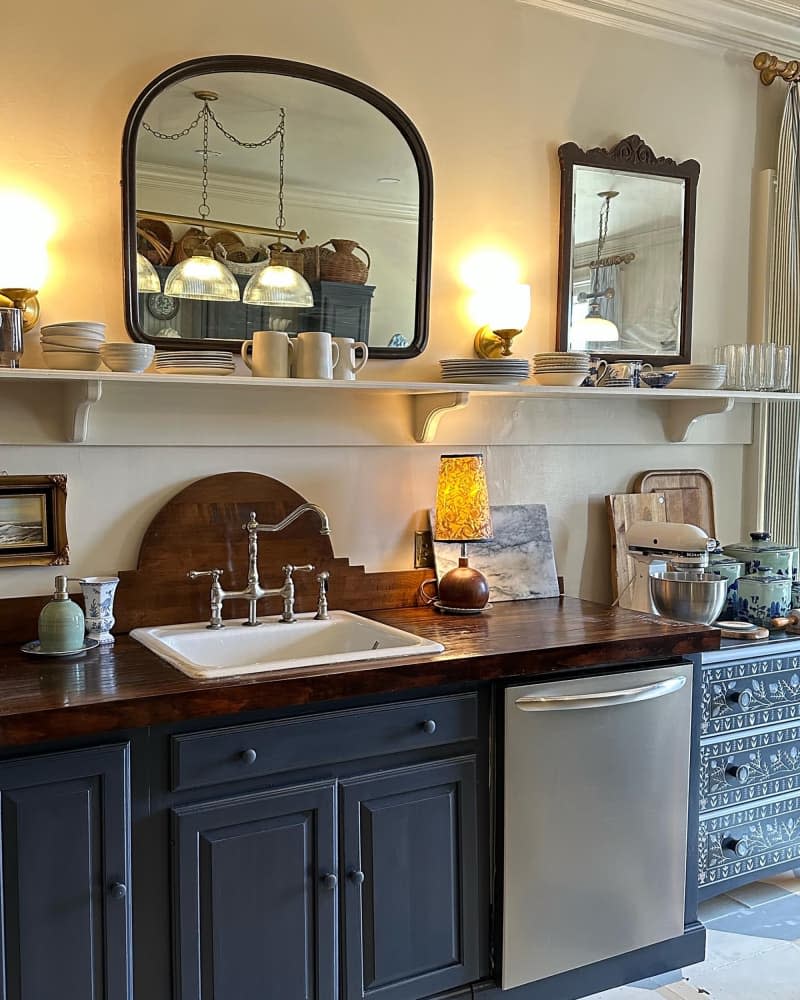
5. Use a unique backsplash material.
Backsplashes are a (relatively) low-barrier way to make a big impact in a kitchen, but Rhodes reminds us the backsplash doesn’t have to look like what’s in a “million kitchens that everyone else has.” Something a little unusual can “feel more your style,” she says. Think out of the box, says Rhodes, with materials like wood planks, brass, or copper sheets that can patina over time. For hers she opted for a custom-made wood backsplash that looks, well, custom! It’s also easily changeable, unlike high-commitment tile.
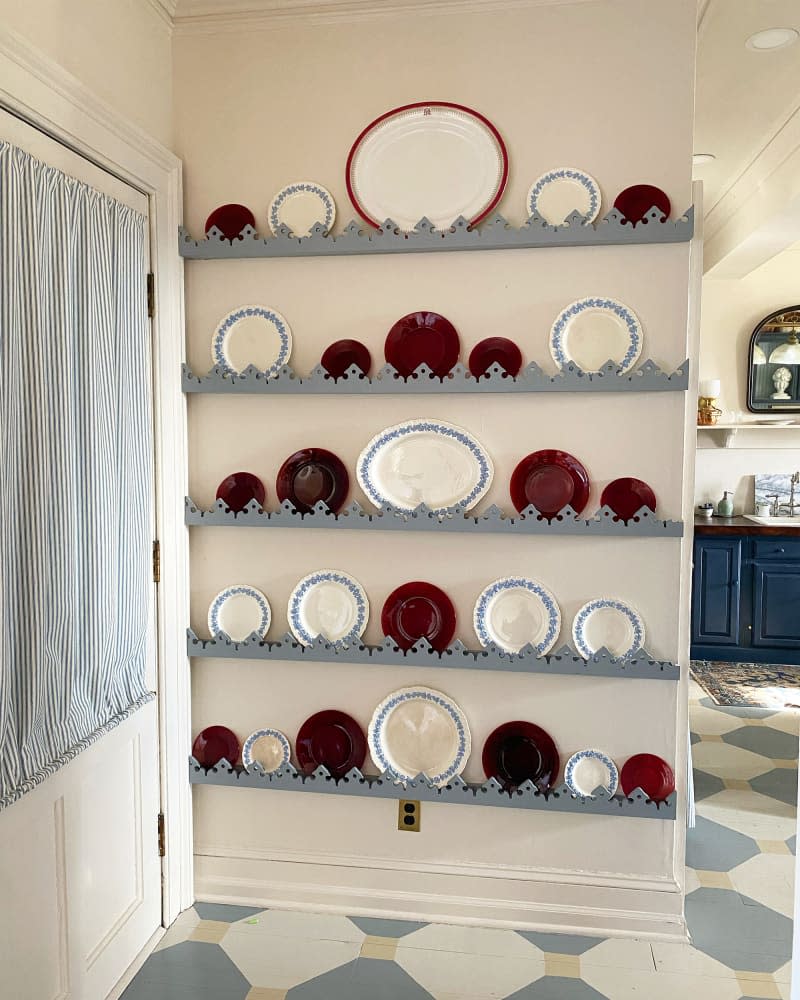
6. Decorate the kitchen!
Rhodes wants you to think about your grandma’s kitchen. Sure, it might not be your style, but “they decorated their kitchens all over, and it felt so cozy to be in that you just wanted to hang out.” Rather than keeping kitchens bare-bones functional spaces, think like a grandma, she says, and go all in, decorating with things like curtains, tablecloths, artwork, and collections for a kitchen that feels warm and inviting.
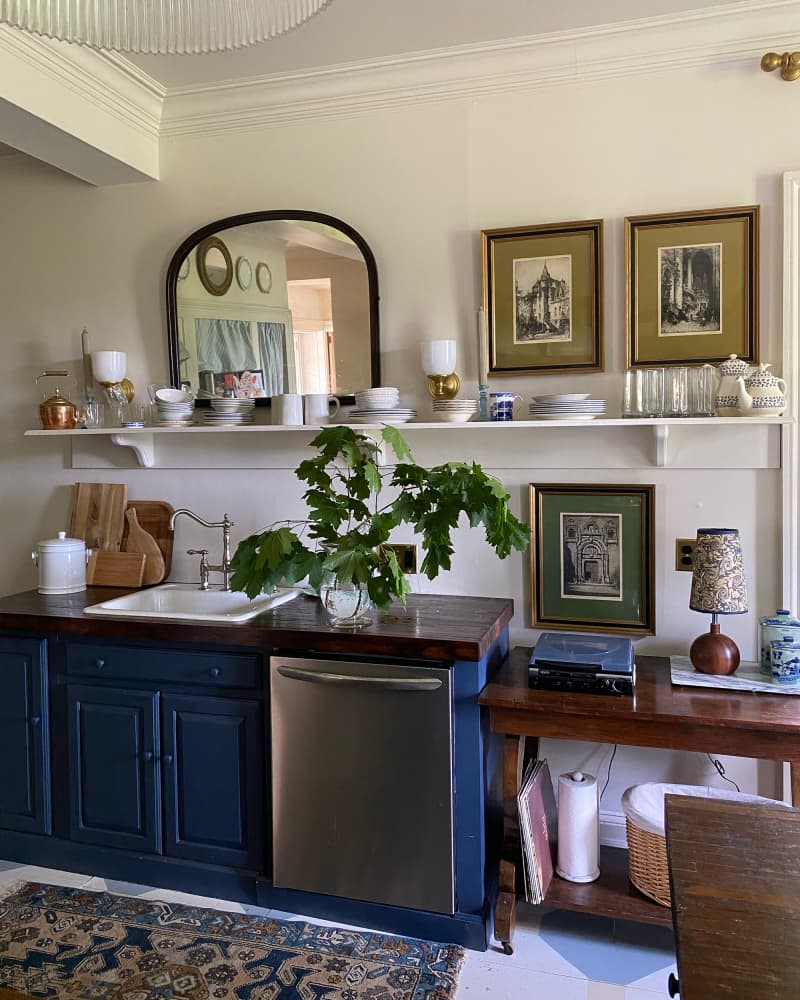
7. Turn storage into art.
We’ll skip right over the open shelves debate here, because for Rhodes, it’s a must. It may not be for everyone, she acknowledges, but displaying things she uses daily, like serving bowls and cutting boards, provides visual interest to the kitchen. Besides, it allows for easy access when she’s cooking or entertaining, and makes the room feel more open and inviting. Especially when you’re displaying things that are pretty, like tablecloths or fun, colorful napkins, styling the shelves makes the kitchen look beautiful, she says, in an intentional way.
This post originally appeared on The Kitchn. See it there: See How an Interior Designer Transformed a “Nightmare Kitchen” — Without a Gut Renovation

