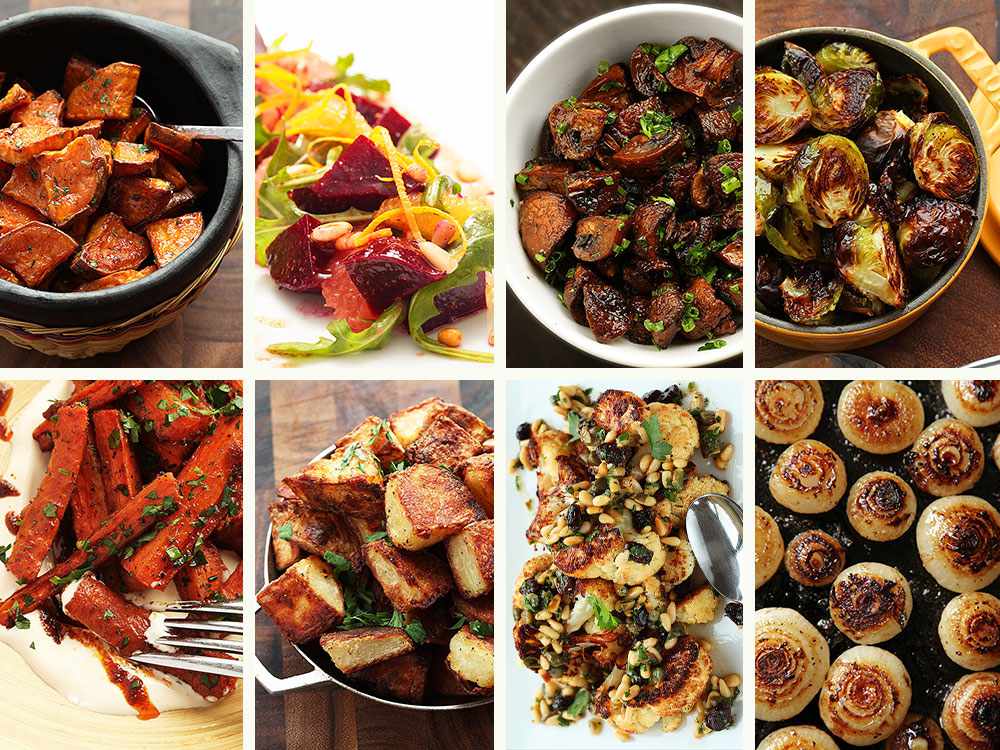
How to Roast Fall and Winter Vegetables | The Food Lab
I associate different appliances with different times of the year. The vacuum cleaner comes out in the summer as the dogs start to shed their fall coats. (Ironically, the vacuum cleaner also comes out around November when my building decides to kick in its central-heating-which-I-have-no-control-over and the dogs again lose the beginnings of their new winter coats.) Spring is when I have regular dates with the laundry machine, as I tend to lean dangerously far back on my balcony chair with a glass of wine more often than I should.
In the winter, it's the oven. We have a not-small-for-New-York but still pretty small apartment that I try to keep cool at the behest of my wife (who is forever opening windows and complaining of smells). But in the winter, hyperactive central heating or not, I can't help myself. My body craves roasted things, and more often than not, those roasted things are fall and winter vegetables: the roots and brassicas (and let's not forget the occasional fungus) that put their best foot forward when sweetened, intensified, browned, or crisped (as the case may be) in the oven.
Now, you can roast vegetables the easy way: just toss everything with oil, throw them on a rimmed baking sheet, and cook them in a hot oven until tender. I do that often when I'm not feeling up to more specialized treatments. But to get the most out of your roasted vegetables, it helps to understand each one's unique characteristics. What they are, where you want them to go, and how to take them there.
Today on The Food Lab, we're taking a look at some of my favorites.
This is a long one (but with lots of pictures!), so you can feel free to jump straight to a section with these links, or if you've got the time (and honestly, who doesn't like procrastinating on a cold winter day?), you can read through the whole thing start to finish. If you don't leave hungry, please email me directly for a full refund.
How to Roast Mushrooms

Let's face it: raw mushrooms are bland, and having those raw slices added to my salads as a kid were part of the reason I grew up really disliking them. The other reason is that when not properly roasted, they can be, well, slimy. A properly roasted mushroom, on the other hand, is meaty, intense, and deeply flavored. That's what we're after.
The Basics: Quarter mushrooms, toss with olive oil, salt and pepper, roast in a 375°F oven for 15 minutes, drain liquid, and continue roasting until browned.
The Full Story: Conventional wisdom tells you never to wash mushrooms, but it's ok, you can go ahead and do it. Even after a prolonged soak, they gain about 2% of their total weight in water—not enough to make a big difference in cook time. You can wash them in cold water, spin them dry in a salad spinner, and proceed as normal, though I'd advise cutting and trimming them before washing, because like the seminal 1986 Bon Jovi album, they're a bit slippery when wet.*
*Don't you just love contemporary topical references?

A moderate temperature is good for mushrooms, as you want to give them plenty of time to lose their internal moisture and concentrate in flavor—at 325°F, this can take over an hour, but there are ways to speed up the process.

See, mushrooms have a sponge-like structure that very easily exudes its moisture. As this moisture escapes, it uses up the energy provided by the oven to evaporate. Until this moisture is mostly gone, it's very difficult for a mushroom to reach high enough temperatures for significant browning to take place.
I found that by letting the mushrooms roast for a good 15 minutes, then draining off the liquid that gets exuded into the tray, I not only could reduce total cooking time by about 15% and improve browning, but I'd also get the added bonus of an intense mushroom-flavored liquid to cook with. I like to think of it as a mushroom-flavored soy sauce alternative.

By the time the mushrooms have browned, they'll have shrunk down to about 50% of their original size (and oddly, the rules of mathematics don't seem to apply here, because they're way more than 200% more flavorful).

Roasted mushrooms are great on their own tossed with a few herbs and olive oil, or as an ingredient in other dishes. Try adding them to your pasta, tossing them with sautéed green beans, or serving them cold with salads.
Get the recipe!
How to Roast Sweet Potatoes

Have you ever noticed that eating sweet potatoes is a bit like a game of Russian roulette where sometimes you get something sweet, intense, and amazing, and other times you get something starchy and bland? There's a reason for that: depending on how sweet potatoes are raised and stored, their relative starch and sugar contents can vary, affecting their final flavor. Wouldn't it be great if there were a way to stack that game and make sure that you win every single time?
Luckily, there is.
The Basics: Cover with water in a pot and heat to 150°F. Let rest for 1 hour. Toss with olive oil and roast at 400°F for 50 minutes, flipping once.
The Full Story: In case you're forgotten your 9th grade biology, starch is made from sugar. More precisely, starch is a polysaccharide, which means that it's a large molecule consisting of many smaller sugar molecules (in this case, glucose). The thing about sugar is, unless it's broken down to relatively simple forms, it doesn't taste sweet to us. Our tongue simply doesn't recognize it.
It helps to imagine sugar molecules as the gang from The Little Rascals. When they're all standing in a row, it's easy for us to identify them as kids. But stack them up on each other and throw a trench coat on 'em, and they're effectively hidden.
Sweet potatoes contain plenty of starch molecules. The goal when roasting them is to try and break down as many of the starch molecules as possible into sweet-tasting maltose (a sugar consisting of two glucose molecules). Pull off the trench coat and knock that child-stack down, if you will. We do this with the help of enzymes.

Sweet potatoes naturally contain an enzyme that breaks down starches into maltose. That enzyme is most effective in the 135°F to 170°F temperature zone (any higher and it deactivates completely), which means that the longer a sweet potato spends in that zone, the sweeter it becomes.

Slow-roasting helps by letting it slowly rise through that range, but an even more effective way is to par-cook the potatoes in water and hold them there. In my testing, I found that an hour at around 150°F is more than enough time to effect this change. I start my sweet potatoes by heating them in a pot, covering them, and letting them rest while I busy myself with other tasks. You can even do this step a few days in advance with no worries.

Once par-cooked, they roast just like any other vegetable, with the exception that they turn remarkably sweet as they caramelize. I like to roast them and then toss them with a bit of extra-virgin olive oil, herbs, and honey to accentuate that sweetness. Maple syrup would also be fantastic.
Get the recipe!
How to Roast Carrots and Parsnips

Roasting intensifies a parsnip or carrot's flavor, but ideally it also produces some amount of caramelization and browning in order to add complexity and a bit of extra sweetness to the mix. The issue is getting them soft and caramelized without letting them shrivel up too much. Nobody likes a shriveled carrot.
The Basics: Par-boiling skin-on carrots and parsnips lets you soften them without losing too much moisture. Follow up by browning in a 375°F oven for about 40 minutes.
The Full Story: If you can find those cute little baby carrots with the tuft of greens that look like a character from a Disney movie (preferably something fuzzy from Bambi) ought to be chewing on it, then you can cook them whole; Just trim the greens down to a half inch or so (and you can even use the tenderest fronds for garnishing the finished plate).

If all you've got is the big ol' regular supermarket carrots and parsnips, you'll want to cut them into baby carrot-sized sticks by splitting them lengthwise a couple times, then cutting them into segments. I like to cook mine with their skins scrubbed but intact because a) it tastes better, b) I'm too lazy to peel 'em, and c) don't know that rustic is so in these days?
If you try to roast them through in the oven 100% of the way, you end up with shriveled, wrinkled remains. Instead, I find it's much better to par-cook them in salted water; They'll tenderize without shrinking. (This step can be done in advance.)

Carrots have a natural affinity for spices (or at least, in my home they do), so I'll generally toss them with olive oil mixed with some variety of spice blend before roasting, whether it's a chili powder (Japanese shichimi togarashi is great), a curry blend, or, in this case, harissa with a touch of cumin and black pepper.
Parsnips are more distinctly flavored and I prefer to keep them simple, adding some herbs at the end.

After tossing, they go into a moderately hot oven until they're nicely browned on a few sides. It takes about 40 minutes.

After I remove them from the oven, I'll toss my carrots and parsnips with an herb that meshes appropriately with my choice of spices—cilantro goes well with harissa, as does a little pool of crème fraîche to keep things cool.
Get the recipe!
How to Roast Brussels Sprouts and Broccoli

They may not look the same, but Brussels sprouts and broccoli are closely related and can be cooked much the same way when it comes to roasting. Both benefit from extremely high heat and browning to the point of a near-char in order to intensify their sweetness and bring out their unique nutty flavor without becoming overwhelmingly sulfurous.
The Basics: Split Brussels sprouts in half and cut broccoli into 1 1/2- to 2-inch florets. Toss with olive oil, season, and roast in a 500°F oven until tender and charred.
The Full Story: Brussels sprouts and broccoli are unique creatures. When cooked poorly, they can give off a strongly sulfurous aroma that many find unpleasant. But if you can crack through that aroma and release the natural sweetness hiding underneath, then you're rewarded with two of the most delicious vegetables around.
The key is to use the full-on frontal assault, no prisoners taken, blast the sh*t out of 'em approach, a.k.a very high heat. This allows the exteriors of the vegetables to caramelize and brown, producing sweet by-products, while at the same time making sure that they don't have enough time to develop the really sulfurous aromas that slower cooking can yield.

While the oven preheats to 500°F, I split my Brussels sprouts or divide my broccoli into florets before tossing them with olive oil. In order to get them as hot as possible as fast as possible, I preheat their roasting pan too.
Tossing the vegetables as they cook can lead to more even browning, but letting them rest on one side will produce more interesting textural contrasts. I like to switch it up depending on the mood I'm in.

If you want to get really decadent, Brussels sprouts in particular love cured pork. Crisp up some bacon, pancetta, or chorizo in a skillet, save the crisp bits, use the fat to roast the sprouts, then toss them together with the meat when they come out of the oven.
Get the recipes!
How to Roast Potatoes

I've written about crispy roast potatoes on more than one occasion, but honestly, they're one thing I never get tired of. Who can resist a thick, craggy, crunchy crust around a soft, fluffy center? Not me, that's who.
But if you want the best, craggiest, crustiest potatoes, it's not as simple as just throwing them in a hot oven. You need to take steps to build that crust up.
The Basics: Par-boil cut potatoes in vinegar-spiked water in order to gelatinize their starch without breaking them down. Drain, toss until roughed-up, then roast in a very hot oven until crisp.
The Full Story: That crust on a roast potato begins its formation when starch molecules are released from inside potato cells that burst as they cook. Those starch molecules then interact with each other in the presence of water to form a gelatinized layer. Eventually, this gelatinized layer dehydrates, creating the crisp crust we crave.
So: the thicker that layer, the better the crust.

Because starch only swells and gelatinizes in the presence of water and there's only so much liquid inside a roasting potato, the key to building up this layer is to par-boil the potato, which breaks cells while providing plenty of liquid to help that starch swell up.
There's one problem with boiling, however: it causes potatoes to break down. So the question is, how do you boil potatoes to gelatinize starch without them falling apart on you?
It turns out that pectin, the polysaccharide glue that holds vegetable cells together, is strongly affected by pH. The more acidic the environment, the more tightly it holds cells together. By adding a splash of vinegar into our boiling water, we can hydrate and tenderize our potatoes without letting them fall apart.

How do we get them even more crisp? By adding surface area. Once the potatoes are par-cooked, I toss them with olive oil (or duck fat or beef drippings, as the case may be), and when I say toss them, I mean really beat them around the bowl until they get a film of starch-and-fat paste on their surface.

A subsequent visit to a 500°F oven, and they become absolutely insanely crisp. There are currently no laws against being too crisp, but if there were, these potatoes would be facing some serious jail time.
Get the recipes!
How to Roast Cauliflower, Cabbage, and Romanesco

Cauliflower and broccoli look similar at first, and they share the same end goal when roasting—sweet nuttiness from browning and caramelization—but cauliflower is much more dense and thus needs to be treated differently to get there. Dense heads of cabbage can be cooked in a very similar manner.
The Basics: Split your trimmed cauliflower or cabbage into six to eight wedges through the core, toss with oil, season, and roast at 500°F until browned and tender, flipping once during cooking.
The Full Story: As with other brassica, high heat is what you're after here in order to get the most flavor out of cauliflower or cabbage.

Fat wedges like this help build up a nice contrast between deeply browned exterior and tender, meaty interior. It's cauliflower that eats almost like a steak.

Roasted cauliflower is great on its own with just a drizzle of really good olive oil or lemon, but I like to turn mine into a warm salad with a more elaborate vinaigrette.

This one is inspired by a dish my friend Einat Admony occasionally serves at her awesome restaurant Balaboosta, with a toasted pine nut vinaigrette made with raisins, capers, and a touch of honey.
Get the recipe!
How to Roast Beets

Beets are my wife's favorite food, which means by extension they're the vegetable I roast most often. When done right they become candy sweet while still maintaining an intense earthiness. I like to do everything I can do accentuate those flavors.
The Basics: Form a tight foil pouch and roast the beets inside with a little oil and some herbs. Once roasted, they slip right out of their skins under running water.
The Full Story:
There may be more than one way to cook a beet, but there's only one way that I go back to again and again. Boiling beets is fast and efficient, but it pains me to see all that wonderful beet juice going down the drain when I finally dump the liquid. Roasting them plain works alright, but they can end up dry and shriveled, and it takes literally* forever.
*not literally

My method of choice is a hybrid. By placing the beets into a tightly sealed heavy-duty foil pouch and placing them in a hot oven, you create a sealed, steam-filled environment, giving you the fast-cooking benefits of a moisture (moist air is far more efficient at transferring heat than dry air), along with the flavor and texture benefits that come from trapping all of the aroma in that pouch along with the beets. Just make sure to seal the ends really well so that no steam escapes.
A moderately hot 375°F oven is the way to go with beets.

Added bonus: as soon as they're cooked, their peels slip straight off.

To accentuate and play off their sweetness, I almost always add a touch of sweetener to whatever dressing I'm making for them—honey is my go-to. Nuts and citrus also pair well with beets, as do cheeses (particularly goat cheese).
Get the recipes!
How to Roast Small Onions and Shallots

Roasting cipollini or pearl onions or shallots has the same goals as caramelizing standard onions for soup or dip: The results should be meltingly tender and incredibly sweet.
The Basics: Start your onions in a skillet with butter, then transfer the skillet directly to a moderate (325°F) oven and roast, tossing occasionally, until completely tender and caramelized.
The Full Story: Onions are high in sugar but are prone to burning. You want to very slowly cook them so that their sugars break down and form sweeter compounds all while making sure that they don't burn and turn bitter. The easiest way to do this is to start them in a skillet.

I like to use butter for my onions, though olive oil works fine as well. By starting them in a skillet then transferring that skillet to the oven, it allows you to very easily toss and flip the onions as they cook, which is important: They get very soft if you're doing it right, so you'll want that easy-flip built in to the cooking vessel.

Pearl onions or shallots will work just fine, but cipollini are significantly sweeter than either and thus all the better for caramelizing.

