Review: This $30 Blink Mini Upgrade Lets You Pan and Tilt To Your Heart’s Content

At just $35, the Blink Mini Camera is one of the most affordable indoor security cameras, not to mention one of the best security cameras we’ve ever tested. Despite the incredibly low price tag, it’s got everything from motion detection to activity zones (more on that later), but the one thing that frustrates a lot of indoor security camera users is the camera’s limited field of view. Once the camera is placed and mounted, what you see on the camera is what you get. That’s the issue the Blink Mini Pan-Tilt Mount is here to eliminate.
Until now, the Blink Mini wasn’t able to pan or tilt, and it had a very narrow range compared to some other options. With the Blink Mini Pan-Tilt Mount, Blink users can now cover a much wider area without purchasing additional cameras. The new mount offers a full 360-degrees of motion.
Today's Top Deals
Because we often recommend the Blink Mini Camera to SPY readers (especially when it’s on sale, which it is as of this writing), we wanted to test out this new Pan-Tilt Mount to see if it’s worth the investment. So if you’re wondering if the new Blink Mini Pan-Tilt Camera Mount is worth it, read on for our full review.

Blink Mini Pan-Tilt Mount
Buy Now On Amazon $29.99
$60 at Best buy
With this accessory or bundle, you now have 360 degrees of panning as well as tilt control of your cam. SPY contributor Jonathan Knoder tested the Blink Mini Pan-Tilt Camera in his home to see if this new camera bundle provided the flexibility and functionality it promises.
Blink Mini Pan-Tilt Mount Specifications
Field of View: 110-degree diagonal / Pan range 360 degrees/tilt range 125 degrees
Camera Resolution: 1080p HD with infrared HD night vision
Camera Frame Rate: 30fps
Size: Mount – 66 x 66 x 88.2 mm / Blink Mini – 50 x 49 x 36 mm
Weight 10.4 oz (pan and tilt)
Power: Wired
In the Box With the Blink Mini Pan-Tilt Mount
Blink Mini
Pan-Tilt Mount
USB Cable
Power Adapter
Blink Pan-Tilt Mount Setup: Easy Enough for Anyone

Setting up the Blink Mini to the Pan-Tilt Mount is, to borrow a line from those old Geico commercials, “so easy, a caveman could do it.” As you can see from the picture above, you plug the gray cable from the Pan-Tilt Mount into the camera and then snap the camera down onto the mount (you’ll hear it click) and viola, the physical installation portion of the camera is done.
Even better, when you download the Blink app to your phone, the app will automatically detect that your Blink Mini is attached to the Pan-Tilt Mount and a virtual directional pad will appear on the live view on your phone when you’re watching streaming video from the camera.
Of course, if you are new to Blink and don’t have an account, you’ll need to create one. This requires both email and phone verification that takes a few minutes, but that’s honestly the lengthiest part of the installation process.
Note: You’ll want to give the camera a little room for calibration. When you first plug the power adapter into the wall, the camera needs to calibrate and orient itself. The camera will begin tilting and spinning around on its own. I had already placed the camera in the area I wanted before it started to calibrate and it got stuck on the railing on the shelf (as seen above) as it was turning, hindering the calibration from completing. After moving it and trying again, everything worked as planned.
Overall, the installation was a breeze.
Blink Pan-Tilt Mount Design: Lots of Plastic
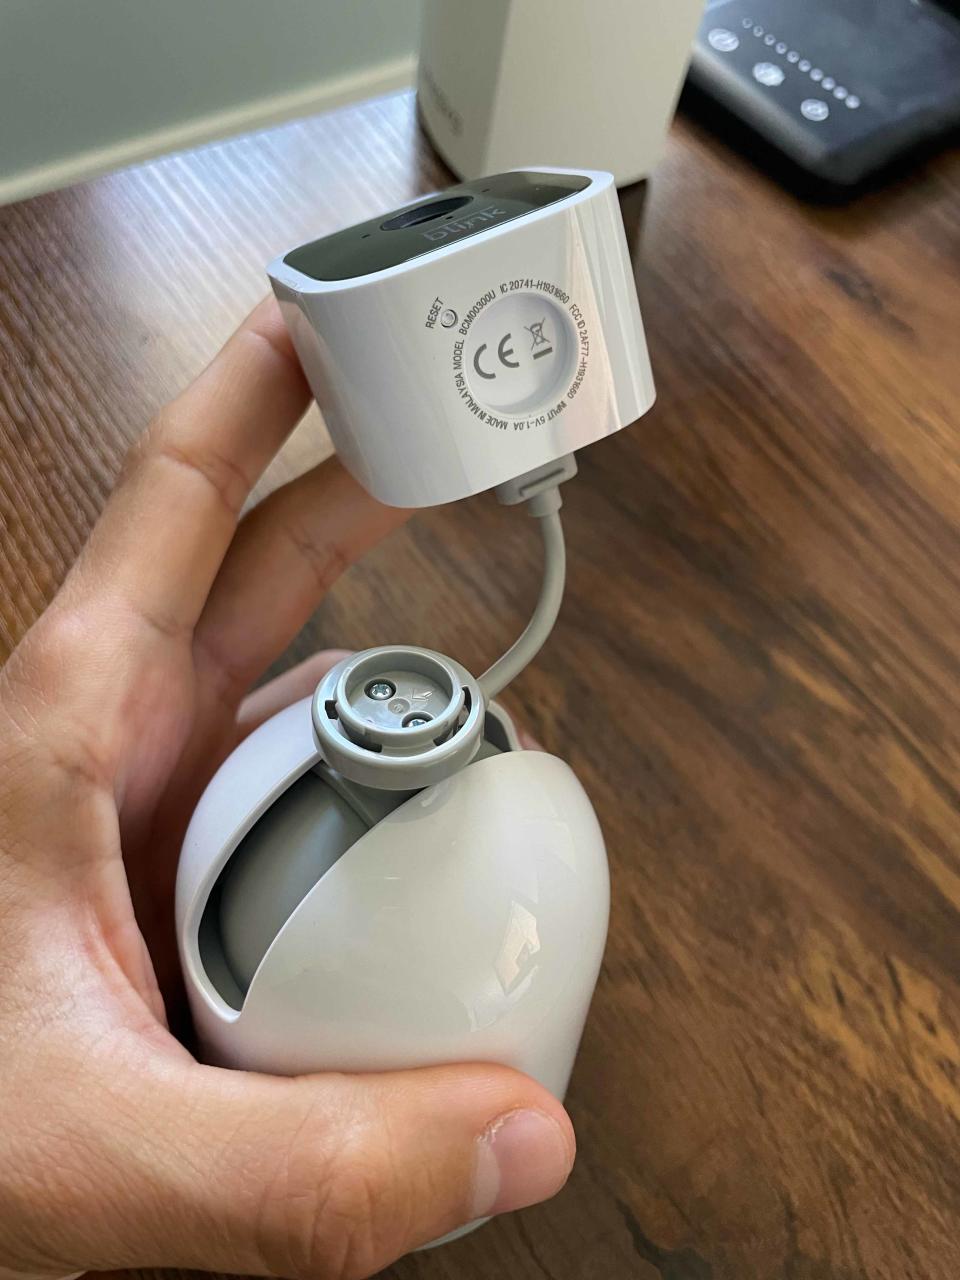
The camera and the connected mount is made entirely of plastic. I was a little worried when I put the camera on the mount that something was going to break. It’s a hard plastic piece (mount) that you push into a plastic opening (camera) and it takes some force to do so. But alas, it snapped on without an issue. Hopefully you won’t have a need to remove the camera from the mount often because I wouldn’t trust that connection design overtime.
There’s two cables required to connect the camera and power it – the little gray cable that connects the camera to the mount (it can’t be longer than two inches) and the power cable that connects to the bottom of the mount to power the device. As one spy editor similarly mentioned in the Wyze V3 Camera Review, if the little gray plastic connector were to go kaput, you’d need to buy a whole new setup, instead of just replacing a single cable. As long as you aren’t connecting and disconnecting the Blink Mini from the Pan-Tilt Mount often, you likely have nothing to worry about.
Beyond the build and aesthetics, the Pan-Tilt Mount creates a wide range of capable movement for the camera including 360-degree panning and 125 degrees of tilt. Theoretically, if you placed it in the center of a room, there would be virtually no blind spots. That’s simply remarkable coverage from a camera that was once held captive by the 110-degree field of view.
Blink Pan-Tilt Mount Camera Features: Everything You’d Expect and More
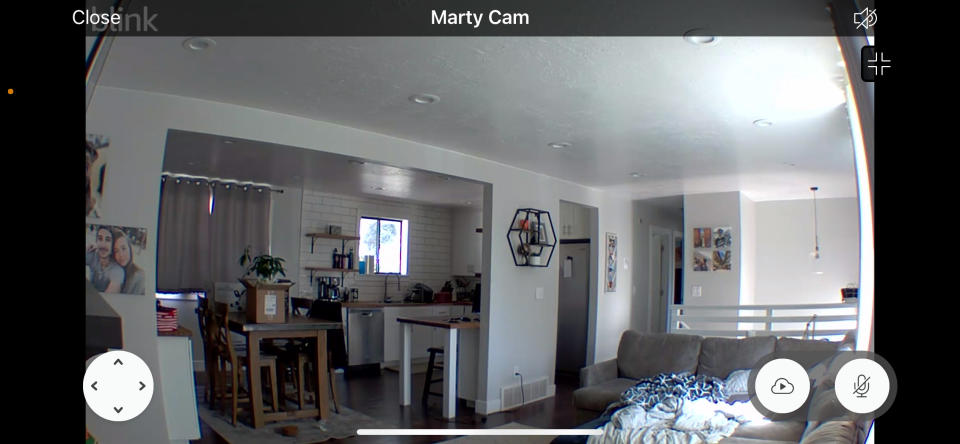
The camera shoots in 1080p that is nice and clear and captures clear black and white footage in the dark as well. But the real bread and butter comes from the assortment of features built into the app’s settings. To start, you’ll notice the home screen has directional pad controls in the bottom left corner (see picture above) to control the camera. If you’ve been moving the camera around and want to immediately go back to “center” you can hit the home button and it will go back to its original positioning, which you set. If you want a quick scan of the entire area, you can click the 360 pan button and the camera will circle around to give you a glance of the whole perimeter.
You do have to get somewhat used to the controls, as there is a delay between when you press, lets say, the pan-left button, and when the camera actually moves. If you’re trying to view a specific spot, it can be a little difficult to be precise with the camera’s movements. That reason alone is why the home button can be especially helpful. Just one press and your camera will go back to exactly where you had it originally positioned.
The features I found most helpful were the motion detection sensitivity slider and the activity zones selector. For me, I don’t need an alert every time my dog shifts from laying on his side to on his back. By turning down the motion detection sensor, I wouldn’t receive notifications for minimal movement around the camera. I was also able to select activity zones that would repress notifications when movement happens in certain areas. In my instance, I don’t need to know when my dog is moving on the couch, so I was able to gray those sections off as “inactive,” but I’d like to know when he is eating or drinking, so I can leave that area active and receive notifications when he is by his food. But this can be helpful in a lot of scenarios beyond pets, such as if a portion of your camera view is facing a window and movement from tree branches or cars driving by are causing you to receive unnecessary notifications.

Aside from the motion sensor settings, you can also enable audio and talk to whoever or whatever is in camera view thanks to two-way communication. And if you were to mount the camera to your ceiling, you can also toggle a switch to flip the video, so although your camera is upside-down, your footage will look normal. Clip length is adjustable anywhere from five to 30 seconds and you can tell your camera to stop recording early if whatever caused the recording to activate stops moving. For local storage, this can help you save space on a USB flash drive. Oh look, we talk about video storage next.
Blink Pan-Tilt Mount Video Storage: Subscription Required

You don’t need a subscription to see live footage or to receive motion notifications on your phone. But you will need a subscription to storage footage. This camera bundle does come with a free 30-day trial to the Blink Subscription plan which includes 60-days of unlimited storage of clips. After the trial period expires, the subscription costs $3 a month. And if storing your camera footage in the cloud gives you the willies, you can store footage locally with the Blink Sync Module 2, but you will need to purchase that and a USB flash drive separately.
Our Verdict: Feature Packed For Sub $100
This might be the only camera setup you need to cover a large area in your home. The 360 panning combined with the tilt essentially eliminates blind spots. And when you factor in clear night vision, as well as motion sensitivity and activity zone adjustments, this is worth $60 and then some.
So Should You Buy It?
There’s no doubt that this bundle brings a much-needed feature to an already great camera. (You can also read our full Blink Mini Camera review.) Whether you want to peek into the secret life of your pet while you’re out, or to enhance your garage door security, with the Pan-Tilt Mount, the camera covers a lot of ground with a single camera, and has many useful security features as well. If the word “subscription” scares you, the $3 fee is affordable considering you get unlimited 60-day storage.
Pros:
Great video coverage with 360 panning
Adjustable motion sensitivity and activity zones
Easy setup
Cons:
Although affordable, video storage requires subscription
Pan and tilt controls are delayed
Blink Mini Pan-Tilt Mount
How Long Will It Last?
Once you place the camera wherever you want it to remain, there’s really no reason it wouldn’t last a long time. Plus, there’s a one-year warranty on the camera should anything go wrong.
More Top Deals from SPY
Best of SPY

