I Replaced My Big-Box Store Cabinets With Custom Plywood Fronts
Well, my boyfriend did, but I supervised—and the process was surprisingly painless.

This is Making a Bar, a four-part DIY series in which our intrepid Executive Editor turns her under-utilized basement into the hopefully chic home hangout of her dreams.
If there is any part of the wannabe bar in our downstairs that has been through the most iterations, it’s the cabinets. Left there by the previous owner, we’d already removed a set of uppers that were just hanging there, with nothing below, when we were having the sheetrock fixed, because they seemed pointless. At the time, a few years back, I wanted to keep some storage options in place while we figured out what to do with the space, and thought there’d be a few ways we could make them work.
Yet none of those ways really panned out into the right combination of low-cost and not too much work. After some careful inspection of their labels, I discovered that these were, unsurprisingly, a company you may have heard of called Hampton Bay available at—you guessed it—Home Depot. Not laminate or vinyl exactly, like I had thought, they’re made of what is called Thermofoil, or Rigid Thermal Foil (RTF). (The difference? "Thermofoil cabinets are made from MDF board covered with a vinyl film, while laminate cabinets are made from particleboard or MDF covered with melamine resin impregnated with paper." It’s a highly affordable option, which explains why it was in this house.)
I had already done a lot of research into painting laminate cabinets, or covering them with vinyl, both of which many people online swear you can do effectively, but I was skeptical, mostly because of a.) This particular material b.) The design of the cabinets, which had an inlay that was absolutely going to make painting or covering them challenging. I didn’t even consider actually just replacing the fronts, because even though that can be fairly low-cost, this is such a low-traffic area, it didn’t seem worth the investment.
Then, an epiphany came to me, one I don’t know why I hadn’t had earlier: Plywood. Obviously a hugely popular style right now both for its aesthetic and cost, we feature a ton of it, particularly in kitchens—the kitchen from this LA home was my main inspiration—on Dwell. We were only going to have to replace a few fronts and drawers, so the materials cost would be low. And I had someone who could basically do the whole thing for free: my partner, who is extremely handy.
First Steps
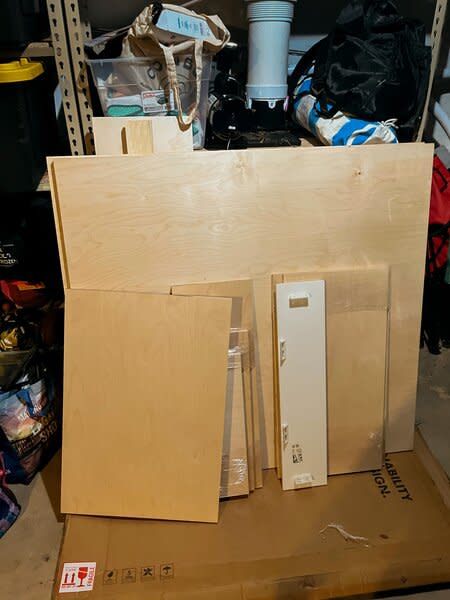
First, I presented my vision to my roommates, who signed on quickly. My partner seemed keen to get it done, and after surveying some of the research I’d done into buying and customizing the plywood himself, he declared it wouldn’t be that difficult. For projects in the past—like our daybed—he’s bought and cut his own wood, but for this one, he decided taking really precise measurements, giving them to a wood shop, and having them cut on slightly higher quality material (Baltic Birch plywood) would be the way to go. They ended up being about $500. (The slightly less nice wood would have been about $100 less.)
The shop was able to fulfill the order within the week; he picked it up and began to work on the install. All of the existing cabinet hardware were concealed hinges, not visible when the doors are closed, so he bought a concealed hinge jig to fit the new boards on the existing hardware.
Installation
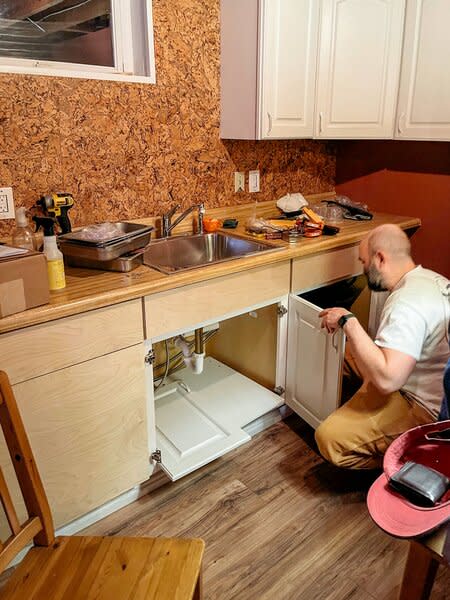
Removing the fronts was very simple, a matter of a few screws for each door and they were off. The hinges weren’t entirely uniform in how they were installed so measuring the new plywood doors was the most precise bit of work; the concealed hinge jig makes a shallow hole in the back of the plywood where the hinge hardware sits so it had to be in exactly the right place.
Having the cuts made for us meant that even though there was leftover wood we could use, any one mistake meant cutting a new door ourselves which wouldn’t be as clean or precise as what the wood shop did—and they had done a great job. Fortunately it all went very smoothly, and all the hinges fit. The small inconsistencies in the hinges themselves meant a few of the doors needed a bit of sanding to open and close smoothly but the whole process was very quick and easy.
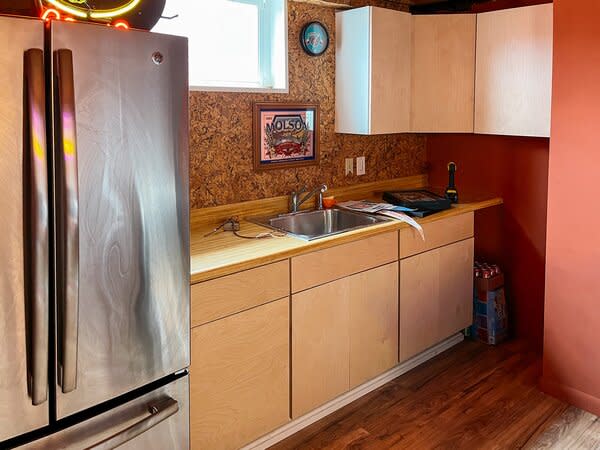
See the full story on Dwell.com: I Replaced My Big-Box Store Cabinets With Custom Plywood Fronts
Related stories:

