How to Refinish an Old Bathtub So It Looks New
"Hearst Magazines and Yahoo may earn commission or revenue on some items through these links."
[table-of-contents] stripped
When you're renovating a bathroom, it's tempting just to scrap it all and start over. You can repaint and replace the floors, but unless you fix the dingy old bathtub your space won't look totally fresh. A new bathtub can turn a medium-size project into a big one, though, and cost thousands. Bathtub reglazing, however, is a DIY solution that will save you money and give you the sparkly new bathroom you want. The best part? Refinishing a bathtub doesn't have to be a scary endeavor—at least not when you have us on your side.
Refinishing and reglazing your bathtub may sound like something better left to the pros, but it's actually possible to do on your own. Refinishing a tub typically involves using a DIY kit (available at many hardware stores) to reglaze an existing enamel, acrylic, or fiberglass tub surface with a new hard epoxy coating that will extend its life and repair any small issues like minor cracks or rust. Reglazing your bathtub is a great way to give your bathroom an aesthetic upgrade without blowing the budget on a full renovation. You can even use the same technique and materials to turn dated or colored tile in glossy white or refresh vintage finds like a porcelain sink or soap dish.
Ahead, we'll walk you through refinishing and reglazing a bathtub step by step, including materials, safety considerations, and more.
Refinishing vs. Reglazing
The terms "refinishing" and "reglazing" are often used interchangeably, but they actually describe two different parts of the same process. Refinishing a bathtub is a means of giving it an aesthetic facelift and repairing any small instances of damage, cracks, etc. Reglazing a bathtub is a part of the refinishing process. It refers to one of the final steps, applying a new glaze after you've prepped and primed the surface. You can refinish and reglaze many different bathtub and bathroom surfaces, including porcelain, acrylic, cast iron, and more.

When to Reglaze a Bathtub
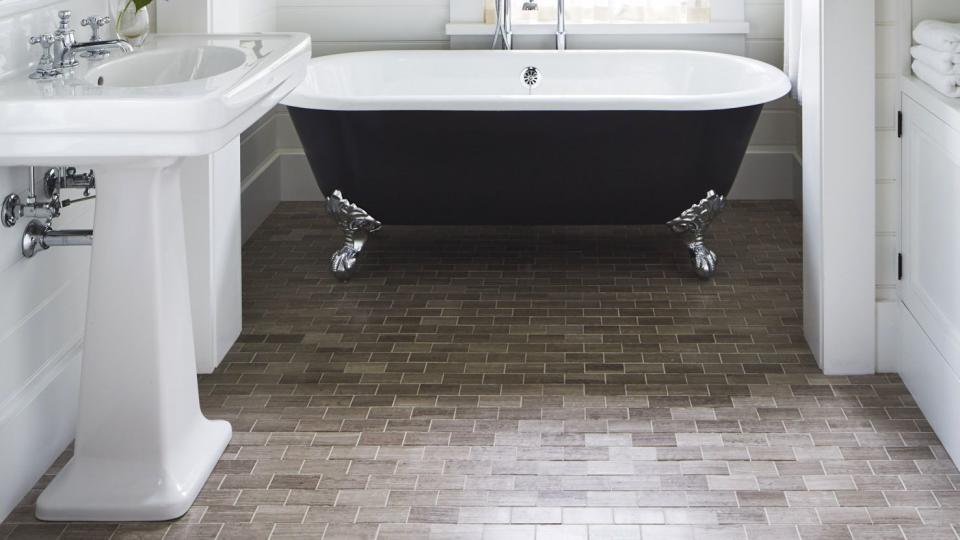
Choosing to reglaze your bathtub isn't a decision you should make on the fly. Before committing to this hefty DIY, it's a good idea to weigh your options when it comes to both refinishing your tub and doing the project on your own versus hiring a pro. Bathroom reglazing is a treatment ideal for hiding small imperfections or signs of aging, like rust, scratches, and stains. It's a great alternative to a full bathroom renovation and an ideal way to garner more interest in the event you plan to sell or rent your home. If you already own or want to use an antique fixture, you can refinish it to make it look new again and help it last longer. This is a great option for clawfoot tubs, alcove tubs, and pedestal sinks that have unique character you want to preserve.
It's important to note that reglazing your tub will not repair major cracks or leaks or bring an end-of-life tub back from the brink. As with any big change, be aware that undertaking this DIY project may actually lead you to uncover major issues in your space, like irreparable rust or water damage that was hidden behind fixtures. Go into the task with your eyes wide open, and be ready to tackle any issues that come your way.
Cost Considerations
Reglazing your bathtub is a great way to make the most of the quality finishes already in your space and save money in order to splurge elsewhere (like on those gorgeous sconces or plush bath towels you had your eye on). Most DIY bathtub refinishing kits cost $40 to $100 and can reglaze tubs, sinks, toilets, tiled walls, and more. Hiring a pro costs considerably more—about $500 to $800—but is still much more affordable than buying and installing a new bathtub. An important note: Most DIY kits come in basic hues (think: white and gray), so if you're looking for something a bit more creative or offbeat, you may have to spring for a pro who can customize the glaze color.
How to Refinish and Reglaze a Bathtub
Plan to do this DIY over a long weekend. Your bathtub will be out of commission for at least three days while the new finish cures.
You'll need:
Etching powder (if not included in your kit; optional)
Stainless steel caulk remover or razor knife
Abrasive tub cleaner or bleach
Sponge/bristle brush
Cleaning towels
Paper towels
Painter's tape
Drop cloths
Mask
Safety goggles
Window fan or air purifier
400-grit wet/dry sandpaper
Foam paint roller and foam brush
Tub and tile silicone caulk and caulk gun
Plumbers tape
Before You Begin
The chemicals needed to properly recondition bathroom surfaces can be harsh, so it's important to protect yourself accordingly with a mask, gloves, goggles, and good ventilation (open windows are a must; a portable air purifier is even better). Likewise, the epoxy used to reglaze your bathtub can be very difficult to remove from unwanted areas, so be sure to safeguard any nearby tile or floors with heavy-duty paper or drop cloths before beginning your project.
Step One: Buy a DIY Refinishing Kit
One of the easiest ways to dive into a bathtub refinishing DIY is to buy a kit dedicated to the process. One of the most recognizable and highest rated on the market is Rust-oleum's Tub & Tile Refinishing Kit. It comes with all the chemicals and paints you need to achieve a smooth, durable finish on ceramic tile, porcelain, fiberglass, acrylic, cast iron, and more. That said, it does not include any of the tools you'll need for the process—like goggles, gloves, a roller, sandpaper, etc.—so you'll have to buy those separately. Other reliable kits on the market, including ArmoGlaze and DWIL Tub & Tile Refinishing Kit, come with some of the tools you need if you'd rather skip the extra trip to the hardware store. Many kits also come with an etching powder (though the Rust-oleum one does not). Etching powder isn't a required, but it can help you remove the old glaze more easily and completely, which may allow the new glaze to adhere better. If your chosen kit does not come with etching powder, you can buy it separately.
Step Two: Remove Old Caulk and Hardware
Shut off the water supply to your tub, then remove any fixtures including drain covers, bathtub spouts, and more. In most instances, that means gently unscrewing them from the wall, but you may need to use a razor caulk scraper to remove the caulk sealing the fixture to the tile or tub surface to be able to do that. Set the fixtures aside, then remove the rest of the existing caulk from the edges of the tub, gently loosening and peeling it away. You can use an abrasive scrubbing pad to remove any stubborn caulk.
Step Three: Deep Clean the Bathtub
To get the best finish possible, start the refinishing process with a squeaky-clean tub. Using bleach or another abrasive cleaner, thoroughly clean the tub and surrounding area, paying special attention to any cracks, crevices, or joints where there could be mold or mildew. Rinse the tub and dry it well with a towel.
Step Four: Protect the Area and Yourself
Now's the time to take precautions to keep the rest of the bathroom and yourself safe. Similar to how you prep for painting a room, you'll want to tape off the area surrounding the tub with painter's tape. You may also want to lay down a drop cloth to protect the floor, especially right beside the bathtub, to catch any drips.
It's also imperative to put on protective gear now. We're about to break out the chemicals here, and it's always wise to take precautions. Make sure you're wearing closed-toe shoes, long sleeves, pants, protective rubber gloves, a mask, and safety goggles. Open any windows and turn on a fan or air purifier to pull fumes out of the room. Your bathroom's exhaust fan should also be kept on.
Step Five: Rough Up the Surface
If you're using etching powder, apply it according to the package instructions, which usually involve adding water and scrubbing with an abrasive pad, then rinse and dry the tub well. Next, rough up the tub with 400-grit wet/dry sandpaper. Be thorough; this step determines how your new glaze will look. If you didn't use etching powder, you need to spend even more time rubbing the surface with the sandpaper. Rinse the tub and dry it well with paper towels.
Step Six: Prime the Surface
Apply the primer included in your kit using a foam roller and foam brush. (If your kit didn't include a primer, chances are it's because the included refinisher is self-priming. You can skip this step.) Never prime your tub using regular paint primer.
Step Seven: Mix and Apply the Reglazer
Your bathtub reglazing kit will come with two items that need combining at this stage: an epoxy resin and a hardener. Mix the two according to manufacturer's instructions, taking note of the "working time" or "open time" of your kit. That tells you how long you have until the epoxy hardens—it's typically around six hours or less. Working quickly, apply the coating to the bathtub surface, completing the entire tub in one session. Apply a second coat according to the instructions, then allow the tub to dry and cure as directed, typically for at least two to three days.
Step Eight: Caulk and Reinstall Hardware
The time has come for the finishing touches, which will bring your DIY bathtub refinishing project to a very satisfying conclusion. Start by sealing the tub joints (where they meet the walls, floor, or tile) with silicone caulk and allow it to cure overnight. Reinstall your hardware (or spring for new shiny stuff), using plumbers tape if needed, and enjoy a steamy, hard-earned bath or shower.
Follow House Beautiful on Instagram.
You Might Also Like

