Before & After: This Pantry Ditched Its Wire Shelves and Now It’s Way More Functional
People tend to spend most of their cleaning and organizing energy on the spaces that are most visible. This is why a kitchen might generally be in tip-top shape but a primary bedroom closet might languish for years before it gets a complete emptying, decluttering, and rearranging.
But a pantry, aka a kitchen’s “closet,” impacts everyone in my household every time we go to eat or cook. A messy pantry can be a downer every time the door is opened. But an organized one, one where you can find everything, clearly see what you don’t have, and grab exactly what you need right away gives every chef or snacker a burst of calm and joy.
Seeing others’ organized pantries is almost as calming — and it’s certainly inspiring. This is exactly what happened to Tracey (@homewithtracey). “I follow tons of interior design Instagram accounts and after looking at how neat, clean, and organized these homes were … it made me want to do it to mine,” she says.
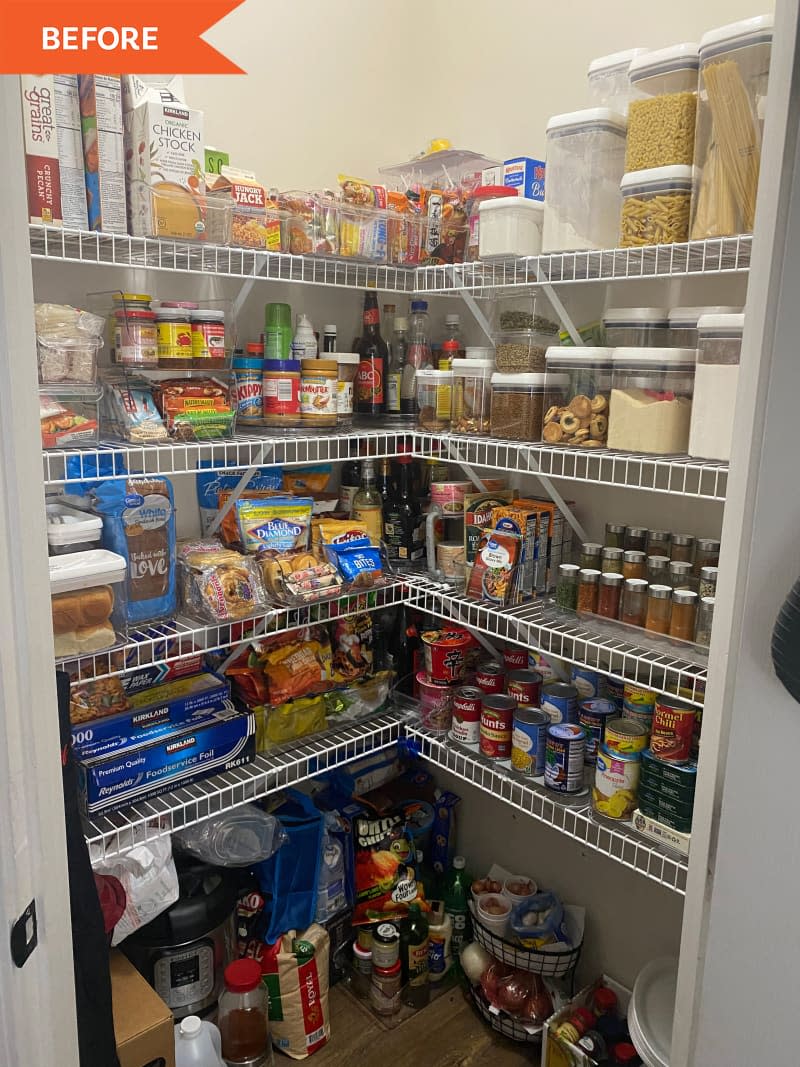
Before Tracey’s impressive makeover, her pantry was full of wire shelves and dysfunctional space. “Everything was pretty much shoved into the shelves/containers,” she explains. “The racks were wired and it’s not the best type of shelves to use because of the gaps. The diagonal support that holds up the shelves was blocking so much space, I wasn’t able to use the space to its full extent.”
On top of the pantry’s function being so compromised, it also wasn’t nice to look at. According to Tracey, “My pantry was such a big eyesore. I was tired of it looking so cluttered, that’s when I decided it needed a redo.”
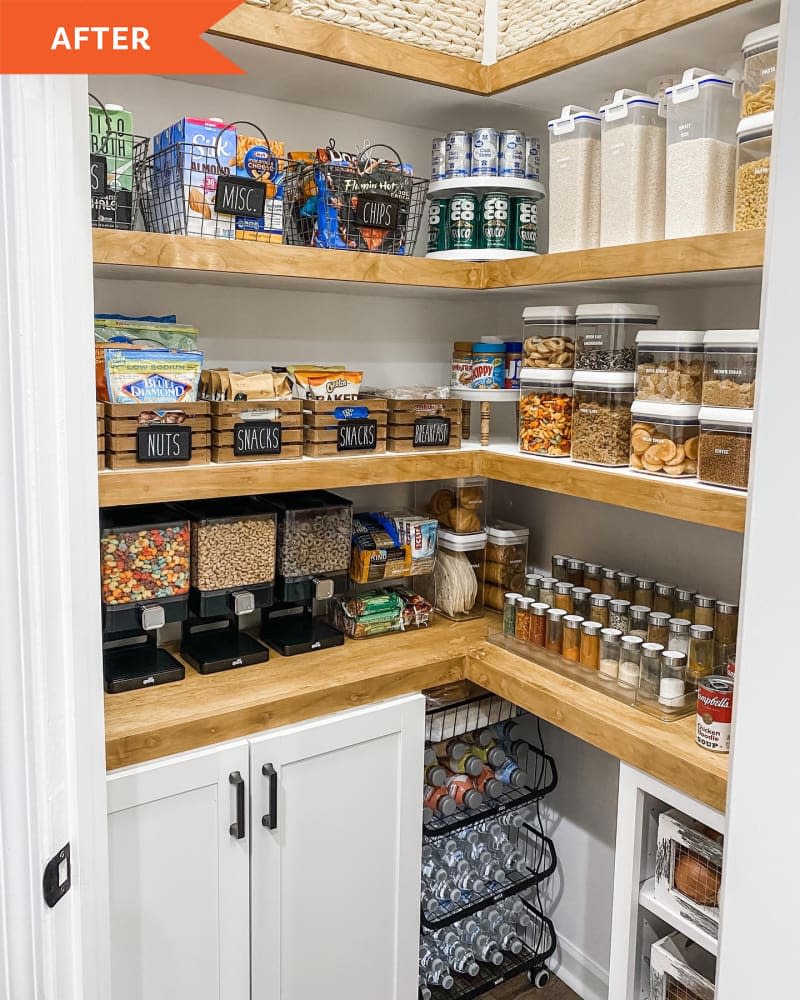
And it got one. Tracey’s goal with her project was to address the pantry’s function and form. “My goal for this project was to make it look aesthetically pleasing yet usable at the same time.” And she had a vision: “I wanted it to have a modern farmhouse style to it. Having a cabinet was a must-have because a lot of my condiment/sauce bottles have labels and hiding those bottles will make it look cleaner.”
Because this was Tracey’s first “hands-on DIY,” she had to purchase all the tools she needed for the first time. She admits she didn’t have a budget in place because she knew this would be her biggest cost. She knocked the project out in three weeks while juggling a newborn.
Tracey offers her step-by-step process:
Step 1: Empty out your pantry and remove wire shelving/baseboard. Patch up holes and paint the wall.
Step 2: Measure and plan how you want your pantry to look like.
Step 3: Build your frames for cabinets and shelves.
Step 4: Install cabinets and shelves.
Step 5: Cut and dry fit your wood. Paint the shelves first (don’t do it at the end like I did). Touch-ups can be done at the end!
Step 6: Install hardwood. Use wood filler to fill in gaps.
Step 7: Cut, dry fit, and install trim. Install plywood. Sand everything down (trim and shelves). Stain bottom plywood.
Step 8: Caulk the seams.
Step 9: Install baseboard (base trim and quarter round shoe trim).
Step 10: Install cabinet hardware.
Tracey shares that “the hardest part was painting all the shelves at the end because it was tedious and cutting the wood precisely.” But the best part? “My favorite part is putting everything back in and just feeling so satisfied that you’ve finally completed your project.”
Tracey sourced her baskets and bins from several retailers, including Amazon, Target, T.J. Maxx, Michaels, HomeGoods, and Marshalls. Regarding “insider tips,” Tracey suggests using large storage containers to hide the bulkier items and employing lazy Susans for sauce bottles and condiments.
For anyone considering a similar project, Tracey recommends taking your time. “Do not rush your project! Take your time — if you don’t know how or what you’re doing, Google it.” She adds that you’ll be able to find most answers to your questions online and through how-to videos. “Most mistakes can always be fixed so don’t be scared.”
This post originally appeared on Apartment Therapy. See it there: Before and After: This Cluttered, “Eyesore” Wire Pantry Gets a Total Modern Makeover

