How to Paint Wood Wall Paneling Like a Pro
Update wood paneling by following this simple step-by-step guide for a beautiful painted finish.
Take your home out of the '70s and paint wood paneling for a low-cost and DIY update. We'll show you how simple it is to give wood paneling a clean, modern look with paint. This step-by-step guide makes the process easy to learn, and you'll have a brand-new look when you finish.
Related: Types of Paint: A Guide to Paint Finishes and Surfaces
Prepare to Paint Wood Paneling

While learning to paint wood paneling isn't hard, proper preparation is essential for the paint to adhere well. Without taking appropriate measures, you could end up with an uneven paint job that you'll have to redo later.
Step 1: Clean Paneling
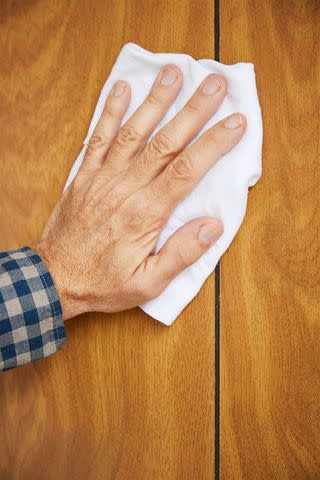
Start by wiping wood paneling clean with a damp rag to remove any dust or dirt. If grease or other problem stains are present, remove them using a mild cleaning solution, then wipe with a clean, damp rag. Be sure to get in the crevices of the panels, which tend to collect dirt. Make sure the wall is completely dry before moving to the next step.
Step 2: Fill Nail Holes
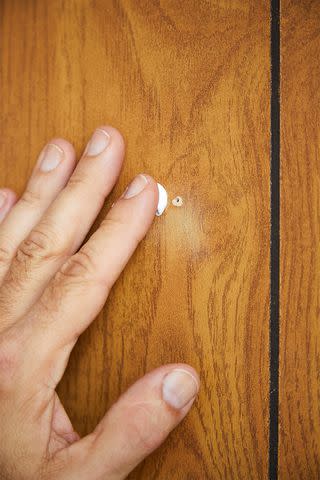
When you paint wood paneling, putty any nail holes or other imperfections with spackling compound. Use a putty knife to best spread the compound over the holes or imperfections. Don't worry about the color of the putty—it will dry neutral and be covered with paint. Allow the putty to dry, then sand the spackling flush with the surface. Wipe away any dust with a tack cloth.
Related: 5 Paint Mistakes That Can Make Your Walls Look Dirty
Step 3: Sand Paneling
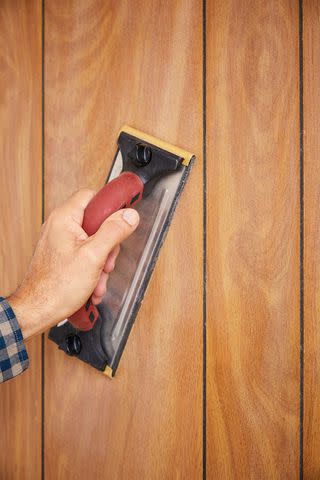
Sand the paneling with 100 grit sandpaper using a pole sander, sanding block, or orbital sander. This will take the sheen off the finish, which will allow the paint to adhere better. Don't get carried away and sand the surface down to the bare wood—just enough to rough up the existing finish.
Step 4: Remove Trim
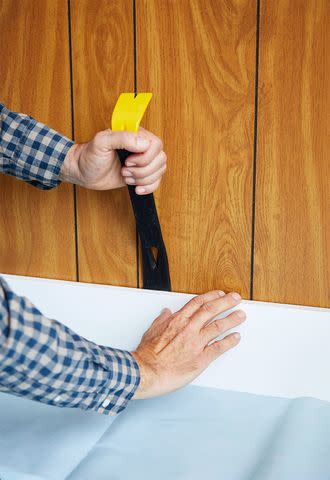
If you plan to keep the trim's color as-is or paint it a shade different than your wood paneling, remove it from the wall. Use a prybar and gently pull it loose. If you plan to paint the trim the same color as the wall, lightly sand the adjacent wood trim on the baseboards to allow the paint to adhere to it. Once everything has been sanded, go over the walls and trim with a clean, damp cloth to remove dust or particles. Touch up any rough sanding spots along the way.
Related: 15 Types of Trim to Consider for Your Home Renovation
Step 5: Caulk Cracks

Using a caulk gun, apply caulk to any cracks and gaps where the paneling meets the baseboard and ceiling or around doors and windows. This will give your room a nice, polished look. Allow the caulking to dry thoroughly before you paint the wood paneling. Consult the manufacturer's instructions to see how long you should let it cure.
Step 6: Protect Surrounding Areas
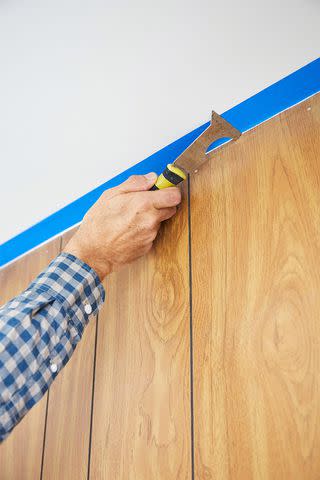
This step is important to keep your room clean while painting wooden wall panels. First, cover the floor with drop cloths large enough to reach along the paneled walls. The paint might drip, and the drop cloth will save your flooring. Next, with painters tape, mask any areas you wish to protect, such as vents, doorways, or windows.
Step 7: Prime and Paint Paneling
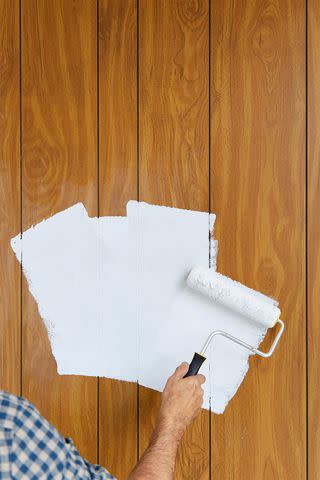
Prime paneling with a latex, stain-blocking primer. We recommend tinting your primer with a colorant similar to the finished paint for even coverage.
Use a roller with a medium nap to paint wood paneling. It should have a long enough nap to fill the vertical grooves in the paneling but short enough to leave a smooth surface. We also advise using a roller with a large or adjustable handle. This will help you reach the entire span of the wall with ease. Once the primer has dried, finish it with two coats of latex wall paint.
Related: What to Know About Paint Sealer and Primer for Your Next Project
The Result: Modern Painted Wood Wall Panels
While painting over wood paneling takes a bit of extra preparation, the result looks clean and crisp. Simply painting the trim involves much less work than tearing it out and replacing it with drywall. Also, we love the textured look of painted paneling! Try this intermediate painting project and see how easy it is to upgrade your space over a weekend.
For more Better Homes & Gardens news, make sure to sign up for our newsletter!
Read the original article on Better Homes & Gardens.

