How to paint a snowy scene in watercolour
The fluidity, transparency and immediacy of watercolour allows the artist to interpret a wide variety of subject matter. Although challenging, especially for beginners, watercolour paints can be simplified by adopting a limited palette and choosing a subject with good ‘tonal contrast’ and there are plenty of watercolour tutorials to help refine your skills.
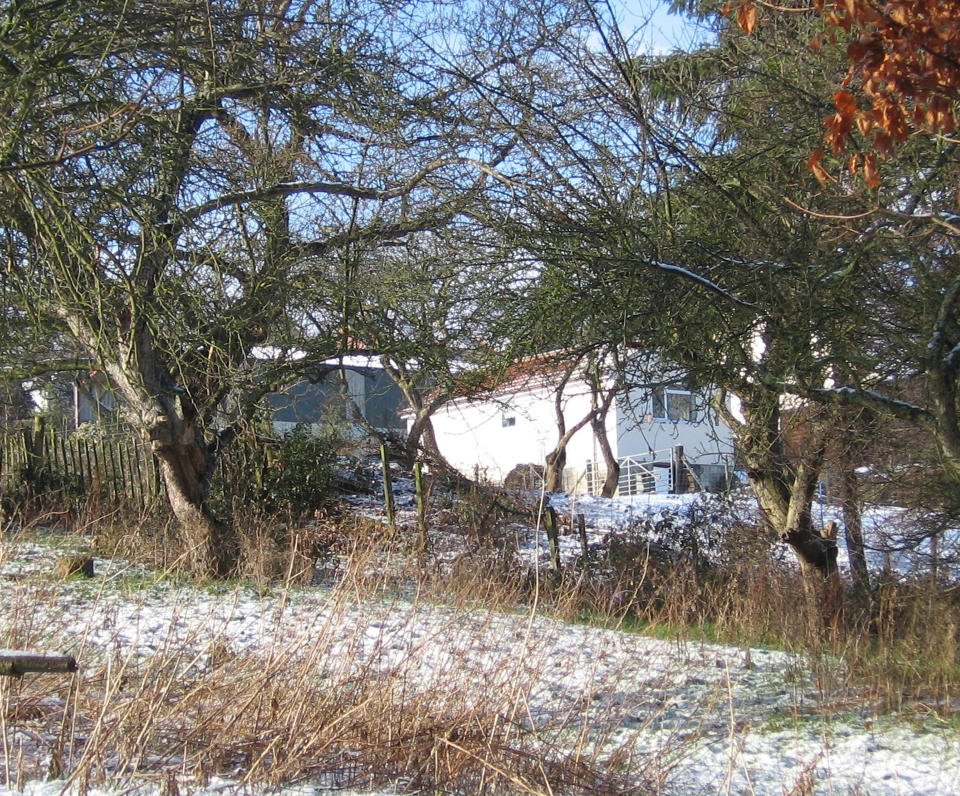
In the following snow scene demonstration, I followed the above criteria and worked from photographic reference, in conjunction with a ‘plein air’ oil painting. Working from a sketch – or even a painting in the final stages – helps to eliminate the often overwhelming detail in a photograph.
01. Gather your materials
To complete this painting you will need:
– Arches, cold pressed, ‘Not’ watercolour ‘block’
– Brushes: Escoda Perla - Nos 8 and10; Pro Arte ‘Acrylix’ Series 202 Nos 2, 4; 203 No 2 Rigger
– Winsor and Newton artists tube colour: Raw Sienna, Burnt Sienna, Cobalt Blue, Cerulean, Ultramarine Blue, Cobalt Violet, Permanent Magenta
– Masking Fluid
– Masking tape
– Ceramic mixing palette
– Small tube of white acrylic paint
– 2B pencil
– Plastic eraser
– Kitchen towel
02. Begin to draw and mask
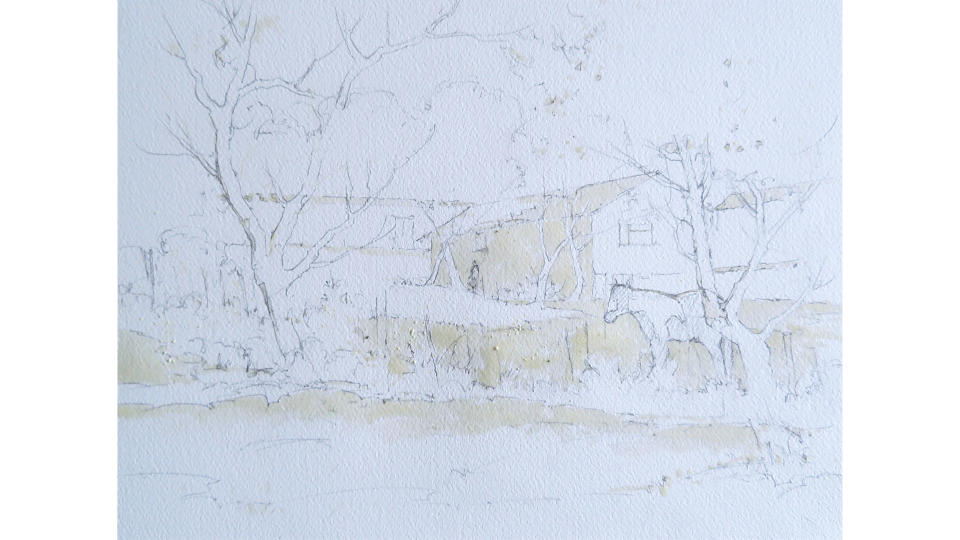
(Image: © Robert Brindley)
Using a 2B pencil, I drew out just enough of the image to enable me to apply the initial loose wet-into-wet colour washes accurately. The predominant areas of sunlit snow, together with smaller highlights, were then preserved with masking fluid using an old No. 2 Pro Arte Acrylix brush. It is important to mask these areas as accurately as possible. Clean the brush immediately after use.
03. Mix colour pools

(Image: © Robert Brindley)
I prepared several colour pools for the first wet-into-wet washes.
These mixes don’t need to be exact; I call them my ‘first guess’. They were prepared using the following colours: Cobalt Blue, Cobalt Violet and Raw Sienna (these three colours are the basic primaries upon which the entire painting is based). In addition, mixes using the following colours were also prepared: Raw Sienna, Cobalt Violet, Burnt Sienna, Cobalt Blue, Ultramarine Blue, Cerulean and Permanent Magenta.
04. Wet into wet, diffused wash
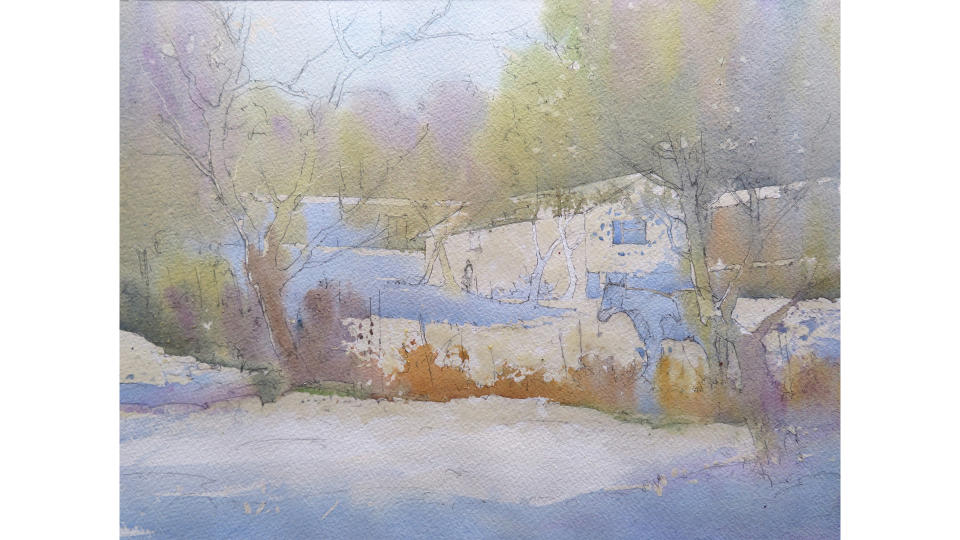
(Image: © Robert Brindley)
Before introducing any of the pre-mixed colour pools, I wet the paper thoroughly. By doing so, a little more time can be taken applying the colour and a soft, diffused result is more readily achieved. My aim was to place the colour from light to dark and as accurately as possible, letting the colours mix freely.
05. Develop the foliage
(Image: © Robert Brindley)
When dry, the foliage on the main trees was painted using the following mixes: Raw Sienna and Cobalt Blue; Cobalt Blue, Raw Sienna and Permanent Magenta; Cobalt Violet, used sparingly, was introduced into the above, damp washes. I tried to keep this diffused wash simple with only a little definition to the edges of the foliage.
06. Remove the masking fluid
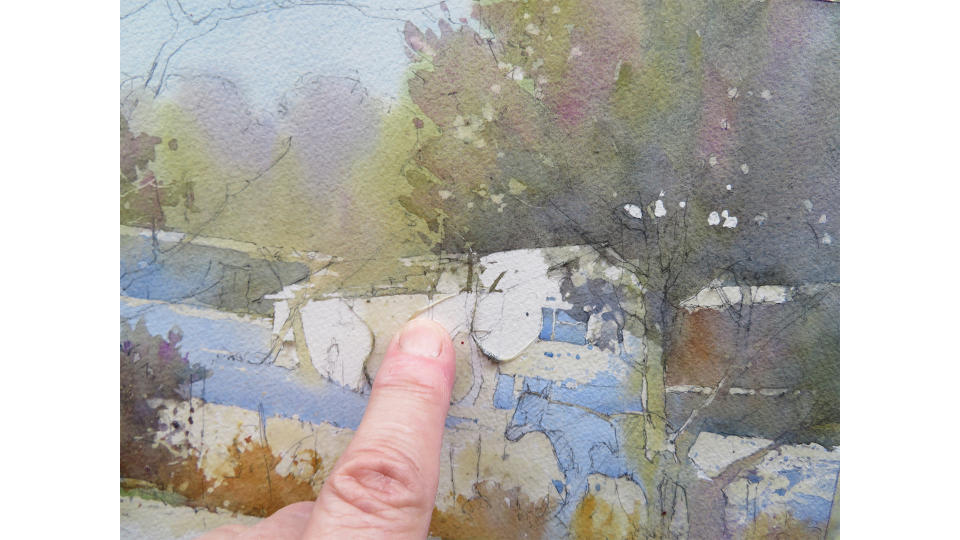
(Image: © Robert Brindley)
Once completely dry, I removed all of the masking fluid using a clean finger. You should never attempt to remove masking fluid until the painting is completely dry. With a damp brush, I then softened a few of the harsher edges. This ensures a variety of edge and makes the masked areas appear more natural.
07. Develop tree trunks and branches
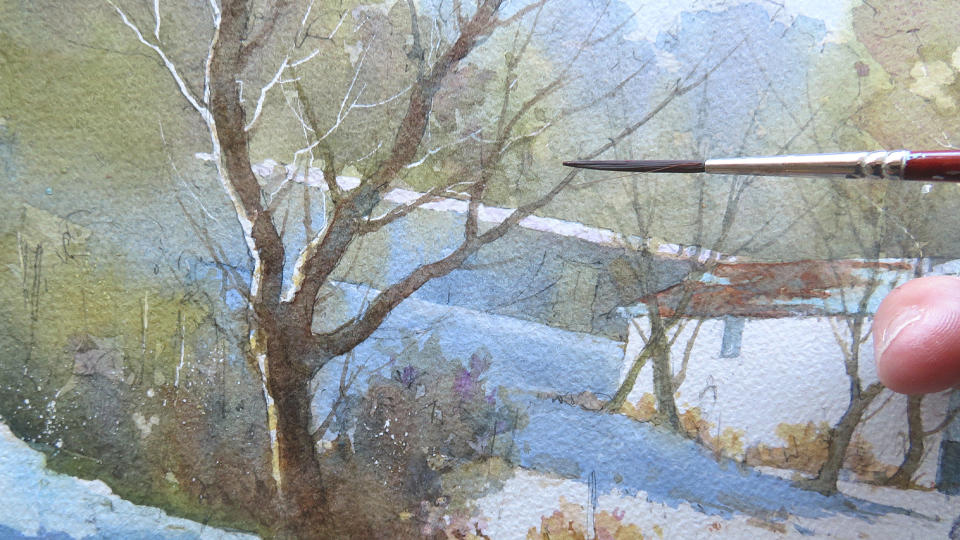
(Image: © Robert Brindley)
Using the No 2 Rigger and the No 8 Escoda Perla, I started to paint the tree trunks and branches. I created a natural taper on the finer twigs and branches by using the brush from bottom to top, finishing with a flick to end the stroke.
The two colour mixes used were: Burnt Sienna and Ultramarine Blue, one with slightly more Ultramarine in the mix and the other with more Burnt Sienna.
08. Paint the pony
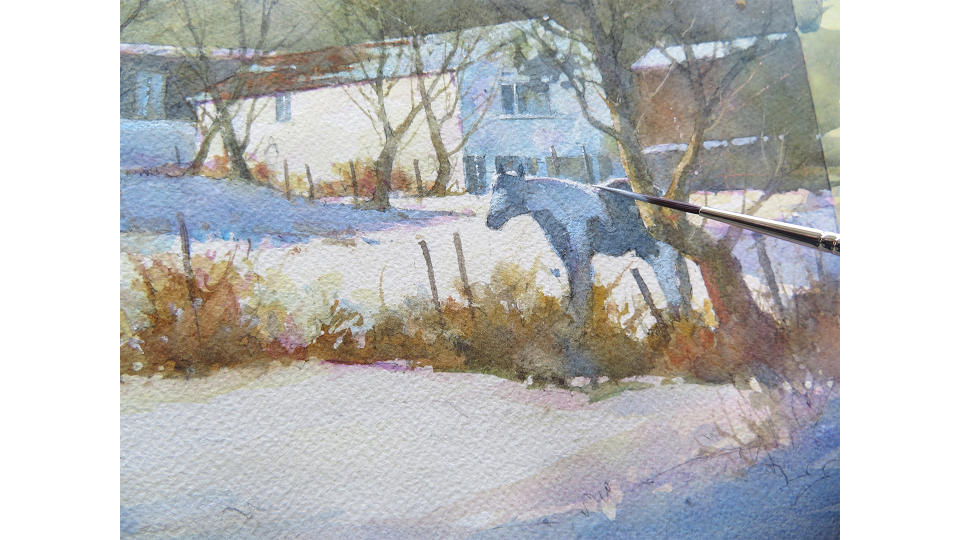
(Image: © Robert Brindley)
To add life to my painting, I included a pony, which was taken from one of my reference photographs. Although I took care to retain the masked highlights, I had to use a little pure Titanium White acrylic paint to reinstate them.
The colour mixes used were: Cobalt Blue, Permanent Magenta plus a touch of Raw Sienna, making a grey-blue colour. A mix of Ultramarine Blue plus Burnt Sienna was used for the dark patches.
09. Add details and foreground wash
(Image: © Robert Brindley)
I started to add the fence posts and more detail to the grasses and bushes on the fence line. I also began to develop the white building further, giving consideration to the tonal values with regard to the lit wall and the wall in shadow. These tonal values ensure that the painted building looks convincing and three-dimensional.
10. Paint the falling snow
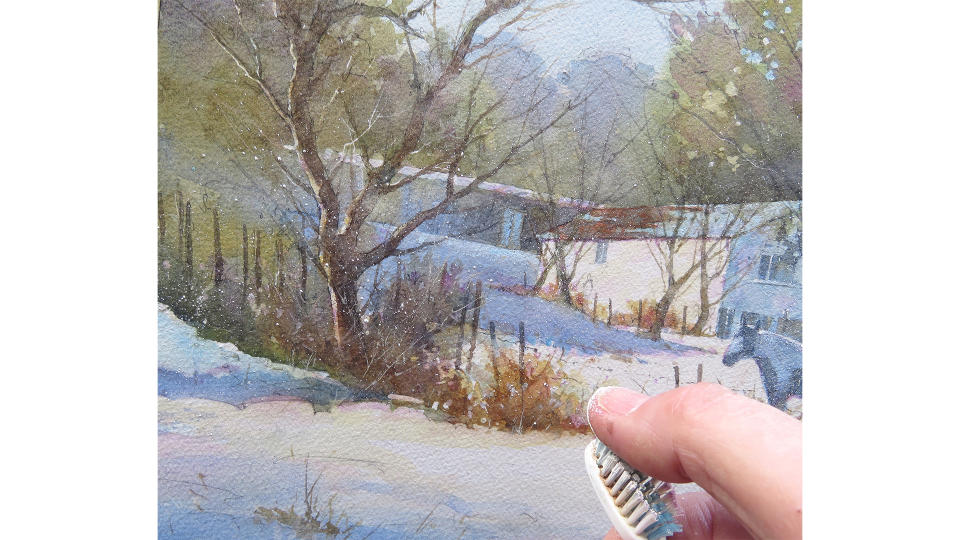
(Image: © Robert Brindley)
I had not planned to paint falling snow, but I felt that it would add atmosphere, further interest, and it would help to soften the overall feeling of the painting. I used a fairly fluid mix of Titanium White acrylic and loaded an old toothbrush with the mix. After trying out the effect on a scrap piece of paper, I spattered the paint carefully using my thumb. I built up the spatter in several applications to control how far that I wanted to take it.
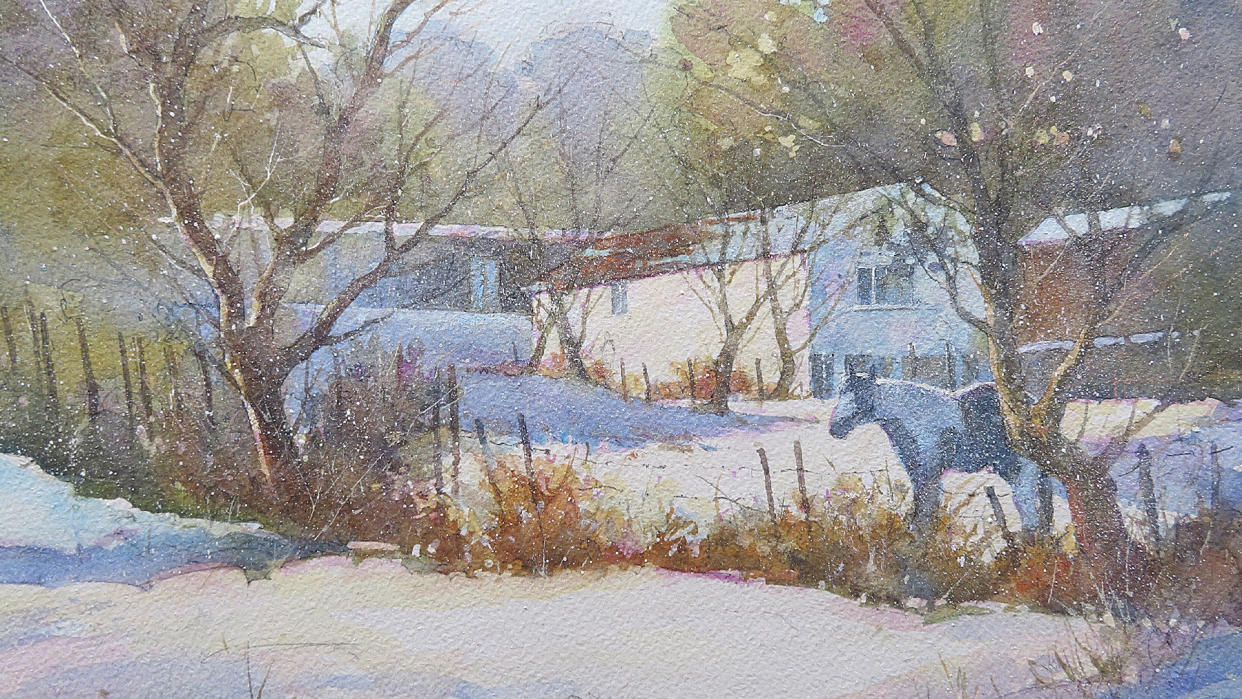
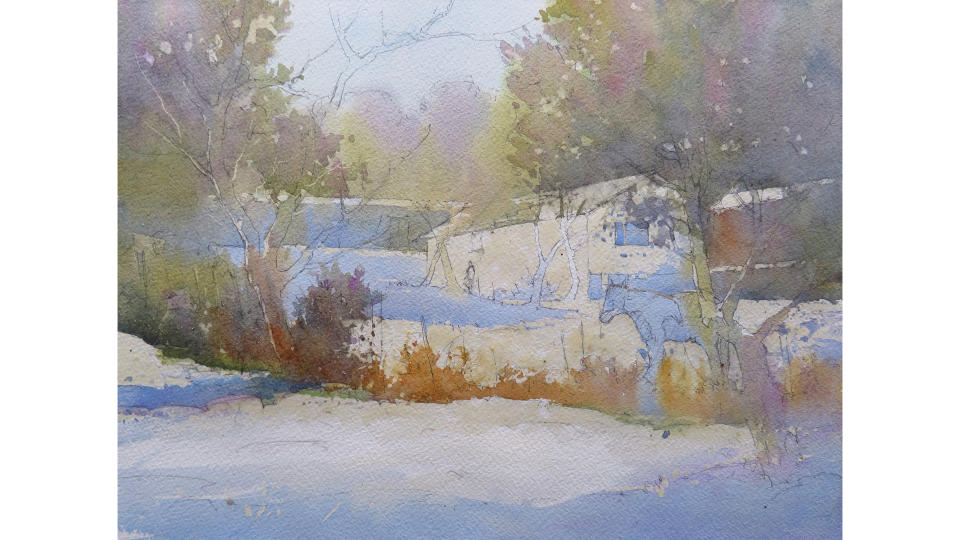
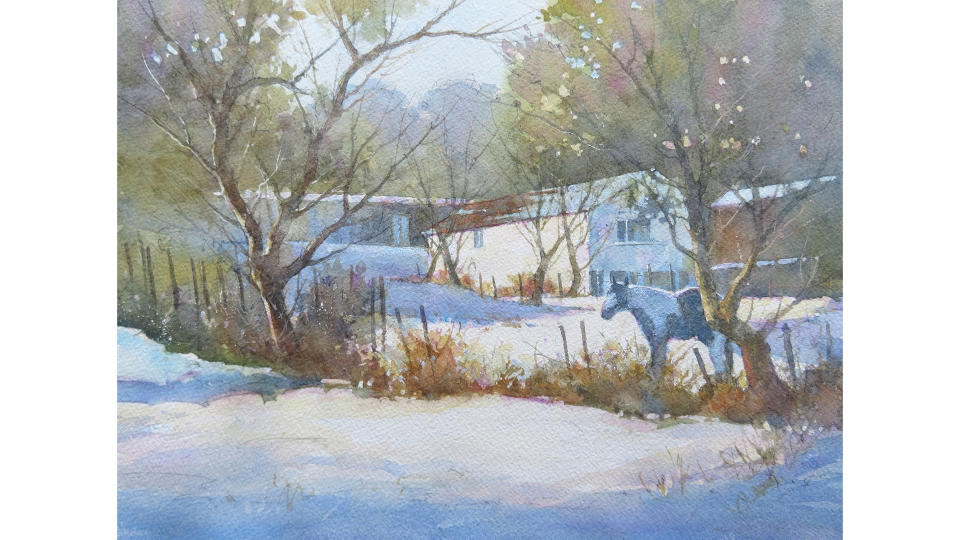
11. Complete finishing touches

(Image: © Robert Brindley)
In this step I gave careful consideration to all aspects of the painting, most importantly to ensure that the tonal values were correct. I was also mindful that by adding too much detail and unnecessary information, I could easily reduce the effectiveness of the painting. I did very little extra at this stage, just adding a few grasses, fine twigs and a few more details on the building.
This content originally appeared in Paint & Draw Watercolours. Buy it at Magazines Direct here.

