How to Organize a Utensil Drawer
Make mealtime a treat with easy-to-reach utensils using these simple drawer organization tips.

Of all the items in your home that go through wear and tear, it’s arguably utensils that see the most usage. Forks, knives, and spoons handle all kinds of food, get run through the dishwasher, then get tossed into a drawer at the end of the day. This also applies to larger cooking tools, especially if you and others in the house are frequent cooks and bakers.
Give all your utensils a proper place to rest when they’re not hard at work with the following ideas for organizing a utensil drawer. And never misplace your favorite spatula again.
1. Personalize Your Utensil Organizer
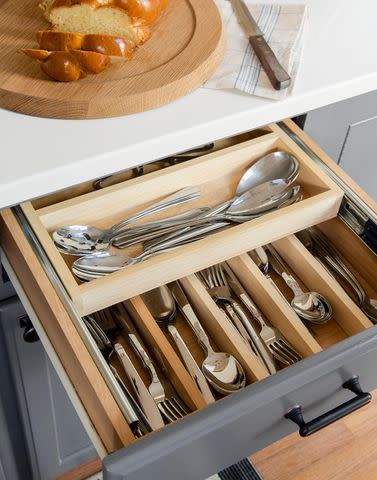
This might sound obvious but you most likely already have something to corral your everyday utensils. But are you using one that really works for you? For example, if you have seven types of utensils in regular use but your organizer only has five or six slots, a couple of them are might not have a home. Find a utensil organizer that has the exact number of compartments for each type, including ones that you use frequently, such as chopsticks and steak knives.
The most often used utensils should be placed in the front and from left to right. In my own organizer, I place small forks, large forks, small spoons, large spoons, and regular knives across five vertical compartments that are front and center. There are two horizontal sections behind these in which I place steak knives and chip clips (which are not necessarily utensils but something I reach for often). The system has to work for you and your family. If you have little ones, consider a second organizer, albeit a smaller one, just for their tiny tools.
Another thing to consider is the type of material. As a professional organizer, I’m not a fan of mesh metal trays because I find that dirt and crumbs collect and fall through the cracks. It’s much easier to clean acrylic organizers as you can hand-wash them or bamboo drawer dividers that can quickly be spot-cleaned with a damp cloth.
2. Try an Expandable Tray
If your utensils change from time to time, or if you move frequently, it might be a good idea to try out an organizer that is customizable. Find a tray that can contract in a smaller drawer and expand in a wider one or simply when you want it to hold more items. These are available for smaller, everyday utensils, as well as larger cooking utensils. This gives you the option to make your drawer system work for you, allowing you to modify it to your exact needs.

3. Make Use of Drawer Dividers
One of my all-time favorite kitchen organizers, other than a lazy Susan, is a durable drawer divider. You can build your own dividers if you’re handy or find the spring-loaded kind that can pop in wherever you need them. Just be sure they fit the height of your drawer and expand to the correct depth so they’re not too short or long.
Drawer dividers are excellent for long, bulky kitchen utensils such as wooden spoons, whisks, and the infamous potato masher. Space them out as wide or as narrow as they need to be to fit all of your tools. If you like the idea of dividers for your everyday utensils, I recommend finding a set that comes with inserts to maximize the space in the drawer.
4. Use a Compact Cutlery Organizer
Short on drawer space? Try a compact cutlery organizer that works well for narrow drawers. These streamlined organizers allow you to fit all of your knives, forks, and spoons in one place while also keeping them tidy and accessible. It’s an especially smart solution for small kitchens.

5. Stay Flexible with Individual Inserts
While not ideal for all of your everyday utensils, individual drawer inserts give you a lot of options for the placement of utensils. If you choose bamboo or acrylic organizers, make sure that your longest utensils, most likely knives, fit the length of them. Arrange them in the drawer in a way that makes sense for you and be sure to add some museum gel or putty to the bottom of each to prevent them from slipping and sliding.
6. Don’t Forget to Label
It might seem like overkill, but if you want your utensil drawer organization system to stick, don’t skip this step. It’s especially helpful to label when you have multiple people who put away the dishes once they’re clean. Add small labels using easy-to-remove label tape on the inside lip of the kitchen drawer, just below where certain items are located. So now when the small spoons come out of the dishwasher, there’s no question about where they need to be returned.

