Here’s How Often You Should Be Cleaning Your Dryer Vent
Getty Images
Cleaning our washing machines and dryers may be the last chores we want to take on after tackling multiple loads of laundry. However, keeping appliances in tip-top shape is the secret to securing the ultimate protection for your clothing, linens, and other washable household items while ensuring they retain their quality for as long as possible.
One of the most important elements of your laundry-related appliances to keep clean is the dryer vent. As Dryer Vent HQ says it’s responsible for how effective your dryer is, and there’s nothing worse than having to run yet another dry cycle when you’re trying to get through multiple loads. Plus, slacking off on this chore is actually a fire hazard.
The U.S. Fire Administration says that nearly 3,000 dryer fires are reported in this country each year, with failure to clean the dryer often enough as the leading cause of these incidents. The organization notes that these fires mostly occur in the winter months, so it’s especially important to stay on your dryer cleaning game during this time of year.
How Often Should You Clean Your Dryer Vent?
Window Ninjas, a home care service based in Richmond, Virginia, advises having your dryer vent cleaned every year, though the company recommends having it cleaned more often, about every 6-9 months, if you have a large family or multiple pets. Some signs you may need to clean your dryer vent are: your laundry is taking longer than usual to dry, the dryer itself is becoming hotter to the touch than normal, and a burning smell coming from your laundry area, according to The Home Depot.
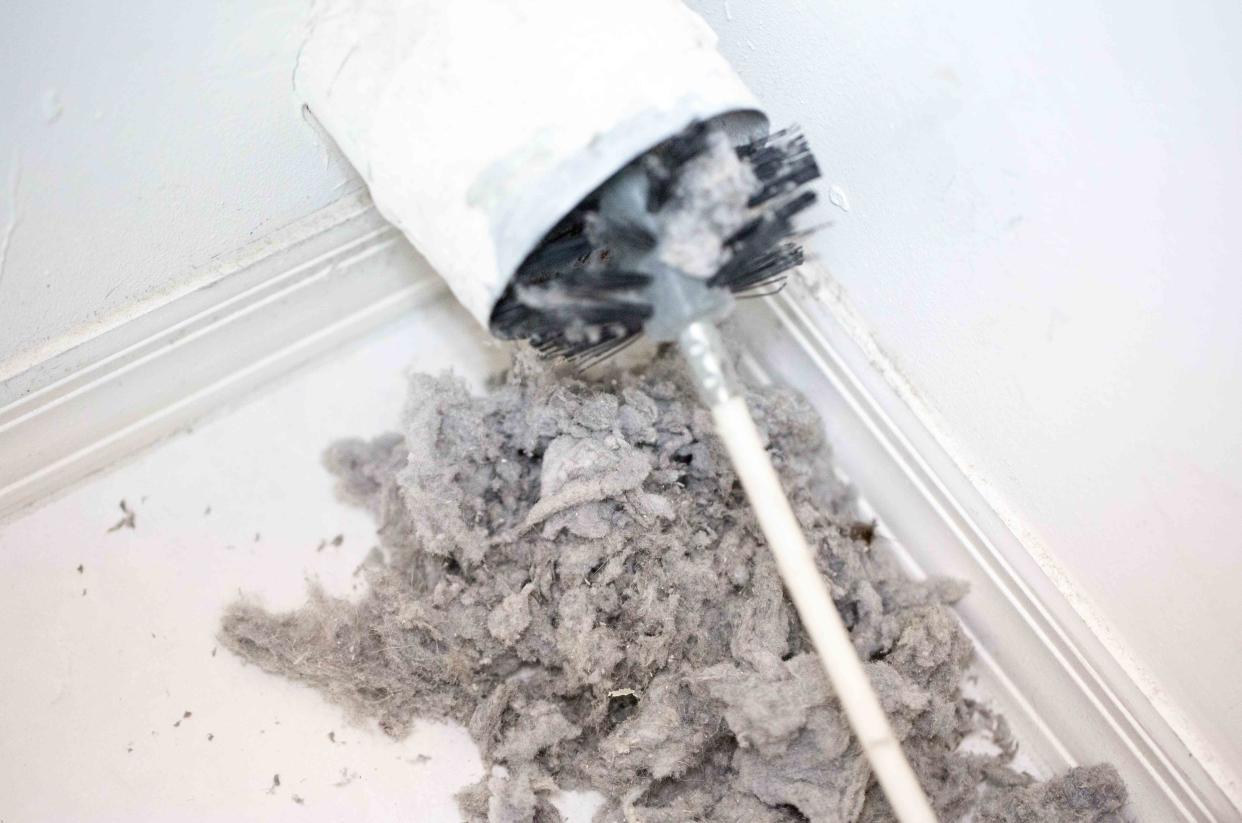
How To Clean Your Dryer Vent
It may be worth seeking professional help for this task to ensure that your dryer vent has been properly cleaned to promote a healthy, safe home and efficient dryer. However, you can take on this chore yourself if you know how to do so properly.
Cleaning your dryer vent is a relatively simple process, starting with inspecting the vent—and the area around it—to ensure it’s not damaged, restricted, or being blocked by animal nests, according to U.S. Fire Administration. From there, The Home Depot recommends unplugging the dryer and disconnecting the dryer duct. Those with gas dryers will need to also turn off the supply valve until the cleaning process is over.
Afterwards, you’ll want to use a vacuum cleaner or shop vacuum to clear any lint and other debris out of the vent hole at the back of the dryer. If your dryer vent is too long to remove debris with a vacuum, you can also use a dryer vent cleaning kit equipped with a special brush that offers a more thorough clean.
Once you’ve finished cleaning, it’s time to reconnect the dryer vent duct, push the dryer back in place, and either replug the dryer in or turn on the gas safety valve. You’ll want to test out your dryer’s efficiency and cleanliness by running it on the “fluff” or “air dry” setting for 15-20 minutes before tossing in a load of freshly washed laundry.
There are several steps you can take to help promote the cleanliness of your dryer in between vent cleanings. Whirlpool says that lint build-up is common for those who overload their washers, wash clothes on a longer or higher water setting than needed, and neglect to clean their lint traps after each load of laundry. Avoiding these common mistakes will help ensure the efficiency and safety of your appliance for as long as possible.
For more Southern Living news, make sure to sign up for our newsletter!
Read the original article on Southern Living.

