Mistakes You’re Making With Your Indoor Cycling Setup That Could Cost You Watts
"Hearst Magazines and Yahoo may earn commission or revenue on some items through these links."
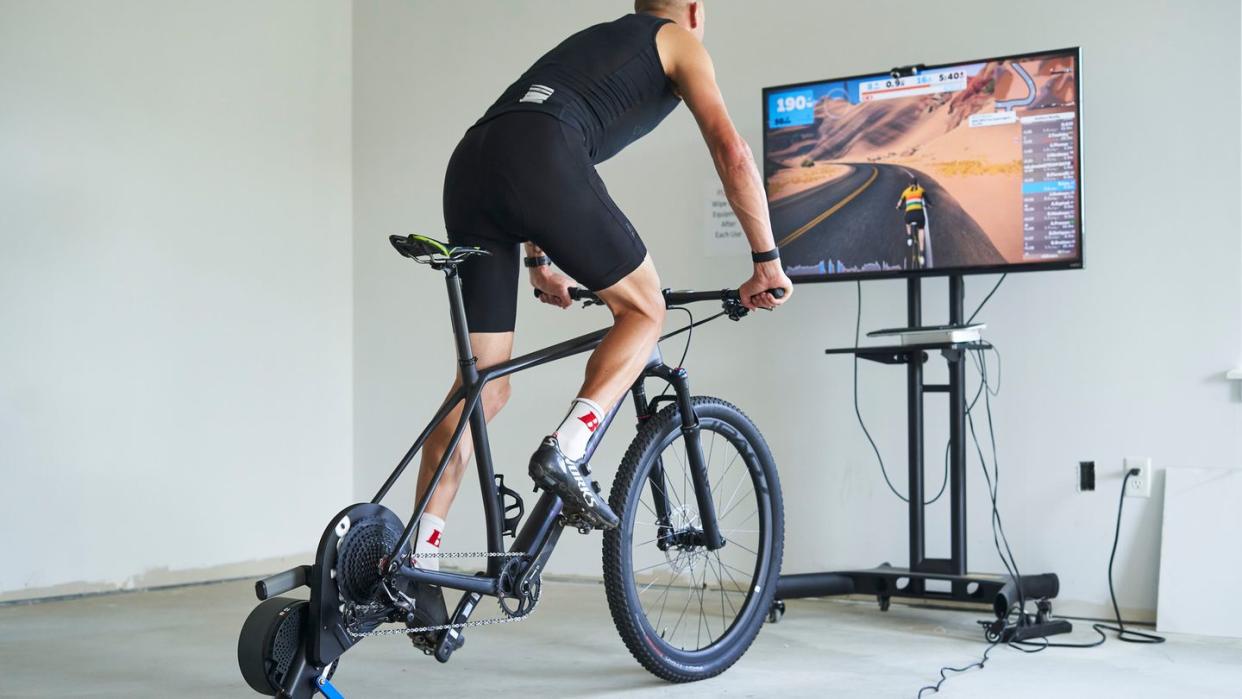
Whatever your preferred method of indoor riding may be—wheel-on trainer, direct-drive trainer, exercise bike, or rollers—most cyclists can agree that indoor riding tends to be a bit drab compared to outdoor riding. Instead of whizzing past scenery and breathing fresh air, you’re staring at a screen or, goodness forbid, a wall.
“Generally, it’s less comfortable to ride indoors because your bike isn’t actually moving,” says USA Cycling certified coach Paul Warloksi. “There’s stale air blowing, and there’s less stimulation.”
While those are generalizations, Warloski says—because you can create a pretty nice indoor setup—they are common pitfalls of indoor riding, even for indoor cycling class aficionados. Other common problems with indoor biking include lower power output, boredom, and greater susceptibility to chafing and saddle sores (if you don’t know what saddle sores are, consider yourself blessed).
In this guide, Warloski and two other certified cycling coaches share their best advice for optimizing your indoor bike setup, including the mistakes you want to avoid, and getting the most out of indoor sessions.
Mistakes You’re Making With Your Bike Trainer Setup
Indoor bike trainers encompass any type of trainer that attaches to a bike. This includes direct-drive trainers, which connect to your bike’s cassette, and wheel-on trainers, which utilize an axle and a flywheel to create friction against your tire. To make your indoor rides more comfortable, avoid these mistakes:
1. Stop: Changing Something About Your Outdoor Fit
Start: Keeping Everything the Same
“Your bike setup and fit should be the same, whether inside or outside,” Warloski says. Changing anything, from the seat height to handlebar depth, is a recipe for discomfort. If you’ve been feeling the need to change something about your fit for indoor riding, it’s likely you just need a new bike fit in general.
2. Stop: Thinking You Don’t Need to Put Air in Your Tires
Start: Airing Them Up Almost Every Time
With a wheel-on trainer, such as the Saris M2 trainer, Warloski says, “the caveat is to make sure you have the tire pumped up to a good pressure and the flywheel tight against the tire to optimize the resistance.”
Before each ride, pump your tires up to the same tire pressure you would for outdoor riding. Tighten the flywheel, and tug the wheel with one hand: If it spins wildly, tighten it some more. If you get the PSI and the flywheel tightness right, your power should be spot-on, Warloski says.
3. Stop: Staying as Still as a Statue
Start: Moving Your Body Like You’re Outside
Due to the lack of environmental factors you get when riding outdoors, such as shifting to accommodate for sloped roads, making turns, and swerving to avoid obstacles in the road, stagnant posture can become an issue during indoor rides, says Kellie Kopach, certified cycling instructor at Life Time Fitness.
“Unlike riding outdoors, cyclists will not be moving around on the bike as much, so any issues with saddle height, bar width, and brake placement will be more prominent,” she says. Regularly moving around, such as shifting your weight back-to-front or moving up and down from your drop bars, can help.
4. Stop: Comparing Indoor Power to Outdoor Power
Start: Comparing Apples to Apples
Feeling discouraged by your Zwift power readings? Don’t stress about it too much. “Comparing the accuracy of your outdoor power meter to a Zwift Hub to a flywheel trainer is comparing apples to kumquats in many cases,” according to Warloski.
“Your power will be different inside versus outside, sometimes higher, but generally lower,” he says. “It’s best to keep your power estimate on each particular trainer.”
He recommends performing a functional threshold power (FTP) test on the indoor trainer to get accurate numbers for it. “Then, don't worry about comparing your numbers to your road numbers, just the machine you’re on,” he says. That indoor FTP should then set the numbers for your power zones when riding inside and you can keep an eye on it to track your progress.
5. Stop: Forgoing Bike Shorts Because “It’s Only an Hour”
Start: Wearing Your Cycling Gear
Although trainer rides are often shorter than outdoor rides—because, hello, intervals!—it’s still wise to wear a proper kit. Because you’re more likely to stay seated and still during an indoor ride, rather than moving around a lot in the saddle, there’s a greater chance of chafing and saddle sores, Warloski says. Good bike shorts and chamois cream help just as much on the trainer as they do outside, he says, so don’t skip just because it’s a short ride.
Mistakes You’re Making With Your Stationary Bike Setup
Indoor stationary bikes come with their own set of challenges, although there’s a lot of overlap in terms of common setup mistakes, too.
6. Stop: Expecting Road Bike Wattage
Start: Realizing Indoor Bikes Are Different
Different types of bikes have different designs, so it’s complicated to compare, says Sarah Griffin, Cyclebar master instructor and certified cycling coach. “Someone can reasonably expect their power output to be lower on a Spin bike because movement is restricted,” she says.
Additionally, Kopach reminds you not to forget about the “X-factor.” “Of course [your power] will differ, because outdoor cycling adds extra challenges, depending on your environment. Factors like road, mountain, and wind resistance require heavy use of your hip flexors, quadriceps, and glutes. Indoor cycling participants use the same muscles, but in a controlled environment,” she says.
7. Stop: Trying to Mimic Your Road Bike’s Geometry
Start: Accepting Your Indoor Bike’s Frame
The experience of a stationary bike versus a road bike is “very different because the bike frames in a group fitness studio setting are one-size fits all,” Kopach says. That means the indoor ride will likely feel different, and that’s okay, as long as you’re set up correctly for that particular exercise bike.
If you plan to cycle in a class setting, Kopach recommends that new riders arrive to their class early in order to get a professional setup on the bike. “Proper seat height and handlebar setups are paramount in order to get the best results in a cycling class,” she says, noting that setting the saddle height too low is a common mistake on stationary bikes. This can lead to reduced power output because you don’t benefit from full extension of the legs.
The best way to find the correct saddle height for you is to see a professional, which in the case of a stationary bike would be an instructor who is familiar with the bike’s geometry. If you can’t make that happen, the rule of thumb is that your knees should almost—but not quite—fully extend at the bottom of the pedal stroke.
8. Stop: Accepting Discomfort
Start: Adjusting the Fit
If you feel uncomfortable on a stationary bike, don’t just accept it as fate—discomfort indicates that you need to make adjustments, Griffin says, just like on a regular bike.
“While some discomfort may be normal when getting used to the seat, nothing should be painful,” Griffin says.
Improper handlebar height is a common culprit for low back pain, Griffin says, while improper seat height commonly causes knee pain.
If you can’t make it to see a professional for a bike fit, Griffin says one tip for finding the right handlebar setting on an indoor exercise bike is to start with your handlebars higher than you think you need and then make slight adjustments until it feels most comfortable. You shouldn’t be overreaching for the bars, but you also shouldn’t be slouching or rounding drastically to grip them—and you definitely shouldn’t end the ride in pain.
Adjusting your seat is a bit more straightforward than the handlebars. “If you experience knee pain, adjust your seat until your knees are slightly bent [at the bottom of the pedal stroke] and pointing forward,” Griffin says.
What to Know About Your General Indoor Cycling Setup
There’s one tip that applies to both indoor bike trainer setups and stationary bike setups:
9. Stop: Enduring Boredom
Start: Making Indoors a Pleasant Riding Experience
Any discomfort you feel during an outdoor ride is likely to be elevated during an indoor ride simply because you’ll be more aware of it, Warloski notes. This is why your indoor riding environment—the setup around your bike setup, if you will—is so critically important.
Warloski recommends getting a good fan or two so you’re not riding in stagnant air, as well as keeping towels on your handlebars and/or wearing a bandana to collect sweat, since you won’t have the benefit of moving through air to evaporate it.
Additionally, having two screens is beneficial, if possible: one for your indoor riding software, such as Zwift or Rouvy, and another showing something that really interests you. Creating distractions so you’re not thinking about riding your bike in your garage or living room can be key, Warloski says.
You Might Also Like

