How to Make Marshmallows: The Best, Easy Recipe
Whether topping hot cocoa or taking center stage in s’mores, marshmallows are always a good idea—and fresh, fluffy homemade marshmallows are much better than store-bought ’mallows. If you want to learn how to make marshmallows yourself, the good news is that it’s actually pretty simple. The most important things you need are a stand mixer and a little patience.

KitchenAid Artisan Mini Series 3.5-Quart Tilt-Head Stand Mixer
$320.00, Williams-Sonoma
Marshmallows need to sit for several hours before they’re ready, but the recipe requires just a handful of pantry ingredients and very little active prep time. Plus, once you master the basic technique, it’s a cinch to add colors, flavors, or mix-ins, and it’s even easier to cut your homemade marshmallows into fun shapes. Making marshmallows, especially when you start creating different colors and shapes, is also a fun and easy kitchen project for kids.
In this guide to DIY marshmallows, we’ll share a classic recipe, plus several fun variations. Here’s exactly how to make marshmallows at home, including tips on coloring, flavoring, and properly storing fresh homemade marshmallows.
The best homemade marshmallow recipe
Yield: 64 mini marshmallows
1. Gather your supplies and ingredients
Making marshmallows is a quick and easy process, but it involves specific timing and extremely hot sugar, so it helps to get all the equipment ready and the ingredients measured before you begin. Here’s everything you’ll need.
Tools
Saucepan
Sharp knife
Rubber spatula
Pastry brush
Cutting board
Candy thermometer with a metal clip
4½ -quart or larger stand mixer and a whisk attachment
9" or 9x13" square pan or ceramic baking dish
Small fine-mesh sieve
Ingredients
Vegetable oil for brushing pan
About 1 cup powdered sugar for coating pan and marshmallows
3 (¼-oz.) envelopes powdered unflavored gelatin
1½ cups granulated sugar
1 cup light corn syrup
¼ tsp. salt
2 tsp. vanilla extract
2. Prepare your pan
Start by using a pastry brush to lightly brush your pan with vegetable oil, then use a fine-mesh sieve to dust the pan with powdered sugar.
3. Prepare the water and gelatin
In the bowl of a stand mixer, dissolve the unflavored gelatin in ½ cup water and let it soften.
4. Make the sugar syrup
Bring the granulated sugar, corn syrup, ½ cup water, and salt to a boil in a saucepan while gently stirring to dissolve the sugar. Attach a candy thermometer to the side of the pan and continue boiling the sugar syrup, without stirring, until it reaches the soft-ball stage, or 240°F.
5. Mix the sugar syrup and gelatin together
Remove the pan from the heat and wait for the bubbles to slightly subside, then turn the mixer on low and slowly pour the hot sugar into the gelatin mixture. Gradually increase the mixer speed to high and continue beating for about 5 minutes or until the mixture is thick and forms a thick ribbon when the whisk is lifted. Beat in the vanilla and then scrape the mixture into the prepared pan, using wet fingers to spread and smooth it.
6. Let the marshmallows sit
Let the marshmallows stand at room temperature until they are no longer sticky and you can gently pull them away from the sides of the pan. This takes about 4 hours, but marshmallows can also sit overnight. While it’s not required, you can cover the pan of marshmallows loosely with aluminum foil. Avoid using plastic wrap because it tends to droop and stick to the marshmallows.
How to cut and store marshmallows
When the marshmallows are ready for cutting, dust a cutting board with powdered sugar, then use a rubber spatula to pull the marshmallows away from the pan and invert them on to a cutting board. If they stick to the pan, carefully slip a spatula underneath the marshmallows to loosen them.
Once they’re turned over on the cutting board, dust the unmolded marshmallows with more powdered sugar. Our recipes call for 1 cup powdered sugar, but you can also use ¾ cup powdered sugar sifted with ¼ cup cornstarch, a combination that’s slightly better at preventing sticking.
When cutting marshmallows, a long thin knife, such as a 6" utility knife, makes the process effortless, but a chef’s knife also works. To prevent sticking, brush the knife with vegetable oil and dust it with powdered sugar. Continue dusting the knife with powdered sugar in between cuts as needed. To get 64 bite-size marshmallows, cut the square lengthwise into eight strips, then cut the strips crosswise into eighths. For 36 larger marshmallows, cut the square lengthwise into six strips, then cut the strips into sixths. Once the squares are cut, coat them in additional powdered sugar, shaking off any excess.
Store homemade marshmallows layered between sheets of wax or parchment paper in an airtight container. If kept in a dry place at cool room temperature, they should keep for about a month. Marshmallows that include mix-ins or that have been dipped in chocolate will have a slightly shorter shelf life.
How to add color to marshmallows
Creating colorful marshmallows is as simple as adding food coloring to the classic recipe. For pastel colors, add ½ tsp. (about 45 drops) of food coloring after you add the vanilla, and beat the mixture until it’s fully incorporated. For deeper color, add more food coloring, drop by drop, until the desired hue is achieved. If you want to make deeply colored marshmallows, you may find it easier to work with food coloring that comes in a pourable bottle rather than a dropper.
You can also create swirls of color to your homemade marshmallows. For a simple streak effect, right after adding the vanilla, add the food coloring, then beat the mixture just until you get the look you like. To give marshmallows a chunkier marbled look, after adding the vanilla, quickly scoop about two thirds of the still-warm marshmallow into another bowl. Add 10 or more drops of food coloring to the remaining marshmallow in the bowl and beat until the color is fully incorporated. Fill your prepared pan with alternating dollops of the plain and tinted marshmallow, then use a knife to swirl the mixture to create a marbled look.
How to cut marshmallows into shapes
Using cookie cutters to create marshmallow hearts, stars, and other shapes gives them even more kid appeal. It’s also a fun kitchen activity for your little ones and makes for a creative holiday project: Make heart marshmallows for Valentine’s Day, eggs for Easter, or ghosts for Halloween.
Spread your marshmallow mixture into a 9x13" pan so that the final product is slightly thinner and easier to cut into shapes. For the best results, use cookie cutters that are about 2½"–3" across, and stick to simple shapes without too many fine details. To prevent sticking, brush the cookie cutters with oil and dust them with powdered sugar before cutting. Continue to dust the cutters with powdered sugar as needed to prevent sticking.
How to add flavor to marshmallows
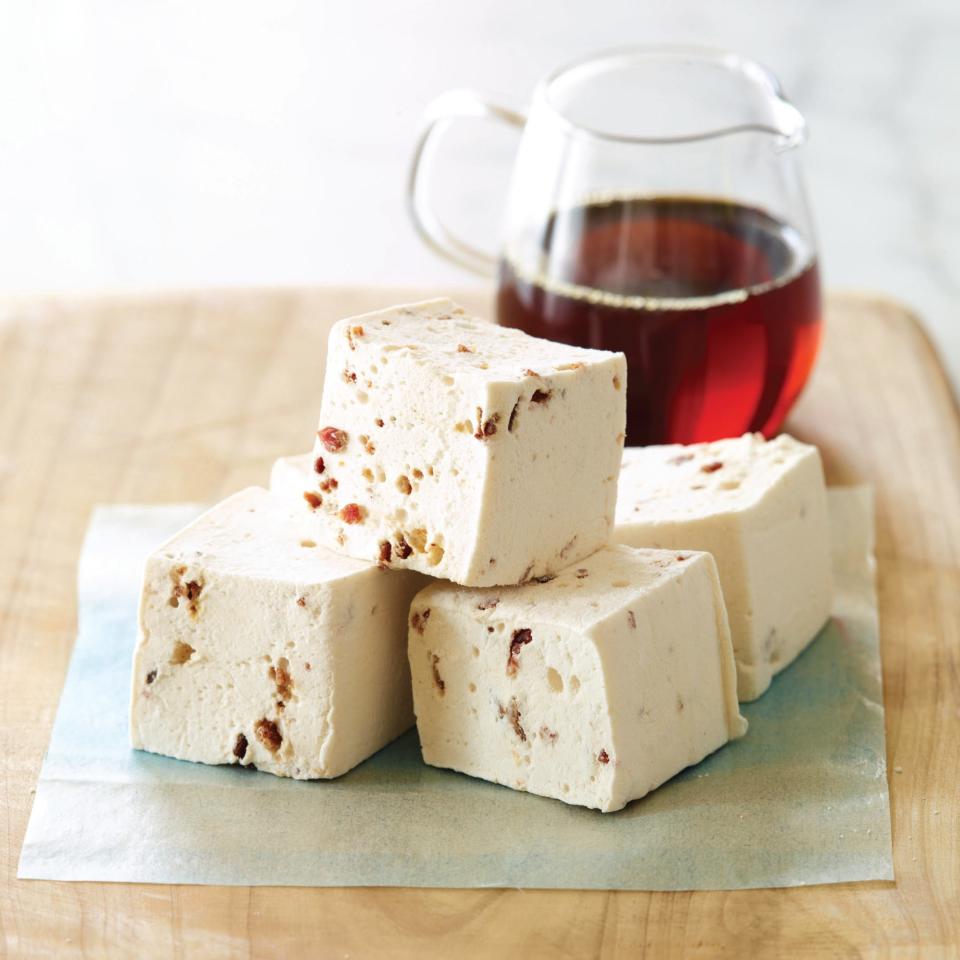
Maple-Bacon Marshmallows
The simplest way to add flavor to classic marshmallows is to swap different extracts for the vanilla extract called for in the classic recipe. Other great options include almond, peppermint, maple syrup, and strawberry, but feel free to experiment with your favorite extract flavors.
Another easy way to flavor marshmallows is by using citrus zest, as in our recipes for Lemon and Pink Grapefruit Marshmallows. In both recipes, the citrus zest is removed from the fruit, combined with sugar, and ground in the food processor before being used to make the sugar syrup. A small amount of citrus juice is added to the water and gelatin mixture for additional flavor, and because the acid in the juice affects the effectiveness of gelatin, an extra ¼-oz. package of gelatin is used. To make these marshmallows look like they taste, add a touch of yellow or red food coloring.
Our Chocolate-Malt and Salted Caramel Marshmallows also both follow the basic marshmallow recipe with slight variations. The soda fountain–inspired chocolate-malt version features syrup made with cocoa powder, malted milk powder, corn syrup, and water that is folded into the basic recipe. To make the salted caramel marshmallows, sugar and water are cooked into caramel, then combined with corn syrup and heated to 240°F (soft-ball stage). This slightly modified sugar syrup is added to the softened gelatin, just like in the basic marshmallow recipe.
Alcohol-spiked marshmallows are a little tricky because high-proof spirits can make unflavored gelatin less effective at binding (in other words, don’t go overboard with the liquor). Our recipe for Crème de Menthe Marshmallows calls for adding 3 Tbsp. of crème de menthe to the water and gelatin mixture—just enough to lend the marshmallows a minty, slightly tipsy flavor without sacrificing their texture. Our recipe for Bourbon-Vanilla Marshmallows also follows the basic recipe, except that the vanilla extract is replaced with bourbon and vanilla bean seeds. These marshmallows have a more pronounced vanilla flavor than the classic version, plus a hint of boozy bourbon.
How to add mix-ins and decorate homemade marshmallows
Toasted-Coconut Marshmallow Squares

Gourmet
Mix-ins such as mini chocolate chips, cacao nibs, or chopped candied ginger are an easy and fun way to upgrade the classic marshmallow recipe. Before scraping the marshmallows into the pan, fold in about ½ cup of your favorite mix-in. Keep in mind that the marshmallows are still warm, so if you’re adding chocolate or anything else that can melt, you may get a streaked effect. You can wait a minute or two for the marshmallows to cool down, but don’t wait too long, or the mixture will become stiff and difficult to fold.
Then there are chocolate-dipped marshmallows. To dip your marshmallow squares in chocolate, set up a double boiler or arrange a clean metal bowl over a pan of barely simmering water and melt about 6 oz. of bittersweet chocolate along with 1½ Tbsp. of vegetable shortening, stirring until smooth. Brush any excess powdered sugar off the marshmallows and, working with one at a time, dip the marshmallows into the chocolate. You can dip just the edge of the marshmallows, a corner, or half the square into the chocolate. Scrape each marshmallow on the side of the bowl to remove any excess chocolate, then transfer, chocolate side up, to a wire rack set over a baking sheet. Let stand until the chocolate is set. If you don’t feel like dipping, you can also simply arrange the cut marshmallows on a wire rack (set over a baking pan to catch drips) and then drizzle melted chocolate over them.
Sprinkles and other small edible decorations can be added to marshmallows, giving them a more festive look while also adding a little texture. Arrange your decorations on a plate and use a small, soft paintbrush to dampen the area you would like to decorate, then dip the moistened part of the marshmallow into the decorations and let stand until dry. If you’ve dipped your marshmallows in chocolate, you can also add some sprinkles or other small edible decoration onto the still-wet chocolate and let it stand until set.
Originally Appeared on Epicurious

