Love 3.1 Phillip Lim’s Embellished Sweatshirt? Here’s How To DIY Your Own

- Oops!Something went wrong.Please try again later.
More from StyleCaster
Phillip Lim Is Creating A New York For Young Multi-Hyphenate Creatives
Spring Sweatshirts Are the Seasonal Must-Have You'd Never Think to Buy
Jilly and Sally are New York-based sisters and style bloggers who share their personal style, beauty tips, and peeks into their lives on their blog, Sorelle in Style. You can find them at @sorelleinstyle on Twitter and Instagram.
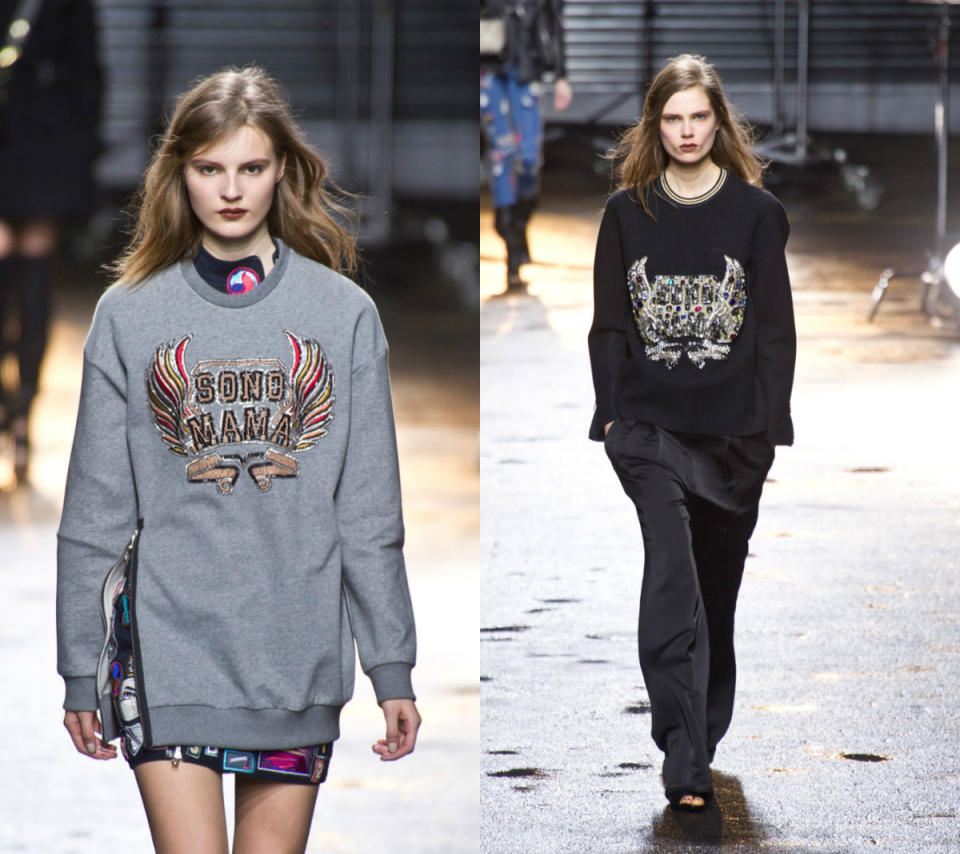
Whether graphic or embellished, the sweatshirt is back in full-force this fall! The cozy-turned-stylish staple has been spotted everywhere from the runways to the streets in all its glory.
Click here to read the full article.
However, it’s the embellished version of the sporty staples that’s really making a style splash, often with with jeweled accents and varsity letters. That said, we decided to rework an old sweatshirt of our own and give it a high fashion finish à la 3.1 Phillip Lim. Check out our step-by-step guide to make your favorite sweatshirt street style-ready!

What you’ll need: A sweatshirt, two old cotton T-shirts (or two pieces of cotton fabric (it helps the design stick best) in whatever colors you’d like), an iron, scissors, fabric glue, iron-on fabric glue, rhinestones/studs of varying shapes and sizes, and stencils.

Step 1: Print out stencils in any shapes you want (you can find plenty on Google!)

Step 2: Trace each stencil onto your T-shirt fabric and cut them out. This will be used for your soon-to-be-embellished design that will go on your sweatshirt.

Step 3: Place each shape onto your sweatshirt first to be sure you’re happy with the design. Love it? Great.

Step 4: Glue each shape down using the iron-on fabric glue.

Step 5: Place a magazine or piece of cardboard inside the sweatshirt to prevent the glue from running through to the back of the sweatshirt while you’re ironing. Then, hold the iron over each shape for 45-60 seconds to allow the glue to stick.

Step 6: After the sweatshirt has cooled down, map out your design by placing the rhinestones or studs on the sweatshirt.

Step 7: After you’re happy with the final layout, start gluing the rhinestones to the sweatshirt using fabric glue.

Get creative – add on whatever shapes you’d like (we chose wings!) and bling away!
More from Sorelle in Style:
Tibi-Inspired D.I.Y. Tee
D.I.Y. Peace Sign Cut-out Tank
Desperately Seeking Knits
Best of StyleCaster

