Learning How to Do Crow Pose? This Practice Will Teach You Everything You Need to Know
This article originally appeared on Yoga Journal
Maybe you’ve been wanting to learn how to do Crow Pose but don't know where to begin. Or perhaps you’ve been practicing Crow for a while yet it still feels like a mystery.
Part of what might be holding you back from being able to come into the arm balance is an overemphasis on the strength part of the pose. It's true, Crow Pose requires arm and core strength. But there’s more to finding that elusive balance than muscling your way through it. Start with these essential truths for coming into any arm balance that you might have never considered. With some curiosity and enthusiasm for these elements, you might find Crow to be more accessible than you had thought it could be.
How hip openers are essential to Crow Pose
Imagine coming into Bakasana (Crow Pose). Can you see the deep squat that's required to get your knees all the way toward your armpits? That requires a pretty intense range of motion in the ball-and-socket joint of the hips. Before you even think about lifting yourself off the mat, you need to be able to come into the basic shape of Crow. And to do that requires that you first stretch the hip flexors (along the front of your thighs), the adductors (along your inner thighs), and the hamstrings (back of the thighs).
That same hip flexibility is demanded by most arm balances. Think about Flying Pigeon (major hip opener) and Eight-Angle Pose (hips again) and Koundinyasana (more hip mobility). A certain level of stretching is a prerequisite before you can come into and maintain each of these poses.
The good news is the best hip openers are the poses you work on each time you practice yoga. Knowing they’re the starting point for your ability to arm balance might help you practice them with a little more intention and diligence.
Why you need to rethink gravity
I can't tell you how many times I’ve seen students attempt Crow Pose by shifting a little weight into their hands and then forcibly trying to lift a foot before it immediately drops back to the mat.
Imagine sand in an hour glass tipped on its side. The moment more sand pours into the front half of the hour glass, the back half lifts on its own. It's the same principle with your body. When you slowly lean forward so that your center of gravity shifts to the front part of your body, your foot (or, hopefully, feet) will naturally lift off the mat.
Instead of working against gravity, let it help you.
What you need to understand about balance
Think of practicing a standing balance pose. You’ll notice that you aren't perfectly still as you try to steady yourself on one foot. There is always movement in any balancing pose. You'll feel almost like you're surfing--a little lean to the right, a little lean to the left.
When you’re balancing on your foot, become aware of the subtle movements and adjustments happening that are helping you maintain your balance. Look for the steadiness to shift among the four corners of your foot (ball mound of your big toe, ball mound of your little toe, inner heel, and outer heel).
The same thing applies when you're balancing on your hands. But the wobbling or swaying is easier to accept in a standing posture because you’re accustomed to being upright. When you're balancing on your hands, engage all your fingers for support so that not all of the weight is on your wrists.
Balancing in yoga is a lot like making our way through life. If we are too rigid in our mindset or attitude or expectations, we tend to fall or have difficulties. But when we are able to sway and shift and soften and flow with what is in the present moment, we can get through things with more ease.
Prep poses that will help you do Crow Pose
The following sequence stretches all the necessary muscles in all the necessary ways so your body will be able to access Crow Pose more easily.
Uttanasana (Standing Forward Bend)
Come onto your mat, take your feet a little wider then your hips, and fold forward over your legs in Uttanasana. Begin with your knees a bit bent so you don't overstretch or strain your low back or hamstrings. Let your head hang down and feel the weight of your upper body gently pulling yourself into a deeper bend. You can let your arms just hang down, or you can take hold of opposite elbows. Begin to sway a little side to side, bringing some movement into the pose. Focus on feeling the opening in the back of your legs. Stay here for however long feels good for you.
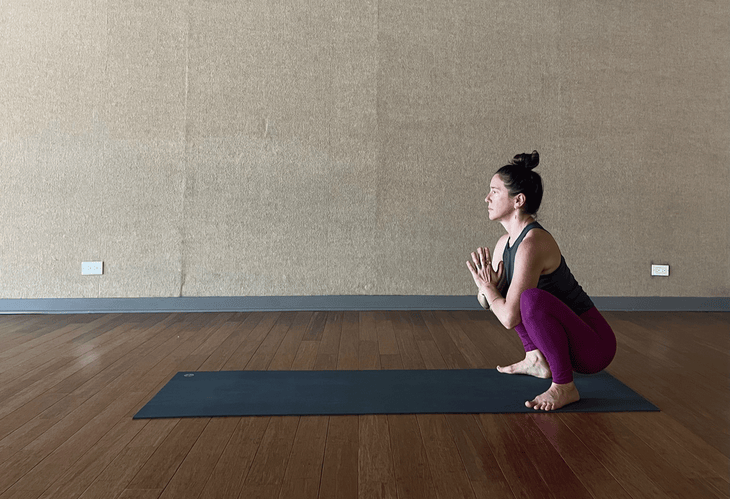
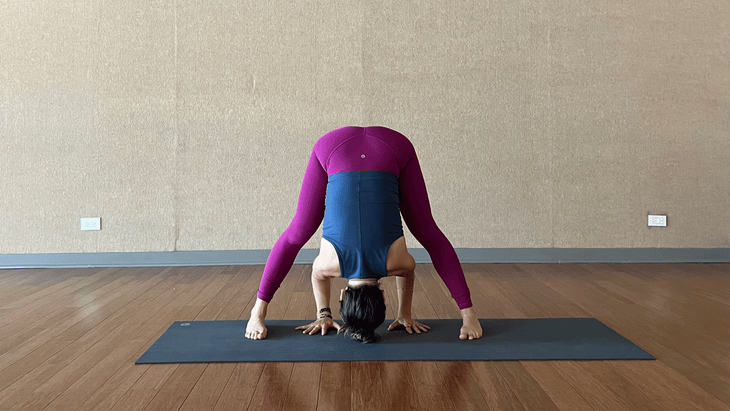
Malasana (Squat or Garland Pose)
From Standing Forward Bend, separate your feet a little wider apart, about as wide as your mat. Turn your toes outward slightly and start to bend your knees. As you come down into a squat, it’s totally okay if your heels need to lift and you do the squat on your toes. If that's the case, keep your hands on the floor in front of you for balance and support. If you can shift your weight toward your heels and lower your feet all the way to the mat, bring your palms to prayer position in front of your heart. Allow your hips to feel heavy and drop your seat closer to the floor. Stay here for 5 breaths.
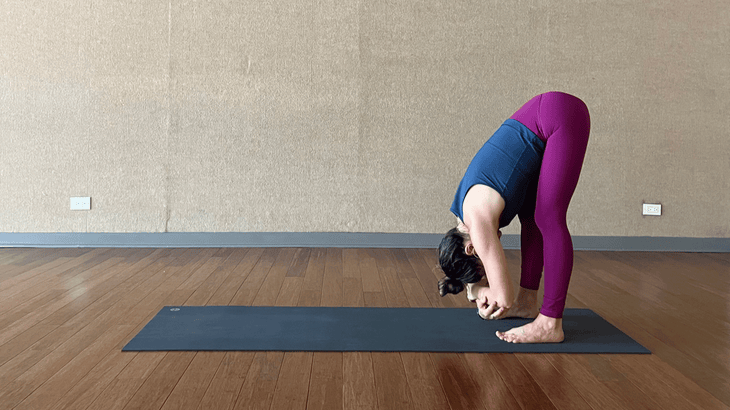
Padangusthasana (Big Toe Pose)
From a squat, lift your hips and fold forward again. Take your first two fingers and make a circle between your big toes and second toes with your fingers and thumbs. Draw your heart forward on an inhale. As you exhale bow down and in towards your legs in and come in Padangusthasana. Notice if this forward bend feels deeper than the first one you did. Engage your stomach muscles to draw yourself deeper into the bend. If it feels okay, bring a little more weight into your toes.
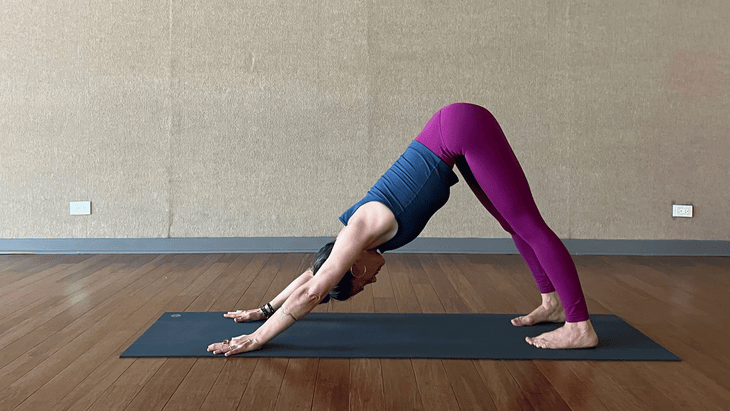
Adho Mukha Svanasana (Downward-Facing Dog Pose)
From the forward bend, inhale as you draw your heart forward and release your grip. Then walk your hands forward and come into Downward-Facing Dog Pose. In this first Down Dog, peddle your legs, bending one knee and straightening the opposite leg. Keep your fingers spread wide and press your palms down evenly. Peek forward at your hands and make sure that your hands are outer shoulder distance apart with your index fingers pointing forward, not inward. The creases of your wrists should be parallel to the front edge of the mat. (This is the exact same hand position you'll use later for Crow Pose.)
Take several breaths here and really feel the grounded energy of your hands pressing down and forward. Extend your hips up and back and away from your shoulders. Reach your heels toward the floor, but if your hamstrings feel tight at all, keep a bend in your knees.
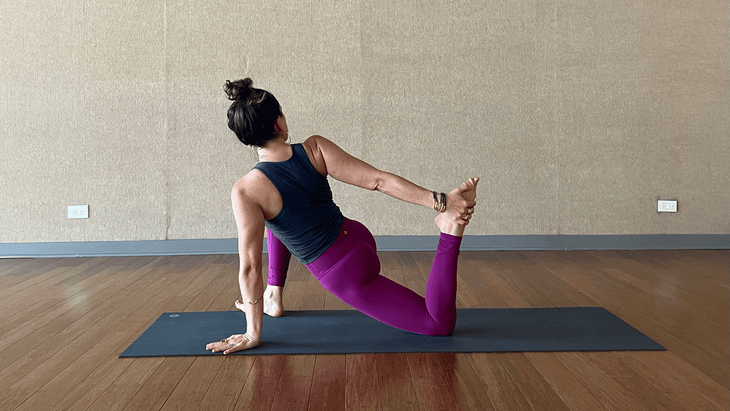
Twisted Monkey
From Down Dog, step your feet together and lift your right leg straight behind you. Step your right foot to the outside of your right hand and drop your left knee onto the mat in a Low Lunge. Inch your right foot to the right side of the mat and bring your left hand all the way to the left side of the mat. Lean into your left hand, place your right hand on your right thigh, and turn your chest toward the right. Turn your right foot slightly out to the right side, by about 10 to 15 degrees. Lower your hips towards the floor and lift your chest and crown of your head. You should feel a stretch here at the front of your left hip and maybe your inner right thigh. Stay here for about 5 to 8 breaths.
If you want to take this pose deeper, you can either lower your left forearm to the mat or bend your back knee and reach your right hand to grasp your left foot. Go slowly and don't overstretch anything.
Slowly release back to Down Dog and repeat on the second side. Then step back to Down Dog and peddle your legs again, shift your hips side to side, move around a little, and see how your body feels.
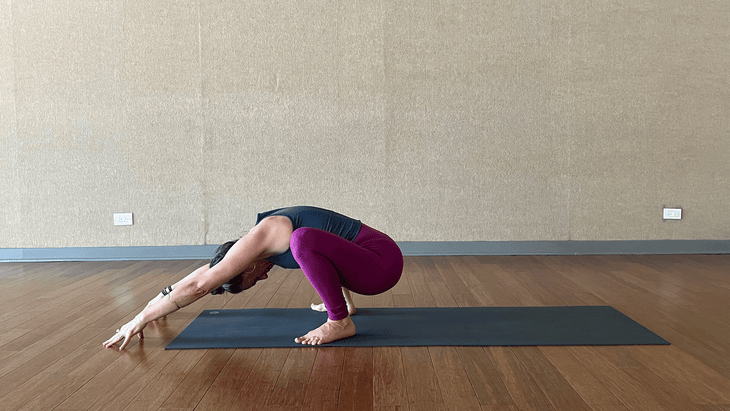
Malasana (Squat or Garland Pose)
From Down Dog, slowly walk your feet to the front of the mat and come into a second squat. Again, turn your toes slightly out and bend your knees deeply so your hips move toward the floor. Keep your knees wide as you start to walk your hands forward. Round your spine, bring your chin toward your chest, and drop your shoulders down low alongside your legs. Tip your weight forward toward your toes and rock a little side to side. Feel the opening all along the back side of your body. (This is a very similar shape to crow pose but without the arm balance part.) Take a few breaths here.
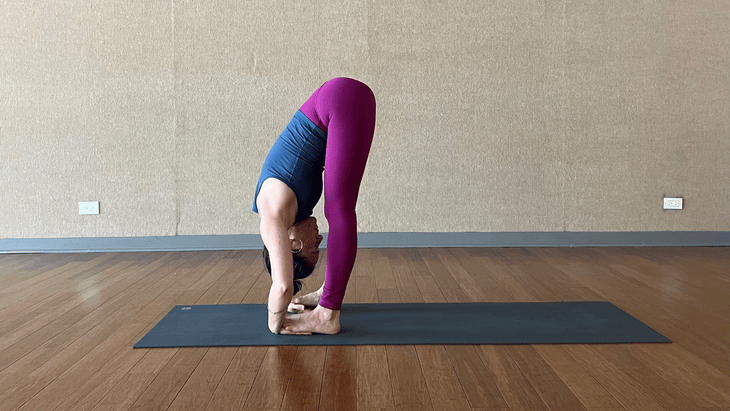
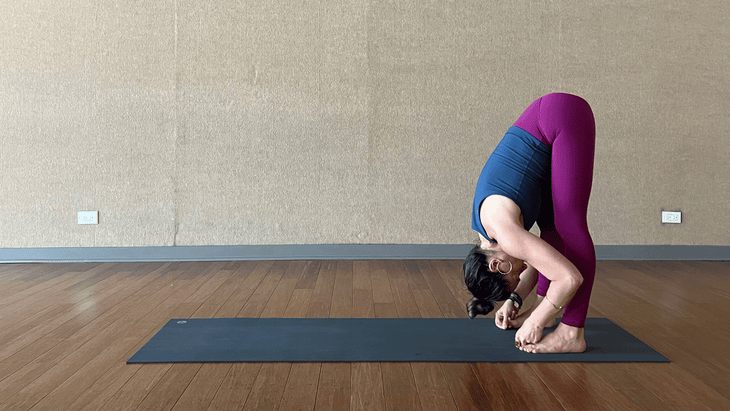
Padahastasana (Hand Under Foot Pose)
From Squat, slowly lift your hips and work toward straightening your legs. Turn your toes to face forward and fold over your legs again. This time, slide them underneath your feet, palms up, and lift your feet just enough to slide your hands underneath your feet and then bow forward over your legs. It's a pretty intense stretch so as you go into it, if it feels like too much, take your hands behind your heels or keep your knees bent. Breathe in and out through your nose and allow yourself to move slightly deeper with each consecutive breath. To come out, carefully pull your hands out from underneath your feet, place your fingertips on the floor, and draw your heart forward on and inhale. Exhale, place your hands on your hips, and draw your chest forward; inhale as you slowly rise to standing, leading with your heart.
Tadasana (Mountain Pose)
From standing in Tadasana (Mountain Pose), take a side stretch to balance things out. We've done a lot of stretching for the hamstrings, and we're going to do another one in a moment, but first reach your arms overhead. Take your right hand to your left wrist, straighten both arms toward the ceiling, slowly lean over to your right. Use your right arm and hand to pull your left arm over to the side. Let your hips shift slightly to the left. Try not to bend forward or backwards, just lean sideways. Take a couple of breaths and switch to the second side. Don't forget to switch hand positions, too!
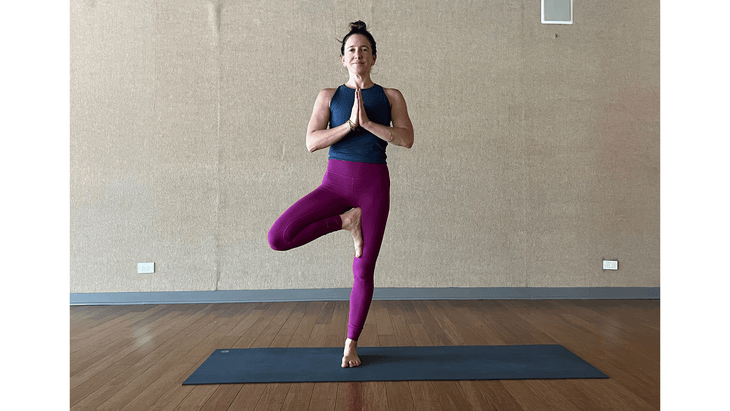
Vrksasana (Tree Pose)
From Tadasana, look down and check to make sure that your left foot is pointing directly forward. Shift all your weight onto your left foot and start to lift your right foot. Take your right ankle in your right hand and draw place your right heel as high as you can on your upper inner thigh. If you can't get your foot very high, don’t worry! You can still practice balancing by taking your foot to your inner calf. Do not place your foot on your inner knee. Squeeze your thigh into your foot and your foot into your thigh. Keep your gaze steady on one point in front of you that is not moving. Bring your hands to prayer position in front of your heart. Take a few breaths here.
Take a few breaths here and if you're feeling up for it try to raise your arms up to the ceiling. Lift your back ribs up away from your back waist and draw the crown of your head towards the ceiling with your fingertips. When you're ready, lower your hands down and place your right foot to the floor. You can try to get up to spending a minute balancing on each side. Balancing postures are so good for you. They add weight bearing to the bones of your body which is wonderful for increasing bone density. Try the same thing on the second side and then pause in Tadasana when you're done.
Prasarita Padotanasana (Standing Wide-Legged Forward Bend)
From Tadasana, turn to face the long edge of the mat. Bring your feet around 4 feet apart or, if you’re taller, take them a little wider. Turn your feet slightly inward, place your hands on your hips, and lift your chest on an inhale and fold forward on an exhale, reaching your hands toward the floor. In this wide forward bend, you are again stretching the hamstrings. Bow forward and drop your head down and breathe into your back body. Slowly shift the weight from heel to toe and notice how the stretch shifts in the back of your legs. Try to walk your hands back further between your feet. Keep your hands outer-shoulder-distance apart. Draw your elbows toward one another so that they are the same distance apart as your wrists. Breathe in and out through your nose and allow yourself to go a little deeper on each exhalation. Take 5 breaths here and, if it feels good, stay longer.
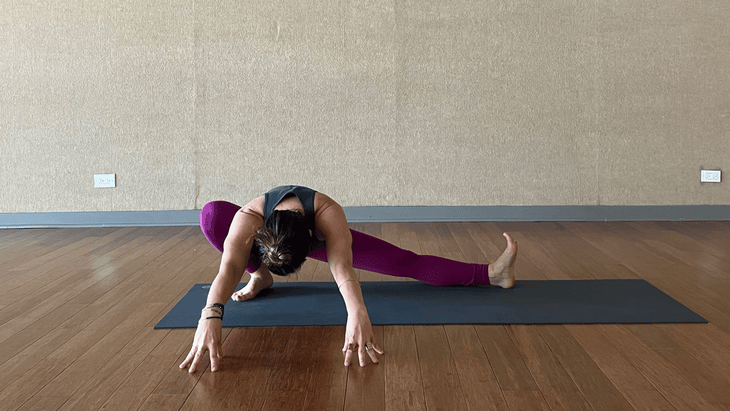
Skandasana (Side Lunge)
From Prasarita Padotanasana, inhale and draw your heart forward. Keep your left leg straight and bend your right knee as you shift your hips to the right. You might bend your knee just a little, keeping both feet flat on the floor, or you might bend it a lot, coming all the way to a squat in your right leg. You might find that you have to move your feet a little wider apart to find the exact right place, so take a moment to see where that is for you. If you're all the way down in a squat on your right leg, rotate your left foot up so your toes are pointing toward the ceiling. Ground your left heel down into your mat. Start to walk both hands straight ahead along the inside of your right leg and bow your head down. If it feels comfortable to you, take your elbows to the ground. If that's too much, just stay upright with your hands or fingertips down. Breathe into your inner left thigh.
Use your hands for support as you lift your hips and then bend your left knee to shift your hips to the left. Remember, both sides of your body are different. If it feels a little tighter or looser on your second side, that's OK. Just stay connected to your breath and bow forward.

Prasarita Padotanasana (Standing Wide-Legged Forward Bend)
After a few breaths on your second side, slowly rise and fold forward one more time in Prasarita Padotanasana. Notice if your hamstrings feel different here. Everything in the body is connected, so if you stretch your inner thighs, you should feel that when we move into another hamstring stretch you can go in a bit deeper. In this forward fold, we'll add a shoulder stretch. Bring your hands behind your back and clasp your fingers together. If that's not possible take a strap or towel between your hands. Reach your arms up and over head, finding a stretch in the front of your chest and shoulders here. Bow down and in, taking your head towards the floor. If you need to have a slight bend in your knees here that's totally okay. Take a couple of breaths and then place your hands to your hips. Root down through both feet evenly and on an inhale look forward, lead with your chest, and rise to stand.

Tadasana (Mountain Pose)
Step your feet together at the top of the mat for Tadasana, arms at your side and palms facing forward. Take a modified Surya Namaskar A (Sun Salutation) here. Inhale, reach your arms overhead, take your palms together, and look up and your thumbs. Exhale, sweep your arms wide, and lead with your heart as you fold forward over your legs. Inhale and lift your chest halfway, exhale and step back to Plank Pose. Pause here, keeping your chin slightly lifted. Feel your hands grounding evenly into your mat. Hug your fingertips into the mat. Feel as if there's a hand on your lower belly lifting you up slightly. Keep that gentle lift of your belly as you slowly lower to the ground.
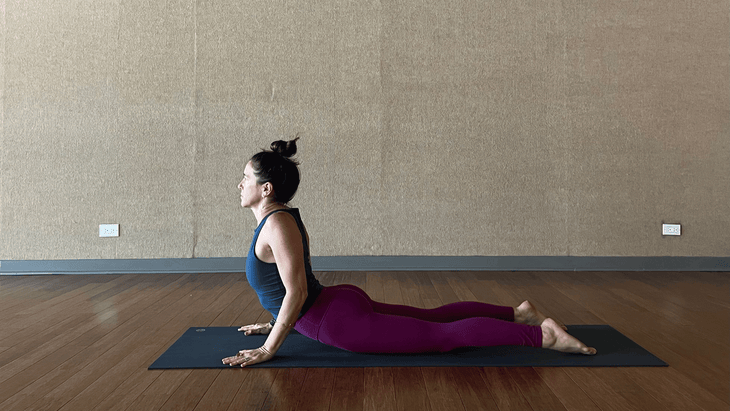
Bhujangasana (Cobra Pose)
Place your hands alongside your chest and keep your hips and feet grounded. Press through the tops of your feet and lift your chest off the mat. You can lift a little or a lot depending on the flexibility of your spine. Draw your shoulders back in space. Engage the muscles that line your spine so that your hands and arms are not doing all of the work. Take a deep inhale here and slowly lower down as you exhale.
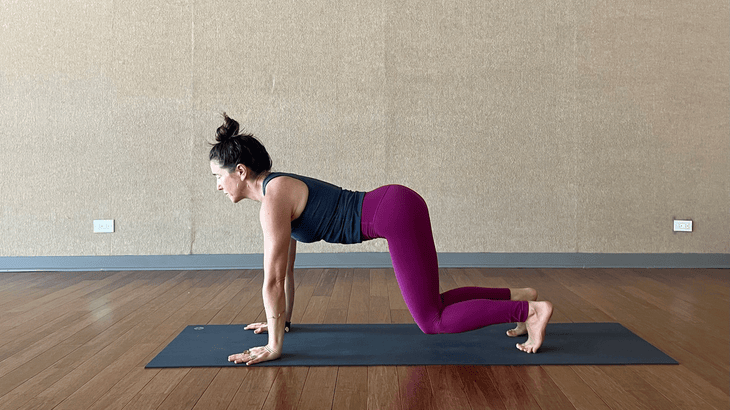
Bird Dog
From lying on the mat, transition to your hands and knees in Tabletop. Bring your knees together and bring the tops of your feet to the mat. Extend your left leg straight back and your right arm forward alongside your ear. Draw your navel toward your spine and reach your extended hand and foot away from the center of your body. Level your hips and shoulders. Look forward slightly and take a few breaths here. Repeat on the second side.
Bear Plank
From Tabletop, make sure your wrists are underneath your shoulders, hands outer-shoulder-distance apart, and your fingers are spread wide, with your index fingers pointing straight forward. Look back toward your legs and separate your knees so they’re hip-distance apart. Tuck your toes under. Keep this shape but lift your knees just one inch away from the mat. Imagine you're wearing a corset and lift your lower belly in and up. Here we are strengthening your core and arms in preparation for crow pose. You can stay here for 5 to 10 breaths, as long as it feels good.
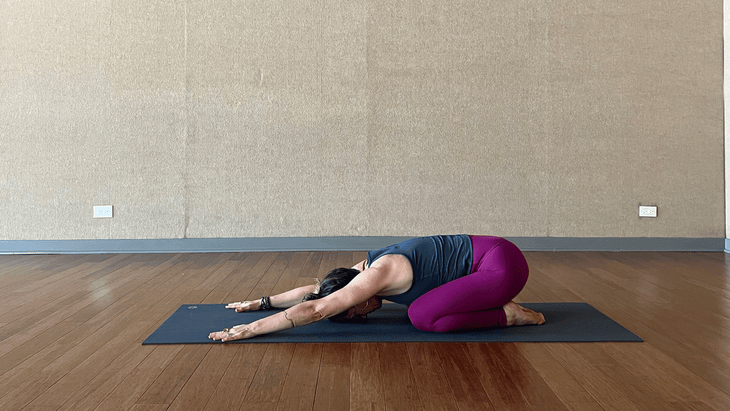
Balasana (Child’s Pose)
From Bear Pose, place your knees back down on the mat. Separate them a little wider than your hips, draw your big toes together, and take your hips back to your heels for Child’s Pose. Rest here for 5 deep breaths.
How to do Crow Pose
It’s time. We're going to explore Crow Pose by trying a couple of different ways, so if one doesn't feel good to you, don't worry! Simply move onto the next.
Practicing Crow Pose skin-on-skin or clothes-on-clothes is more challenging. Try to practice with long leggings or long sleeves, but not both.
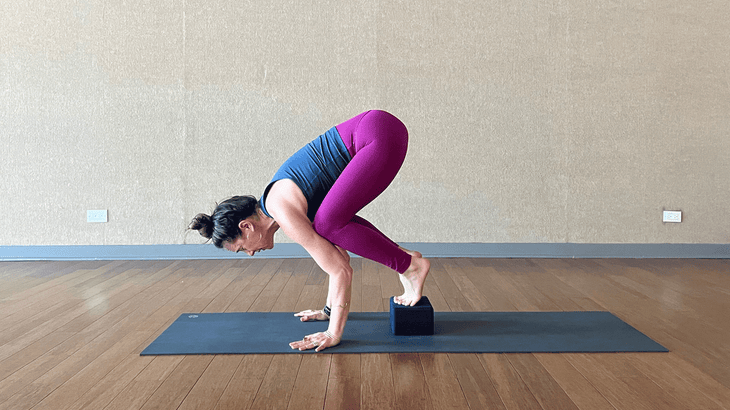
Crow Pose with a block to help lift your knees on your arms
Grab a block and place it on its flattest position on your mat. Bring both feet onto the block and come into a squat with your toes touching and your knees wide apart. Drop your chest down low between your knees and take your hands toward the floor. Pull your hands back so that your knees are moving tight to your shoulders, lift your hips a little bit and lean forward slightly. The block underneath your feet should make it feel easier to come into the shape of Crow Pose. It helps lift you and shift you forward.

Take your gaze a little in front of you, hug your hands into the mat, breath in and out through your nose, and slowly pour more sand into the front part of the hourglass of your body and see if your feet slowly start to rise. Remember, keep your elbows drawing in toward each other. If you can't lift your feet at the same time, try one foot at a time. Rest in a squat, a standing forward bend, or Child’s Pose.
Crow Pose if you have a fear of face-planting
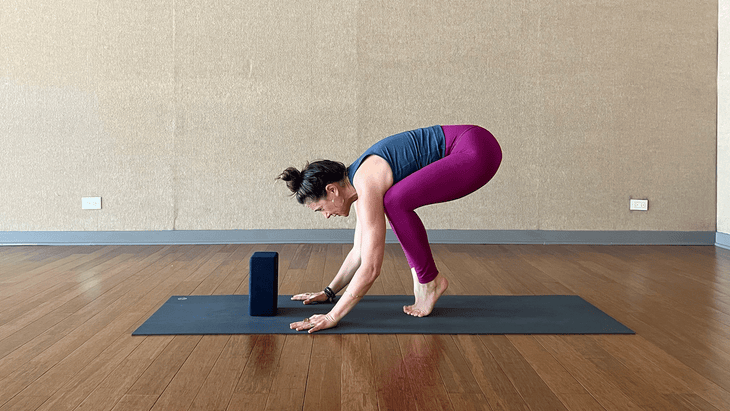
Now let's try another approach to Crow Pose. This time, you'll place your block in a position where you can rest your head on it for support. This version is especially helpful if you have a fear of falling forward. Practicing it this way will enable you to learn the shape and feeling of the pose without the possibility of landing on the floor.
Begin by setting your block out in front of you at its highest height. The most challenging part of this variation of Crow is finding the correct height and placement for the block. It might take a little bit of trial and error to get it right. Take your hands about 6 inches behind the block and come to a squat. Drop your chest down between your knees, start to lift your hips, and place your knees on the back of your arms.
Lean forward and place your head on the block. If it's in the wrong place or if it's the wrong height, you'll know right away and can adjust it. You can connect either your forehead or the crown of your head to the block. You just want it to be another foundation of the pose. Even if a lot of your body weight is on the block, it’s OK. You're practicing being able to lift your feet and hold the weight of your body on your hands and arms. You’re building strength and creating new neural pathways of information regarding what you can do with your body. Eventually, you'll be able to do it without the block under your head.
I like to start with the block in its highest position just to see how it feels, but most often people use it at the medium height. It has to be low enough that when you lean forward, your feet can lift. Play around with it a few times and see how it feels. If you're new to Crow Pose, this might feel scary. An alternative is to use a couch cushion or a couple of pillow, although I like using a block because it's solid and supportive so it tends to give you more balance than anything that’s softer.

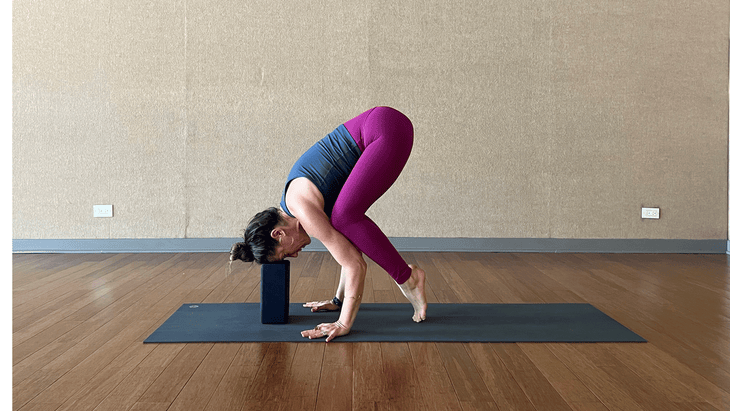
Crow Pose without props
From Child’s Pose, bring your hands alongside your knees and lift yourself into a squat. We're going to try without any props. Place your palms on your mat in the same position we've been working on--your hands outer shoulder-distance apart, fingers spread wide, and your index fingers pointing forward. Now, lift your hips slightly but keep your knees bent. Keep your arms bent to create a shelf for your knees to rest on. Try to place your knees anywhere on your upper arms above your elbows.
Draw your navel toward your spine and looking forward slightly, just like you did in Bear Plank, trying to lean your weight into your fingertips so that your heels can rise away from the floor. If you drop your chin to your chest, that's when the risk of falling on your head gets greater, so keep your gaze just a little forward on the floor in front of your fingertips. Keep hugging your fingertips into the mat to help with the balance. Your fingertips are your brakes and can keep you from falling too far forward when you exert pressure from them into the mat. If you can't get both feet to rise, try shifting forward and lifting one foot at a time. Then put that foot down and lift the other foot. Pay attention to your hands, that's your base, the most important part of the posture. Allow for some movement here. Even if you can't lift your feet off the floor at all, play around with the placement of your knees on your arms and practice hugging your elbows toward each other, which can be really helpful in holding yourself aloft in Crow. Come back to a squat or a standing forward fold for a few breaths.
Counter stretches for after you learn how to do Crow Pose
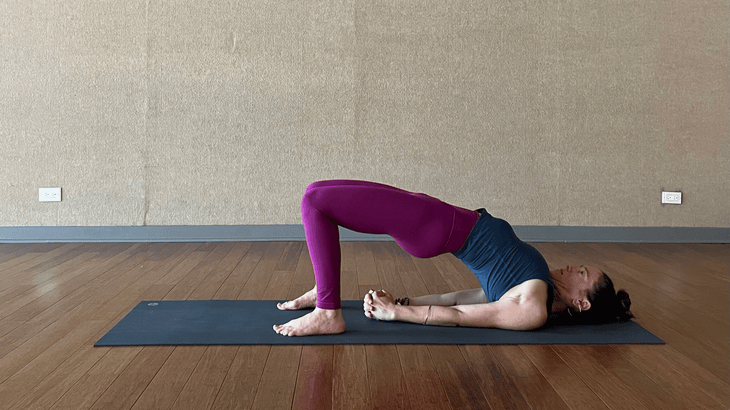
Bridge Pose
From a reclining twist, slowly release onto your back. Bend your knees and place your feet flat on the floor. Adjust your hips so your spine feels straight before you come to Bridge Pose, which is a counter to all that forward bending. Draw your heels close to your hips. Take your feet hip-distance apart and feel that your feet are pointing directly forward. Press your feel firmly down into the floor and start to lift your hips up. If you can interlace your hands underneath you please do, and shimmy up onto your shoulders. If that's difficult, take hold of the side edges of your mat with your hands and try to walk up onto your shoulders here. Keep pushing your feet into the floor to lift your hips up and help open your chest. Maintain this posture for up to a minute and then slowly release your back onto the floor.
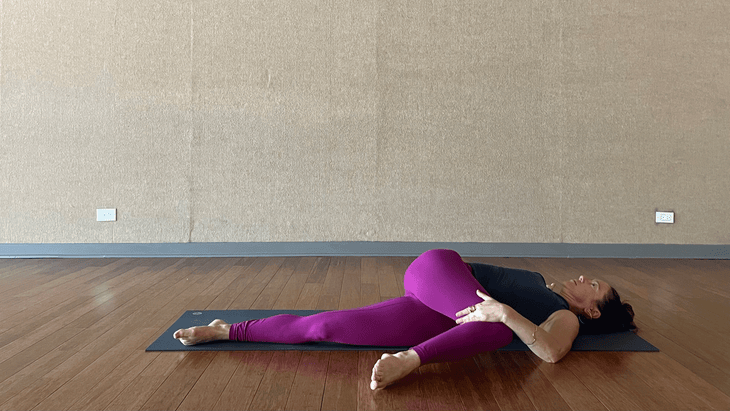
Reclining Twist
From Crow Pose, make your way onto your back. Hug your right knee into your chest and extend your left leg to the floor out in front of you. Take a deep breath here. Slowly start to move into a twist by rolling onto the outer edge of your left hip. Let your right knee drop over to the left. Reach your right arm out at shoulder height with your palm facing the ceiling. This is a counter stretch for your pec muscles, which have been working super hard in Crow pose. Take a few breaths here and let your right shoulder release toward the floor. When this side feels complete, come back to neutral on your back. Switch to the second side.

Savasana (Corpse Pose)
From Bridge Pose, draw your knees into your chest and give a little rock side to side. Take a deep breath here and honor yourself for trying something new today. Not only is trying new things good for your body, it's also very good for your brain. The goal is not in making it into that shape. The goal is in the process of trying, being open-minded, moving your body in new and different ways, and maintaining a good attitude throughout the process, no matter what happens. These lessons that we learn on the mat are so important because we can take them off the mat and into our daily lives and feel better there, too. So as you shift into Savasana, your final resting pose, imagine one experience in your life where you think being more open-minded, or trying something new, or having a positive attitude might help you? Envision yourself walking through that specific experience with this new mindset. Notice how that feels.
Release into Savasana and allow yourself to rest, letting your body receive all the benefits from your practice today. You can even set a timer here in Savasana so you know just when it's time to rise. I'd suggest setting it for a minimum of 5 minutes. Let go of any controlled breathing and just soften, surrender, and let go.
About our contributor
Claire Mark is the director of teacher training at Yogaview in Chicago and the co-founder of Chill Chicago, a modern meditation studio. Claire has been teaching yoga and meditation since 1999, and she's trained with some of the most well-known teachers in the US. Claire's classes are vigorous and challenging, yet taught with kindness and acceptance. Claire is also a certified life coach, cookbook author, and mom. Learn more at chillchicago.com, yogaview.com, and clairemarkyoga.com.
For exclusive access to all of our fitness, gear, adventure, and travel stories, plus discounts on trips, events, and gear, sign up for Outside+ today.

