Learn About Dying Easter Eggs with Silk Ties for Colorful, Vibrant Fun

Make a gorgeous set of patterned Easter eggs with the help of a few old ties. Learn how to dye eggs with silk ties in just three steps.
These intricate Easter eggs give new meaning to the term "tie-dye." You won't believe how easy it is to transfer patterns from the fabric onto plain white eggs. Wrap eggs with 100% silk ties (or any other 100% silk material), then boil them in vinegar to set the design—it's that easy!
Use this technique for dying Easter eggs with silk ties that have sentimental value (like Grandpa's old ties), or have fun thrift shopping for inexpensive silk material. When choosing your fabric, look for bold patterns with many colors. Darker shades of purple, red, blue, and green transfer best, while pastels and light colors will give you a more subtle design. Add the finished eggs to your Easter basket or use them as part of your annual egg hunt—these brightly colored decorations are sure to stand out.
:45 Creative Ways to Make Colorful Easter Eggs
How to Make Silk Tie Easter Eggs
Supplies Needed
Uncooked white eggs
100% silk ties or material
White cotton fabric
Plain white string or rubber bands
Low stockpot
Water
White vinegar
Baking sheet
Paper towels
Step-by-Step Directions
Follow our simple how-to instructions for dying Easter eggs with silk ties in under an hour. Keep in mind the hard-cooked eggs won't be edible after you've transferred the silk design.
Step 1: Prep the Eggs
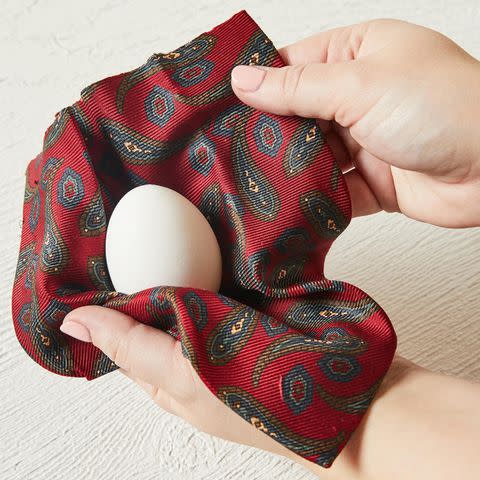
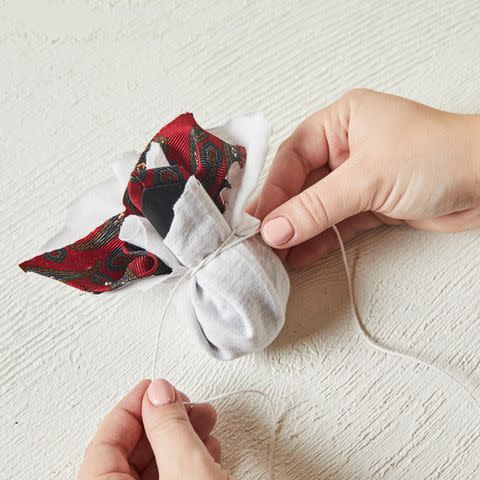
Cut your silk ties into large pieces to cover eggs. You'll need approximately one tie for every three eggs. (We found the bottom third of the tie was large enough to cover one egg.) Cut the tie down the middle and remove the inner fabric or foam from the tie and trim piece to cover the egg. Wrap the tie tightly around the egg, careful not to crack the eggshell. Try to smooth any wrinkles or creases. The tighter you wrap it, the clearer the pattern will be. Cut a slightly larger square of white cotton fabric and wrap it around the tie-covered egg. This will help keep the dye from transferring to the other eggs as you boil them. Secure with plain white string or a rubber band.
:How to Make Shaving Cream Easter Eggs with a Pretty Marbled Look
Step 2: Cook Eggs
Gently set your wrapped eggs into a low stockpot and cover them with cold water. Be sure there's at least an inch of water covering the top of the eggs. Add six tablespoons of white vinegar. Over medium heat, slowly bring water to a boil and cook for a minimum of 20 minutes. Remove eggs and place them on a baking sheet lined with paper towels to cool.
:28 Eye-Catching Ideas for Decorating with Easter Eggs
Step 3: Remove Fabric
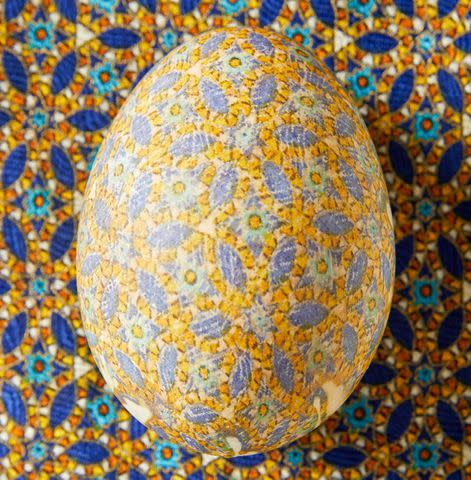
Once the eggs are cool, cut off each egg's cotton and silk fabric. Don't reuse the silk fabric on another egg—the design has already been transferred. Gently wipe egg dry of any excess moisture. If you want to add shine to your silk tie eggs, rub them with some vegetable oil. Store in the refrigerator until ready to add to your Easter centerpiece or basket. These eggs are for decorative uses only. We don't recommend eating the finished silk tie-dyed eggs.
false
