Installing Foam Board Insulation Between Studs
The Spruce / Kevin Norris
Reviewed by Kelly BaconFact checked by Jillian Dara
Rigid foam board insulation can be used throughout the home, but most often it is found in basement walls. If you are a do-it-yourself homeowner finishing your basement, you might decide to use foam board insulation on the walls behind the studs. This is standard for most basement walls.
Other times, you might decide to install the foam board between the studs. It's a non-standard mode of installation for rigid foam and is time-consuming. But sometimes it is your best option if existing studs are already built tightly against the exterior wall.
Foam Board Insulation
Foam board insulation is large 4-foot by 8-foot sheets of closed cell foam ranging from 1/2-inch to 2 inches thick used to insulate walls. The insulating capacity of foam board ranges from R-5 to R-10.
What Foam Board Insulation Is
Rigid foam board insulation is extruded polystyrene that is used in homes both above- and below-grade. Metallic reflective film is sometimes added to one side of the rigid foam.
Because it holds up to water well, the board excels in below-grade applications such as basements. Made of closed-cell foam, the board is highly durable and strong, able to withstand pressures up to 100 psi.
With R-values reaching R-10 for a 2-inch board, foam board doesn't have nearly the insulating capacity of even standard R-13 fiberglass insulation. But foam board's tight-pore resistance to moisture makes it the favored product on exterior walls over highly porous fiberglass or rockwool.
Tips
In basements, fiberglass insulation can be used when insulating a heated finished basement space against another interior basement space that is unheated. Because this interior wall is expected to stay dry, fiberglass insulation can be used.
Rigid Foam Board Sizes
Rigid foam board insulation comes in up to 4-foot by 8-foot sheets to help you rapidly cover expansive walls. Smaller and more manageable 2-foot by 8-foot and 4-foot by 4-foot sheets can sometimes be purchased, as well.
Large sheets often come with shallow cuts that allow you to snap the sheets in half, without using a saw. Generally, these scores will not help with between-stud installation because the scores are not the correct width.
Rigid Foam Water-Resistance
Rigid foam insulation is considered to be impervious to water. Rigid foam insulation is better at mitigating mold than fiberglass insulation. But mold and mildew can still grow on the surface of rigid foam insulation. The difference is that mold and mildew cannot enter rigid foam. Fiberglass insulation's many open cells allow entry to mold and mildew.
Rigid Foam: More Uses
Rigid foam board can also be used as a soundproofing material between rooms. One-inch sheets of rigid foam are routinely used as subfloor covering on basement floors.
Rigid Foam R-Value
Rigid foam insulation tends to have a low to moderate R-value per dollar, compared to fiberglass. Per square foot of R-value, rigid foam board insulation costs about twice as much as fiberglass. A 1 1/2-inch thick sheet of rigid foam insulation has a R-value of 7.5.
Continuous Insulation Makes a Perfect Basement Wall
Rigid foam is meant to be continuous. By contrast, the classic wall system of studs placed every 16 inches on-center does not provide for continuous insulation.
As an exterior sheathing, rigid foam is installed on the outside of the house, just under the siding. The foam sheets are butted next to each other and taped to prevent air infiltration.
On basement walls, continuity is important, too. With sheets tightly placed end-to-end, there is no chance of a thermal bridge.
Preventing Thermal Bridges and Breaks
A thermal bridge is any avenue that unwanted temperatures, hot or cold, are given to come into your home.
A thermal break can be as obvious as a crack or hole in the wall. Surprisingly, it can also be a solid material that has high thermal conductivity. Metal easily transfers cold. If you have any kind of unbroken metal that runs from the exterior to the interior, such as a pipe, you have a thermal bridge.
Wood can also be a thermal bridge, though not as pronounced as metal since wood is not a good conductor of temperatures. Wood wall studs can act as a passageway for cold to transfer into your home's interior.
When to Install Rigid Foam Insulation Between Studs
The correct method of using rigid foam is to run continuous 4-foot by 8-foot sheets of rigid foam across the concrete basement wall behind studs.
Installing foam board insulation between studs is not its intended use. But if there are no other options, installing foam board between studs in below-grade areas can have some benefits, particularly as wood has some insulating properties.
For wood-frame walls, the manufacturers' intended use is to apply the insulation to the outside, not inside, of braced framing or structural sheathing. As a rule of thumb, any insulation is usually better than no insulation, as long as that insulation does not create more problems for you later on.
Insulating with fiberglass against a vapor-heavy concrete wall is an example of a well-intentioned remodel that may create more problems down the road. Your best efforts at adding fiberglass insulation to a moist wall system are undone, often within a few years, by fast-growing mold and mildew. Moisture-logged insulation's insulating properties drop dramatically, and the presence of mold means that the insulation needs to come out right away.
But rigid foam insulation does not soak up water, and its smooth surface does not harbor mold in the way that fiberglass' millions of air pockets do. Even with its flaws—namely, its inability to perfectly mold to the bays between the studs—rigid foam insulation will be a better bet than no insulation.
Using low-expanding spray foam sealant to seal those gaps further increases rigid foam's insulating properties between studs.
Pros and Cons: Rigid Foam Between Studs
Pros
More affordable than spray foam
Less mold growth than with fiberglass
Moisture-resistant
Cons
High-effort installation
Studs can still transmit cold
Difficult to seal gaps
Spray foam installed by a company may cost more than you can afford, making rigid foam the more affordable option. Plus, because basements tend to have some insulation from the earth they're surrounded by, temperatures have some natural moderation, and the issue of thermal breaks caused by rigid foam is minimal.
On the other hand, though, rigid foam may not be a good option if the wall-system is already establish: Dismantling the wall system just to run continuous rigid foam board insulation may not be a worthwhile project. There is also the added work of cutting multiple pieces of rigid foam to exacting dimensions to fit in the bays. Plus, the rigid foam won't cover the wood studs, which can transmit some cold into the basement during times of extreme temperature—and wood studs expand and contract, providing more opportunities for cracks to develop in the foam.
How to Install Rigid Foam Insulation Between Studs
Measure the Project Area
Measure the entire wall area to figure out the amount of rigid foam to purchase. Do not subtract studs. For example, the wall may be 30 feet long by 7 feet high. Consider 210 square feet to be the entire amount of rigid foam insulation to purchase.
The Spruce / Kevin Norris
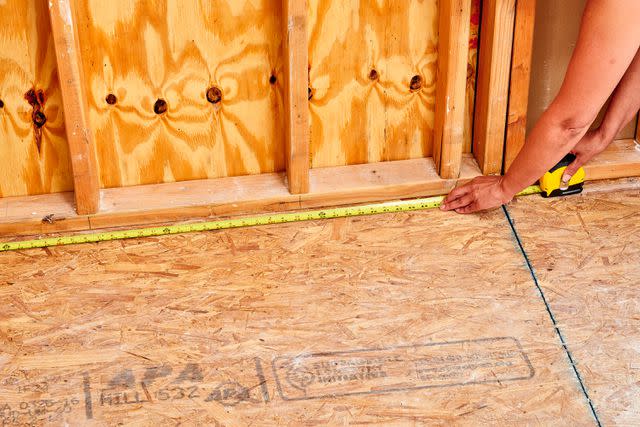
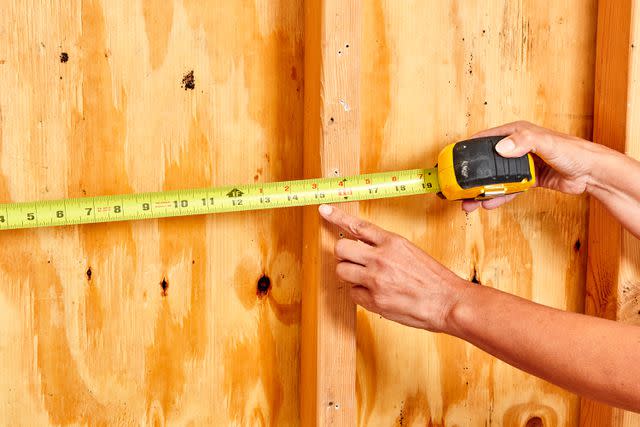
Measure Individual Cavities
Measure each bay individually. Studs placed every 16 inches on-center will have approximately 14 inches of bay width. While you want the foam to be tight, you do not want it to be oversized, as it is difficult to shave down the foam.
One trick to making this project work properly is to treat every wall bay separately. Often, studs may be spaced at dimensions that are not exactly 16 inches on-center. Measure each bay separately and write down that measurement, as in this example:
Bay 1: 16 inches x 7 feet
Bay 2: 16 1/8 inches x 7 feet
Bay 3: 15 7/8 inches x 7 feet
The Spruce / Kevin Norris
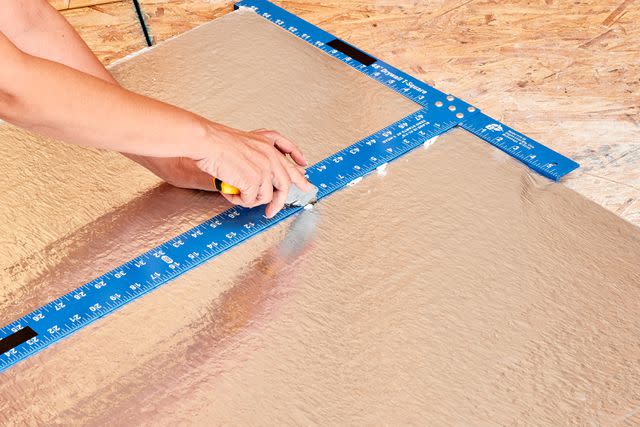
Mark and Cut the Rigid Foam
Mark the dimensions with a permanent marker on the rigid foam with a drywall square. Cut the rigid foam with an ordinary wood saw.
The Spruce / Kevin Norris
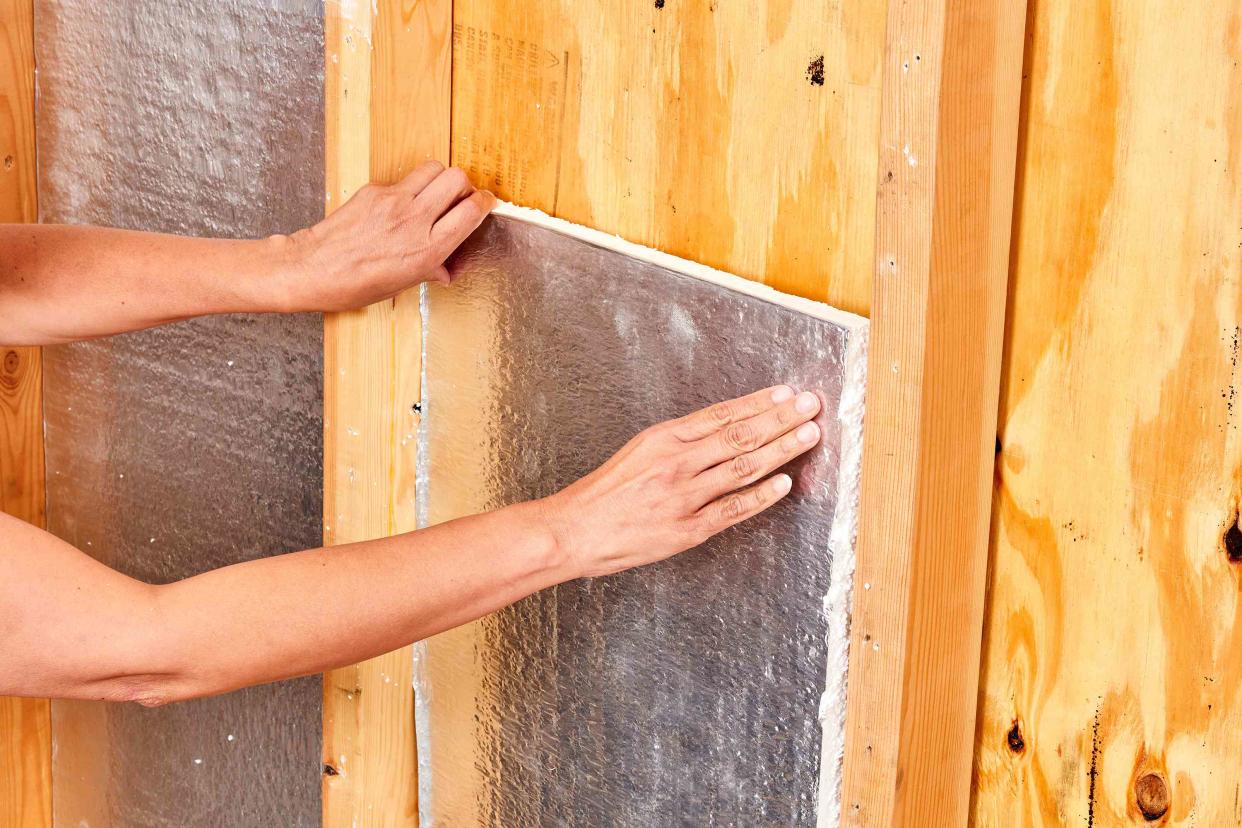
Install the Rigid Foam Insulation
Place each rigid foam sheet in its own wall bay. The fit should be firm but not so firm that the edges of the foam begin to tear. If this happens, pull out the sheet and slightly trim down the edges with the saw.

The Spruce / Kevin Norris
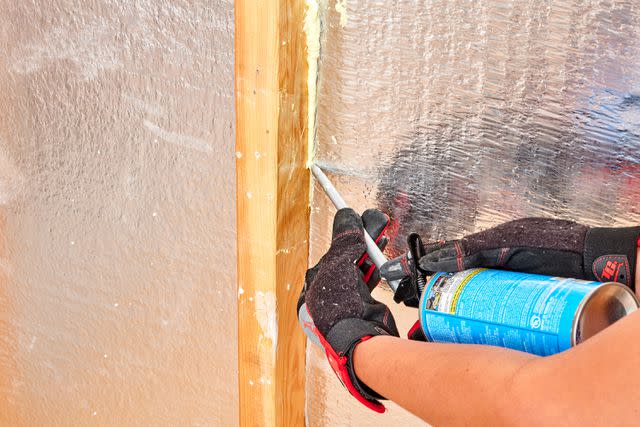
Seal the Gaps in the Insulation
Gaps between the foam and studs should be sealed with low-expanding spray foam sealant.
The Spruce / Kevin Norris
Read the original article on The Spruce.

