These Ingenious Fall Pumpkin Displays Give Cabincore Vibes
"Hearst Magazines and Yahoo may earn commission or revenue on some items through these links."
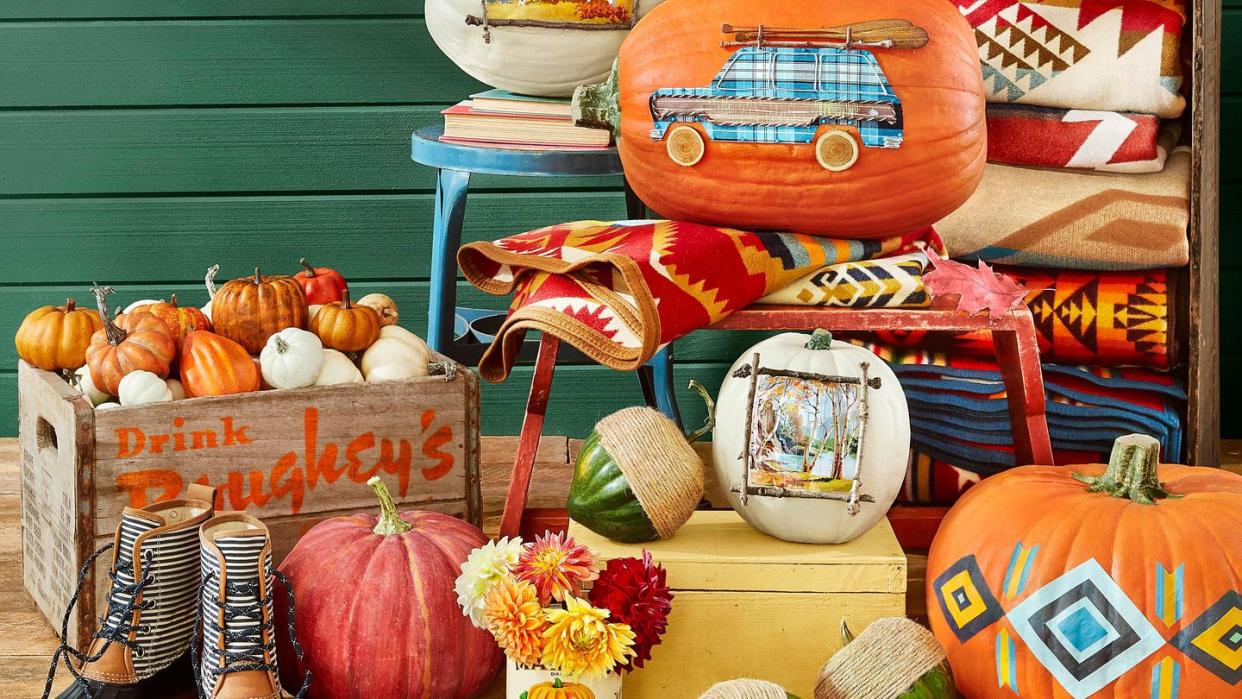
Fall is here! Let's slip away to a cozy cabin for a weekend of leaf peeping. Can't get away? Then take five minutes and get lost in these whimsical, cabin-inspired fall pumpkin displays conjured by Country Living Food and Crafts Director Charlyne Mattox. Every nostalgic detail—from the vintage paint by numbers and cozy Pendleton blankets to the old-school games and wood-burning stove—evokes an autumn escape to a cabin in the woods.
Now, as fall porch decorating ideas go, these pumpkin displays are, shall we say, "extra." But if you're looking to win the neighborhood award for best outdoor Halloween decorations, one of these vignettes is definitely your ticket. Or you can keep it simple and try a fun idea or two. We've got to say, for an easy no-carve pumpkin option, the Wagoneer complete with "wood" paneling is pretty epic!
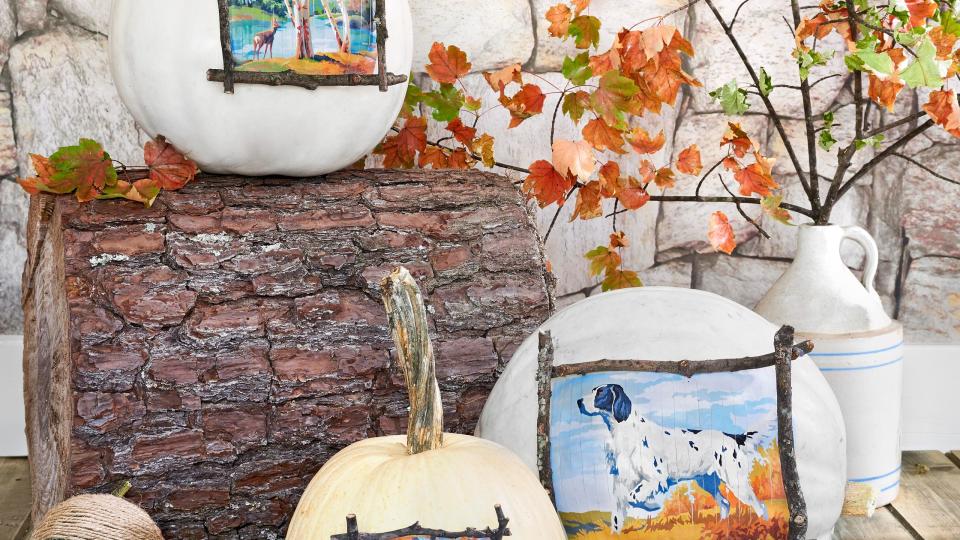
Paint By Numbers Pumpkins
Retro paint by numbers pieces often feature fall scenery—tree-lined trails, babbling brooks—and you can find them gracing the heart-pine paneling in plenty a cabin. To create the ones you see below, photocopy your favorite works of art (or simply Google “vintage paint by numbers” and print your favorite scenes, scaling them up or down as necessary). Cut the paper printouts into half-inch strips, and attach to white pumpkins using Mod Podge. (Line up the image as best you can, taking heart in the fact that some imperfection adds charm.) Attach twig “frames” with hot-glue.
Acorn Squash Acorns
A produce section staple this time of year, acorn squash is an obvious pick to mimic the classic nut, so squirrel away this easy idea. Cut a 4-foot piece of thin tan twine, and attach one end near the stem of the squash with a small map tack; wrap the twine around the top third of the squash, applying hot-glue intermittently. Adhere end with hot-glue, and trim excess twine.

Pendleton Blanket Pumpkins
Countless Americans have curled up under this Oregon company’s throws since 1909. We let some of the more iconic Pendleton patterns (Crossroads, Serrado, and Spirit Guide) inspire these motifs, all created with colorful washi tape. Follow our templates to get the look.

Wood-Burning Stove Pumpkin
No cabin evening is complete without a roaring fire in a wood-burning stove. To assemble yours, cut a hole in the bottom of an extra-large pumpkin, and scoop out pulp and seeds. Trace the door template on the pumpkin, scaling up or down as necessary. Chisel out the outline, and use a knife to cut out the windowpanes.
Paint the pumpkin (excluding chiseled section) black. Fill with sticks longer than the hole, and top with battery-operated tea lights. Remove the stems from four small pumpkins, paint pumpkins black, and arrange them in a square configuration; place stove pumpkin on top. Rest a piece of solid, expandable drain pipe over the stem; attach pipe to the wall or ceiling to help it stay upright.
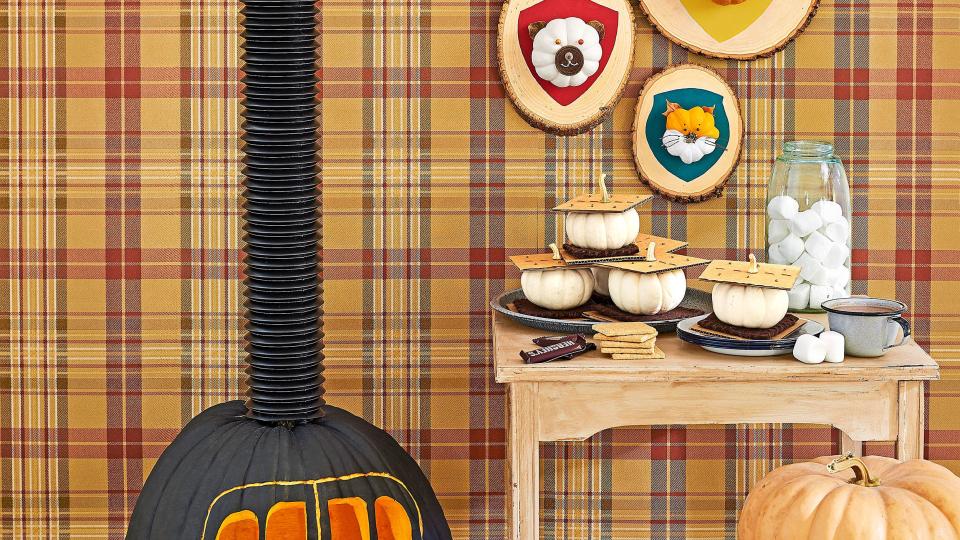
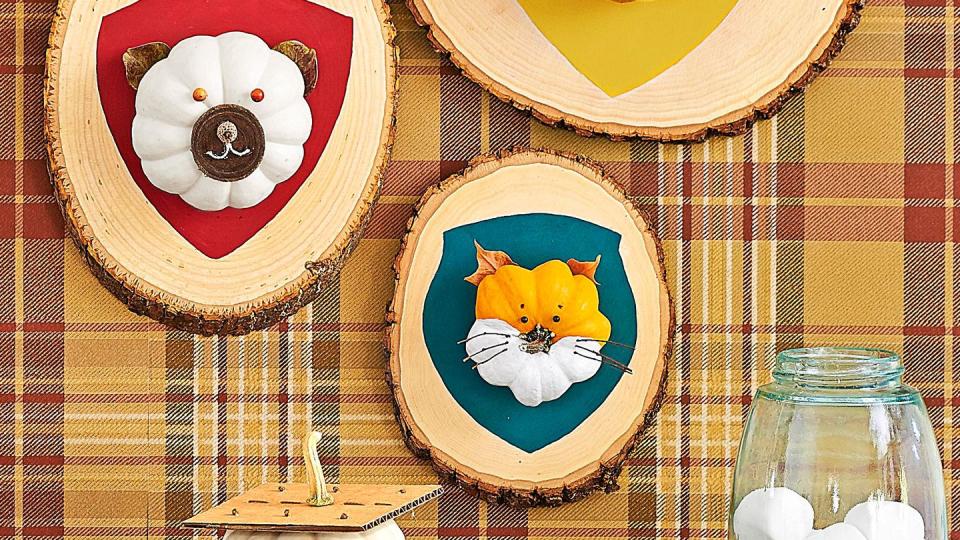
Animal Wall-Mount Pumpkins
For the cutest, kindest take on taxidermy, paint plaques, in varying colors, on large or medium-size wood rounds.
For the moose: Remove the stem from a small pumpkin. Stain a small oval wood piece dark brown, and hot-glue small beads toward the bottom to create the nose; glue to the top of the pumpkin. Use a needle to poke small holes in the back sides of the pumpkin, and insert large oak leaves to create the antlers. Hot-glue small nuts above the nose to create the eyes.
For the bear: Remove the stem from a small pumpkin. Stain a small round wood piece dark brown, and hot-glue an acorn top to the wood piece to create the nose; glue to the top of the pumpkin. Hot-glue small, round-ish leaves to the back of the pumpkin to create the ears and small red beads above the nose for the eyes.
For the fox: Paint the lower half of a small orange pumpkin white; allow to dry. Poke three small holes on each side of the stem, and insert tiny twigs to create the whiskers. Hot-glue small, pointy leaves to the back of the pumpkin to create the ears; insert black map tacks for eyes. Drive a long nail, at an upward angle, through the back of each large wood round and into the pumpkin to secure.
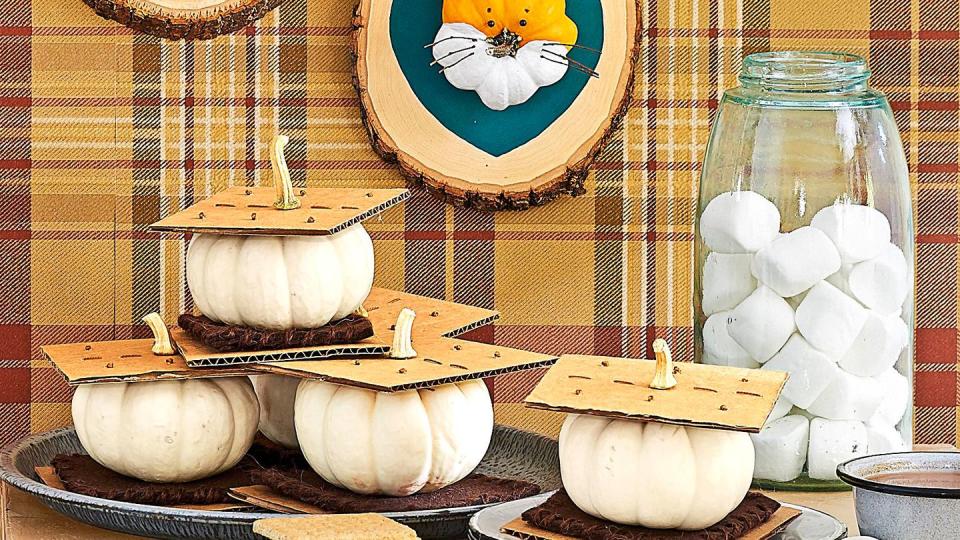
S’mores Pumpkins
Gather four small white pumpkins. Cut a piece of cardboard into eight squares. (The squares should be slightly larger than the pumpkins). On four of the squares, use a large needle and light brown embroidery floss to make a line down the center and six French knots on either side of the line. (Needle-averse? Use a brown marker to mimic the perforations on a graham cracker.)
Cut eight square pieces of brown felt (they should be slightly smaller than the cardboard); whipstitch two together using dark brown embroidery floss; continue stitching pairs until you have four “chocolate” pieces. Snap the stems off pumpkins, and hot-glue stems to the centers of the stitched pieces of cardboard. Sandwich everything together.
Cabin in the Woods Pumpkin
Remove stem from a large pumpkin. Attach two pieces of wood in an inverted “V” shape using L-brackets. Attach a triangular-shaped piece of wood in the top corners of “roof” with hot-glue; cover the wood with wood-patterned paper. Attach stem to the wood roof with hot-glue to create a chimney. Use pinecone scales to create overlapping shingles on roof (secure with hot-glue). Insert a piece of thin wire into the chimney, and wrap a puff of batting around the wire to create smoke. Rest the roof on top of the pumpkin.
Create a window by gluing twigs in a 4-pane window shape. Pleat two small pieces of fabric, and hot-glue to the back of the window to make curtains. To make the door and threshold, use an L-bracket to attach two small pieces of wood perpendicular to each other. Use hot-glue to attach twigs for the door frame. Attach leaves to create a wreath. Make a “walkway” with small rocks.

Woody Wagoneer Pumpkin
Trace the Wagoneer template on plaid fabric, scaling up or down as necessary, and cut out; attach to a pumpkin with small map tacks. Cut the wood panel from wood grain-patterned Duck Tape, and attach to the wagon. Use hot-glue to attach silver cording to the wagon to outline the windows and wood panel. Glue a small spiral of cording to create the gas cap and a zigzag to create the bumpers. Hot-glue small wood slices for the wheels and small twigs to the roof to create the roof rack. Top with a toy canoe and oars.
Fishing Bobbers Pumpkins
Paint the bottom half of small white pumpkins with red craft paint; dangle bobbers from a vintage fishing pole.
[image] stripped
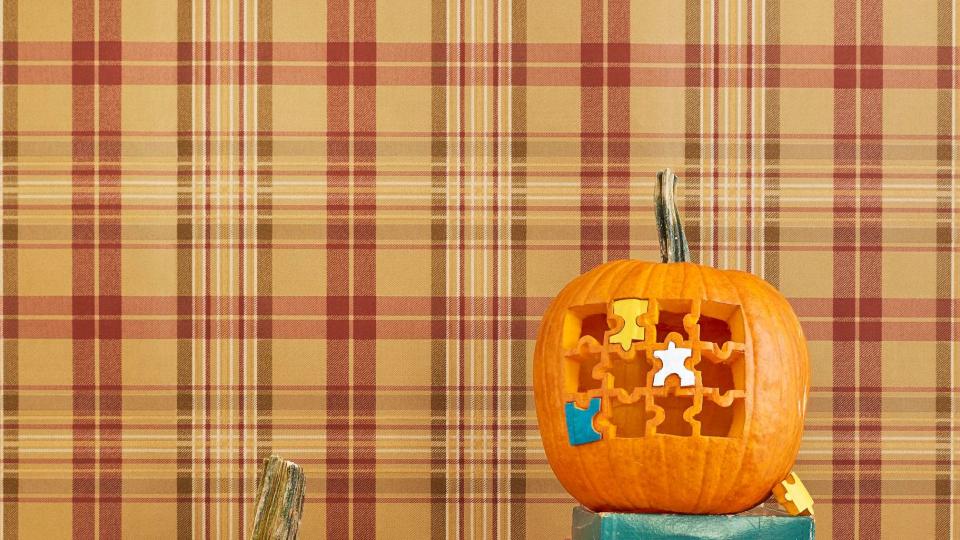
Jigsaw Puzzle Pumpkin
Cut a hole in the bottom of a pumpkin, and scoop out pulp and seeds. Trace the puzzle template on the pumpkin, scaling up or down as necessary. Use a knife to cut out the puzzle pieces. Use craft paint to paint the puzzle pieces. Challenge kids to complete the puzzle for candy prizes.
Dartboard Pumpkin
Scale the dartboard template up or down as necessary. Use template to cut 10 triangles from white contact paper and 10 triangles from black contact paper. Adhere to the pumpkin, lining up the edges, as shown above. Use template to cut rings from black, red, and green contact paper. Adhere the large black ring on the outside of the triangles, overlapping the edges slightly. Adhere the red ring along the inside edge of the black ring, overlapping edges slightly. Adhere the green ring on the dartboard. Use the template to cut small circles from green and red contact paper; adhere to the center of the board. Hot-glue silver cording along the seams of the white and black triangles. Adhere white vinyl stick-on numbers on the black ring. Add darts as desired.
You Might Also Like

