How to Use IKEA Furniture for Built-In Storage
Stay within your renovation budget with these IKEA furniture hacks to DIY your own built-in storage.

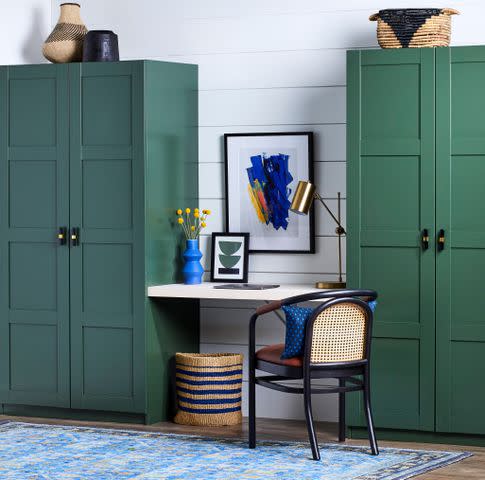
Courtesy of LeeAnne Mullins
IKEA is known for its budget-friendly Scandinavian designs you can't typically find at your local furniture store. But the readymade furnishings don't always come with a custom look. However, DIYers are changing that narrative by using IKEA bookshelves, drawers, and cabinets as an economical starting point for a customizable, floor-to-ceiling built-in look.
While there are hundreds of combinations possible, there are a few pieces that have shown to be the most popular. When placed together and shown a little DIY love, a few stand-alone furniture pieces can become built-in storage in the form of decorative bookcases, wardrobes, desks, and entertainment centers.
Although somewhat time-consuming, this transformation is well worth the work. Bespoke built-in materials and installations can cost thousands of dollars, but this method for DIY built-ins cuts costs drastically depending on the style and size of pieces you choose.
IKEA Furniture Pieces to Consider for Built-Ins
BILLY Bookcase
The most popular item used for shelving is the BILLY bookcase. It comes in three colors: Birch veneer, black-brown, and white. The color you choose will depend on the color you plan on painting your built-in; a dark paint color works best with black-brown and a light paint color with white. There are also endless styles and sizes of the signature BILLY bookcase. You can choose from glass or panel doors, ones with wide or narrow shelves, and vertical or horizontal designs.
The best height and width for your bookcase will depend on the size of your space and the other pieces you plan on using to build your final product. Keep in mind that there are also height extensions available. Measure your space and compare it with the item's measurements to puzzle together your ideal, custom combination.
HEMNES Bookcase
A BILLY alternative is the HEMNES bookcase, which has deeper shelving and is made with sustainably-sourced solid pine rather than particle board. Since it won't have the ultra-shiny gloss finish, it's easier to prime and paint than the BILLY. However, it also comes at a higher in price. Another benefit is that you don't need to trim off the legs of this bookcase so that the bottom can fit snugly into the space you're placing it.
HAVSTA Cabinets
Home DIYer LeeAnne Mullins (@lifewithleeanne on Instagram) created her own semi-custom office combining two types of IKEA furniture—BILLY bookcases and HAVSTA cabinets, which are made of solid pine. Mullins notes that the built-in look began with the pieces she chose; because the BILLY bookcases are more shallow than the base of the HAVSTA cabinets, they appeared inset and already like a custom build when placed on the cabinet base. She also placed the BILLY bookcases upside-down with the toe kick at the ceiling, which could easily be covered with crown molding or trim. This prevented any gap between the cabinets and bookcases.
"Aside from patience, and the upfront design steps, the project itself is one of the easier DIY projects I've completed in my home," says Mullins. "IKEA furniture gives people a great head start that way."
RAST Dresser or PAX Storage
Once you know what you want your finished product to look like, start scrolling through IKEA's storage and organization, where you're sure to find a product for any storage goal you have. For example, if you want to include drawers in your built-ins with shelving above on each side of a desk, two of the RAST pine dressers combined with two BILLY bookcases would suit your needs perfectly.
If you're looking for hallway storage or a new wardrobe, try using IKEA's PAX system. Even better, their PAX planner can help you visualize your chosen combination for all your storage needs. PAX products can also be elevated and customized at home for a built-in look.
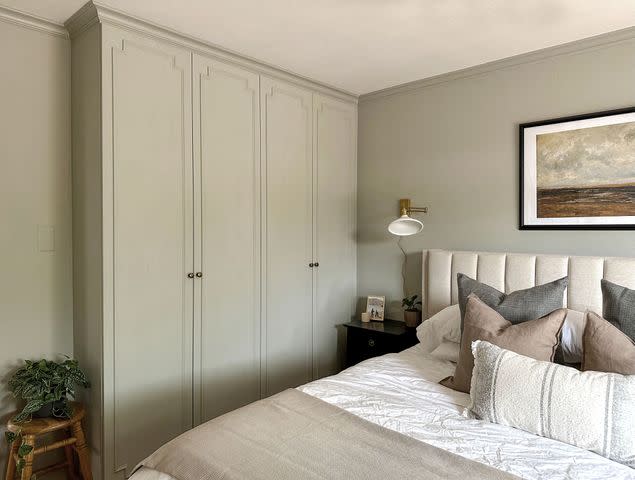
Blaine Moats
How to Achieve a Built-In Look with IKEA Staples
So you've drawn out your plan and purchased the pieces to make it happen—you're getting closer to your dream built-in storage. There are quite a few ways that you can embellish the pieces to get a look your love.
Assemble and Build Furniture
First, build a base of 2x2s, 2x4s, or plywood to lift the pieces off of the ground. To make it flush against the wall, it is recommended to remove any existing baseboard behind the finished piece. This step will already give the illusion of a built-in.
Once you have your base, place all of your IKEA pieces together in the way you'd like and screw them together, securely attaching them to wall studs and to the base with wood screws.
To further customize shelves, consider adding arches or other designs to the top of your shelves. Cut wood with curves and angles and screw on to the furniture when finished. Or add thicker pieces of trim between each shelf to make the entire piece appear bigger. If your items have doors, make them look high-end by cutting trim pieces to create a frame for the door's exterior.
Pay Attention to Details for a Polished Look
Next, fill in all holes with a basic surfacing compound where extra shelving or additional pieces could have been added (especially for BILLY bookcases). When all the holes have been filled in, caulk all of the seams where the pieces of furniture meet and where the furniture meets the wall. This will create a seamless, built-in appearance.
Finish the look by installing baseboard molding that matches the rest of the space for your new furniture base to integrate it into the room.
And don't be discouraged by the steps and supplies needed—Mullins encourages even DIY newbies to try their hand at a large-scale project like IKEA built-ins. "You can be a novice without many tools and still do this. Most big-box lumber stores will cut wood for you, so if you know the size of the trim pieces you need, they can trim them on-site," she says. "You can also check out your local tool library for low-cost rentals for things like a nail gun or sander."
Courtesy of Rebecca Rajs
How to Paint the Final Product
Once you have your pieces assembled and all extra touches complete for a custom-built appearance, it's time to finish your DIY storage unit with paint.
No matter the type of IKEA furniture you have, sanding before primer is always a good idea. If you have a BILLY bookcase, for example, it most likely has a high-gloss finish, making it difficult for the paint to properly adhere. To combat this, a repetitive process of sanding and painting is necessary for long-lasting coverage. If you want to avoid sanding at all costs, use a shellac primer like Zinnser B-I-N Shellac-Based Primer and Sealer before painting. Make sure to let the primer cure for 2-3 days in between coats (two coats of primer is best before painting).
Choose Your Paint
Water-based latex paint works well for DIY built-ins; consider using a matte finish to hide any imperfections. While a brush can work, a paint sprayer will save you time and prevent visible brushstrokes. While not always ideal, it is recommended to paint your storage unit the same color as the room to make it appear built-in.
Rebecca Rajs (@rebs_home) chose Sea Haze by Benjamin Moore for her entire wardrobe and bedroom. She added thin trim pieces in a unique box shape and crown molding to the IKEA PAX series pieces.
"It can be a really affordable way to add something totally custom and unique to your home," she says. "I was nervous to tackle this project, but I'm so happy I went for it! The finishing details make all the difference, so don't be afraid to try a bold paint color or add any fun detail you want."
Sand, Paint, Dry—Repeat
When sanding your built-ins, opt for a tougher grit sandpaper, such as 180-220, before the first coat of primer. After the first round of sanding and primer, use a finer grit, like 800-1000, as a polisher to give the paint some traction. Paint and sand with fine grit for four additional coats, giving each coat at least 24 hours to dry between each. While this is a tedious process, it's well worth it to prevent scratching and chipping in the future. When all four coats have been applied and dried, end with a finish coat to protect the paint underneath.
Decorate Your IKEA Built-Ins
Finalize your built-in lookalike with hardware of your choice and style as desired. Try placing books, vases, and treasured knickknacks on the various shelves. With all of your newfound storage, look to some new organization ideas to keep everything tidy.
For more Better Homes & Gardens news, make sure to sign up for our newsletter!
Read the original article on Better Homes & Gardens.

