How to Prevent Bunions, and Maybe Even Reverse Them
(Photo Courtesy of Peter Dazeley / Getty Images)
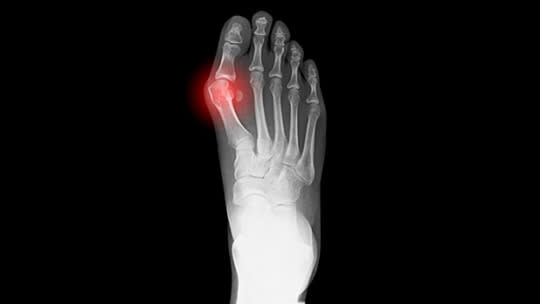
Bunions, as unflattering as they are painful, aren’t just hereditary. They’re often another unfortunate side effect of muscle imbalances and can develop from simply walking. In the case of bunions, imbalances keep your foot from moving properly, eventually leading to a bony protuberance. The good news is that, like many misuse injuries, bunions are preventable — and in some cases even reversible — with the right training regiment.
First thing to understand is your basic foot anatomy. You have three main components: the rearfoot, midfoot, and forefoot. Ideally, these sections should work together like gears in a bike. As you walk, and your weight is transferred back to front, your foot should move from supination (inward roll of the foot) to pronation (outward roll) and back to supination again, using all three components. (Note: A running store may have declared you a pronator or supinator, and in need of special shoes to fix your gait. The truth is if you fix imbalances affecting your feet, you won’t need special shoes.)
Related: 5 Workouts to Boost Foot Strength and Mobility
I typically see bunions form after years of wear and tear that causes motion to be lost in pronation at the rear foot and midfoot. This then causes the navicular (one of the midfoot bones) to be stuck in supination and the MTP joint (the line of the big toe) to drop upon pronation. This keeps you from getting you optimal muscle efficiency and a proper push off from your stride.
When you walk or run like this, you place excess weight on the outer edge (lateral border) of your foot. When it is time to push off, you instead push off the inside of your big toe. This is why calluses form under your first MTP and big toe. The forces aren’t transferred efficiently and your foot turnout increases. After years of walking this way and putting excess force on the big toe, you eventually end up with the bony growth we know as a bunion, or hallux valgus.
Related: Do You Really Need Running Insoles?
If a bunion is just starting to form, or has just recently formed, these are the steps you should take to reverse it, or at least keep it from growing. And while you won’t be able to get rid of a bunion you’ve had for years, you can use these steps to change your biomechanics so the growth doesn’t get worse. What to do:
Shin Release
Kneel with hands on the ground, the outside of your shin on top of a lacrosse ball. (Do not place the ball on your shinbone.)
Roll shin up and down over the ball.
Once you find a tender spot, stop and point your foot up and down for 30 seconds, or until you feel the muscle release. Repeat on both legs.
Related: How to Injury-Proof Your Body
Evertor Release
Find a stable, firm surface roughly knee height. Sit on it with one leg bent and foot on the ground, the other is on the surface, knee bent 90 degrees and ankle hanging off.
Place lacrosse ball on the outside of your lower leg, just below the knee joint.
Slowly allow body weight to sink into the ball.
Move your foot side to side until discomfort in that area decreases.
Move the ball around to multiple sore spots, progressing down your leg toward your ankle.
Perform on each leg for one to two minutes.
Plantar Fascia Release
Standing with knees slightly bent, step one foot forward onto a lacrosse ball, and gently roll the ball under foot.
Once you find a tender spot, stop and point your toes up and down.
Roll each foot on the ball for one to two minutes.
Related: The Real Reason You Have Plantar Fasciitis (and How to Fix It)
Soleus Release
Sit on the floor, legs straight out, with lower calf on top of a lacrosse ball or foam roller.
Place your other leg over the one you are releasing and roll yourself up and down over the ball.
Once you find a tender spot, stop and point your foot up and down for 30 seconds.
Midfoot Pronation and Supination Mobilization
Stand on right foot, knee slightly bent.
Transfer weight to the front part of right foot, keeping foot flat on the ground. (Stand close to a stable surface so you can use your hands for extra balance.)
Twist the rest of your body from right to left, keeping foot flat. If you have a hard time keeping it flat, place left foot on top of right for added pressure.
Perform 10 to 15 repetitions and then shift the weight to your heel and repeat the above steps. Repeat entire sequence on left foot.
Related: How to Fix Your Running Form
Calf Raises
Stand with chest against a stability ball that’s rested on a wall, legs straight and feet slightly behind you so that your heels aren’t touching the floor.
Shift your weight all to one leg with the other leg resting on the back of the working leg. Slightly bend your knee.
Go up on your toes, then come all the way back down until heel touches the floor.
Repeat the motion with working leg straight foot pointing straight.
Repeat the motion with working leg straight and foot turned outwards.
If this is too difficult, you can perform with both feet on the ground.
Perform three sets of 15 reps of each position.
By David Reavy
More from Men’s Journal:
The Right Way to Strengthen Your Feet
