How Hip Thrusts Compare To Squats & Deadlifts
"Hearst Magazines and Yahoo may earn commission or revenue on some items through these links."
Squats, deadlifts, and Bulgarian split squats are great, but hip thrusts also have a place in your lower-body strength routine. The move is a favorite amongst trainers and athletes alike, but you may be wondering, what muscles does the hip thrust work, exactly?
“A hip thrust is an exercise that mainly works the glutes and hips,” says Daniel McKenna, CPT, a New York City-based certified personal trainer and creator of The Irish Yank Fitness App. “It’s one of the most beneficial workouts for your glutes to improve strength and power.” (Now that’s a glowing endorsement!)
It’s also an excellent move for targeting the glutes without placing the same amount of strain on the spine as a squat or deadlift, since a hip thrust starts right on the mat and your shoulders are supported on a bench or couch, says Samantha Rothberg, CSCS, founder of Samantha Rothberg Fitness. Plus, the hip thrust also gives support to the upper back by laying on the bench, allowing for heavier weights to be lifted while maintaining proper form, she adds.
The hip thrust may look intimidating in the gym, but they’re actually suitable for all levels, says McKenna. If you’re new to lifting, you can start with bodyweight as you get comfortable in the movement pattern, and over time you can progressively increase weight to challenge the glutes and build strength, he explains.
Here's a full guide to hip thrusts, including how to do them properly, the common mistakes to avoid, and intel on all the benefits and muscles worked when you nail the lower-body move.
Meet the experts: Daniel McKenna, CPT, is a New York-based certified personal trainer, former tread and strength Peloton instructor, and creator of The Irish Yank Fitness App. Samantha Rothberg, CSCS, is a certified strength and conditioning specialist and founder of Samantha Rothberg Fitness.
What is a hip thrust and what muscles does it work?
In addition to the aforementioned glutes and hips, the hip thrust targets the hamstrings, quads, adductors, and core, says Rothberg. “It’s a hip extension exercise (think the opposite of hip flexion, when the knee comes closer to the chest) that has tremendous carry over into both activities of daily living such as walking, and athletics such as running, jumping, and climbing.”
The lift works your entire posterior chain, but mainly fires up the gluteus maximus, the largest muscle in the glutes, along with the gluteus medius, and gluteus minimus, says Rothberg. The gluteus maximus is the primary “mover” in the hip thrust and allows you to extend your hips and provides stability to your hips and knees, she explains. “If you can’t feel your glutes [firing] while performing the hip thrust, you’re probably set up incorrectly,” she explains.
But wait… there’s more! The hamstrings come into play as the main supporting muscles of the exercise which allows you to extend the hips, and the quads activate for proper leg extension, stability, and balance, says McKenna. Your hip adductors also work to stabilize the legs and maintain proper alignment throughout the entire move, he adds.
Last but not least, your deep core muscles engage to stabilize the spine and pelvis as your hips extend and complete the “thrusting” motion, says Rothberg.
Benefits Of The Hip Thrust
It builds lower-body strength.
As I've explained, hip thrusts are a great exercise for building muscle in the lower body and core. As you perfect the movement, you’ll also be able to increase reps, sets, and weight which leads to more defined muscle, adds Rothberg.
It improves posture.
Strong glute muscles stabilize the sacrum (the bone located at the base of your spine) which creates a balanced posture, says McKenna. Hip thrusts also strengthen your deep core muscles which improve posture and keep your back safe, Rothberg adds.
It enhances functional movement.
Your glutes are crucial in allowing you to perform day-to-day activities with ease, and strengthening them helps your body tackle other exercise (like walking or keeping your balance) at peak performance, says McKenna.
It can increase bone density.
Weight-bearing exercise and resistance training (like the hip thrust) is key to increasing your bone density, says Rothberg. Everyone can benefit from stronger bones, but this is particularly important for those prone to osteopenia or osteoporosis, she adds.
How To Do A Hip Thrust With Proper Form
To stay safe and reap the benefits, proper form is key when nailing a hip thrust. If you’re a beginner, start with your bodyweight to get comfortable in the movement pattern. From there, Rothberg recommends holding a dumbbell (around 35 pounds or less) by the ends and placing the weight across your hips.
Once you’re ready to level up, work your way up to a barbell and add five to 10 pounds on each side. After all, the glutes are the biggest muscle in the body, so they have the potential to lift heavy, adds Rothberg.
Pro tip: If you’re using a barbell, you’ll need to place a pad between your hips and the bar. Many gyms will have options like this one. Rothberg says it makes sense to use the pad even if you’re working with a dumbbell for max comfort.
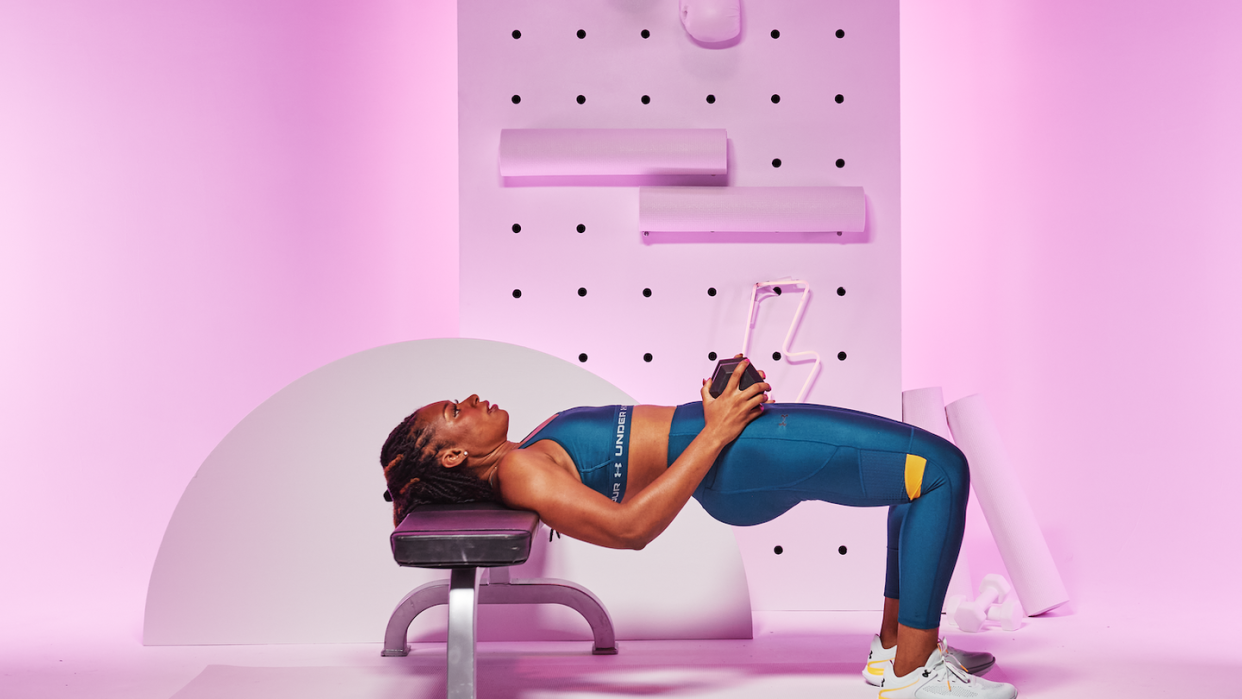
How to:
Sit with feet flat on the floor, slightly wider than hip-width apart, in front of a couch, workout bench, or stable chair, with toes slightly turned out.
Place forearms flat on surface so elbows point back and fingers point forward. (Alternatively, you can rest your shoulder blades directly across the surface, which is the way to go if you plan to add weights to the move.)
Lift seat up off floor and walk feet out until planted slightly beyond knees. This is your starting position.
Inhale, then push through heels and engage glutes to extend hips up until body forms a straight line from shoulders to knees. Maintain a slight chin tuck with focus down the body (do not look up toward the ceiling).
Exhale, then slowly reverse the movement to return to start until hips are just a few inches off the floor. That's 1 rep.
If your goal is to increase muscle size, do three to four sets of six to 12 reps with 45 to 60 seconds of rest in between. If your goal is overall strength, do two to four sets of two to six reps with up to three minutes of rest in between.
Pro tip: If you can perform an additional two reps during your last set, Rothberg says it’s time to increase the weight. Newer lifters should increase by five to 10 pounds, and more experienced lifters should increase by 10 to 15 pounds at a time. If you have limited equipment, increase your reps and sets or decrease your recovery time.
Common Hip Thrust Mistakes To Avoid
Ensure the bench is at the correct height. When you elevate your hips and place the top of your back against the bench (or other object), your knees should be at a 90-degree angle with your torso parallel to the floor, says Rothberg. If the bench is too high or too low, you’ll compromise form which increases the risk of injury.
Focus on proper foot positioning. It's important to keep your feet slightly beyond your knees and a little more than hip-width apart, says McKenna. “If your feet are too close to your hips the exercise becomes quad dominant rather than glute, and if your feet are stretched too far out from the hips it results in limited work for the hamstrings and glutes,” he explains. Also remember to push through your heels (not your toes) when performing the exercise.
Maintain a neutral spine. Rounding the lower back or shrugging your shoulders puts added stress on the spine which increases your risk of injury, says McKenna. Instead, focus on maintaining a neutral spine throughout the exercise and engage your core to stabilize the spine, he adds.
Keep the weight on your hips. If you add a dumbbell or barbell, the weight should always be positioned across the hips, says McKenna. Placing the weight on the stomach or lower back can cause injury.
Tuck your chin. Tilting your head back disengages your core and puts strain on your neck and shoulders, says McKenna. Instead, keep your chin tucked and your gaze slightly down toward the chest while lifting the hips into extension, he explains.
Focus on correct hip alignment. Not extending your hips enough or overextending them at the top of the exercise can shift the load from your glutes to your lower back. To maintain proper form and keep your glutes working, Rothberg says to lift your hips only until they’re in line with your shoulders in a “tabletop” position.
Hip Thrust Variations To Try
The following exercises work similar muscles to the hip thrust and are great to work into your routine for variety, say Rothberg and McKenna.
Glute Bridge
How to:
Lie face-up on the floor with knees bent at a 45-degree angle about six inches in front of butt, feet planted flat, and arms resting on the ground at sides, palms face-down.
Gaze toward the ceiling and engage core, which will help stabilize spine. (Brace stomach as if someone is about to punch you in the gut.) Lower back should be pressing lightly against the floor.
On an exhale, engage glutes and drive through all four corners of feet to press hips up toward the ceiling, keeping shoulders planted on the floor and gaze toward the ceiling. Continue lifting hips until body forms a straight line from knees to shoulders.
On an inhale, slowly lower hips back to the floor, allowing knees to bend back to a 45-degree angle. That’s 1 rep.
Kettlebell Swing
How to:
Stand with feet slightly wider than shoulder-width apart. Hold a kettlebell in front of body with both hands, arms straight.
With a slight bend in knees and a flat back, hinge at hips and swing the kettlebell back through legs. Use that momentum to stand and swing the kettlebell out in front of body, up to shoulder height.
Thrust hips forward, and engage glutes and core as you stand up straight. When the kettlebell hits shoulder height, knees should be straight and glutes contracted in a full hip extension.
Allow the kettlebell to swing back down through legs, while hinging at the hips. That's 1 rep.
Sumo Deadlift
How to:
Stand with feet shoulder-width apart (a little wider if you prefer), with a set of dumbbells in front of you.
Rotate feet away from the midline of body so they’re turned out 30- to 45-degrees.
Bend at the hips, keeping chest up and driving hips back as you reach hands down to grab the dumbbells with an overhand grip.
Take a deep breath and engage core, keep spine straight as you squeeze glutes, and thrust hips forward while raising the dumbbells as you straighten legs to stand.
Slowly lower the weights back to the floor. That’s 1 rep.
Romanian Deadlift
How to:
Stand with feet hip-width apart. Hold the barbell or dumbbells out in front of you, near thighs.
Keeping back and legs straight, hinge at the hips and focus on sending hips and butt back as you lower the barbell/dumbbells toward the ground. Make sure weight is in your heels and inhale.
Maintain that position and lower yourself as far as flexibility allows, ideally with the weight(s) landing at least in the middle of shins.
Engage glutes, contract hips, and drive back to the starting position, locking hips out at the top. Exhale. You should feel a squeeze in your hips and quads as you lock them out. That's 1 rep.
Dumbbell Back Squat
How to:
Start standing with feet parallel and shoulder-width apart, holding a dumbbell in both hands and resting behind neck.
Engage core, push hips back, and lower down slowly until thighs are parallel with the floor.
Press through feet to reverse the movement and return to start. That's 1 rep.
Frequently Asked Questions

How do hip thrusts compare to squats and deadlifts for glute strength?
Squats and deadlifts are killer moves for increasing your glute strength, but a hip thrust allows you to specifically isolate your bum, says Rothberg. In fact, studies prove that your glutes are more engaged in a hip thrust than in a squat or deadlift, while the hamstrings are more activated in the deadlift than in the hip thrust, she explains. Remember: the peak load on the glutes is at the top of the hip thrust, so it’s imperative to go through the full range of motion for maximum benefit, she adds.
That said, it’s worth your time to train squats, deadlifts, and hip thrusts for a well-rounded routine, says Rothberg. (FYI: Rothberg recommends programming a squat or deadlift before a hip thrust since they’re more challenging on the central nervous system, and it’s important to do those before you begin to fatigue.) And! To really grow your glutes, which is a whole nother story TBH, you should also work in moves that stretch your glutes to the max (like weighted reverse lunges).
How often should you do hip thrusts?
Frequency depends on your goals, ability, and current fitness level, but generally speaking, hip thrusts should be done one to three times per week, says Rothberg. Just take at least one day of rest between training the same muscle groups, she adds.
What equipment do you need for hip thrusts?
The most common way to perform the hip thrust is with a barbell, pad (to protect your bones as the weight increases), bench, weight plates, and clips, says Rothberg. However, if this equipment isn’t available to you, you can totally use your bodyweight against a chair or couch, or a dumbbell placed over the hips against a bench, she says.
You Might Also Like

