It’s High Time You Knew How to Make Cannabutter
This article is part of Spring Bake, a collection of brand-new recipes and ideas that will keep you in cake, buns, and cookies until summer.
I came late to cannabutter, which doesn’t make much sense. A Northern California upbringing and affinity for kitchen projects should spell an illustrious relationship with infused baking, but the truth is I didn’t get into making my own edibles until after college. I followed all of the guidelines I got from friends and the internet: I started small, experimented with flavor complements (peanut butter = great! lime = interesting!), and learned as I went. But even as I developed some halfway decent skills, I always felt there was untapped potential in the shiny greenish concoction I’d brewed on the stove. The science was clear, but the art was murky. I had questions only a professional could answer.
Unsalted butter—or oil, or lard (we’ll get there)—is the key to baking with weed because of its high fat content, says Miguel Trinidad, chef and owner of New York’s Jeepney Filipino Gastropub and 99th Floor, a cannabis supper club. Infusing fat with cannabis means imbuing it with cannabinoids (like THC and CBD) and terpenes (the compounds responsible for weed’s flavor and smell) that you extract with time and heat; the fat acts as a carrier and integrates these features throughout whatever recipe you use.
Making edibles at home is practical for a few reasons. Managing dosing yourself means creating a product that packs your ideal punch—your cookies can be as potent or low-key as you wish and change from batch to batch. Also, the up-charge on store-bought edibles is much higher than it is on cannabis flower, says Monica Lo, a San Francisco-based creative director and blogger behind Sous Weed, a resource for cooking with cannabis. Thanks to new licensing costs and taxes, it’s much more cost effective to get into the homemade baking game.
One thing to remember before you begin: Good cannabutter isn’t a way to use up bad or old weed. “I always tell people it’s not like cooking with wine,” says Sheila Mitchell, the pastry chef behind popular Los Angeles cannabis baking pop-ups and the very newly launched Rose Gold Pastries. “Quality matters. Most people use shake”—that is, scraps and pieces that have fallen off of bigger buds—“but you want higher quality shake to bake with. Cheap weed means pungent flavor but no power.” Striking a balance of potency and taste is the goal when baking with cannabis, and with a little guidance, it’s easier to do than you might imagine.
First, we activate
Canna Butter Primer - PROCESS 1
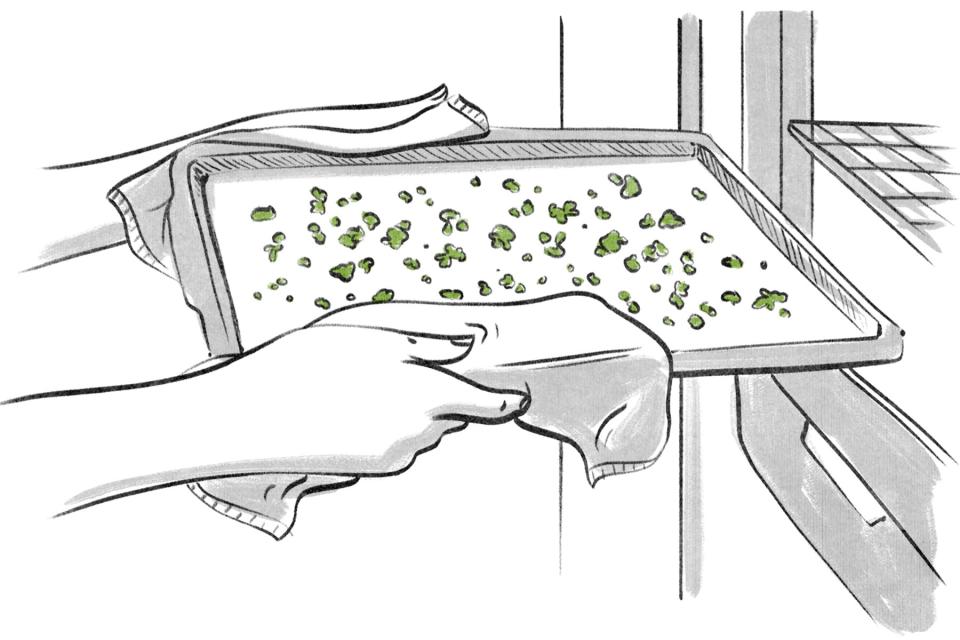
Illustration by Amber Day.The first step in preparing weed to use in any edible context—infused butter, spice blends, steeped honey—is to activate it. If you’ve ever seen a movie where a character eats a ton of raw cannabis from a bag and proceeds to trip out for an entire afternoon, you might think that weed is potent from the jump. In reality, while eating handfuls of straight flower will definitely have an effect on your body (i.e., you will likely barf), it would not be the same as having smoked it or eating a commensurate dose of edibles. This is because compounds in cannabis like THC and CBD, called cannabinoids, need heat to transform, a reaction called decarboxylation. Most commonly, you decarboxylate, or decarb, your weed by lighting it on fire or vaporizing it. But for cannabis that you plan to use in cooking or baking, you need only harness the power of your oven.
“Decarbing is a very simple process to do at home,” Trinidad says. First, roughly chop or medium grind your flower into small pieces—“not too big that the heat can’t get to the heart of it, and not too small that it’ll fall through your strainer.” Then spread the cannabis out on a sheet pan and pop it in the oven at 220°F for 30 minutes. If you have a convection oven, Trinidad suggests covering the sheet pan with foil and poking a few holes through it, so your flower doesn’t blow away. “A friend of mine forgot and lost an ounce of weed that way—and now every time he cooks dinner you can smell it.”
Pick a fat, any fat
Butter is the prototypical fat for infusing with cannabis: creamy, flavorful, and called for in most baking endeavors, it’s an easy place to begin. But depending on how you ultimately want to use your infused fat, you can branch out with other ingredients instead. Olive oil, vegetable oil, lard, chicken schmaltz, even meltable vegan butters—any fat that’s stable and liquid between 160°F and 200°F can get the cannabis treatment and be integrated into your lifted baking repertoire.
When she isn’t using butter, Mitchell loves to infuse coconut oil, especially when she’s hoping to yield a stronger end result. “Coconut oil has a higher fat content than butter,” she says, “and when you extract the THC from cannabis, the fat is what carries it. As long as you’re not using a recipe where the final texture can be negatively affected by subbing in coconut oil, I think it’s a great alternative.”
Get to steeping
Canna Butter Primer - PROCESS 2
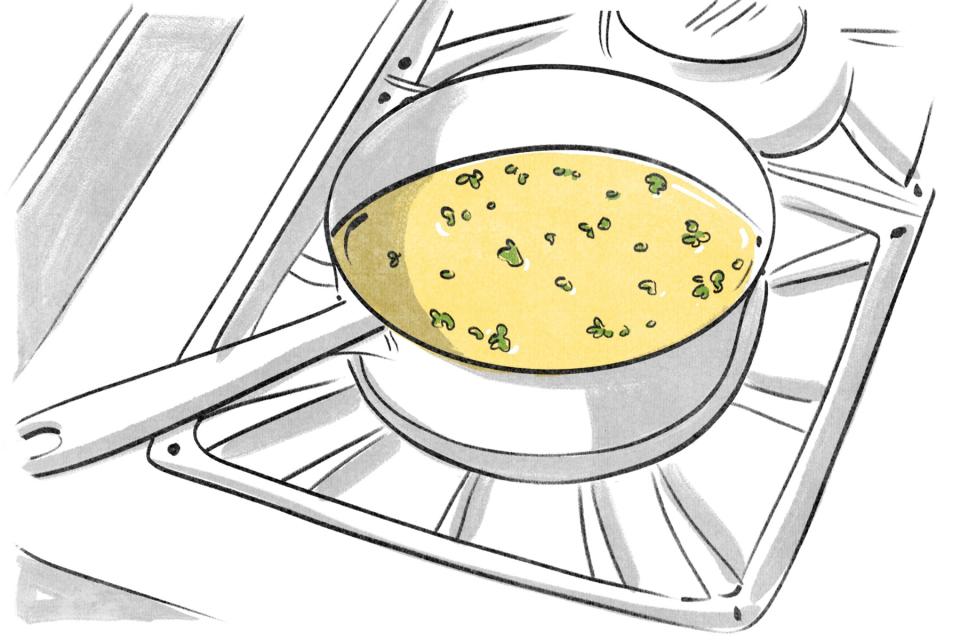
Illustration by Amber Day.There are many ways to steep your decarbed weed in fat; the right method for you is based on personal preference and the gear you have to work with. Perhaps the most basic version takes place on the stovetop with just a small saucepan. Before writing this story, it was the only way I’d ever made cannabutter at home: mixing equal parts melted butter and water (the water keeps the butter from scorching, which is more likely because of its proximity to the heat source) with decarbed weed, and monitoring it on the stove for two to four hours. The goal is to keep the temperature between 160°F and 200°F, which means actively helicopter-parenting your nascent canna-brew from start to finish.
Canna Butter Primer - PROCESS 3
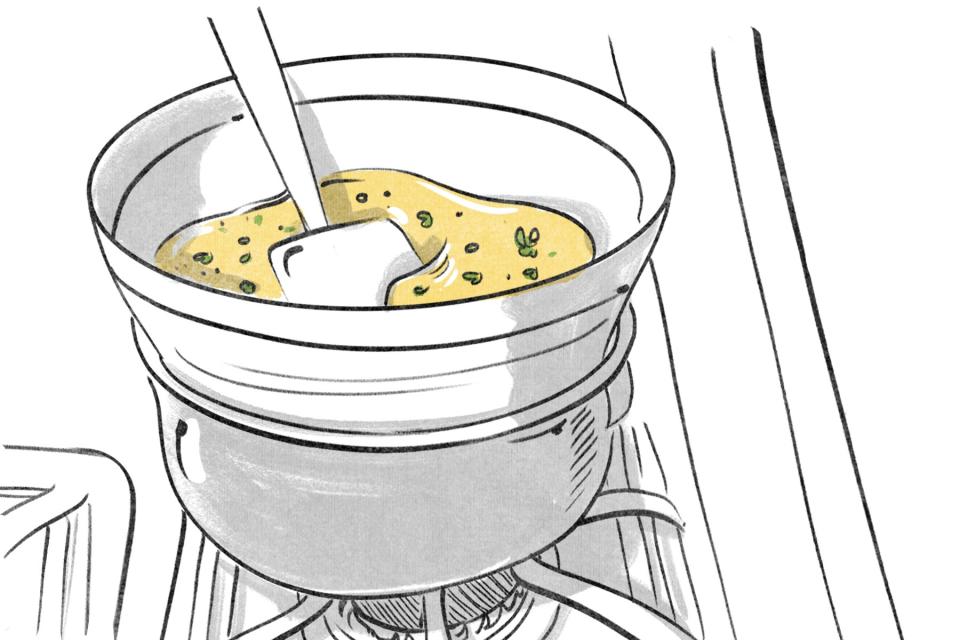
Illustration by Amber Day.For Trinidad, the go-to stovetop method is with a double boiler, which is more delicate, faster, and a little cheffier than the saucepan move, though you likely have all of the tools you need in your kitchen already. “I mix my melted fat and decarbed flower in a heatproof bowl, then set it over some very gently simmering water,” he says. You don’t need to add water to the fat because the heating process is gentler, and if you stir occasionally and keep the heat steady, the whole thing can be done in under an hour.
Why do steep times differ so much from technique to technique, and from person to person? It’s a hot button issue, Trinidad says, and a debate that’s gone on in the industry for years. “Some people say you have to let it go low and slow for eight hours,” he says, “while some think you can get it done in just one or two. I think of it like tea: The longer you steep, the more flavor you extract, but after a certain point, it gets bitter. More time means extracting more plant matter, which is what turns your fats green and adds all that cannabis flavor, but not necessarily more THC. Depending on what you’re using it for, you might want all the weed flavor in your cannabutter—or maybe you just want the power.”
Canna Butter Primer - PROCESS 5
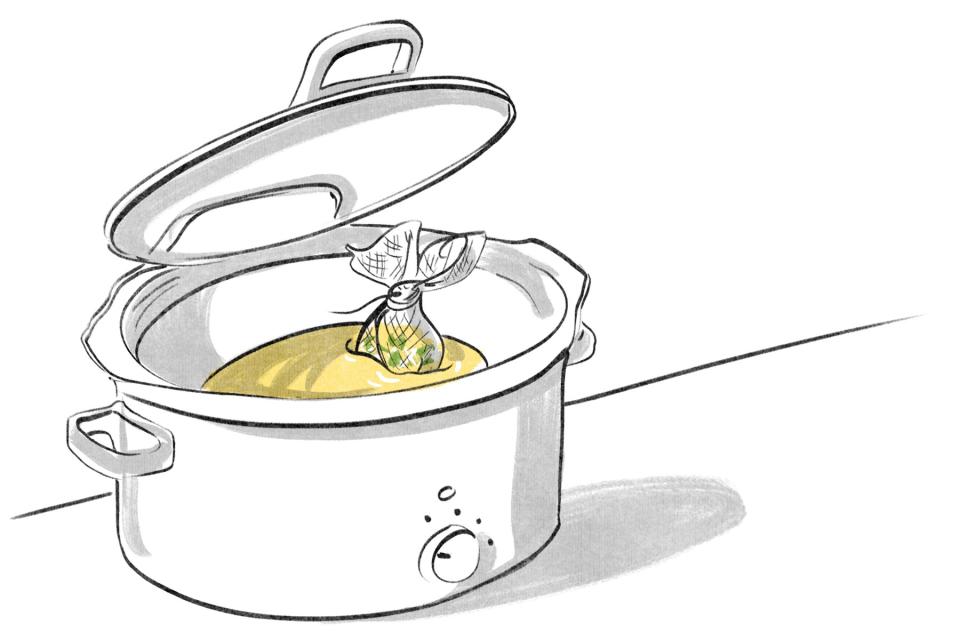
Illustration by Amber DayMitchell advocates for a longer infusion time rather than a quick one: “I’m on Team Low and Slow for sure,” she says. “Physically, you can observe the change happening over time. After a few hours your fat will be tinted green, but after eight hours you’re looking at serious green. That’s the transformation.” Mitchell manages her steeping in a Crock-Pot, a popular move because of the appliance’s ability to regulate temperature over a long period of time. “It’s the easiest way to not burn anything, and I don’t have to worry about personally controlling the heat,” she says. Mitchell’s process is to make a sachet with cheesecloth for her decarbed weed and drop it right into the Crock-Pot of melted butter (you could also use any slow cooker, the slow-cooking function on your Instant Pot, or any other countertop appliance that has a time-and-temperature regulating feature). Then she steeps it for eight hours at the lowest possible setting.
cannabutter step 4 final.jpg
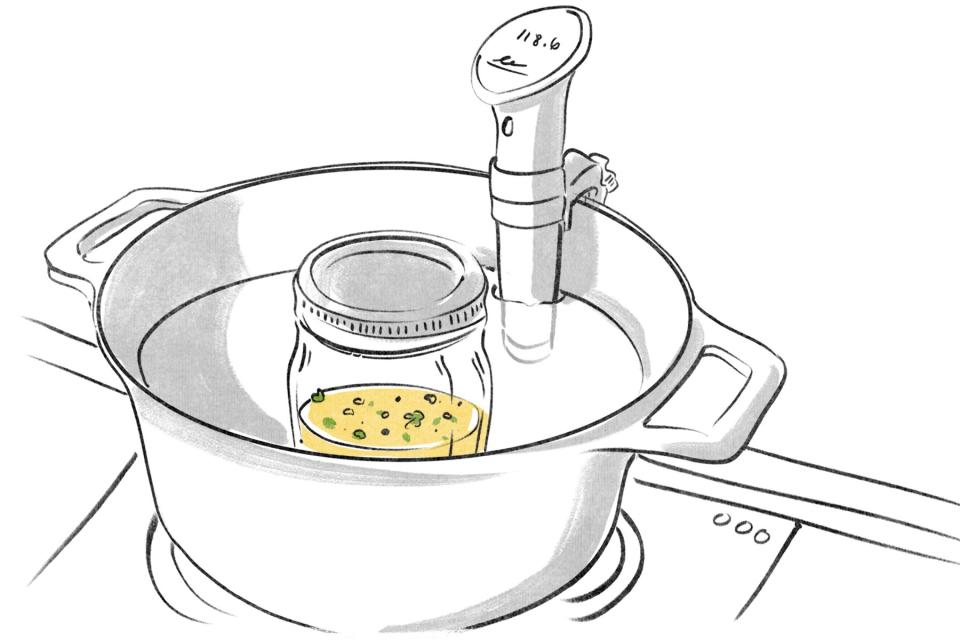
“When I first started making infused butter at home, I had a strict landlord and no cannabis smells could come from our apartment,” Lo says. “I was the creative director of a sous vide company at the time, so I tried using our machine—and it worked!” An immersion circulator for sous vide cooking makes cannabutter the same way a Crock-Pot does: by maintaining a steady temperature over a set period of time. But with the sous vide method, you stick your fat and decarbed weed in a bag or airtight jar and place it in a bath of temperature-regulated water. “Since the cannabis and oil or butter are sealed and placed under water to infuse, there’s no smell. There’s also no need to babysit a stovetop or an open flame, and you can make multiple infusions at once.” Lo cooks her infused fats sous vide at 185°F for four hours.
Strain and store
Canna Butter Primer - PROCESS 6
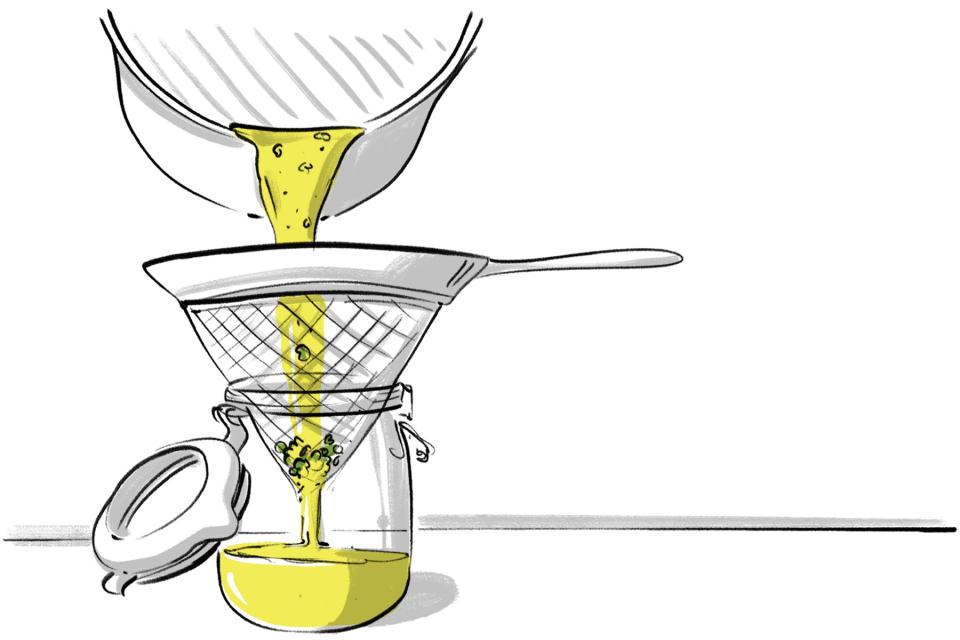
Illustration by Amber Day.Unless you’re using a sachet like Mitchell, the last step in your infusion process is to pour your cannabutter or oil through a fine-mesh strainer to sift out any particulate. Your fat is ready to use right away in recipes that call for melted butter or liquid fat, or you can stick it in the refrigerator to harden before creaming with sugar. “Infused butters and fats can last a couple months in the fridge,” Trinidad says, “and a little longer in the freezer. I keep mine in clear glass containers unless it’s olive oil–based, which I keep at room temperature in a dark bottle to block out the light.”
Know your dose
Trinidad’s entry into weed baking as a teenager hits on the most common concern people have about homemade edibles: that you never really know what you’re going to get. “We were experimenting with brownies and cookies back then,” he says, “and not understanding what we were doing. We didn’t have formulas or devices to help measure potency, so we winged it! And the result was either horrible tasting with no effect or left you holding on to your seat.”
The average cannabis consumer these days is better-versed in personal dosing thanks to the advent of regulated store-bought edibles. Knowing exactly how many milligrams of THC and CBD are in a given gummy or mint makes it easier to find your sweet spot and know—with numbers, not a vibe—how something will affect you. But that same certainty is harder to come by when making your own cannabis infusions at home. For the best sense of how to dose your baking project, you’ll need to do a little research and a little math.
First, determine the ideal strength for each serving of your infused baked good. As a lover of dessert, there’s nothing that bums me out more than being told I can eat only half or one quarter of an edible; to me, the delight of a ~special treat~ is I get both a whole cookie and a high. If the proper dose is barely a bite, it’s usually because someone didn’t plan ahead.
The magic number of THC milligrams you should use per serving depends on your tolerance level, but 5 to 10 is a good place to start. “I keep my doses pretty low because I want you to enjoy this—I’m not trying to ruin anyone’s day,” Mitchell says. Lo agrees: “Going low-dose is my preference, so I can consume throughout the day and not feel impaired.” Begin with something in that range, then adjust when you know how your body responds.
The next step is deciphering the potency of the strain of weed you’re working with. You can do this by shopping for lab-tested cannabis, which will come marked with its exact THC percentage, or by looking up the variety you purchased on a trusted online resource like Leafly. There is a margin of error involved in using any guidance that isn’t about the exact weed in your hands, because light levels during growth, curing processes, and other factors can affect potency within the same strain. But having even a general sense of the strength of cannabinoids in your product will help you make a dosage plan. (If you’re really serious about it, you can invest in a device like tCheck, which tests infusions and raw buds to evaluate potency.)
Finally, follow the formula below to help you dose. Buckle up, this is the math part.
Multiply the percentage of THC in your weed (written as a decimal) by the number of grams of weed you’re using. For example, if the weed you bought is 18% THC and you have 3 grams to bake with, you’ll multiply 0.18 x 3, which is 0.54.
Multiply that number by 1,000 to convert from grams to milligrams. Using our example above, 0.54 x 1,000 = 540. This means your infused fat will contain 540 mg of THC in total.
Divide that result (the total THC, in mg) by the number of tablespoons of fat you’d like to infuse. Don’t worry yet about the quantity of butter called for in your cookies or cakes—we’ll get to that shortly. If you’ve decided to infuse two sticks (16 tablespoons) of butter, 540 ÷ 16 = 33.75 mg, which means you’ll get roughly 34 mg THC per tablespoon of infused butter.
Now, figure out how much infused butter you want to use in the specific baking recipe you’re using. You may want to make the recipe entirely with cannabutter, or with a mix of cannabutter and regular butter—it all depends on the potency you’re going for per serving.
Let’s say you substituted all eight tablespoons of butter called for in a cookie recipe (like this one, which makes 18 cookies) with the butter you made above. Eight tablespoons x 34 mg THC per tablespoon = 272 mg, which is about 15 mg THC per cookie. If that’s a good dose for you, then you’re good to go—proceed as normal!
But if you’d like a lower dosed cookie—say, 5 mg THC each—you only need to use enough infused butter to equal 90 mg THC (5 mg x 18 cookies). At 34 mg THC per tablespoon, that’s about three tablespoons of your infused butter. Supplement the remaining five tablespoons of butter in your recipe with the regular stuff.
Finally, while this formula will get you fairly dependable results, nothing about cannabis is 100% foolproof. Every crop is different, so even if you follow the same equation with the same strain every time, you may get varying results. That’s why Lo recommends sampling your butter or oil to feel out relative potency. “After my sous vide infusion is finished, I test a half teaspoon to gauge the effects on my body,” Lo says. “My recipe may be too low dose for some people, but that’s the beauty of DIY: You can easily modify and adapt.”
How to use your cannabutter
We’ve arrived at the best part! You made cannabutter or another infused fat, and now you get to use it. The quintessential weed bake is brownies—chocolate and cannabis is a storied flavor combination, especially with a bit of espresso powder in the mix, per Mitchell—but you can really make anything that calls for the fat you infused. Cakes, pies, cookies, bars, loaf cakes, curd, muffins, scones, fudge, flatbreads: It can all be made with your weed-ified product. The only consideration is taste and what other ingredients will play best with the flavor of your weed.
For the professionals, an infused fat’s destination rides on the terpenes, or flavor- and aroma-carrying compounds, in a specific haul of cannabis. “The strain that I get determines what I do with it,” Trinidad says. “Something that’s high in myrcine and lyamine is citrusy, so I’d use it in a lemon cake or lemon curd. Some are funky and go really well with spice, like in my Four C’s ice cream: cannabis, cayenne, cherries, and chocolate. And for some reason, oatmeal raisin cookies are SO good! They work so well with an infusion.”
Aside from her coffee-spiked brownies, Mitchell’s favorite thing to bake with cannabis is peach cobbler. “I use a citrusy strain to infuse coconut oil, then add a bit of that to the peaches and spices in the filling. I use regular butter in the topping for the flavor; it’s a great combination.”
Of course, there’s a wide world of cannabis cooking beyond baking as well, using the same infused fats to baste protein, stir into sauces, and drizzle over vegetables. Lo develops many savory recipes for Sous Weed that play up flavor pairings between terpenes and punchy pantry staples; she infuses lard to use in an XO sauce and citrusy strains in olive oil to make salad dressings, proving that low-dose edibles don’t have to be saved for dessert.
For your first time around
All three experts offered the same advice for people just beginning their homemade edibles journey: Start slow. “Find out what your number is,” Trinidad says. “We all have the receptors built-in, but everyone is different.” Lo agrees: “How you metabolize THC will be unique to you. Starting at a low dose will give you a good gauge on your tolerance and your experience.”
Also, don’t jump to conclusions about whether or not your edible is “working.” Time is a vital part of the equation. “Give yourself two hours to digest and see how you feel,” Mitchell says. “Rushing into something stronger because it hasn’t hit you yet could mean ruining your day and wasting product.” Plus, she says, an amount that works for you in other cannabis mediums might be too high when baked into something sweet. “I’ve found that sugar accentuates the high—that’s why gummies are so popular,” she says. “Sugar has a similar effect on your brain, so it’s a little bit like mixing drugs. Starting low is always the right idea.”
Originally Appeared on Epicurious

