These Halloween makeup hacks will save your skin and your money

Halloween is one of our favorite holidays for many reasons. We love watching classic Halloween movies, eating an endless stream of bite-sized candy bars, turning our homes into mini haunted houses, and of course, planning our costumes. Aside from allowing us to dress up however the hell we want to, Halloween pushes us to experiment with makeup in ways that we normally wouldn’t. Halloween makeup can make or break a costume, and we take our Halloween costumes seriously.
Although we love planning our spooky looks, scrounging the necessary supplies to complete our costumes can be time-consuming and expensive.
Even just makeup can be a huge expense when you’re trying to create whimsical mermaid scales or spooky zombie wounds—and you might only use the products once. Another issue: Costume makeup kits can take a nightmarish toll on your skin.
No one wants to wake up on November 1st and be scared by the sight of their own skin—spooky season is over by then. News flash: You can actually create scary-good Halloween makeup designs using the products you already have in your makeup bag.
We rounded up some drugstore hacks to help you create a brilliant Halloween makeup design without breaking the bank—or making your skin break out.
1Pasty undead skin
A post shared by Michelle Tiley (@michellenicoletiley) on Sep 19, 2019 at 8:09am PDT
The first step in creating the appearance that you are, ahem, dead, is dulling down your skin. The simplest way to do this is by using a foundation or concealer that is three to four shades lighter than your skin tone. For those with fair to medium skin tones, find a foundation or concealer that also has the opposite undertone to your skin.
If your skin has a more yellow undertone, use a lighter and pinker-toned foundation or concealer to get a corpse-like look. If you have a more red skin tone, use a lighter and yellow-toned foundation or concealer. This will neutralize the dominant tone and help make you achieve the ultimate zombie paleness. For medium-dark to deeper skin tones, find something that is lighter and yellow- or warmer-toned to achieve pale skin without looking ashy. Avoid products with SPF if you expect to take photos.
If you don’t want to buy a whole foundation for one night, just get a concealer you can use all over.
Try Nyx Concealer Wand or Maybelline Fit Me! Concealer, which both come in six shades. For darker skin tones, try foundations such as L'Oréal True Match (except don’t find your true match for this look), Black Radiance Pressed Powders, or Iman Cosmetics Foundation Sticks.
2Skull designs
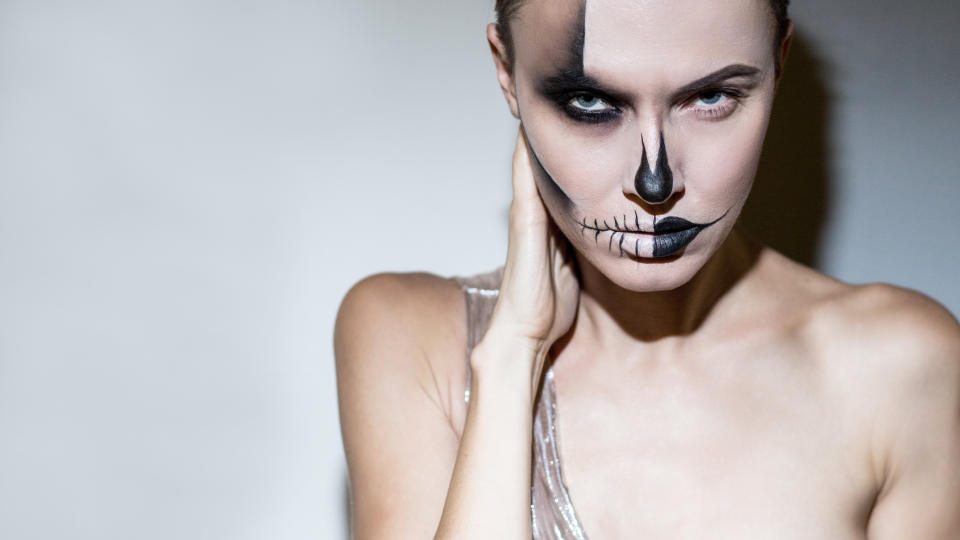
When creating a skull Halloween makeup design that requires you to cover part or all of your face with white makeup, layering is key. You will need to work with both cream/liquid makeup and powders to make an opaque white canvas. Start by using the lightest possible concealer or foundation you can find as a base (see above). Then, use Nyx Milk pencil to outline the shapes you want.
Roughly color in the areas you want to be white, then blend with a sponge, fingers, or a brush.
Add more until the desired color is reached. Press a matte white powder shadow to set and build color payoff. Alternatively, you can use baby powder. Finish with a translucent powder if your skin is oily—or if you plan on dancing throughout the night. Use eye and lip pencils to complete the look with whatever colors you need. For a dimensional finish, use a frost white shadow on the high points of the face.
3Contour for sunken eyes
A post shared by 𝔜𝔞𝔡𝔦𝔯𝔞 𝔐𝔞𝔯𝔮𝔲𝔢𝔷 🇺🇸🇲🇽 (@yadeemua) on Sep 20, 2019 at 11:47am PDT
Contouring the cheek bones, jawline, and eyes can help create the illusion of being undead—or even just help you change your face shape to more closely resemble your character for the evening. Contour color should be a taupe or grey tone that is darker than your skin tone, creating the illusion of a shadow. If you have a bronzer and a grey eyeshadow, dip your brush in both to mix together your own version. Bronzer alone will only add a healthy glow or a touch of color, which defeats the whole point.
You can also use a grey eyeshadow alone as your contour for a more dramatic effect.
To save a few bucks, you can pick up a small eyeshadow pallette with taupes, greys, and blacks to do your face and eyes with one palette. NYX Natural Eyeshadow palette checks all of the boxes.
4Fake blood
A post shared by Adorer | The Dark (@adorer.dark) on Sep 16, 2019 at 1:09am PDT
There are several ways to fake a hemorrhage with your Halloween makeup. If you only need small bloody details, use a true red or wine-toned lip liner to draw the shape of the wound, and fill in any areas you want to appear injured. Elf Matte Lip Color in Rich Red or Wine can help you with precision outlining. Then, fill in slightly larger areas.
Next, take a liquid lipstick in a true red or wine tone and go over the fake injury. It will add dimensional texture and even more longevity—which means things will look even bloodier. NYX Soft Matte Lip Cream in Copenhagen or Madrid are great products to try.
For more freshly bloodied looks, you can add a red gloss on top—or even make your own blood at home. To make fake blood at home, you can use corn syrup or simple syrup, cocoa powder, food coloring, and cornstarch.
The food coloring may stain clothing, but the cocoa and sugar are antioxidants and hydrate the skin. Fake blood capsules are not very expensive either—just add some ground coffee beans for a thicker, more congealed texture (and ground coffee beans also help you avoid skin irritation—because science.)
5Torn skin
A post shared by Vanessa (@_vmua) on Sep 20, 2019 at 11:21am PDT
If you want gore and decay but can’t be bothered with glue and prosthetics—or you are allergic to latex—you’ll be happy to know that faking a cut or bite is cheap and easy. All you need is lash glue and tissues. Clean the area where you plan to apply the cut—and make sure you dry the area completely. Apply a thin coat of lash glue to the area. While the glue is still wet, lay a piece of crumpled tissue over the glue. Repeat until the desired thickness and texture is achieved. (Here’s a how-to with pictures.)
With scissors or a paper clip, make a slit in the tissue (but don’t cut your own skin!). If this makes you nervous, you can tear up the tissue before you place it on your skin.
Once your “cut” looks the way you want, cover it with foundation and powder so it will set and match the rest of your skin tone.
To make it bloody, fill in the cut as described above.
You probably have some of these supplies at home, so dig through your makeup collection and see what treasures you can find. Be patient, because accomplishing these Halloween makeup looks might take a couple attempts. Happy spooky season!

