This Hack Can Make Your Old Laminate Counters Look Seriously Luxe
It’s safe to say most folks spent an outsized amount of time in their own kitchens last year, so if you’ve found your eyes drawn to your dingy laminate counters more often than usual, you’re likely not alone.
Maybe you’ve been putting off doing anything about them because you’re a renter, or you own but don’t have the budget right now to tear everything out and put in all new countertops. But thankfully, you have options that don’t involve a pricey renovation.
From contact paper to a faux marble paint job and beyond, there are plenty of DIY hacks out there that can help you transform your laminate kitchen counters from cheap to expensive-looking in a snap. Of course, if you’re a renter, it’s always a good idea to check in with your landlord before tackling any project that will significantly alter your space — but there are still rental-friendly ways to get the $$$ look on a budget.
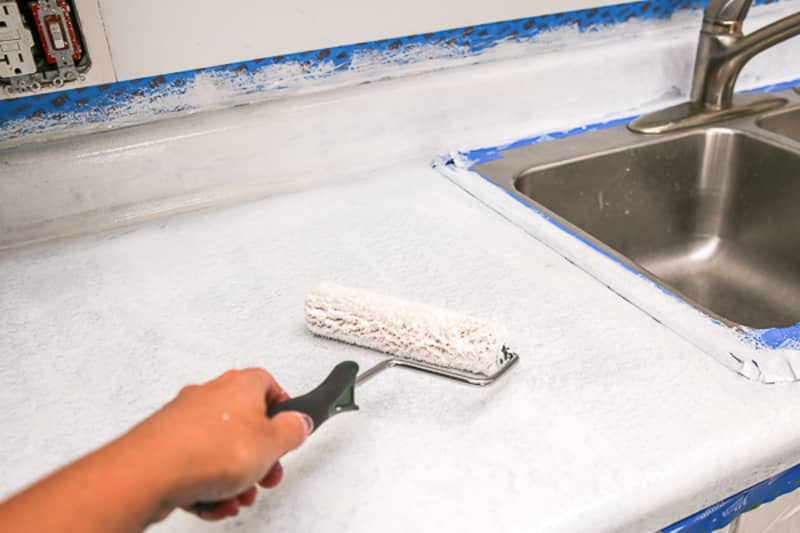
Paint right over it.
Sometimes you don’t have to overthink it: A complete laminate counter upgrade can be as simple as a fresh coat of paint. But naturally, not any old can you find moldering under your sink is going to do the trick. For this project, you’re on the lookout for a specific product called countertop coating, which is available for under $50 on Amazon. It’s thicker and more durable than regular paint, which will quickly flake off if you try it on your counters, but also has a much stronger smell, notes Brittni Mehlhoff of Paper & Stitch Blog. So make sure your area is well ventilated before getting started, and maybe even consider wearing a respirator mask while you’re working.
As with any painting project, you’ll want to clean and sand your surface — look for a sanding sponge with a beveled edge for those hard-to-reach-corners, and then tape off any areas that aren’t getting painted. Aim for long, overlapping strokes, and expect to apply multiple coats, letting it dry completely in between each one. Once you’re happy with the opacity, let it dry for three days before using your counters at all. At that point, you can either leave it as is, or add a coat of polyurethane to defend against chipping.
Re-finish it with a faux-marble look.
Sure, those countertop coatings can be tinted to 16 different colors. But if you’re feeling really fancy, you don’t have to stop there — it’s not too much harder to replicate a surface like marble or granite on the cheap.
Just complete all the steps above for a fresh base layer, and then you have some options. If you’re feeling creative, you can take a page out of DIY blogger Sarah Powell’s book, and employ a sea sponge technique with various shades of gray acrylic paint under a layer of epoxy. The result looks almost identical to marble, and she says it was still holding up well two full years later.
Lauren Jansen, the blogger behind Farmhouseish, also redid her countertops using a marbleizing technique. After prepping the surface, she painted a chalk paint layer and researched to replicate the marble look. “Start by looking at a photo of real marble to see how the veins run,” she says in her post. The final step is to add epoxy, and once it’s dried, you have a stunning surface that looks convincingly real.
Cover it with contact paper.
If you’re looking for the most temporary and renter-friendly of methods, contact paper is an excellent place to start. The material is decorative on one side — in patterns like granite, wood grain, or faux tiles — and adhesive on the other, and the application process is as simple as measuring, peeling, and sticking. (Although you can and should set yourself up for additional success by cleaning your countertops intensely beforehand and letting them dry fully before getting to work.)
Other useful tools for this process are a smoothing tool and pin for erasing bubbles, plus a utility knife for trimming, all of which will make your contact paper countertops more durable long-term. Blogger Anika of Anika’s DIY Life has resurfaced her countertops with contact paper in several rental units she’s lived in over the years and says she was initially worried about how long they’d last. But 10 months after installing it in her kids’ bathroom, she said it was still very well sealed, and looked identical to the day she’d stuck it down, even after multiple spills and
This option can be a great solution for renters, since the paper is removable on move-out — but it’s still a good idea to run it by your landlord before installing.
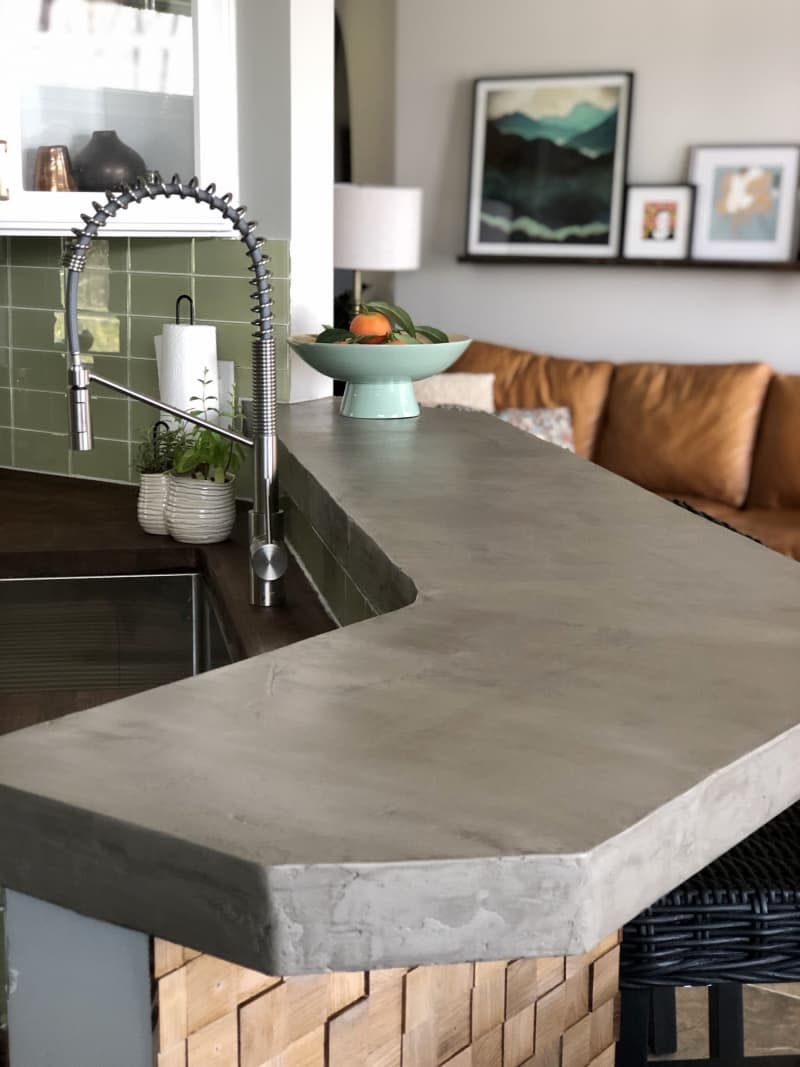
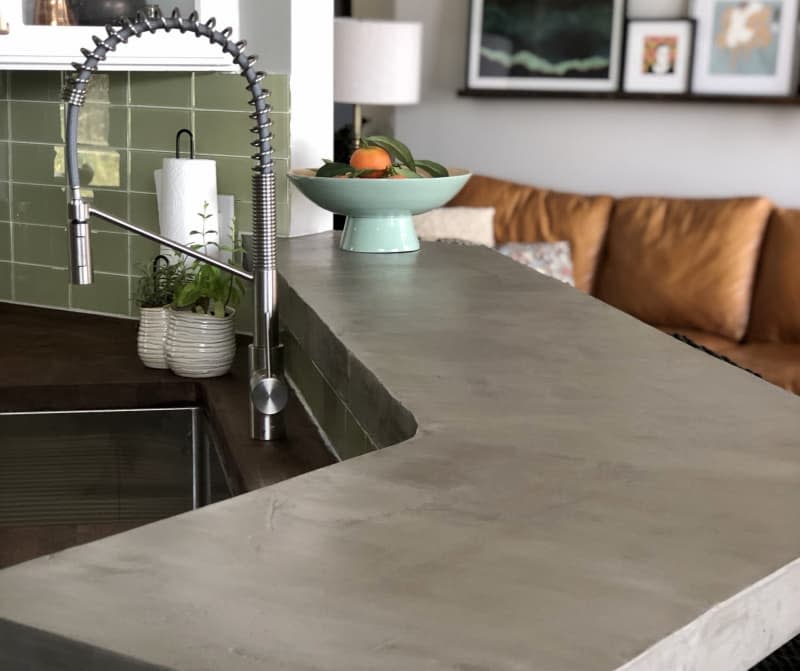
Skim coat it with concrete.
Finally, it’s possible to give your kitchen an industrial edge without pouring your own concrete countertops. Full disclosure: this project is both dusty and intensive, so make sure you set aside enough time before diving in.
You already know you’re starting with a deep clean and a good sanding, at which point it’s time to mix up your concrete. DIYer Libbie of A Life Unfolding — who’s refinished both kitchen counters and a bar top (pictured above) this way — recommends mixing up small batches so your concrete doesn’t dry out between steps.
Like Libbie, you’ll use a trowel to apply a thin but consistent layer of the concrete over every inch of your sanded laminate, and then let that dry. (Note that in the bar top pictured here, she applies concrete to a plywood base that’s placed on top of her existing counters to help give it a thicker, more substantial profile — but this is not necessary.) Repeat the process as many times as you need to get your desired thickness, sanding lightly between each thin coat.
Finish with three light coats of Acrylaq, and you’ve got yourself a brand new setup that’s likely to last you far longer than your original laminate ever could have.
Give it a faux wood look.
If you love the idea of painting your laminate but want to take it a step further, take a cue from Lia Watson, the mastermind behind the blog Southern Yankee DIY. After redoing her kitchen, she took on another passion project at her parents’ house: refreshing a pantry kitchen. It’s separate from the central kitchen and mainly used by her father. “He can make a complete mess while cooking, and my mom won’t say a word about it,” Watson says in her post.
The first step involves thoroughly cleaning and preparing the surface. Watson advises using a solution of diluted rubbing alcohol to freshen up the laminate, and if there are any stubborn grease spots, use a stiff bristle brush to scrub it off. Don’t worry about damaging the laminate because that’s the point of the next step, which is taking a sanding block and roughing up the surface so your paint will stick.
Next comes priming the surface. Watson recommends a kit by Retique It. Use two coats, and let it dry thoroughly before the fun and creativity begin. Brush on a heavy coat of stain, and drag your graining blocks through the wet stain until you see a natural-looking pattern you like. Also, don’t forget to do the sides of the countertop to give a genuinely woodsy look. The results are stunning — and convincing. “Y’all, these countertops are even better than I thought they could be,” Watson said in her post in true Southern style.

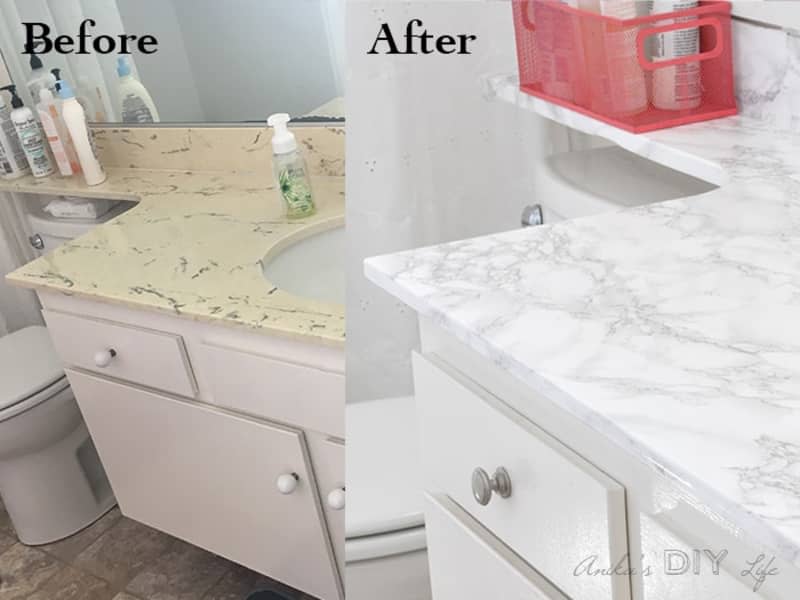
Use a stone-like finishing product.
When a reader commented that this story was missing a method she had tried, I had to check it out. “I did a LOT of research on this before I resurfaced my laminate countertops,” wrote reader AbbieDove. “I ended up going with the Daich Mineral Select SpreadStone line.” She noted that it’s held up beautifully after three years without chips, peeling, or cracks.
To get to the bottom of this method, blogger Christa Ellis breaks it down into simple steps and assures that anyone can redo laminate counters using SpreadStone. She advises cleaning your current laminate and rough up the surface using sandpaper, as with other techniques. The kit comes with three coatings — base, stone, and a clear topcoat — which are simple to apply, although you will need to sand the stone coating to your desired smoothness before adding the topcoat. The new surface transformed the look of her entire kitchen. And, like AbbieDove, Ellis is thrilled with the resiliency.

