The Guide to Sous Vide Eggs
Everything you need to know about using a temperature-controlled water bath to cook eggs.
Let's start off by saying that despite the title of this post, sous-vide eggs are a misnomer. "Slow-cooked eggs" would be a more apt description. Very, very slow-cooked eggs even better. It's only through association with the equipment used to cook sous-vide (vacuum-sealed) foods that the term sous-vide eggs has stuck, despite the fact that there is no vacuum involved in their preparation. Still, it's the common term for them, so I'll use it.
With that out of the way, let's get cracking with the matter at hand. Sous-vide eggs made their way around pretty much every fancy restaurant's menu in some form or another between five and ten years ago. It's one of the easiest and best uses of a sous-vide style water circulator—it required no expensive vacuum sealer (the eggs cook directly in their shells), and it allowed chefs to achieve textures with eggs that they had never been able to achieve before.
We recently reviewed the best immersion circulators on the market for home cooks, so the time is ripe for you to get in on the action. Today we're going to talk about the ins and outs of cooking eggs in the shell in a water bath.
Consider the Egg and Its Components
While we generally think of eggs as having two parts—the white and the yolk—there are actually three phases that we should care about: the yolk, the tight white, and the loose white. (McGee, On Food and Cooking, pg 75-78)

The yolk is the main nutrient source for the developing chicken embryo, and as such contains most of the nutritive value in the egg, including vitamins, minerals, and a good chunk of fat and protein. It's tightly bound in a membrane that keeps it spherical within the egg (though it flattens out and spreads when you break the egg onto a plate or in a pan.
The tight white consists of about 90 percent water with the rest being made up of proteins and a minute amount of minerals, fatty acids, and glucose. It is contained within a delicate membrane that is just slightly smaller than the full size of the egg.
Finally, the loose white is the part of the egg white that is not contained by the egg white membrane. When you crack the egg open, it's the white that spreads freely away from the rest of the egg. Its composition is similar to that of the tight white, but it has a lower concentration of proteins and other dissolved solids.
As eggs age, both the yolk and the tight white membranes will get thinner and more fragile. At the same time, the tight white will leak moisture into the loose white, diluting the loose white further and causing it to become even runnier.
Raw eggs are basically balloons of water thickened up by proteins. In their raw state, these proteins are tightly and individually packed and can thus flow relatively freely around each other. Think of them as little balls of yarn. As the egg gets heated, these balls slowly loosen up. Eventually, they begin to entangle one another, creating a semi-solid meshwork that is powerful enough to suspend the water, fat, and minerals that make up the rest of the egg.
Keep on cooking and that mesh will start to tighten up, eventually squeezing so tight that emulsions will break and the egg—in particular the egg yolk—will go from being tender and homogenous to dry and crumbly.
Why is this important for sous-vide cooking? Because of varying concentrations of different types of proteins within each of the eggs' three consituent parts, each of those parts behaves slightly differently when heated. Tight whites will begin to set first, though they don't become fully firm until a relatively high temperature. Loose whites remain watery until high temperatures, and yolks fall in the middle, gelling softy at moderate temperatures and getting firmer and firmer the more you heat them.
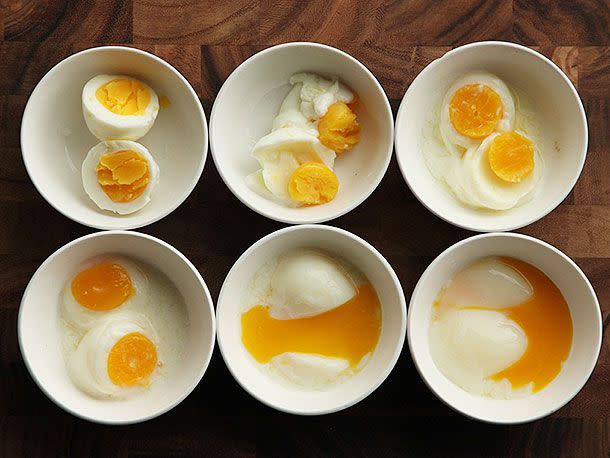
Here's What Happens to Sous-Vide Eggs at Different Temperatures
To demonstrate this, I cooked eggs in a sous-vide cooker to various temperatures ranging from 130°F (54.4°C) to 165°F (73.9°C)*. In each case, I heated large eggs for exactly 40 minutes—enough time for the egg to reach thermal equilibrium (that is, it is the same temperature as the water bath all the way through to the center), but not so long that the effects of prolonged cooking will have started to take effect. (We'll discuss those effects more later on.)
*Note that my sous-vide cooker has temp-set resolution of 1°F or 0.1°C, hence the conflicting number of significant digits.
Sous-Vide Egg Cooked to 130°F (54.4°C)

At 130°F, an egg can sit indefinitely without any sort of gelling taking place. This is useful if you have a fear of using raw eggs in sauces like mayonnaise or Caesar salad dressing. By holding an egg at 130°F for a few hours, you can effectively sterilize it, making it safer to consume in raw preparations.
Loose white: Indistinguishable from raw.
Tight white: Indistinguishable from raw.
Yolk: Indistinguishable from raw.
Sous-Vide Egg Cooked to 135°F (57.2°C)

Proteins are just beginning to unravel, causing the egg white to take on a cloudy appearance. Texture-wise, it's tough to distinguish the egg from a raw egg.
Loose white: Appearance is slightly cloudy, texture is indistinguishable from raw.
Tight white: Appearance is slightly cloudy, texture is indistinguishable from raw.
Yolk: Indistinguishable from raw.
Sous-Vide Egg Cooked to 140°F (60°C)

The first big jump for tight egg whites, which at 140°F, will become firmly set enough to hold their basic shape, though the slightest provocation will cause them to crack and split.
Loose white: Watery and loose.
Tight white: Ghostly white and barely set.
Yolk: Indistinguishable from raw.
Sous-Vide Egg Cooked to 145°F (62.8°C)

Here the whites are firm enough to let you cut through them and pick them up with a spoon, while the yolk remains raw. This is my favorite temperature for poached and soft-boiled eggs (details and recipes to follow).
Loose white: Watery and broken.
Tight white: Opaque white with a ghostly fringe, set enough to cut with a spoon.
Yolk: Ever-so-slightly thicker than raw.
Sous-Vide Egg Cooked to 150°F (65.6°C)

Another big jump here! Those egg yolks have gone from completely liquid to a soft, malleable texture that easily holds its shape.
Loose white: Watery with coagulated chunks of protein.
Tight white: Completely opaque, firm enough to break along fault lines when you cut it with a spoon.
Yolk: very tender but malleable and firm enough to hold its shape when cut in half.
Sous-Vide Egg Cooked to 155°F (68.3°C)

At this stage, the yolks have caught up with the whites in terms of firmness—you can easily slide a spoon or knife into the whites, but the yolks offer a bit of resistance and hold their shape much better. This is my least favorite egg temperature.
Loose white: Watery with coagulated chunks of protein.
Tight white: Opaque and firm, but still tender.
Yolk: Fudge-like in texture. Malleable, but starting to slightly crack.
Sous-Vide Egg Cooked to 160°F (71.1°C)

Finally, at the 160°F mark the loose whites have been heated sufficiently to coagulate completely leaving no watery liquid phase within the shell.
Loose white: Solid but tender, it tends to peel away from the tight white in a distinct layer.
Tight white: Opaque and firm, but still tender.
Yolk: Completely firm and still malleable, but with a tendency to crack with pressed or cut.
Sous-Vide Egg Cooked to 165°F (73.9°C)

If hard-boiled is how you like your eggs, then a 165°F sous-vide egg should do you well. This is the ideal temperature for an egg salad that has distinct chunks of tender, non-rubbery egg.
Loose white: Opaque and firm, but still tender.
Tight white: Opaque and firm, but still tender.
Yolk: Completely firm but still moist and not at all powdery. It crumbles easily along fault lines.
And if you like your eggs even more well done than that, then I can only surmise that you are either a) my wife or b) somebody with equally strange taste.
Timing Matters With Sous-Vide Eggs!
So we've looked at temperatures, and for a long time I believed that with eggs, that was the only thing that really mattered. That is, until I had a chat with César Vega, an expert in the science of dairy products. His assertion was that since many of these gelling reactions take place relatively slowly, simply bringing an egg up to equilibrium temperature will not actually take it to its maximum thickness.

So I cooked eggs at each of these temperatures for times ranging from 45 minutes to 2 hours. The testing showed that indeed timing does matter, though the most noticeable effects are with the egg yolks. For instance, an egg cooked at 145°F for 45 minutes will have a barely set white and a completely liquid yolk. Take that up to 2 hours and the whites will still be just about the same, but the yolk will have thickened to the point where it holds its shape as well as, say, a washed up jelly-fish.
Check this out:
Egg Cooked Sous Vide at 145°F for 45 Minutes

Raw yolk that easily mixes with a white that is barely set, but can be broken up with a spoon. Pretty, right? This is the type of eggs that the Japanese call onsen tamago, or "hot spring eggs." Given a hot spring of the right temperature, you can drop a half dozen eggs in as soon as you wake up and have a breakfast of soft cooked eggs waiting for you when you get back from your morning jog.*
*This makes the assumption that you a) live in Japan, b) live near a hot spring, and c) take morning jogs that last at least 45 minutes and no more than an hour and a half.
Egg Cooked Sous Vide at 145°F for 1 Hour

Slightly thicker yolk that holds peaks for about five seconds when you pour it off of a spoon.
Egg Cooked Sous Vide at 145°F for 1 1/2 Hours

Whites that are ever-so-slightly firmer than 45 minutes eggs (though barely distinguishable), and yolks that are as thick as tender pudding.
Egg Cooked Sous Vide at 145°F for 2 Hours

I couldn't tell a difference between the 1.5 hour whites and the 2 hours whites. Yolks at this stage are solid enough that you can pile them up in a bowl and let them sit for a good half hour and still distinguish individual lumps. Gloppy is the word I'd use.
How to Make Sous-Vide Eggs
So now that we've seen how temperature and time affect the various parts inside an egg, we can easily poach or soft boil eggs to exactly the texture we'd like them to be, right?
Well yes, if you're content to serve sous-vide eggs out of the shell as-is. But what if we want to strive for something with more textural contrast? Something with a slightly more traditional appearance (albeit with improved texture control)
A perfect poached egg should have a distinct layer of egg white around the exterior that is firmer than the rest of the egg. A sort of skin, if you will. Similarly, soft boiled eggs should have whites that are firm around the edges—firm enough that they hold their shape when you peel the eggs—but yolks that are completely liquid. How do we achieve these effects?
Steps to a Perfect Sous-Vide Poached Eggs
Once we've gotten our tender-and-barely-set 145°F 45-minute eggs, the only thing we need to do to convert them into bona-fide poached eggs is to, well, poach them. This is a technique I first saw employed by Nick Anderer, chef at New York's Maialino.
Here's how you do it.
Step 1: Crack

Start by cooking the egg to the desired degree of tenderness. I prefer mine at 143 to 145°F for 45 minutes. At this stage, you can let the egg rest at 130°F indefinitely until ready to serve, or even refrigerate it overnight before proceeding with the rest of the steps.
To remove it from the shell, crack the large end of the shell on a flat surface, then carefully peel away a window with your fingertips while still holding the egg with your other hand. The watery, loose white will begin to drip out. This is ok. You won't be need that part.
Step 2: Dump

Gently flip the egg out into a bowl. Out should come a perfectly egg-shaped object consisting of the gelled soft white and yolk, surrounded by the watery, barely-set loose white. Our goal is to leave that loose white behind.
Step 3: Separate

To do this, I use a perforated spoon to carefully lift the eggs before dumping the loose whites out.
Step 4: Slip

From here, the eggs get slipped into a pot of water that is just below a simmer. They should immediately start to set up around the outside.
Step 5: Poach

Swirl the water in the pan occasionally to make sure the eggs aren'y sticking to the bottom and becoming flat on one side. Since the eggs are already mostly set, this is not as big a problem as it is when poaching raw eggs. The eggs need only about a minute to develop a skin.
Step 6: Drain

Finally, fish out the egg with the perforated spoon. What you end up with is the platonic ideal of a poached egg. Ivory white and opaque with a perfect egg shape and a tender outer skin that just barely holds in the liquid contents inside. Your eggs Benedict will never be the same.
The best part? Once cooked, you can chill the eggs in an ice bath and store them in water in the refrigerator for up to a few days. To serve them, just submerge them in warm (130 to 140°F water) for ten minutes or so and they're as good as fresh.

I use these eggs as the foundation for all sorts of dishes. Need a way to turn those sautéed vegetables or that salad into a meal? A perfect poached egg will do the trick. (Stay tuned until tomorrow for a recipe for the corn, chorizo, and basil dish you see above).
Perfect Sous-Vide Soft-Boiled Eggs
I'm a fan of the three-minute boiled egg, but it's not perfect. Because of the high temperature of cooking, at three minutes the exterior whites are cooked, but the inner layers of white are still barely cooked and jelly like, while the yolk remains cold. Wouldn't it be nice to have that firm outer white with a tender inner white and a yolk that is warm all the way through?
Sous-vide methods can help fix these minor imperfections and also make the process entirely foolproof.
Because the slower and more gently you cook the longer it takes for physical changes to take place, with lower temperatures, you have quite a large window for perfection with eggs. Alex Talbot and Aki Kamozawa take advantage of this fact in their great first book Ideas in Food in their recipe for Thirteen-Minute Onsen Eggs (page 139). By cooking eggs for 13 minutes at 167°F, you eliminate the need for the seconds-accurate timing you'd need with boiling or simmering water.
The slightly higher temperature also builds in a temperature gradient—the whites get hotter than the yolks. Thus you end up with an egg with a yolk that is just barely beginning to thicken and a white that is relatively firm. With this method, the thin white will not thicken completely and will drop away easily from firm tight white.

Pretty, right?
But what if you want a soft boiled egg that you can serve all fancy-style in an egg cup, in the half shell? For that, we need a method that allows us to not only cook the interior perfectly, but one that also allows us to peel the eggs.
Peeling Sous-Vide Eggs
You might have noticed in the photos above that at the point in which the loose white begins to finally firm up—between 155° and 160°F—that a curious thing happens: the surface of the egg begins to get cratered and broken due to the white sticking to the inner membrane of the egg shell during peeling.
We've certainly all seen this happen before, right?

""Eggs will peel exactly how they want to peel and nothing you do will change that.""
My favorite theory about peeling boiled eggs is one I heard last week over on Reddit where the user no_dice_grandma said, "Through my years of peeling boiled eggs, I have learned one universal truth: Eggs will peel exactly how they want to peel and nothing you do will change that."
This is partially true. After testing literally thousands of eggs, I've found no method that will work perfectly 100 percent of the time to get an egg white to separate cleanly from the shell, but there are things you can do to push the odds in your favor.
Modernist Cuisine recommends either chilling boiled eggs briefly in a liquid nitrogen bath, or by torching the shells with a blow torch until they turn dry and brittle. Depending on my mood, there are many things I'm willing to whip out in the name of great breakfast, but liquid nitrogen and a blowtorch rarely make that list.
Of the normal methods, the only thing I've found that really make a difference—and bear in mind, this is an average difference only, as even the best laid eggs will occasionally refuse to peel cleanly—is to plunge the eggs directly into boiling water at the start of cooking, and to shock it in ice water as soon as you are done cooking.
I am not 100 percent positive of exactly what's going on in that shell, but my guess is that by cooking eggs at a low temperature, proteins coagulate and cross-link slowly, giving them plenty of time to bond with the interior of the shell. Cook them fast and they'll quickly change their shape before they get a chance to bind to the shell—much like how a chicken breast is far more likely to stick to a warm pan than to a ripping hot pan.
As for the chilling, my theory would be that a plunge into ice water causes the egg to shrink slightly within the shell, making it pull away and thus making it easier to peel later on.

So how do you adapt this to the sous-vide method? Modernist Cuisine suggests you cook the eggs in a water bath first, followed by a boil to set the exterior (volume 4, page 74). But this doesn't solve our shell-sticking problem. Instead, I do the exact opposite.
I cook my eggs just like I'd cook them for a normal three-minute egg—plunging them into boiling water for three minutes, then shocking them for a full minute in an ice water bath. After that, I drop them into a 143°F water bath and let them cook for 45 minutes, which sets the whites to tender perfection all the way through while leaving the yolk warm, golden, and ready to flow.
The best part? Because of the par-boiling and shocking step, these eggs peel just as reliably as a traditional soft boiled egg (which is to say, not 100 percent reliably, but still pretty darn well).
Too much fuss for some simple eggs, you say? I say you have never tasted perfection.
Get The Recipes:
Editor's Note
This guide was originally published as part of the column "The Food Lab."
October 2013
Read the original article on Serious Eats.
