How to Grow And Care For Collard Greens
Growing collards is simple and the luscious leaves of collard greens look as good as they taste.
Laurey W. Glenn
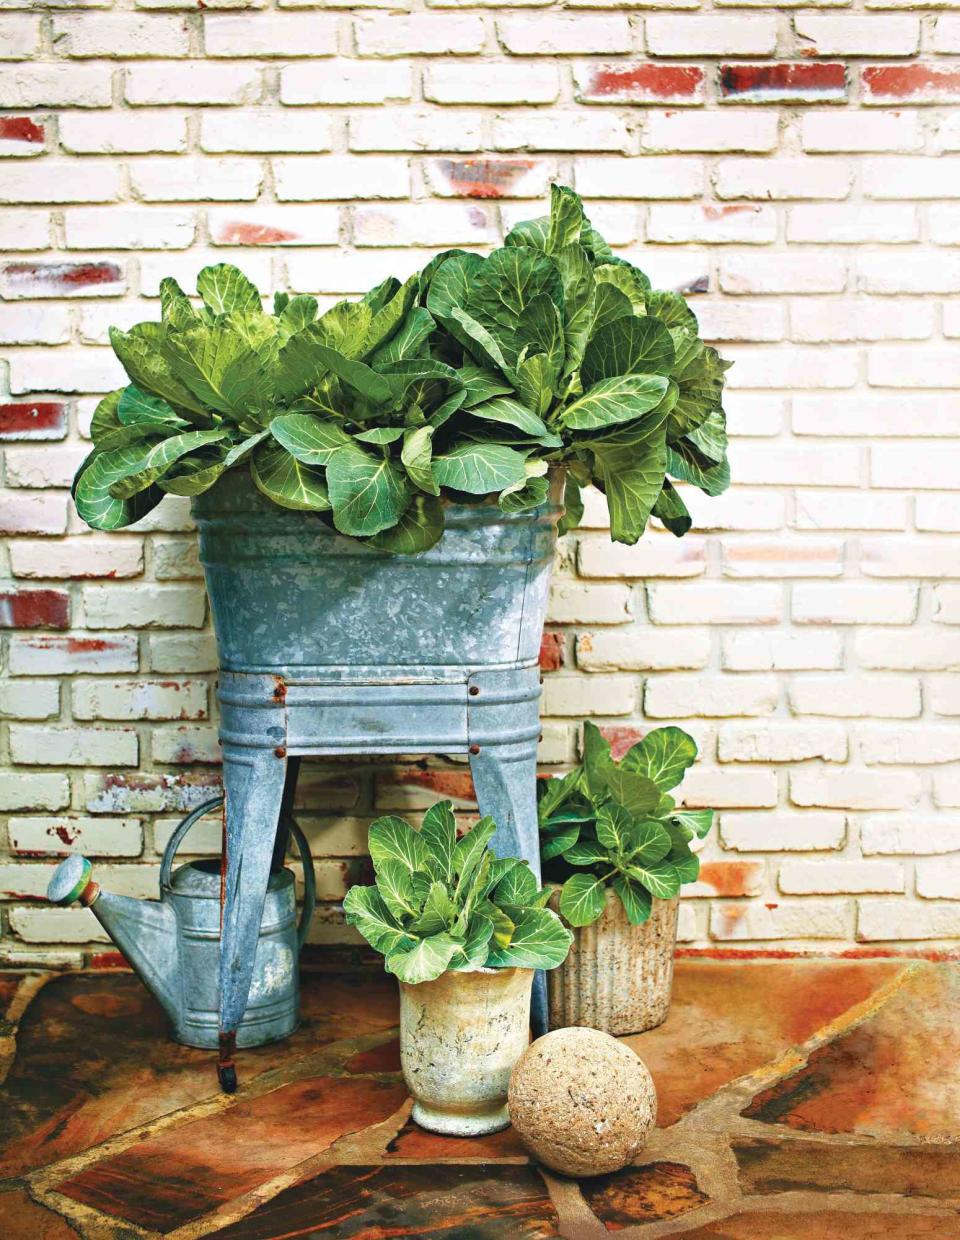
The striking foliage of collards is a decorative choice to fill containers. Group pots to keep plenty of fresh greens at hand.Easy and versatile collard greens have graced Southern gardens and tables for generations. Thriving in cooler weather, these nutritious, leafy greens are a cousin to kale and cabbage. In fact, collard greens are the same species as kale (Brassica oleracea) but are differentiated by their smoother, thicker leaves and slightly milder flavor. In the South, we love them simmered with salt pork and a splash of vinegar, but collards are just as adaptable to different styles of cooking as kale. Follow our guide to planting this easy-to-grow green in your garden so you can enjoy collards throughout fall, winter, and spring.
Common Name | Collard greens |
Botanical Name | Brassica oleracea |
Family | Brassicaceae |
Plant Type | Herbaceous annual, biennial |
Mature Size | 1 ft. tall, 18 in. wide |
Sun Exposure | Full |
Soil Type | Fertile, loamy, moist, well-drained |
Soil pH | Slightly acidic (6.0-6.8) |
Hardiness Zones | 8-11 (USDA) |
Native Area | Mediterranean |
Collard Green Care
Depending on where you live in the South, you can plant collards in early spring and again in late summer or early fall. You can sow seeds directly in the garden in the latter part of the year. Transplants are generally more successful in the spring because of the cool soil temperature. Collards love nitrogen and soil that is rich in organic matter. Grow them in full sun in the garden or in a container as an accent plant.
Light
Collards are the most productive when planted in a spot that receives at least six hours of direct sunlight a day. While they do thrive in full sun, these plants prefer to stay cool. If you are planting in late summer, your collards may appreciate a bit of afternoon shade. Collards will tolerate partial shade, but should receive at least four hours of sunlight daily to develop the best flavor.
Soil
Plant your collards in fertile, well-drained, slightly acidic soil. They prefer loamy soil but also do well in sandy soil that is rich in organic matter. Mix in aged compost to improve soil fertility. Mulch around your plants with shredded bark, shredded leaves, or weed-free straw.
Water
Collards prefer consistent moisture. Water your collards regularly, making certain they receive an inch or two of water per week between rainfall and hand watering.
Temperature And Humidity
Collard greens easily survive below-freezing temperatures in winter. Temperatures below 20 degrees Fahrenheit may kill the plants, but a touch of frost makes the leaves sweeter. Many Southern gardeners prefer to plant collards in fall for that reason. Collards can survive winter further north than Zone 8 if you experience a mild winter.
Collards are more tolerant of hot and sticky weather than other types of greens, but the heat will encourage the plants to bolt. Once a collard plant flowers, it produces fewer, tougher, and more bitter leaves. The plant is focused on producing seeds and ending its life cycle. You can leave the flowers in the garden for a time for pollinators to enjoy, or simply pull your collards out and dispose of them.
Fertilizer
Your plants will produce more leaves if you supply extra nitrogen. Collard greens also need calcium for optimal health. Consider having your soil tested with your local extension office before choosing a fertilizer.
Calcium nitrate is a good choice for many gardens. Side dress with calcium nitrate (15.5-0-0) fertilizer three or four weeks after planting. Follow the label directions to determine the amount needed. Sprinkle the fertilizer 4-6 inches away from the plants to avoid burning the roots, and water well. You can fertilize a second time in another three to four weeks.
Types Of Collard Greens
Collard greens can have curly, ruffled, or smooth leaves that range from green to blue (cooking darkens the color). Many have loose, upright leaves, while other "heading" varieties look closer to a cabbage plant. Some collards are more bolt-resistant and better for planting in spring, while others are known for having sweet, tender leaves in winter. Many gardeners are familiar with open-pollinated, heirloom varieties that have been grown for generations. Now you can also find hybrid varieties bred to look beautiful in the market—and just as pretty in your kitchen garden:
'Georgia Southern': Traditional heat-tolerant heirloom variety with long, slightly ruffled leaves; slow to bolt
'Flash': Hybrid with smooth, ping-pong-paddle-shaped leaves; very slow to bolt
'Top Bunch 2.0': Quick-growing, attractive hybrid with oblong and slightly crinkled leaves
'Top Chop': Large, oblong, slightly ruffled leaves notable for sweet flavor in winter; slow to bolt
'Vates': Heirloom best planted in fall for winter harvest; named for the Virginia Truck Experiment Station
'Champion': Open-pollinated variety developed by the Virginia Ag Experimental Station as an improved version of 'Vates'; more bolt-resistant and darker color
'Morris Heading': This blue-green heirloom has rounded leaves that can form a loose head in the center
How To Grow Collards From Seed
When buying seeds, select a variety that is recommended for the time of year. If you are planting in early spring, you'll want a variety that matures more quickly, in 50 or 60 days rather than 80. Collard greens germinate fastest at a soil temperature of 75 degrees Fahrenheit, so seeds should be started indoors in spring unless you live in an area with mild winters. The seeds will easily sprout directly in the garden in late summer or autumn. If you have a scorching hot fall, it could be better to wait until October or November to plant them—aim for 80 days before your first frost. Follow these instructions to sow seeds in the garden:
Amend your soil with about 4 inches of compost or other organic matter if needed to improve fertility and drainage.
Create a trench 1/4 to 1/2 inches deep. Multiple rows should be separated by 2 to 3 feet. Sprinkle seeds along the trench, then cover and water.
Continue watering regularly to keep the soil moist. After the seeds sprout and grow at least 4 inches tall, thin them to about 18 inches apart. You can use the discarded baby collard greens in your cooking or salads. This is also a good time to mulch around your plants.
For a spring or summer crop, start your seeds indoors four to six weeks before transplanting in the garden, which you can do a couple of weeks before your last frost date:
Use a tray of small pots such as six-pack plant containers. Fill the containers with sterile seed-starting mix.
Plant two seeds per pot at 1/4 to 1/2 inch deep and cover.
Water the pots until the seed mix is thoroughly moistened. Cover with a clear domed lid and place in a warm spot in bright light.
Once the seeds sprout, you can remove the lid and move your plants to a slightly cooler spot in bright light. Collards prefer to grow in 60-70 degrees. Keep soil moist.
Once it is time to transplant, begin to harden off your seedlings by gradually exposing them to the outdoors. Bring them in at night if a freeze is expected, as they will be more susceptible to damage.
Transplant them in deep, fertile, loosened soil about 18 inches apart. Mulch around the plants.
How To Harvest Collards
Use a small knife or clippers to cut the entire plant about 4 inches from the ground; the plant will send up new leaves from the remaining stem. You can also pop off single leaves by hand, starting from the bottom. The plant will continue to produce leaves from the center, eventually creating a tree-like stalk. In fall, wait for a light frost to sweeten the flavor of the leaves.
Potting And Repotting Collards
Collard greens make good container plants, whether planted solo or mixed with cool-weather flowers and vegetables. Because collards expand over time, choose a large container. You could place one collard in a pot with a 12-inch diameter, or two collards in a 24-inch pot or barrel planter. Tuck in smaller plants around them such as violas or spring onions. If the collards overtake the other plants, you can thin out the pot and eat your harvest, or move your bedding flowers to another pot.
Make certain your container has a drainage hole, and use high-quality potting soil that drains well. Some potting soils already contain fertilizer. If yours doesn't, use a slow-release nitrogen fertilizer according to label directions, or a water-soluble fertilizer at half strength.
Overwintering
As previously mentioned, collard greens can often survive winter throughout the South, especially if your Zone 6 or 7 garden experiences a milder winter than usual. If you live in the Upper South, collards will happily grow through the winter in a cold frame. If you don't have access to a cold frame, provide extra protection to your plants anytime you are facing days of below-freezing temperatures. Surround your plants with shredded leaves or straw to keep them warm. You can also cover the plants with a sheet or floating row cover on cold nights.
Common Pests & Plant Diseases
Deter collard-loving caterpillars, especially in spring, with a biological insecticide such as DiPel or Thuricide containing Bt (Bacillus thuringiensis). You're more likely to spot cabbage white moths or brown cabbage looper moths fluttering around your plants before you see any caterpillars. Larger caterpillars can be picked off the plants and dropped in a can of soapy water. Aphids can become a problem later in the year; spray them off the plants with water and use insecticidal soap to discourage them.
Diseases can often be prevented by good drainage. If your collards are affected by black rot (causes V-shaped yellow areas on leaves) or Alternaria leaf spot (brown spots surrounded by yellow halos), the best course of action is to go ahead and harvest diseased plants. Dispose of whatever parts you don't use in the trash. Don't plant cole crops like cabbage, greens, or broccoli in that spot for at least two years.
Downy mildew can also afflict plants during wet weather, starting with gray moldy patches on the leaves that eventually turn brown. Increase spacing between tightly packed plants and avoid getting leaves wet when you water. Downy mildew can be treated with fungicide. If you choose to spray, check the label to see if you need to wait a certain number of days before eating your collards. The safest bet may be to simply remove affected plants.
Common Problems With Collard Greens
With good soil, mild temperatures, and adequate rainfall, collard greens require very little care. However, collard leaves can sometimes turn yellow for reasons that are not related to disease. Keep in mind that older leaves naturally turn yellow as they age.
Leaves Turning Yellow
Collards can become stunted and turn yellow from a lack of watering. If you are having dry weather, water your collards regularly. Chlorosis, or the yellowing of leaves between the veins, can be caused by a nutrient deficiency. Collards are heavy feeders and require extra nitrogen when planted in infertile soil. Fertilize your plants if you have not already. You can have your soil tested by an extension office to see if you have other nutrient deficiencies or if your soil is too alkaline for collards. They'll recommend amendments to improve your soil.
For more Southern Living news, make sure to sign up for our newsletter!
Read the original article on Southern Living.

