Got Wrist Pain? Swap These 7 Yoga Poses Into Your Practice
This article originally appeared on Yoga Journal
Yoga requires a lot from our hands and wrists. Some of our most powerful inversions--think Handstand, Down Dog--are weight-bearing poses that rely on hand and wrist strength. But the graceful wrist joint can be delicate and susceptible to stress injury. Yoga and anatomy teacher Arturo Peal says there are ways to avoid harming the wrists. As a bodyworker, massage therapist, and longtime Aikido practitioner, he's had a lot of opportunities to help students understand that delicate balance between joint stability and mobility.
The anatomy of the wrist
We think of the wrist as the joint between your arm and your hand, Peal says. But it's a little more complicated than that. The radiocarpal joint is the juncture between the radius--your forearm bone--and eight small bones in the heel of your hand called carpal bones. Like all joints, the carpals are connected by cartilage, synovial fluid, fascia, tendons, ligaments, and connective tissue. They're padded by fleshy muscle at the heel of the hand.
A ligament crosses the carpal bones and makes a tunnel for the median nerve that extends the length of the arm to the hand, he says. "That’s the carpal tunnel where you have a lot of tendons passing through a very, very tight area." Compression of the nerve can cause tingling, numbness, or weakness in your hands (aka, carpal tunnel syndrome).
"A lot of wrist problems can start in the neck," Peal says. "There’s so much compression going on for the nerves that are coming down into the arm.”
How to care for your wrists in yoga
Over time, weight-bearing exercises can lead to compressive wrist injuries. "Some yoga poses can aggravate a carpal tunnel problem or tendonitis," Peal says. The problem is often with positions where the wrist is flexed and bearing weight. Chaturanga is a prime example.
"What I see often is people collapsing their body weight into the heel of the hand," he says. Instead, he suggests engaging the entire length of the fingers and the metacarpal heads--the base of the fingers where they meet the palm of your hand--rather than the fingertips and the heel of your hand. "It’s really helpful to get a little sense of space in the palm," he says. (You may have heard yoga teachers describe it as creating a bit of a suction cup.) That helps distribute your weight.
Your instinct may tell you to cushion the heel of the hand, but soft padding may backfire. "Sometimes with softer surfaces like foam blocks allow your wrist to sink further into the padding. "It’s actually going to increase the angle of your wrist," Peal says. That will put more pressure on the tendons. A better option may be to use a firm wedge to ease the angle of your wrist.
Peal will often teach Down Dog, Chaturanga, Plank and other poses against the wall. By using the wall as the "floor," his classes can enjoy the same movements without putting pressure on the joints.
7 wrist-friendly yoga poses to swap into your practice
If you have a wrist injury "the temptation is to try to undo it with yoga," Peal says. "But sometimes regular yoga aggravates it." A better idea is to modify your physical practice to include yoga poses that are easier on the wrists. That may mean modifying a pose, substituting another, or skipping a certain asana altogether. And don’t worry: You'll still be doing yoga if you opt out of poses that put pressure on your wrists or that require you to bend your wrist in an acute stretch. Here are some wrist-friendly substitutions or your favorite poses.
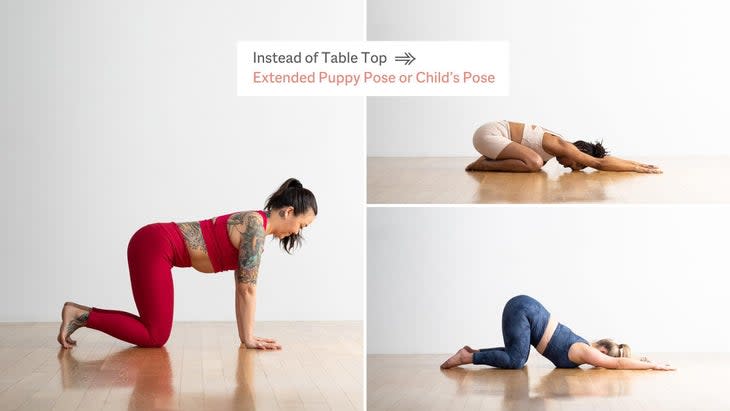
Instead of Tabletop, Try: Uttana Shishosana (Extended Puppy Pose) or Balasana (Child's Pose)
Table isn't the worst pose for tender wrists. Because you're on all fours, your hands don't take all of your body weight, and it's easy to shift some of the weight to the knees. But if you need to take all the weight off your hands, come into Puppy or Child's Pose instead. Depending on what pose you are moving from or to, you may also try Sphinx Pose.
How to practice Child’s Pose
Kneel on the floor and sit back on your heels. Separate your knees as wide as your hips. On an exhale, fold forward and lay your torso down between your thighs. Walk your hands out toward the front of your mat. Tuck your chin slightly to lift the base of your skull away from the back of your neck. Using a block (or two!) under your forehead will lift your body higher--in a position closer to Table.
How to practice Extended Puppy Pose
Come onto all fours with your toes curled under and your hips over your knees. Walk your hands forward, keeping your buttocks lifted up. Extend your arms, keeping them active; don't let your elbows touch the ground. Drop your forehead to the floor or to a blanket and allow your neck to relax. Move your chest toward the floor to keep a slight curve in your lower back. To lengthen the stretch in your spine, press your fingers down and stretch through the arms while pulling your hips back toward your heels. To exit the pose, press your hips back toward your heels and rest in Balasana.
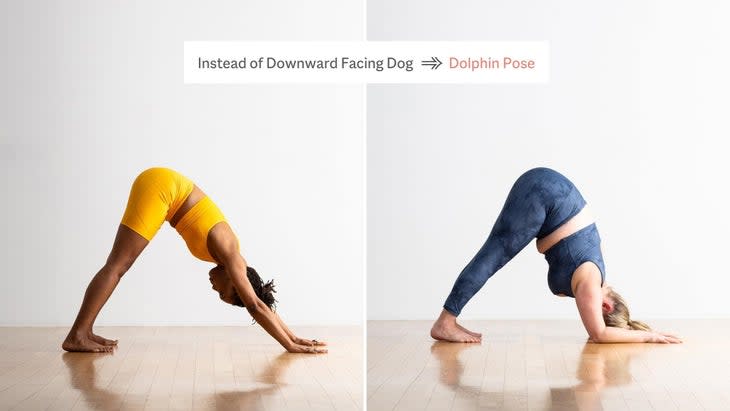
Instead of Adho Mukha Svanasana (Downward-Facing Dog), try: Dolphin Pose
Dolphin is technically a more challenging pose than Downward-Facing Dog, Peal says. Because your torso is closer to the ground, you may feel more stretch in the legs, hips, and back. The elbows-down position may allow you to feel a stronger stretch between your shoulders.
How to practice Dolphin Pose
Come to a kneeling position with your knees directly below your hips. Place your forearms on the floor with your shoulders directly above your wrists. Firmly press your palms together and your forearms into the floor.
Curl your toes under, on an exhale, lift your knees away from the floor, straighten your legs, and press your sitting bones toward the ceiling. Your knees can be slightly bent and your heels may be lifted. Press your forearms actively into the floor. Firm your shoulder blades against your back, draw them wide and down toward the tailbone. Hold your head between the upper arms. To exit, release your knees to the floor with an exhale.
Instead of Plank Pose, try: Forearm Plank
Forearm Plank (otherwise known as Dolphin Plank Pose) is just as challenging as Plank Pose--and deceptively so. While you are hovering closer to the ground, you are holding yourself up with the strength of your biceps, not your whole arm. If that’s still too much for you, try dropping your knees to the floor, as in the variation pictured above.
How to practice Forearm Plank
Start in Dolphin Pose. On an inhale, shift your body forward until your shoulders are directly over the elbows. Walk your feet back if necessary to extend your body in a straight line from the crown of the head to the heels. Your torso will be parallel to the floor. For the variation, bring your knees to the floor, but keep your back long as you ground down into your elbows. Lengthen your tailbone toward your heels. Look straight down at the floor and keep length in the back of your neck. To come out of the pose, use an exhale to lower your knees to the floor if they’re not down already. Press back to Balasana (Child's Pose).
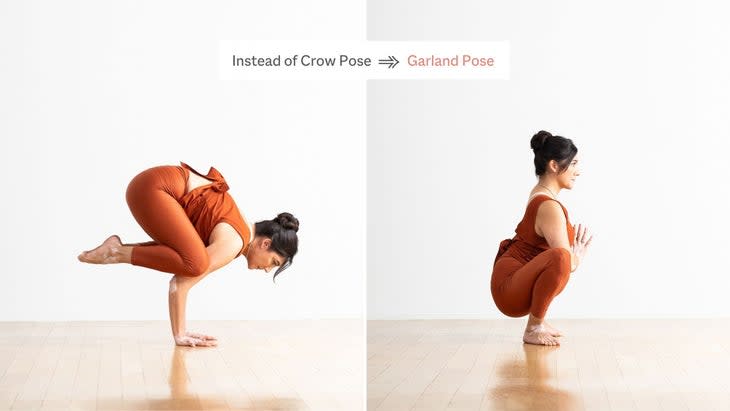
Instead of Kakasana/Bakasana (Crow Pose | Crane Pose), try: Malasana (Garland Pose)
Crow or Crane Pose requires not only your full weight on the hands, but can sometimes give an acute bend at the wrists. Practicing Garland gives you a similar wide-knee stance. You can play with pushing the elbows and inner thighs against each other to enjoy a strong groin stretch. And you can practice with your hands on the floor for support without putting weight on wrists.
How to practice Garland Pose
From Tadasana (Mountain Pose), squat with your feet as close together as possible. Separate your thighs slightly wider than your torso. Exhaling, lean your torso forward between your thighs. Bring your palms together in Anjali Mudra (Salutation Seal) and press your elbows against your inner knees. You can also support yourself by placing your hands on the floor in front of you. To come out of the pose, place your hands on the floor, bring your knees in, and push up into Uttanasana (Standing Forward Bend), then return to Tadasana.
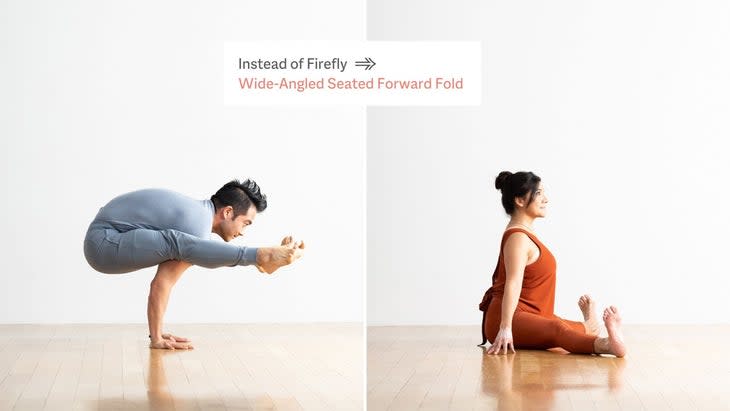
Instead of Tittibhasana (Firefly Pose), try: Upavistha Konasana (Wide-Angled Seated Forward Bend)
If you take the lift out of Firefly Pose you have, essentially, a wide-legged forward fold. The pose can be more or less upright depending on how far forward you fold. Walk your hands forward between your legs or come down onto your elbows for more intensity without compromising your wrists.
How to practice Wide-Angled Seated Forward Bend
Sit in Dandasana (Staff Pose). Open your legs out to the sides as wide as you are able. Flex your feet and point the toes up. Rotate your legs so that your knees and quadriceps are also facing the ceiling. Inhale and lengthen your spine; exhale and hinge at your hips, walking your hands forward and bringing your torso toward the floor between your legs. Keep your back straight. To come out of the pose, walk your hands back toward your torso and return to Dandasana
Instead of Adho Mukha Vkrsasana (Handstand), try: Virabhadrasana 3 (Warrior 3) or Salamba Sirsasana (Supported Headstand)
There are a couple of ways to get the full-body extension of Handstand without having the entire weight of your body directly on your wrists. Supported Headstand is an obvious option if you want to get upside down. You need stable wrists, but they don't need to bear weight. (You can also use an inversion bench.) As a sub for Handstand, Peal has his students practice Warrior 3 against the wall so they can experience the sensation of full-body extension while they are supported by the wall and the standing leg. Warrior 3 allows you to adjust your shoulders and your spinal alignment, without the fear of falling. "This is a great way to work toward Handstand,” Peal says. “They can start to work on getting confidence."
How to practice Warrior 3
Begin in High Lunge with your right foot forward. Inhale to lengthen your spine. Exhale and tilt your torso forward, and reach your arms out ahead. Shift your weight into your front foot, and move forward and straighten your right leg as you lift your left leg until it is parallel to the floor. Extend your hands forward so that your upper arms frame your ears, and your head, torso, pelvis, and lifted leg to form a straight line. Keep your pelvis level. Tone your lower belly, and direct your tailbone toward your left heel to provide support for your lower back. To come out of the pose, carefully bend your right knee and step back with your left foot, returning to High Lunge or Virabhadrasana I.
How to practice Supported Headstand
Start in Extended Child's Pose. Place your forearms on the floor in front of you, interlace your fingers, cupping your palms so that the pinky side of your hands are on the floor. Place the crown of your head on the floor with the back of your head against your cupped hands. Press down with your forearms and elbows and allow your head to come slightly off the floor. Tuck your toes, lift your knees, and straighten your legs. Then walk in toward your head until your hips are straight above your shoulders.
Maintaining your weight on your arms (not your head!), bend your knees and use your core to lift or hop your hips and legs off the floor. Keep your legs together and find your balance with your knees bent. When you are ready, you may choose to lift your legs up so they are directly over your shoulders. Stay up as long as you feel comfortable and strong. To release, use your abdominal strength to bring your feet back down to the floor slowly.
For exclusive access to all of our fitness, gear, adventure, and travel stories, plus discounts on trips, events, and gear, sign up for Outside+ today.


