Got Neck Pain? Melt Away The Tension With These Simple Stretches
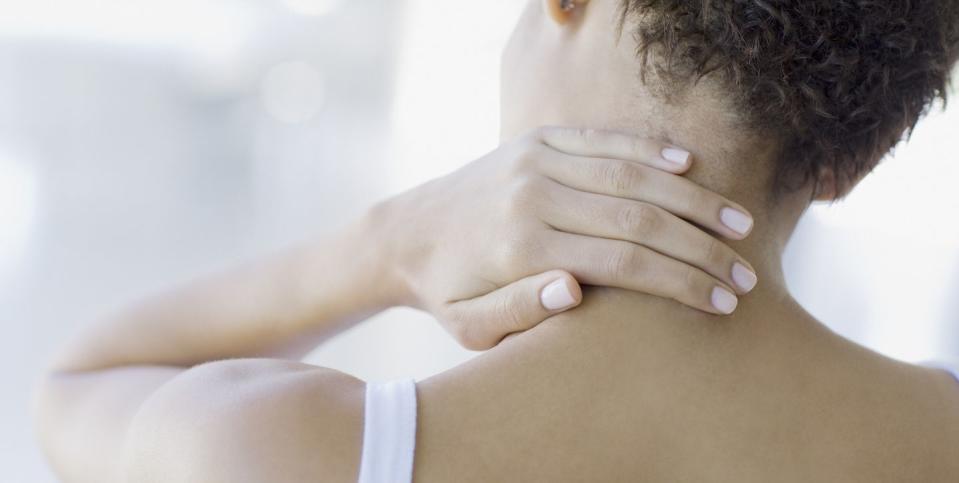
Let us guess: At some point, you’ve had neck pain. Maybe you’re even struggling with it right now. After all, an estimated one in three people experience neck pain once a year—and women suffer from it more often than men, according to the Institute for Quality and Efficiency in Health Care.
Don’t fret. These neck stretches wil help you relieve that aggravating ache. But before we dive into step-by-step instructions, let’s talk a little more about why you might be dealing with neck pain, what you can do in addition to stretching, and when you might need to seek a professional opinion.
The Culprit
Your initial thought might be to blame neck pain on time spent sitting at a computer (TBH, same). That’s definitely one possible explanation, according to Matthew Tolstoy, DACM. But generally speaking, he says, gravity is the problem.
“Gravity is always trying to pull our structures down into a collapsed state,” Tolstoy says. Your neck, he adds, is heavily responsible for fighting that pull in order to keep your head and visual field stable. When you get stuck in a habit for how you do that—like continually sitting in the same posture—you may start to experience symptoms of fatigue and overuse, he notes.
Stretching As (Part Of) The Solution
“The two things we want to combine are being able to release the tension, but then also having something that re-patterns the way the body is stabilizing itself in response to gravity,” Tolstoy says.
In addition to stretching, that can mean changing up the way you sit so that you’re rotated in a different direction than usual, utilizing a sit-stand desk, or even working on your knees for part of the day instead of sitting in your chair, he explains.
It might also mean working on the mechanics of your breathing (see the first exercise on the list below!). Doing so can help your body feel a sense of stability elsewhere in the torso and ultimately allow your neck to relax, Tolstoy notes.
When You Should See A Doctor
First of all, only start with tactics like stretching if your pain is minor or moderate, Tolstoy advises. For severe neck pain, he says, just go get checked out right away. And watch out for severe, sharp pain; pain that shoots down the arm; or a sudden, drastic decrease in mobility that lasts for a couple of days, he adds. If you notice any of those symptoms, see a pro ASAP.
If you do start with these strategies to fight off less intense pain, you’ll still want to see somebody if they aren’t working. Tolstoy recommends giving it a week or two of trying to do your stretches (ideally a few times per day). If you’re still not seeing an appreciable change, he says, you’ll want to get a clinical perspective on that pain.
Similarly, he notes, if the discomfort starts to expand into other parts of the body or a larger area in your neck, that’s a good indication that you should see someone.
The Regimen
Below you’ll find Tolstoy’s recommendations for neck stretches and movements to foster mobility. He suggests trying them all over the course of a day or two and taking note of which ones make your neck feel lighter and easier to move.
“It’s also a good idea to reassess some of your neck movements after doing each stretch/exercise, especially in the beginning, to find which ones you respond to best,” he explains.
Here’s how: Set up your phone and take a video of yourself doing flexion (tucking your chin to your chest), extension (looking up and backwards as far as you can), side bending (putting your ear to your shoulder), and rotation (looking over your shoulder) before and after your exercises.
“This can be extremely helpful because it allows us to see positive (or negative) effects that maybe aren’t connected to what we can noticeably feel,” he says. “But if the body is showing us that a certain stretch increased movement by 40 percent, that’s good evidence to prioritize that drill.”
Once you’ve discovered which three to five movements from this list your body responds positively to, Tolstoy recommends doing them once or twice a day.
“For many people, it’s often just as good (and sometimes better) to take two minutes multiple times a day and do a few repetitions, rather than sitting down and cranking out their full sequence for 20 minutes straight,” he says.
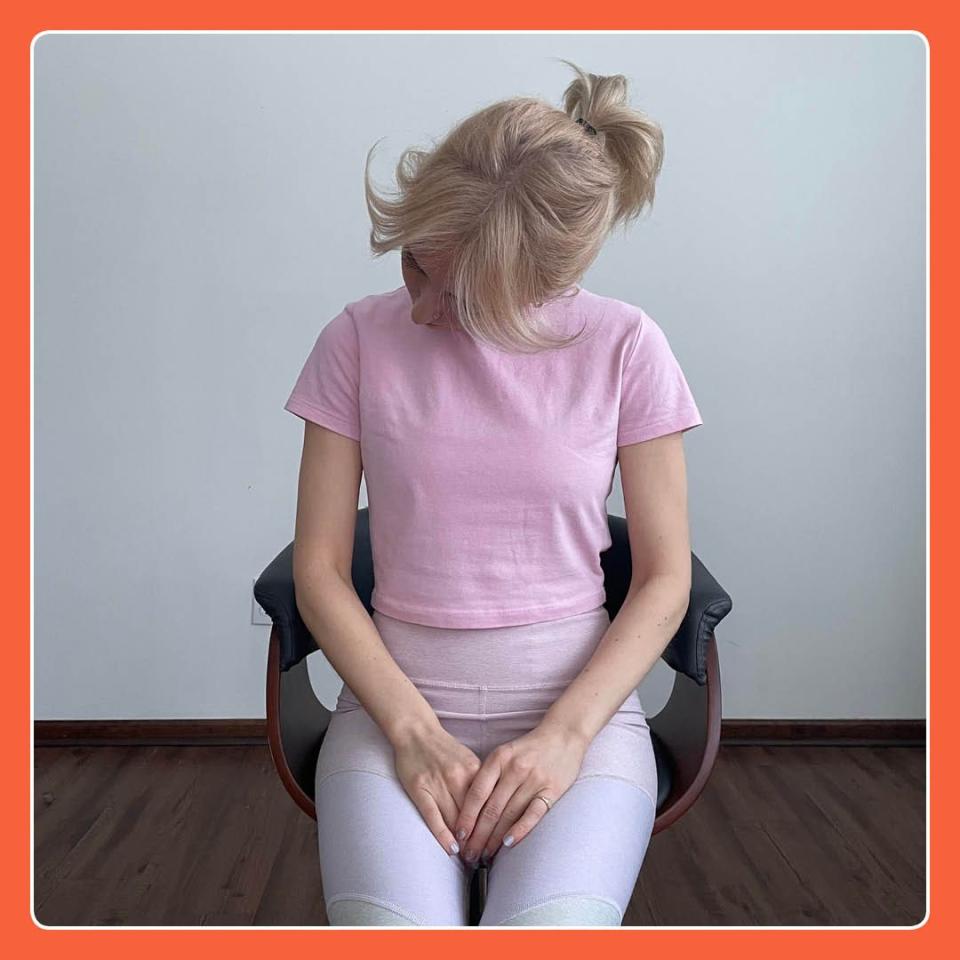
The Movements
All these neck stretches and exercises (demonstrated by Guiliana Hazelwood) and instructions come straight to you from Tolstoy. Now, read on and get ready to tackle that neck pain.
1. 360 Breathing With Neck Relaxation
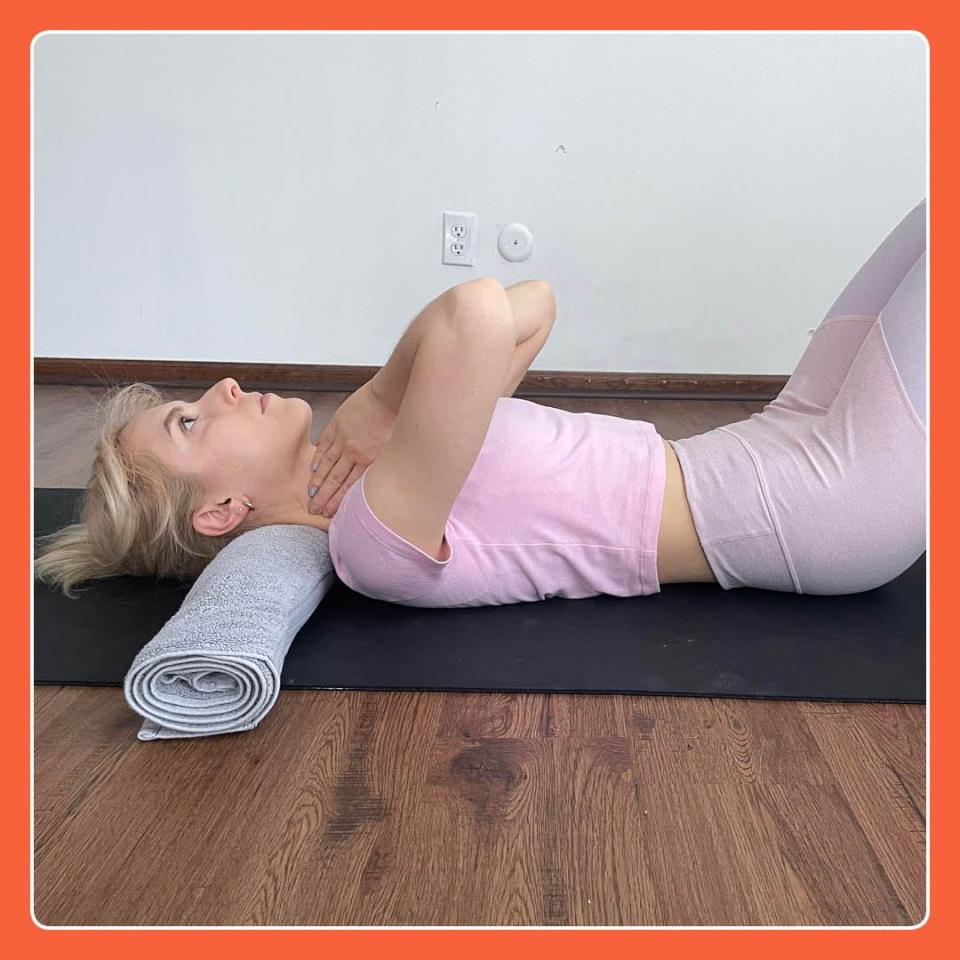
This move targets your whole neck.
How to:
Lay on your back with a rolled up towel placed under the arch of your neck (not the back of the head, but slightly below). Let the towel support the natural curve of your neck so the muscles can relax further with gravity’s help.
Begin to take long, relaxing breaths, focusing on a slightly longer exhale than inhale if possible. Don’t force either the inhale or exhale — this shouldn’t be stressful or panicky, but see if you can guide the breath into this longer cycle.
Place your fingers on either side of your neck and monitor how soon and how much the muscles on the sides of your neck (the scalenes) turn on. We are trying to help the neck relax and not contribute to the breathing process. It’s okay to feel a little activity on the sides of your neck, but ideally it happens late in the inhale and only contributes a subtle assist.
During the long exhale, feel how your core muscles are recruited to help empty your lungs. That increased core activity can help the neck sense it’s fine to relax because other stabilizers are present.
See if you can feel your breath expanding 360 degrees around the center of your body, out into your abdomen and rib cage (front, sides, and back). Most people need some help expanding the breath into the sides of both the abdomen and ribs as well as the upper back, so pay particular attention to these areas.
Continue breathing like this for one to two minutes (up to 10 minutes if helpful).
2. Forward Fold
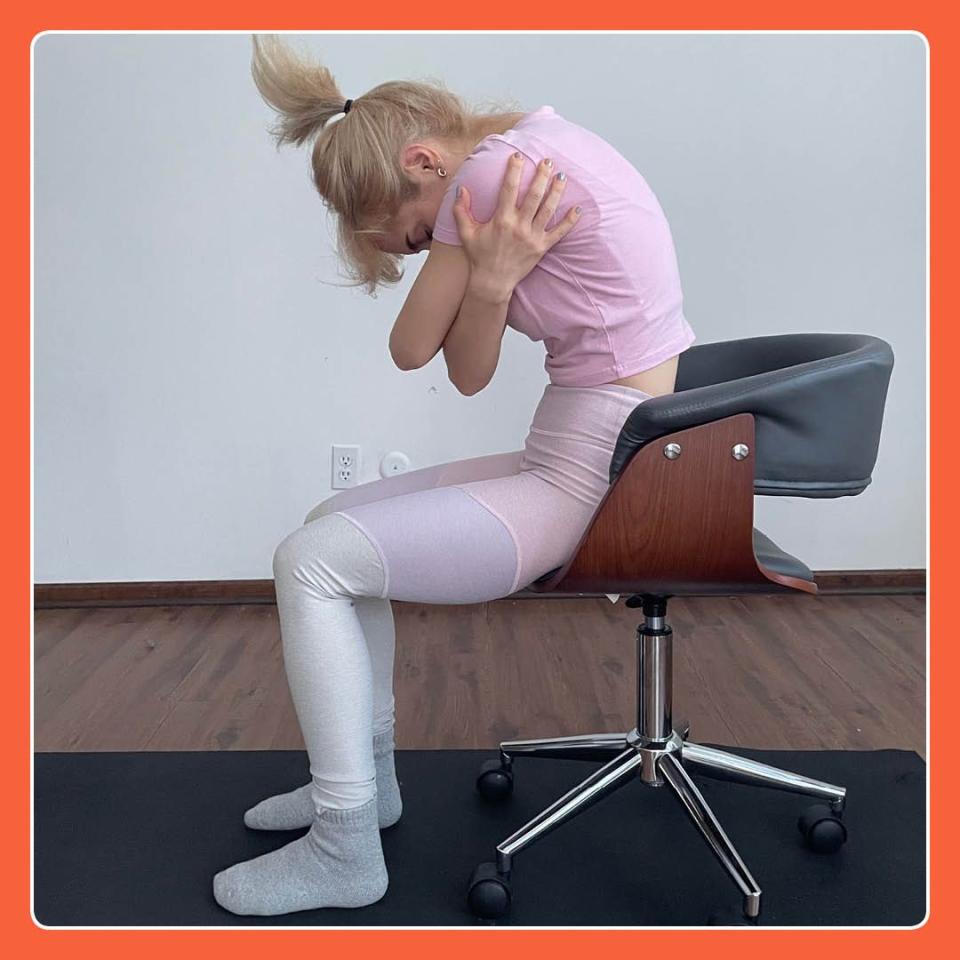
This one targets your upper back and the back of your neck.
How to:
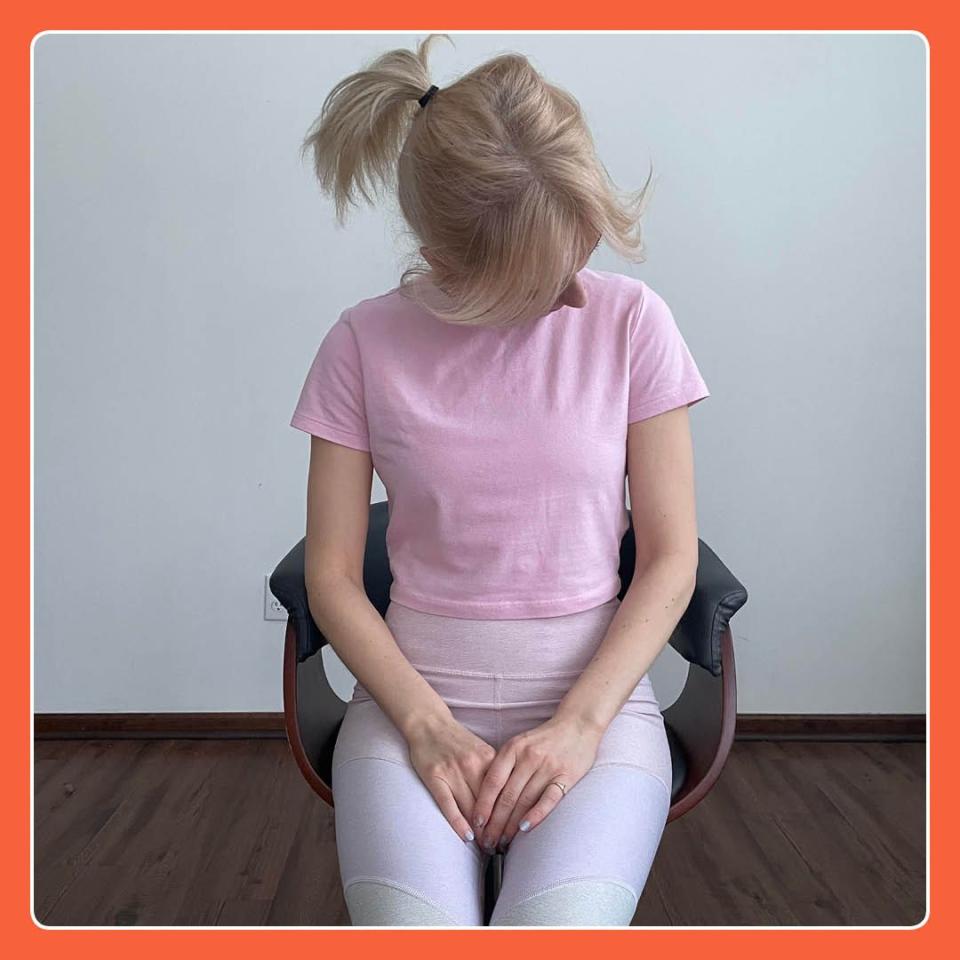
Wrap your arms around the back of your shoulders, tuck your chin to your chest, and fold forward as far as feels comfortable.
Feel how your arms are preventing the front of your body from expanding with the breath. Use that to help the breath find its way to stretching your back ribs and neck.
Take a long, smooth inhale followed by a slightly extended exhale (feeling your abs kick in again like in the last move).
Continue breathing in this way for one to two minutes, keeping your chin tucked towards your chest to increase the stretch in the back of your neck.
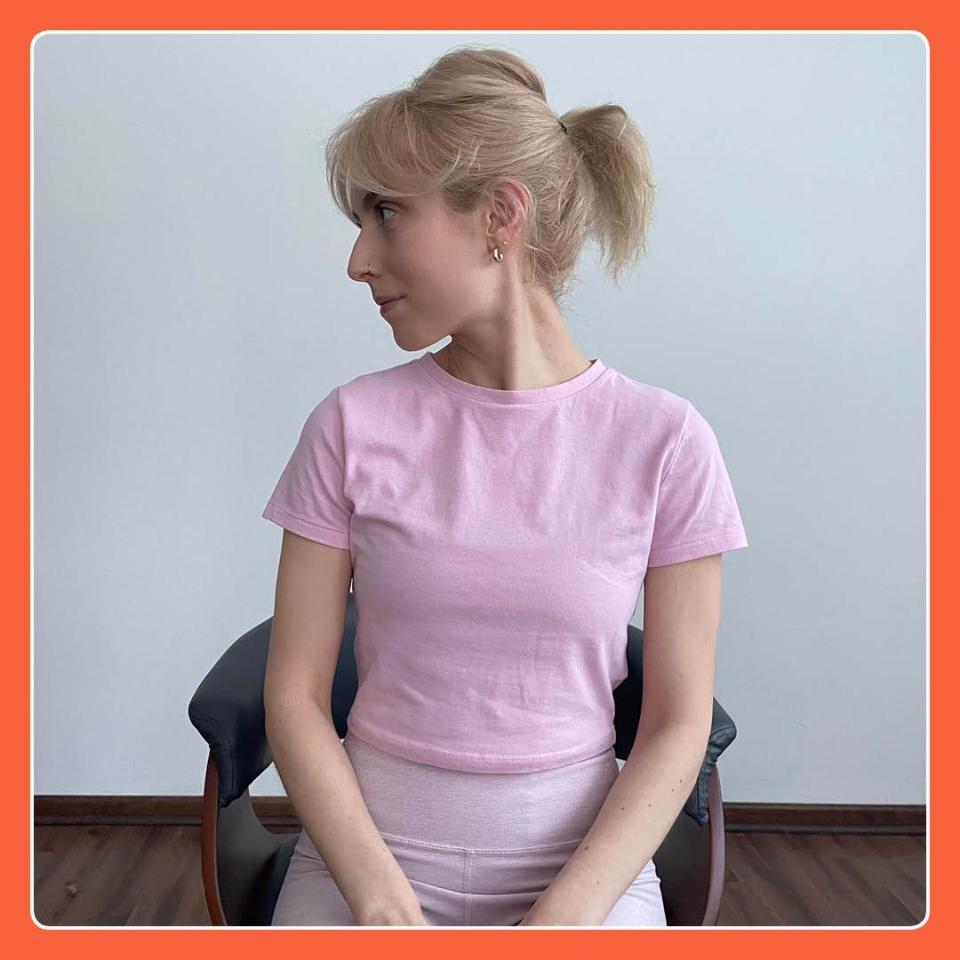
3. Chin Forward To Shoulder
The targets here are your back and side neck muscles.
How to:
Sit tall and tuck your chin to your chest.
Slowly move your chin towards one of your shoulders, feeling the stretch on the opposite back of your neck. Pause for two to three seconds in the stretched position, then repeat to the other shoulder. Repeat 10 times on each side.
Watch if your chin wants to drift away from your body in an effort to reach your shoulder, and try to keep it tucked as close as you can during the entire movement to improve the stretch.
Pro Tip: If this feels like too much, you can lessen the intensity by either tucking your chin less or rotating less towards your shoulder.
4. Nose Across Ceiling

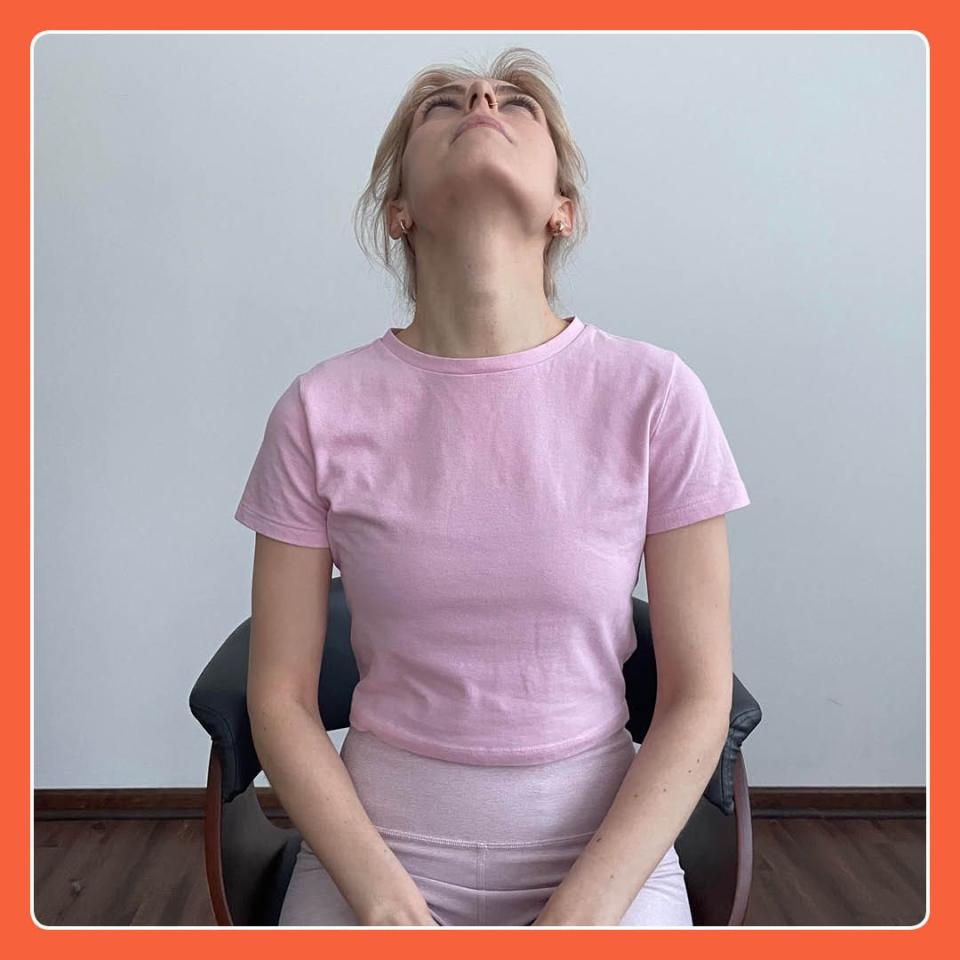
This move targets your front and side neck muscles.
How to:
Gently tip your head back, nose to ceiling, as far as feels safe. Feel the stretch across the front of your neck.
Imagine an arc going from the outside of one shoulder, up across the ceiling, and down to the opposite shoulder. Trace your nose along that path as best you can.
Repeat 10 times in both directions, alternating sides.
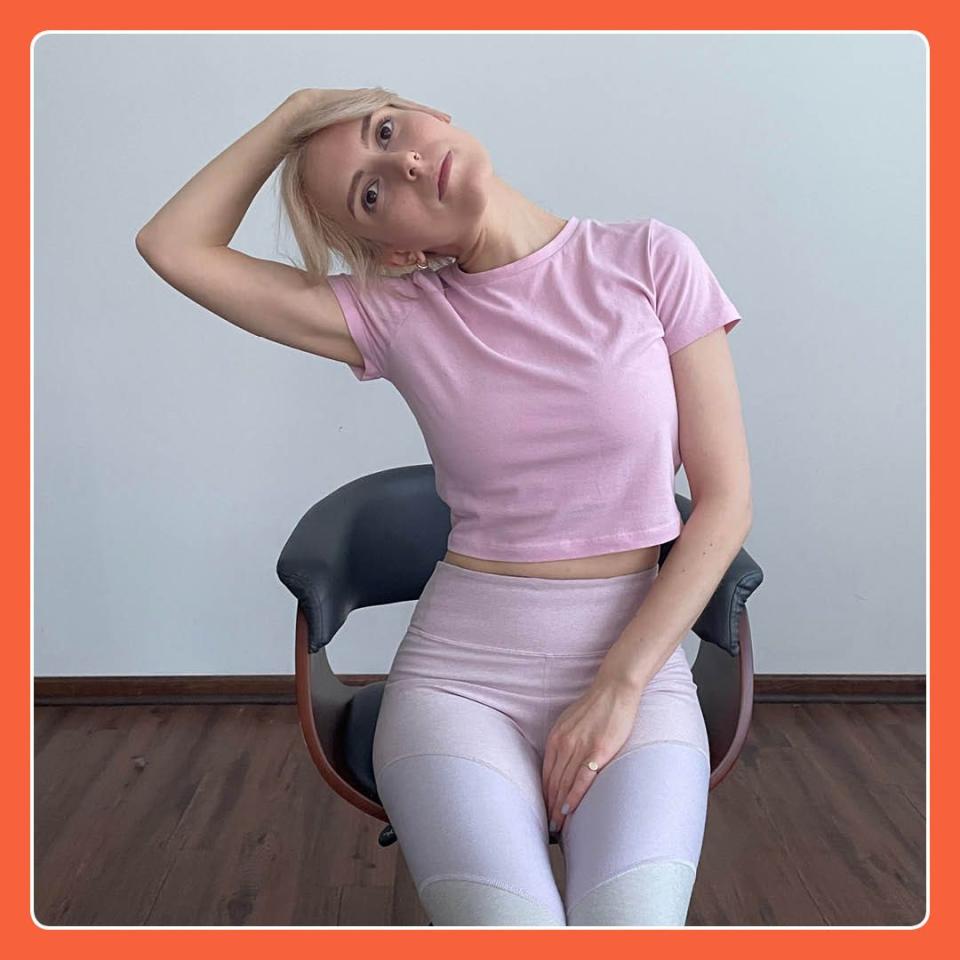
5. Neck Rotations With Contract-Relax

This one targets your side neck muscles.
How to:
Sit tall and rotate towards one shoulder as if you are trying to look behind you. Keep a slight chin tuck while rotating.
Once you reach your end range, hold the position for 10 seconds, taking long, slow breaths.
Place a hand on the side of your head and push into it, as if you were rotating your head back to the middle, but the pressure from your hand resists the movement. Hold for five seconds and then slowly relax, seeing if you are now able to stretch further. Repeat five times on each side. (Note: If you’re turning to the left, use your right hand on the right side of your head. If you’re turning to the right, use your left hand on the left side of your head.)
Make sure to let the contractions be gentle — 10 to 30% effort is enough to make improvements and be safe.
Pro Tip: Use a lighter amount of pressure to avoid the contraction causing pain. If pushing into your hand is too intense or painful, simply allow your hand to help guide your neck into the stretch without pushing back against it.
6. Side Bends
These target your side neck and torso muscles.
How to:
Sit tall and bring one ear to the same side shoulder while also bringing that same shoulder to the hip. Keep a slight chin tuck while bending.
Hold the position for one to two minutes, taking long, slow breaths.
Feel how the stretching side of the rib cage can expand with the breath more than the shortening side. Try to fill up the "opening" side as much as you can during the inhale and then feel the side abs activate more on the "closing" side during the long exhale.
7. Band Pull And Rotate
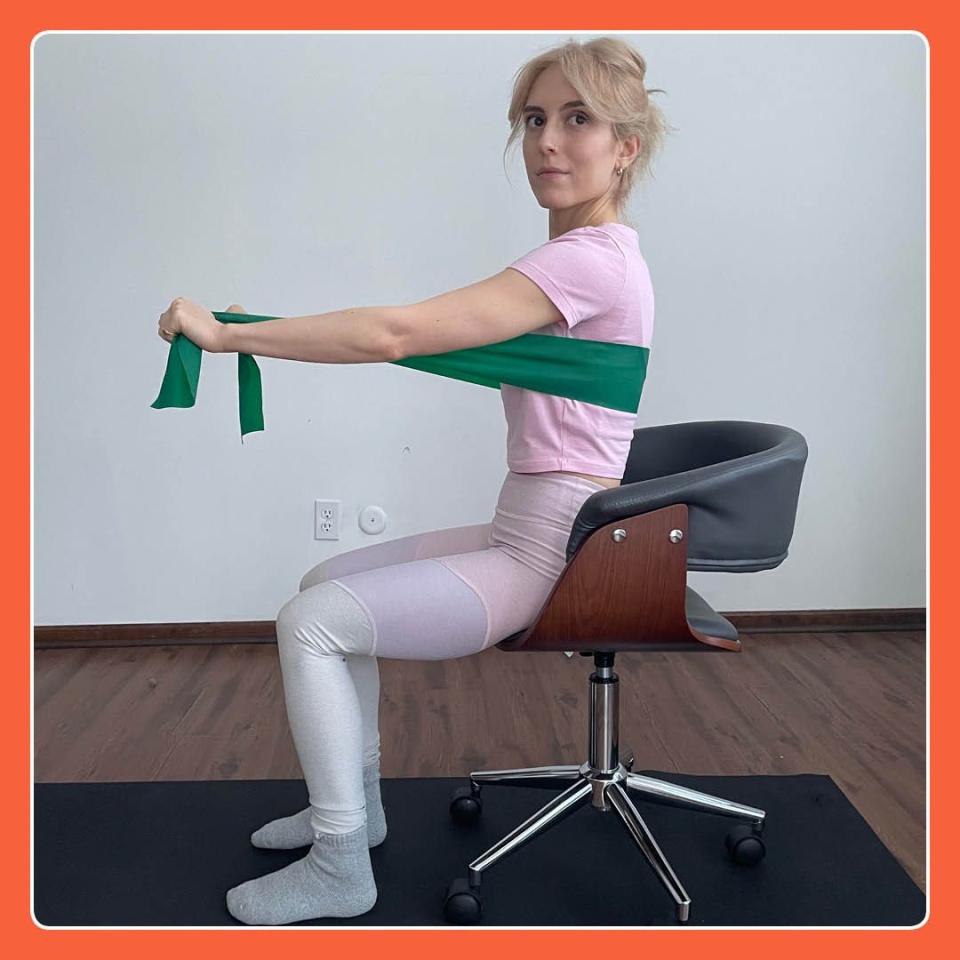
This exercise targets the sides and back of your neck.
How to:
Sit tall with a light resistance band looped around your back, just below your shoulder blades, holding it in each hand.
Breathe in and reach your arms forward with palms facing each other, keeping a slight bend in your elbows. Feel how this brings activity to your core and your back ribs can expand backwards into the tension of the band.
On the exhale, turn your head as if you are looking over one shoulder as far as you can. Hold that position for the duration of the exhale, then return to the starting position and relax the band.
Repeat six to eight times per side.
8. Assisted Flexion Stretch
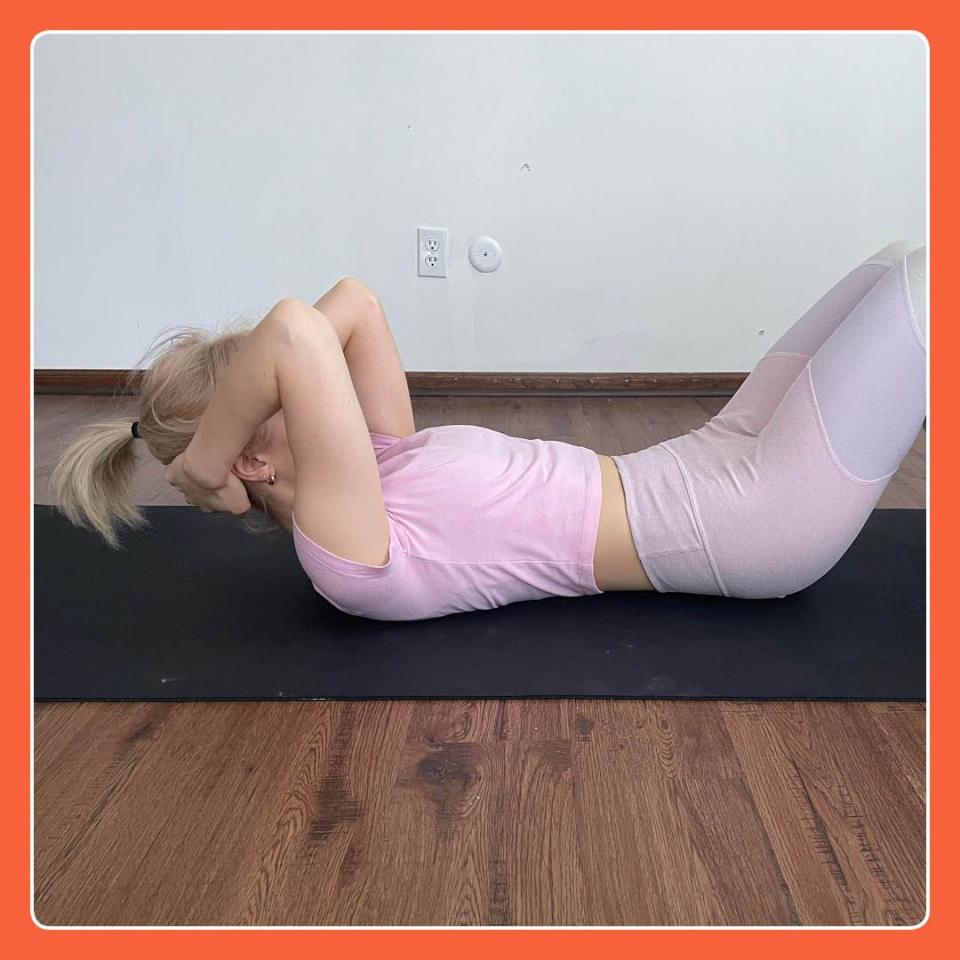
This move targets the back of your neck.
How to:
Lay on your back with knees bent and feet flat on the floor so your pelvis can slightly tuck under and your low back lengthens on the floor. Clasp your hands behind your head.
Use your hands to curl your head up off the ground, bringing your chin to your chest, but making sure your upper back stays in contact with the floor.
Hold for 30 to 60 seconds while breathing into the upper back and side ribs.
Pro Tip: To progress with this one, add five-second isometric contractions. While in the stretched position, push the back of your head into your hands and resist for five seconds, three to five times.
9. Tabletop Rotations With Band
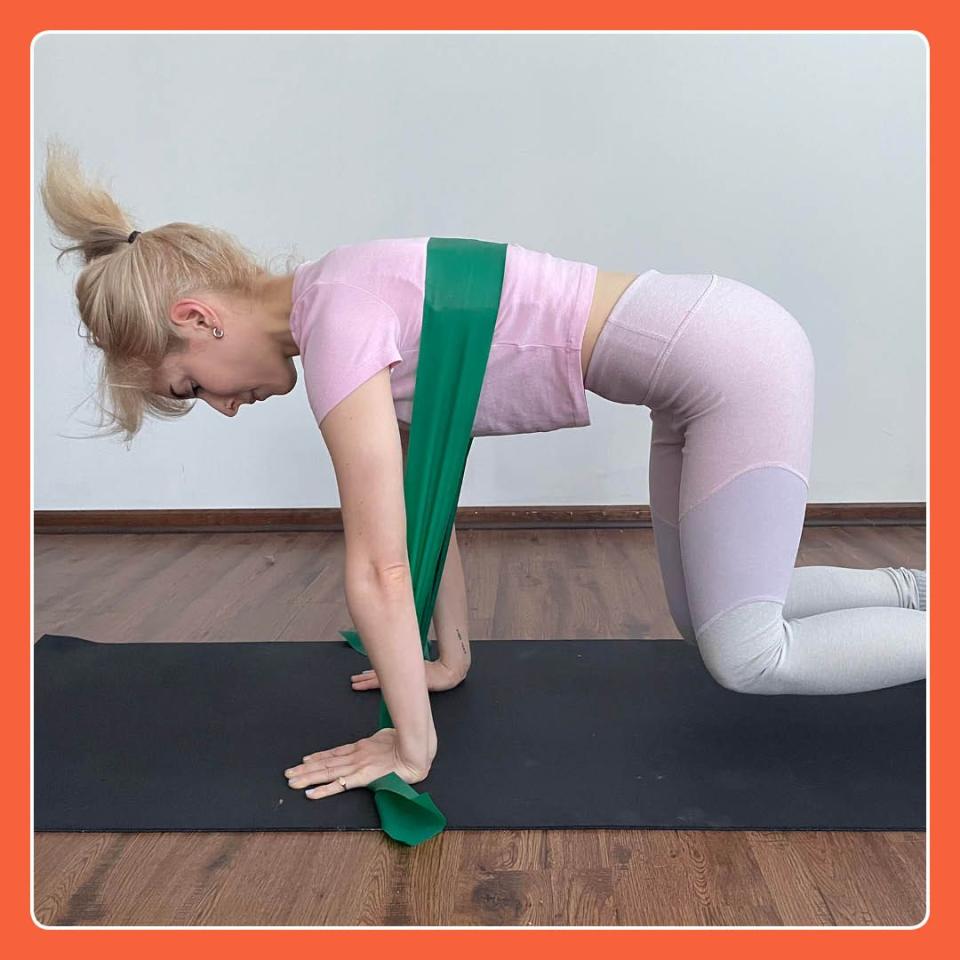
These target your side neck muscles.
How to:
Set up in a tabletop position on your hands and knees with a light resistance band looped around your back (under your shoulder blades) and pin it under your palms.
Press down through your toes and palms with a slight bend in your elbows to lift your knees one inch off the floor. Make sure the lift is only one inch — higher here isn’t better.
Breathe in, feeling your back ribs expand back into the band. On the exhale, rotate your head over one shoulder as far as you can (as though you’re attempting to look behind you), holding for the duration of the exhale.
Return to the starting position, let the knees come back to the floor for a moment, then repeat five times on each side.
Pro Tip: If this is too challenging, try keeping your knees on the floor.
You Might Also Like

