How to French Braid Your Own Hair
Getty Images
The French braid is an excellent option for beginner braiders. It can result in an easy-to-achieve professional hairstyle that can also moonlight as an effortless summer style to keep your hair out of your face. They're also a great protective style for natural hair, and suit all face shapes, to boot.
But let's be real: it takes time to master the art of braiding. However, don't let this discourage you — no need to wait 'til your next hair appointment to ask your hairstylist to hook you up. You can learn how to French braid your own hair and we're here to help.
Here, InStyle spoke with hairstylist Bobby Tochterman, co-founder of Maverick House NYC, a receptionist-free salon, and Robin Groover, owner of Too Groovy Salon in Atlanta, Ga., to give you a step-by-step tutorial on the best way to French braid your hair, no matter the texture.
RELATED: If You've Never Heard of Knotless Braids, It's Time to Catch Up
Step One: Prep Your Hair
Before you start braiding, you need to prep your hair. Tochterman advises to grab a brush and bungee. A hair bungee is better than tying your hair with traditional elastic bands, which can cause breakage. And they expand like classic elastic bands; however, each end has a hook to secure hair without pulling on it, making it beneficial to those with coarse or thick hair.
Once you're ready, prep your hair with antioxidant-filled RandCo Suncatcher, "[It's the] perfect leave-in conditioner — lightweight, has vitamin C, helps detangle and nourish, and has UV protection," gushes Tochterman. "It's the perfect prep for all hair types." If you opt for a wet look braid, Tochterman recommends a quarter size of RandCo Motorcycle Flexible Hold Gel.
As for natural hair: "French braids on textured hair begins with elongation of texture with a stretching drying method or blow drying to make the hair manageable for a smooth finish," shares Groover. If you place heat on your hair, don't forget to shield your hair with a heat protectant. OGX Silk Blowout Quick Drying Thermal Spray protects hair up to 450 degrees, minimizes drying time, and smells divine. "Once the desired texture is achieved, make sure the ends are detangled to avoid breakage," instructs Groover.
Step Two: Parting
For fine to medium hair, after you brush, Tochterman advises the following: first, taking a section of hair from the forehead to the back of the head. Then split the hair into three equal sections so you chunks on the left, in the middle, and on the right.
With natural hair, Groover opts for a different technique: "Part the hair down the middle or with a low side part and divide the hair into two sections." And if you ever wanted to know the key to a sharp part, "the secret weapon is tracing the part with the African Pride Edge Styling Wax for shine and a detailed finish."
Next, "divide the subsection into three small sections and begin the braid at the edges with the tiny short cross movements for a precise finish and style longevity. But do not grip tightly to prevent breakage," warns Groover. "Let the product secure the strands in place."
You should also keep in mind that the size of the braid will alter its look. "Large braids give a fuller look; small to medium braids are tighter and have less frizz," explains Groover.
The length of the braid also determines where you will focus on applying product. "Shorter braids require more product to prevent the braids from unraveling, [while] longer braids require more product on the ends to protect and prevent splitting," she states.
VIDEO: 8 Mistakes You Didn't Know You Were Making With Your Protective Style
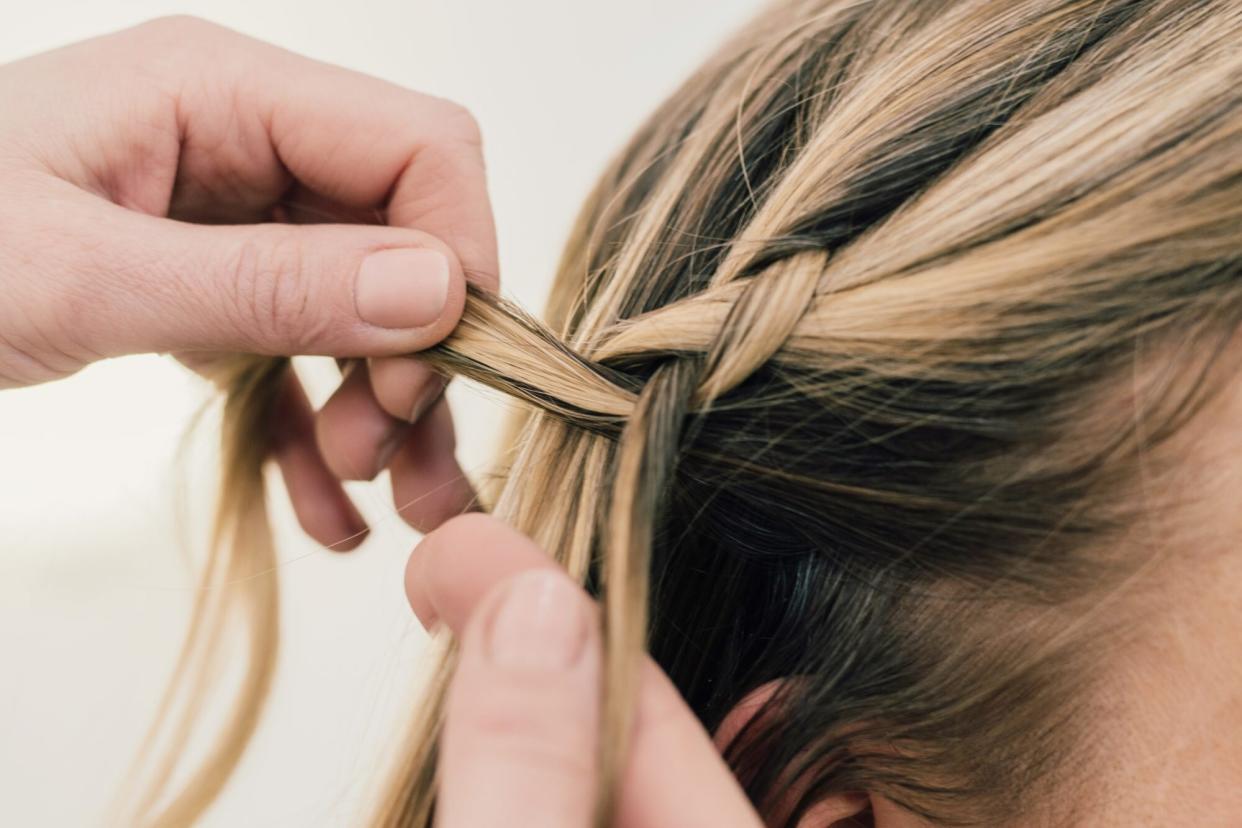
Step Three: Braiding
Tochterman breaks down the exact way to French braid below. (We promise it's easier than it seems).
Take the right strand and cross it over to the middle.
Take the left strand and cross over to the middle.
Move all strands over to your left hand, separating them with your fingers. This frees up your right hand to work with.
In your left hand, hold each strand between your fingers, with the pinky holding the left strand, the middle finger holding the middle strand, and your index finger holding the right strand.
Pick up a small section of hair on the right and add it to the right strand by sliding it between your thumb and index finger to add to the braid.
One hair is added to the right strand, cross the right strand over the middle, and bring all the hair to the right hand. Hold the right strand with your pinky, the middle strand with your middle finger, and the left strand between your index and thumb. This way you free up your left hand to repeat the same sectioning technique on the other side.
Once you have added hair to the left strand, cross over to the middle section.
Repeat right side and left side until you run out of hair to add into the braid.
Braid the shaft of the hair down to the ends.
Once you're done, finish the braid with the hairspray of your choice "to calm flyaways and keep the shape," says Tochterman. For natural hair, Groover recommends "smoothing and designing your edges." You can use that same styling wax or the edge control of your choice.
Voila! You've completed a French braid — all on your own!

