The Food Lab's Complete Guide to Sous Vide Chicken Breast
Cooking chicken breast sous vide is hands down the best way to ensure it comes out tender, juicy, and full of flavor.
What if I told you that chicken breast doesn't have to be bland? That it doesn't have to be dry, stringy, or insipid? Your chicken breast has the potential to be the life of the party, with a level of juiciness you thought only the best pork chops could have. It can be the meal that everyone really wants, not just because it's healthy and inexpensive, but because it's so damn tasty.
The secret to perfect chicken? Temperature control. The kind of down-to-the-degree control that only an immersion circulator can get you. If there's one dish that most dramatically shows the differences between this and traditional cooking methods, it's chicken breast. Luckily, it's also one of the easiest dishes to cook, and this guide will show you how to do it step by step.
The Benefits of Cooking Chicken Breast Sous Vide

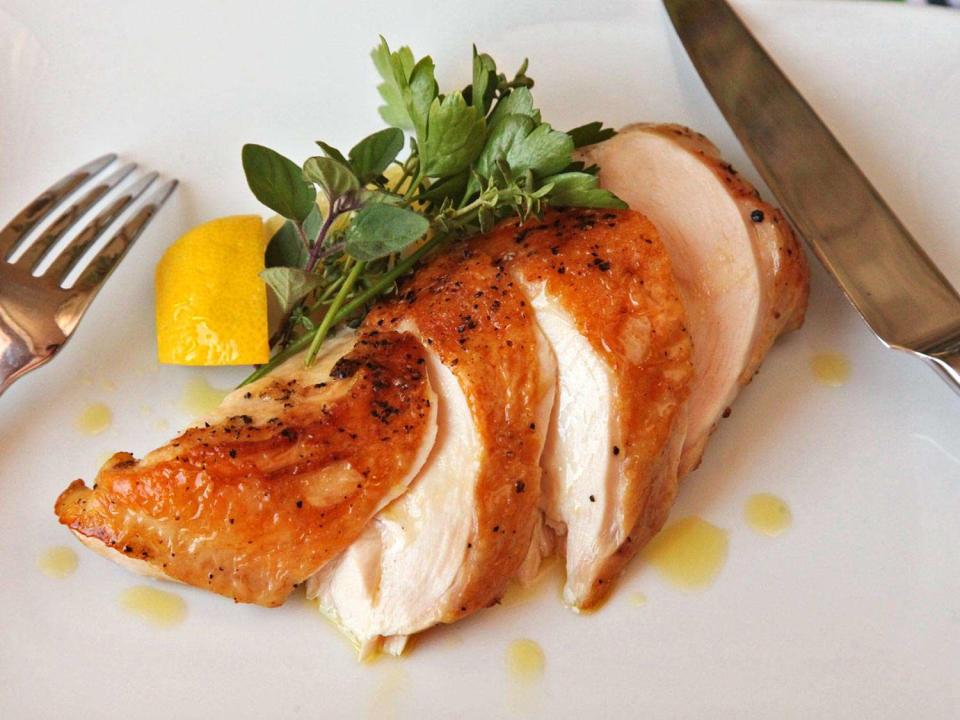
Chicken is easy enough to cook using traditional methods, so why would you want to cook it sous vide? Take a look at that chicken. Tender enough to cut with a butter knife, glistening with flavorful juices. It's got texture and flavor that just aren't attainable via traditional high-heat cooking methods.
See, traditionally cooked chicken is penetrated by higher heat from the outside in, making it very difficult to gauge exactly what temperature it is from the edges to the center. This presents a problem. In order to ensure that the center of the chicken is cooked through and safe to eat, we inevitably overcook the outer layers, leading to that familiar dry, stringy texture.
With sous vide cooking, we're cooking at precisely the temperature at which we want to serve the meat, which means that by the time we're done, the chicken is cooked perfectly from edge to center.
What's more, as we'll see shortly, cooking chicken sous vide actually allows you to serve it at a slightly lower temperature, preserving valuable and flavorful juices.
If we're to believe what our parents always told us, chicken should be cooked to 165°F (74°C). Then again, it's a pretty safe bet your parents had neither modern equipment nor a modern approach to food safety. These two things are what allow us to safely cook chicken to far lower temperatures while achieving more desirable textures. Here's the scoop.
Sous Vide Chicken and Food Safety
There is a misconception about what constitutes a safe cooking temperature for meat. If you've ever taken a ServSafe class, you've probably heard of the 40–140°F (4–60°C) "danger zone," the temperature range in which bacteria supposedly thrive. You've been given urgent warnings to avoid serving any food that has remained within this range for a total time of four hours. You've probably also heard that in order for chicken to be safe, it ought to be cooked all the way to 165°F.
Yet sous vide–style precision cooking often takes place well below the 140°F mark, in excess of four hours, and my own recommendation for cooking chicken falls in the 145–150°F (63–66°C) range, well below the 165°F target we've all learned. What gives? Is my sous vide chicken still safe to eat?
Here's the thing: Industry standards for food safety are primarily designed to be simple to understand, usually at the expense of accuracy. The rules are set up such that anybody, from the turn-and-burner at Applebee's to the fry-dunker at McDonald's, can grasp them, ensuring safety across the board. But for single-celled organisms, bacteria are surprisingly complex, and despite what any ServSafe chart might have you believe, they refuse to be categorized into a step function.
"Food safety is a function of both temperature and time."
The upshot is: Food safety is a function of both temperature and time.
What the USDA is looking for is a 7.0 log10 relative reduction in salmonella bacteria in chicken. That is, a reduction that ensures that out of every 10,000,000 bacteria living on that piece of chicken to start, only one will survive.
Take a look at this simplified chart I drew using data from the USDA's guide.
Pasteurization Time for Chicken With 5% Fat Content (7-log10 lethality)
Temperature | Time |
136°F (58°C) | 68.4 minutes |
140°F (60°C) | 27.5 minutes |
145°F (63°C) | 9.2 minutes |
150°F (66°C) | 2.8 minutes |
155°F (68°C) | 47.7 seconds |
160°F (71°C) | 14.8 seconds |
165°F (74°C) | Instant |
Or, if you prefer it in graph form, here you go. Regardless, this follows a pretty straightforward logarithmic decay curve: The hotter you get, the faster bacteria die, and the faster the rate of bacteria dying increases.

As you can see, at 165°F, you achieve pasteurization nearly instantly. It's the bacterial equivalent of shoving a stick of dynamite into an anthill.
At 136°F (58°C), on the other hand, it takes a little over an hour for the bacteria to slowly wither to death in the heat. In fact, you can even pasteurize chicken as low as just above 130°F (54°C), but I don't recommend it. Partly because there's a risk that your sous vide device is mis-calibrated by a degree or two, but, more importantly, because chicken cooked to 130°F has a very soft, almost raw texture that is simply not appealing.
It's important to note that these times represent the minimum safe cooking time for chicken after it has reached those temperatures internally, which can take up to 45 minutes or so. To be safe, I recommend tacking on an extra hour to the time recommended in the government charts when starting with chicken from the fridge, or two hours when starting with frozen chicken.
The Effect of Temperature on Juiciness
I knew that the hotter you cook chicken, the more juice it expels, but I wanted to know exactly what the effect is, both from a measurable, quantitative perspective and from a subjective "how does it taste?" perspective.
To do this, I cooked near-identical chicken breasts to temperatures ranging from 135°F (57°C) up to 165°F, measuring the moisture lost to the bag in each sample and tasting the results.
From a quantitative perspective, the differences are pretty dramatic.
Here is how much juice is expelled from an eight-ounce chicken breast cooked to 140°F (60°C):

And here's 150°F (66°C):

It's more than twice as much! Interestingly, I found that the amount of liquid a chicken breast loses does not rise steadily as the temperature increases. Below 138°F (59°C) or so, it loses very little, but there's a big bump right around 139–140°F (59–60°C). Between 140 and 149°F (60 and 65°C), there's again a steady increase in juices lost, followed by another big bump around the 150°F mark.
Moreover, even though chicken fat starts to melt at around 100°F (38°C), it's not until you hit that second bump at 150°F that liquefied fat really starts to come out, beading on the surface of the juices.

When tasted, all of the chicken came out relatively juicy, though the juiciest were those that were cooked the least. Even at 150°F, chicken cooked sous vide comes out juicier than chicken cooked to 150°F using conventional methods—the wonders of gradient-free cooking!
The Effect of Temperature on Texture

The texture also changes dramatically as you cook your chicken at progressively higher temps, and, unlike with juiciness, this is a change that's readily apparent when you eat. Just like any overcooked chicken, once you get to around the 155°F (68°C) mark, sous vide chicken starts to take on an unpleasant chalky, tacky texture (though, again, far less than with conventional cooking methods).
140°F (60°C) Chicken: Very Soft and Juicy

Between 140 and 145°F (60 and 63°C) is my preferred temperature range for chicken served hot (and I generally aim for the hotter end of that scale). Chicken cooked to 140°F has a very tender, extremely juicy, and smooth texture that is firm and completely opaque (no medium-rare chicken here!) and shows no signs of stringiness or tackiness. It melts between your teeth.
150°F (66°C) Chicken: Juicy, Tender, and Slightly Stringy

Once we get over that 150°F hump, things start to look a little more traditional. Your chicken will still be plenty moist and tender, but will also show some of its signature stringiness. This is my preferred temperature for chicken that's destined to be served cold as a salad.
160°F (71°C) Chicken: Juicy but Firm and Stringy

It's hard to accurately describe the texture of well-done sous vide chicken. Imagine the texture of traditional roast chicken from, say, your high school cafeteria. Now imagine that the chicken is just as stringy, with that tacky texture on your molars as you bite into it, except it's also extremely juicy and moist.
If you are a lover of traditional roast chicken, but have always wished it were moister, then this may be the temperature for you.
The Effect of Timing
I've always liked the idea of setting my precision cooker to a given temperature—say, 145°F—dropping in my chicken breasts, then walking away until I'm ready to eat. Early sous vide proponents (including myself) claimed that you could absolutely not overcook your meat this way.
Turns out this is not true. It's still possible to overcook meat using a sous vide cooker, but it's much, much more difficult.
Just as bacteria reduction is a function of temperature and time, the breakdown of proteins within the chicken breast is also dependent on temperature and time. The longer a piece of chicken sits at a given temperature, the more it breaks down, and the softer it becomes.
You can clearly see this in action by taking the juices out of the bags used for identical pieces of chicken, one cooked for two hours and one cooked for 24 hours, both at 145°F:

The 24-hour chicken has juices that gel solid due to the amount of gelatin and other proteins extracted from the chicken.
More tender chicken may sound like a good thing, but it's not the right kind of softness. Instead of tasting tender, overcooked sous vide chicken just tastes...mushy. To test the limit of how long you can cook chicken this way, I put identical chicken breasts in 145°F water for one, two, four, eight, 12, and 24 hours. The difference is stark—timing can have even more of an effect than temperature when taken to extremes.

At two hours, the chicken has a nice, resilient chew to it, while retaining juiciness.

At 24 hours, on the other hand, the chicken is tender to the point that you can leave fingerprints in its surface that don't even begin to bounce back out.
For best results, I recommend never cooking your chicken for longer than four hours, though two is even better.
Temperature and Timing Chart for Sous Vide Chicken Breast
Too much data? Okay, here's all of that compressed into only what you need to know:
Sous Vide Chicken Breast Temperature and Timing Chart
Texture | Temperature | Timing Range |
Very soft and juicy when served hot | 140°F (60°C) | 1 1/2 to 4 hours |
Tender and juicy: Ideal for chicken salad when served cold, slightly stringy when served hot. | 150°F (66°C) | 1 to 4 hours |
Traditional, juicy, firm, and slightly stringy, served hot | 160°F (71°C) | 1 to 4 hours |
How to Cook a Chicken Breast Sous Vide, Step by Step
Step 1: Preheat Precision Cooker
Preheat your sous vide precision cooker to the desired final temperature according to the timing chart above. Allow the water bath to come to the right temperature before adding your chicken.
Step 2: Season Chicken

Season bone-in, skin-on chicken breasts generously with salt and pepper.
Step 3: Bag Chicken

To bag chicken breasts, start by folding the top of a vacuum-seal or zipper-lock bag back over itself to form a cuff. This will prevent chicken juices from getting on the edges of the bag, which can interfere with the seal or provide vectors for contamination.

Slide the chicken breasts into the bag, along with any aromatics, such as fresh herbs or lemon slices (if using).

Then unfold the edge before closing the bag.
Step 4: Seal the Bag

Seal the bag with a vacuum sealer or, if using a zipper-lock bag, with the displacement method. To do this, slowly lower your bagged meat into a pot of water, letting the pressure of the water press air out through the top of the bag.

Once most of the air is out of the bag, carefully seal the bag just above the waterline.
Step 5: Cook the Chicken

Drop the bag in the water bath, making sure not to block the intake or output sections of your precision cooker. If properly sealed, the chicken should sink. Cook according to the timing charts above.
Finishing on the Stovetop
Step 6: Remove the Chicken From the Bag

Remove the chicken from the bag, discard any aromatics (if using), and place it on a paper towel–lined plate. Pat it dry very carefully on both sides.
Step 7: Preheat a Cast Iron or Stainless Steel Skillet
Heat a heavy cast iron or stainless steel skillet, coated with one tablespoon of vegetable, canola, or rice bran oil, over medium-high heat until shimmering. Because skin-on chicken has natural insulation, it's not necessary to use the super-high heat that is required for searing things like steaks or pork chops.
Step 8: Add Chicken

Carefully add the chicken to the hot oil, skin side down.

For best results, use a flexible slotted fish spatula or your fingers to hold the chicken down against the corner of the pan in order to maximize contact between the chicken skin and the hot oil and metal. Tilting the pan toward the chicken to help the fat pool up under the skin can also help.
Be careful, as the chicken may splatter and pop as it sears. I recommend wearing gloves and long sleeves if you are sensitive to small oil splatters.

Carefully lift and peek under the chicken as it cooks to gauge how quickly it is browning. Let it continue to cook until the skin is deep brown and very crisp. This will take about two minutes total.

Remove chicken from pan and let it rest until cool enough to handle, about two minutes.
Step 9: Remove the Bones

As soon as the chicken is cool enough to handle, carefully remove the wishbone, which runs along the fatter end of the breast. It should pull right out. (Note, however, that the wishbone may already have been removed in-store.)

Next, peel the breast off the breastbone by running your thumb in between the meat and the bone. It should come right off.
Step 10: Carve the Chicken

Use a sharp chef's knife or boning knife to slice the chicken on a bias.

Cut the chicken into three or four thick slices to make it easier to eat when serving.
Step 11: Serve the Chicken

Serve the chicken immediately, garnished with lemon wedges, extra-virgin olive oil, or a vinaigrette or sauce, as desired.
Finishing on the Grill
Step 6: Remove the Chicken From the Bag
Remove the chicken from the bag, discard any aromatics (if using), and place it on a paper towel–lined plate. Pat it dry very carefully on both sides.
Let the chicken cool slightly while you preheat your grill. (If you place it directly on the grill now, it will overcook while it crisps.)
Step 7: Preheat Your Grill
Light one half chimney full of charcoal. When all the charcoal is lit and covered with gray ash, pour it out and arrange the coals on one side of the charcoal grate. Set the cooking grate in place, cover the grill, and allow it to preheat for five minutes. Alternatively, set half the burners on a gas grill to the medium heat setting, cover, and preheat for 10 minutes.
Clean and oil the grilling grate.
Step 8: Add Chicken
Place the chicken, skin side down, on the hotter side of the grill and cook.
Carefully lift and peek under the chicken as it cooks to gauge how quickly it is browning. Let it continue to cook until the skin is deep brown and very crisp. This will take four to five minutes total.
Remove the chicken from the grill and let it rest until it's cool enough to handle, about two minutes. Remove bones and carve according to the instructions in the stovetop section above.
Finishing for Chicken Salads
Step 6: Chill Chicken

Drop the bagged chicken breasts into an ice bath and let them rest until completely chilled, about 10 minutes.
Step 7: Un-Bag and Remove Skin

Remove the chicken breasts from the bags, discard any aromatics, and peel off the skin and discard it.

Make sure to get any membranes that remain over the meat!
Step 8: Remove Bones

Remove the breastbones and the wishbones from the chicken and discard or save for stock. You should be able to pull them out easily with just your fingers.
Step 9: Dice Chicken

Split the chicken horizontally lengthwise, then cut it into half-inch-long strips. Cut crosswise to create half-inch dice. Use the diced chicken for your favorite chicken salad recipe (such as this Classic Chicken Salad; this Chicken Salad With Avocado, Corn, and Miso Dressing; or this Hot and Numbing Sichuan Chicken Salad) for extra-juicy and tender results.

Frequently Asked Questions About Sous Vide Chicken Breast
Q: What are the downsides to cooking chicken sous vide versus using a more traditional method?
Sous vide–style precision cooking is a technique, another tool in your arsenal, and just like all techniques, it involves a trade-off. The two most obvious downsides are that it takes longer (nothing that can't be overcome with planning) and that it requires more equipment. Cooking a chicken breast sous vide requires a precision cooker and a plastic bag or vacuum sealer in addition to all the tools required for more traditional methods. Chances are, if you're reading this article, you already have those extra tools.
Finally, sous vide cooking precludes the ability to make a pan sauce, as you won't develop much fond (the browned bits left in the bottom of a pan when searing meat) while crisping up a sous vide chicken skin.
Remember this: Sous vide is not a silver bullet or a panacea meant to solve all of your cooking problems, or to replace more traditional methods. It's a tool meant to expand your options, not to replace them.
Q: Can I get brown, crisp skin on sous vide chicken?

True sous vide precision cooking on its own doesn't achieve the high temperatures needed to trigger the Maillard browning reactions, nor the dehydration needed for crisping. Foods cooked sous vide need to be finished via a higher-heat method if browning and crispness are what you're after. For chicken, that means putting it in a skillet with hot oil or on top of a grill. Check out the step-by-step directions above for more details.
Q: Is there any advantage to using bone-in, skin-on chicken?

Yes! The main advantage is insulation during searing. Chicken breast meat is very delicate and prone to overcooking. Skin is a wonderful insulator—that's what skin is designed to do in nature, in fact.
That means that unlike, say, a steak or a pork chop, which requires blazing-high heat to get a good sear without overcooking, chicken can be cooked at a more moderate temperature. The heat works toward crisping and browning the skin, but doesn't penetrate too far into the bird, helping maintain its juiciness.
Another advantage provided by skin and bones: flavor.

Chicken cooked with the skin and bones intact simply comes out of the bag more flavorful.
Q: What about brining?
Brining—the process of soaking meat in a saltwater solution in order to help it retain moisture better in the future—is entirely unnecessary for sous vide cooking. Your chicken will come out plenty moist and juicy, while also having a more concentrated chicken flavor, as using a brine dilutes the flavor of the chicken with water.
Q: When should I season my chicken?
I season my chicken with salt and pepper before sealing it in vacuum bags. Because of its skin and bones, there's no real risk of the meat curing or becoming unpleasantly spongy with prolonged salting, as there can be with beef or pork.
Q: What happens if I leave a chicken breast cooking sous vide for longer than the maximum time recommendations? Is it dangerous?
So long as you're cooking it above 130°F (54°C), there are no real health risks associated with prolonged sous vide cooking. You will, however, eventually notice a difference in texture. For best results, I wouldn't cook it any longer than the maximum recommended time for each cut and temperature range. See the section on timing above for more details.
Q: Can I chill and reheat my chicken breast after cooking it sous vide if I haven't opened the bag?
It's true that given a high enough temperature (130°F or higher) and a long enough time period (several hours), the contents of a sealed sous vide bag should be close to sterile, which means that rapid chilling via an ice bath, followed by rapid reheating, should pose no health risks. However, I still strongly recommend against it: It's not doing any favors for the quality of your chicken.
Moreover, it takes just as long to reheat an already-cooked sous vide chicken breast to its final serving temperature as it does to cook that same breast from scratch, so you really aren't saving any time by doing it.
Q: Can I cook a chicken breast sous vide straight from the freezer?
Yes! Chicken breasts can be seasoned and sealed in bags, then frozen just as they are. To cook, pull them out of the freezer and drop them straight into the water bath, making sure to add an extra hour to the cooking time in order to allow the chicken to fully thaw and heat through to the center.
Q: Should I add anything to the bag when cooking chicken breast sous vide?

You definitely can. I like to add aromatics based on the flavors of the finished dish, whether that's a few tarragon sprigs and some wheels of lemon for something like a classic Western chicken salad, or slices of ginger, garlic, and scallions for an Asian cold salad.
The key is to avoid excess liquid—otherwise, you end up flavoring the liquid with chicken instead of the other way around—and to bear in mind that most spices and garlic will intensify in flavor when added to a sous vide bag.
Q: Does sous vide chicken need to rest?
Traditionally cooked chicken breasts need to rest; that is, they need to be set aside for a few minutes before cutting and serving. This resting period allows time for the temperature gradient within the chicken to even out. The cooler center is gently heated by the hotter outer edges, while the edges, in turn, lose some of their heat to the outside world. Evening out that uneven temperature gradient is important: It's what prevents a chicken breast from leaking its juices everywhere the moment it's sliced open.
Because a sous vide chicken breast cooks from edge to edge more or less perfectly evenly, there is no temperature gradient to deal with. Sous vide chicken can be served immediately, though it won't hurt to let it rest on a cutting board while your guests make their way to the table or while you get your side dishes and sauces ready.
Q: Can I still make a pan sauce for sous vide chicken?
Pan sauces require a nice layer of browned proteins on the bottom of your skillet with which to form their flavor base. This is produced when raw proteins bond to the metal in the pan and subsequently brown via the Maillard reaction.
With sous vide cooking, the proteins have already coagulated well before your chicken makes its way to the pan, which means that this fond never forms. The bad news is, you can't make a good pan sauce for sous vide chicken. But the good news is that all of that great flavor and extra moisture is already packed in there right where it belongs: in the chicken itself. A sauce is almost superfluous for this reason, though a simple vinaigrette, a drizzle of olive oil, or a squeeze of lemon never hurts.
Editor's note: This guide was produced for Serious Eats as part of our partnership with Anova, the makers of the Anova Precision Cooker. You can download the Anova Precision Cooker App (it's free) to grab all this information right off your phone or tablet while you're cooking. And, if you've got an Anova Precision Cooker, you can even control it directly from the app via Bluetooth or WiFi. Of course, this information should prove useful to anyone who owns a functional sous vide device.
Get The Recipes:
July 2015

