Everything You Need To Know About Straw Bale Gardening
It's counterintuitive, but ditching the dirt could be the secret to a thriving garden.
Debibishop/Getty Images
At first glance, straw bale gardening might seem like a novelty or even a too-good-to-be-true scheme, but the method has been around for decades, and gardeners say it works. Joel Karsten, who wrote the book on straw bale gardening, Straw Bale Gardening Complete (or rather, books—he actually wrote four of them), came up with the idea for gardening in straw bales when he was living on a property that didn’t have enough topsoil to grow produce.
Having grown up on a farm, Karsten had seen how plants would naturally sprout out of a bale as it began to decompose, and wondered if he could plant right inside a straw bale. After more than fifteen years refining his method, Karsten wrote a self-published pamphlet on the topic, and eventually a publisher came calling in 2013. Since then Karsten has been the face of this unusual method, although he does not claim to be its sole inventor.
We called on Kartsten and Gail Pothour, a UCCE Sacramento County Master Gardener, with more than a decade of experience gardening in straw bales to find out more about this unusual way of growing vegetables. Here are their tips for starting a straw bale garden.
Related: 5 Gardening Mistakes Almost Everyone Makes
Meet Our Expert
Joel Karsten, horticulturist and author of Straw Bale Gardening Complete
Gail Pothour, a UCCE Sacramento County Master Gardener at Fair Oaks Horticulture Center
What is Straw Bale Gardening?
Straw bale gardening is a method of gardening that uses a straw bale as the medium to grow plants. It is an easy, low-cost, and impermanent way to create vegetable beds. Straw bale gardening is especially useful in situations where you cannot grow in the ground either because the soil is contaminated or because there are inhospitable growing conditions.
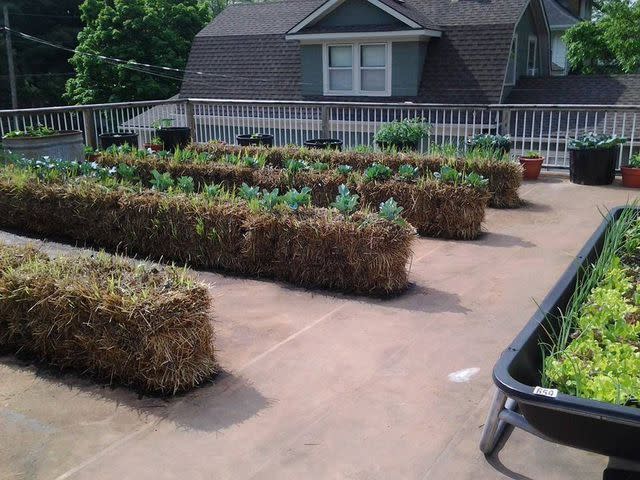
Karsten says that he’s had readers send him pictures of their straw bale gardens from all over the globe. “People are straw bale gardening in places where you don't even dream of gardening: Abu Dhabi and Egypt, Israel and New Zealand, north of the Arctic Circle,” he says. Out in Northern California, Pothour says the head gardener at the Fair Oaks Horticulture Center, where she gardens, heard Kartsen on the radio after his book came out and decided to try using straw bales to raise crops. They’ve raised a portion of their vegetables in straw bales ever since.
Joel Karsten of strawbalegardens.com
How Do You Start a Straw Bale Garden?
You’ll need more than just a straw bale to start a straw bale garden. First, you need a site with full sun exposure. Pothour advises that you plan your placement with aesthetics in mind too. “[Eventually] they can look kind of unsightly. I'm not sure I'd put this in my front yard because they look pretty bad by the end of the season.”
In addition to the bale itself, you’ll need fertilizers to “condition” the bale, sterile potting soil, and seeds and/or seedlings for your vegetables.
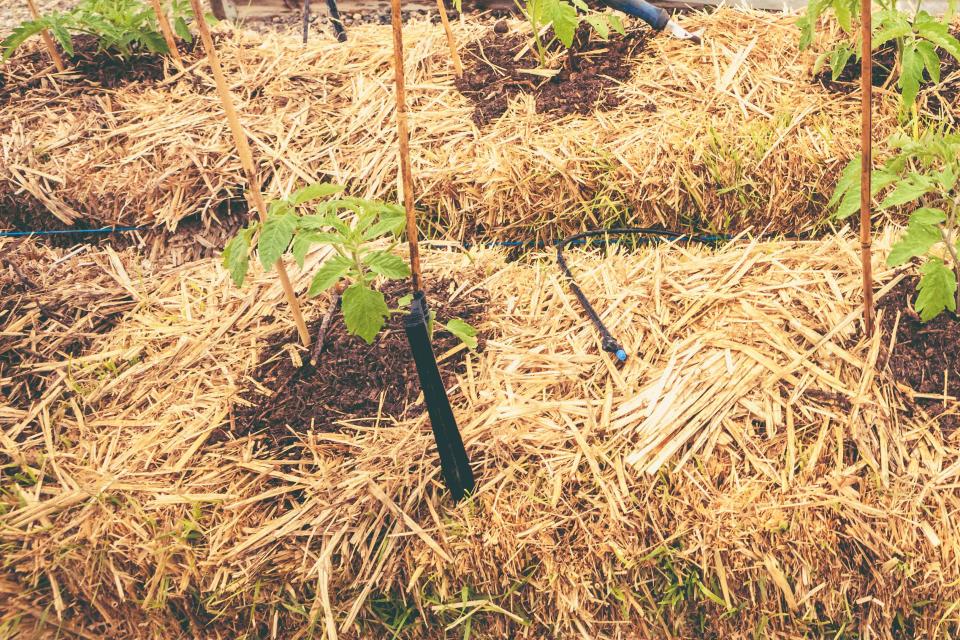
Both Karsten and Pothour suggest that it’s worthwhile to set up an automatic irrigation system for the garden–even if it’s a one-summer experiment. You can use a soaker hose or a more complex drip system paired with an automatic timer. Otherwise, you’ll need to water by hand daily and twice per day in the peak of summer.
Be sure to buy a straw bale—not a hay bale, which will have many unwanted seeds within (and will “sprout like a Chia Pet” according to Karsten). The bales should be positioned cut side up with the strings around the sides of the bales. If you end up with a bale with the strings running on the cut side, you should still position the bale so the strings are around the sides: You’ll just have to work harder to get your seeds or seedlings into the bale, cutting through the straw crosswise.
Related: Yes, You Should Fertilize Your Houseplants—Here's How
How Do You Condition the Straw Bales?
In his books, Karsten lays out two methods–organic and conventional–for conditioning the bales, which is basically a process of partially composting the bales before you plant. (The moisture and nitrogen from the fertilizer speed up the natural decomposition process.) Pothour notes that the Fair Oaks Horticulture Center uses the organic method because they have a commitment to organic produce, but homeowners might find the smells associated with the organic fertilizers unappealing.
“If you go the organic route, just bear in mind it's going to take longer to condition, it is more expensive, and it does smell,” she says. “So don't put it anywhere next to your patio or your kitchen door where that odor could be very offensive.”
For the conventional method, Karsten recommends 1 lb. of lawn fertilizer that contains no pesticides or herbicides and a bag of 10-10-10 organic fertilizer for every bale you plan to plant. For the organic method, you’ll need a lot more: 5 lbs. of blood or feather meal and an organic source of Phosphorus and Potassium, as well.
Conditioning via the conventional method takes 10-12 days depending on the air temperature. Using Karsten’s method you’ll alternate sprinkling on ½ cup of fertilizer on Day One and watering with warm water on the next day for a total of six days, then on Days 7, 8, and 9 you’ll cut back on the amount of fertilizer to ¼ cup and water it in, and finally you’ll add the 10-10-10 on Day 10. You can find the complete instructions in his book Straw Bale Gardening Complete.
Tips
Mushrooms might pop up on your bales–they are a sign that decomposition is taking place. While they are not good for eating, they are also not harmful–either knock them off or let them be and they’ll disappear on their own.
What Can You Plant in a Straw Bale Garden?
You can grow a huge variety of plants in your straw bales, but there are a couple crops to avoid. Karsten says that sweet corn is one to skip because your yield will be tiny and there’s a danger of the bales tipping over.
Pothour also cautions against plants that will grow very tall like some varieties of tomatoes. However, most tomatoes work great in straw bales—just choose dwarf varieties. Karten hasn’t had much success with onions in Minnesota, but says gardeners in more southern climates could have success.
Avoid planting perennial crops, like asparagus, artichoke and rhubarb, because they regrow year after year and your bales will not last more than two seasons, and skip rosemary which prefers an alkaline environment.
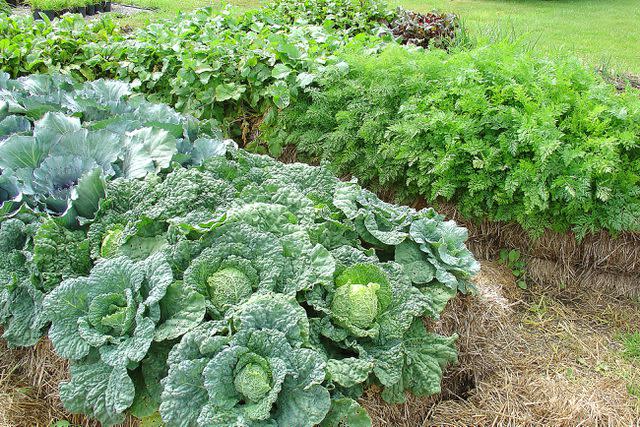
Kartsen says, “Tomatoes, peppers, and cucumbers do really well, and the whole squash family and the whole cabbage family just loves it,” noting that the bale method prevents some of the challenges of growing squash and cabbage, like cabbage worms, which lay their eggs in the soil. Pothour has had great success with sweet potatoes, which she says end up much less scratched up than those grown in a traditional garden bed.
Joel Karsten of strawbalegardens.com
Tips
Suppress nearby weeds. Karsten encourages gardeners to put down cardboard or wood chips between the rows of bales to suppress weeds, and because covering the soil prevents cabbage worms from laying eggs near your veggies.
How Do You Plant in a Straw Bale Garden?
Once your bail has been conditioned, it’s time to plant. To transplant seedlings (aka starts), you’ll need a hand trowel and sterile potting soil to create a cozy home for your baby plants (Karsten estimates about a ½ cubic foot of potting mix per bale).
Use your trowel to dig a hole in the bale, spacing the plants according to their recommended spacing. Place the seedling into the hole, water it in, and then backfill with your potting mix. To plant seeds, you’ll create a thin 1-2-inch layer of planting mix on top of the bale to set the seeds into. Follow the directions on the seed packet for spacing.
How Do You Care for a Straw Bale Garden?
Your straw bale garden will need to stay moist, so watering is essential. However, Karsten cautions, “The number one mistake people make is to overwater their straw bale gardens. It's really easy to do.” Once your bale is moistened it will only take a gallon or two a day to keep it from drying out (possibly more in very hot weather). “Hose-end timers that you program like an alarm clock are a lifesaver,” says Karsten, who typically sets his to run for three minutes every 12 hours. “During the heat, the real hot part of summer, you can increase the frequency,” he adds.
You’ll also want to start fertilizing your straw bale garden once the seedlings have their third leaf pairs. Spray on a liquid or soluble fertilizer every few weeks to keep the plants nourished. Organic gardeners will use a foliar fertilizer such as fish emulsion, which Karten notes, “smells bad but works great.”
Tips
Cut, don’t pull. As your garden winds down at the end of the season, Karsten recommends cutting any dead foliage or vines instead of pulling the plants out because extracting the roots can further compromise the bale, preventing you from using it again.
Troubleshooting Common Issues
The biggest problem most gardeners run into is that their bales start to slump and look sloppy as the season progresses. “As the straw bale starts to decompose, it shrinks. So you’ve got to keep those strings tight,” says Pothour. She and the other gardeners at the Fair Oaks Horticulture Center developed a method they call the “tourniquet method” which uses a stick to twist the baling twine tighter.
Both Karsten and Pothour also recommend using a physical barrier like a small fence or board to help prevent them from slumping too much. Another issue that Karsten says occasionally comes up is ants, which won’t bother your crops: They’re after the straw. His advice? “Ignore them.”
Related: The 11 Top Gardening Trends of 2024, So Far
For more Real Simple news, make sure to sign up for our newsletter!
Read the original article on Real Simple.

