Easy Halloween Pumpkin Painting and Decorating Ideas for Kids
This Halloween season, dress up every room of the house with a cute and clever pumpkin craft that will make your kids ooh, ahh, and giggle at every turn.
Dane Tashima (photographs) and Pam Morris (styling)
Nothing says Halloween quite like a pumpkin. The orange gourd is the center of many seasonal activities. But how can you pick the very best one—and what should you do with your pumpkin when you get it?
From low- and no-carve pumpkin crafts to creative pumpkin painting ideas, here's what you can do with your pumpkin this season.
Pumpkin Decorating 101
When it comes to Halloween decorating, you must first select the perfect pumpkin—or help guide your kiddos toward the best option—and then decide which route you want to go: painting or carving. Either way, be sure to follow these pumpkin decorating tips:
Pick the best pumpkin. Buy a smooth pumpkin with a flat clean surface. A pumpkin that is lighter in weight usually means it has thinner skin, which can be cut through more easily. If you are interested in carving your pumpkin, you should also choose one which is slightly lighter in color; it generally means it will be softer and easier to carve.
Prep your pumpkin. Before you begin to decorate, you'll want to wash the surface with a wet cloth to remove any dirt or residue. And here’s an unusual tip: Leave the stem on as you design and carve out the features! The stem can act as a handle and cuts down on the opportunity for hands and blades to meet up inside the pumpkin.
Let the kids get in on carving. If you don't want to freehand your jack-o-lantern's features, print out a template and tape it on the pumpkin. Let the kids poke holes along the lines of the template into the pumpkin’s skin with a skewer. If the features are straight lines, they can also use a fork to make the holes. This is a helpful preparatory step for the grown-up to go in with a knife.
Time for the hole! Once the features are carved, draw a circle on the bottom of the pumpkin and cut it out with a serrated knife. Keeping the opening on the bottom helps prevent the pumpkin from caving in as it starts to rot. With a big spoon, push up your kids' sleeves and let them get messy, scooping out the seeds and guts of the pumpkin!
Safety first. Keep your hands, tool handles, and pumpkin surface dry to prevent slippage. Use flameless candles.
You can increase the life expectancy of a carved pumpkin by spraying the cut edges with Pam or rubbing them with Vaseline. Spraying the pumpkin occasionally with a spray of bleach and water can decrease the bacteria which causes the rotting process. You can also wrap a carved pumpkin in plastic wrap and store it in the fridge.
Related:6 Scary Easy DIY Halloween Decorations
5 Low- or No-Carve Pumpkin Ideas
Photos Courtesy of Dane Tashima / Styling Courtesy of Pam Morris
Friendly aliens
Paint gourds and squash with silver spray or brush-on acrylic paint; let dry. Get as creative as you'd like with the features—and use things you already have around the house! Some ideas to try:
Glue on bottle caps for eyes or ears
Use plastic forks or spoons for arms
Dig through the bottom of the toy bins and find the little stray party favors and turn them into eyes or noses
Cut a Play-Doh lid in half and tape a toothpick to the back of each half. Insert into squash as ears.
Cut sponges into hands and feet and attach with glue or straight pins
Pencil topper erasers make great ears or noses
Glue beads to golf tees and press into the alien as eyes
Use Lego pieces for eyebrows, mouths, or other facial features (the sillier the better!)
Photos Courtesy of Dane Tashima / Styling Courtesy of Pam Morris
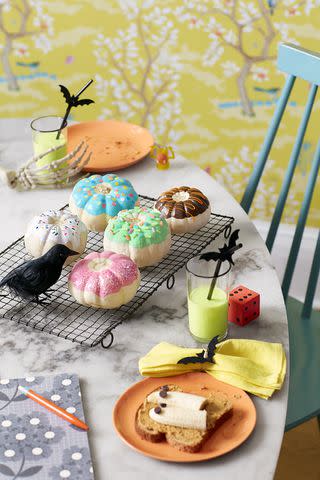
Delicious doughnuts
Remove the stem of a white mini pumpkin. Paint icing on with acrylic paint and let dry. For the sprinkles, use hole-punched paper circles, glitter, and one-quarter inch pieces of cocktail straws. For extra icing–who can resist?!—use dashes of puffy paint or create a squiggly paint drizzle.
Related:14 Easy Halloween Crafts for Toddlers and Preschoolers
Photos Courtesy of Dane Tashima / Styling Courtesy of Pam Morris
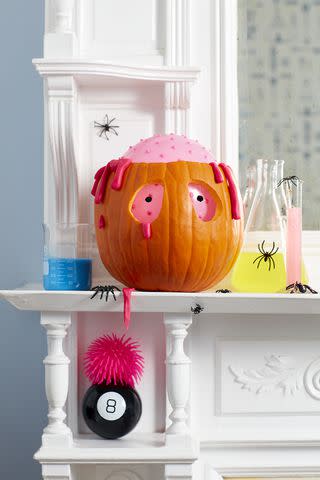
Overflowing brain
Draw a 6” circle on the top of your 9” pumpkin, cut it out using a paring knife, and scoop out the seeds with a large spoon. Cut eyes from the front of the pumpkin. Press a 7” spiky ball into the empty pumpkin (enlarge the hole little by little if needed), and mold Play-Doh drips onto the edges. Insert straight pins into half-inch black pom-poms and press the point of the pin upwards into the eye socket.
PHOTOS COURTESY OF DANE TASHIMA / STYLING COURTESY OF PAM MORRIS
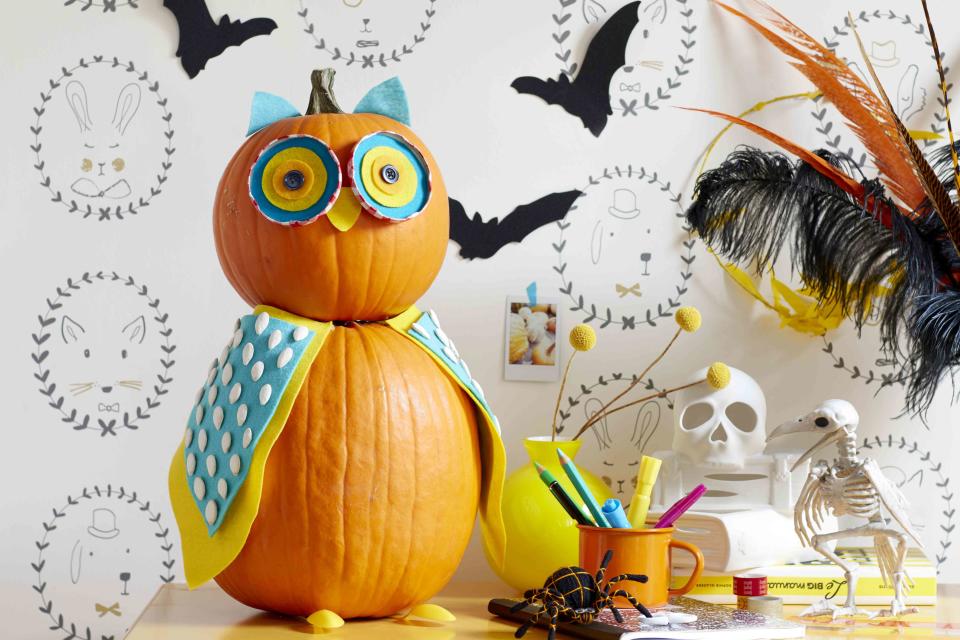
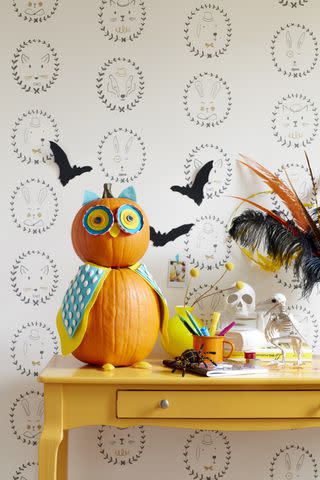
Adorable owl
For your pumpkin owl's eyes, cut three concentric circles of felt and glue them inside two jam jar lids. Glue a black button in the center and then glue the entire thing onto the front of an 8” round pumpkin. Cut a triangle of yellow felt and glue between the two jar lids to make the beak. For the ears, cut two more triangles of felt and attach to the top of the pumpkin using straight pins. In contrasting felt colors, cut two small wings and two larger wings (these should be about the height of the bottom pumpkin), glue them together, then glue roasted pumpkin seeds—glitter or smaller pieces of felt work too—on top of the smaller wing. Pin or glue the wings to the 10-12” body pumpkin, where the head meets the body. Place head on top of body and stand body on top of plastic spoons handles as feet.
Related:Halloween Tips for Kids With Sensory Issues
Photos Courtesy of Dane Tashima / Styling Courtesy of Pam Morris
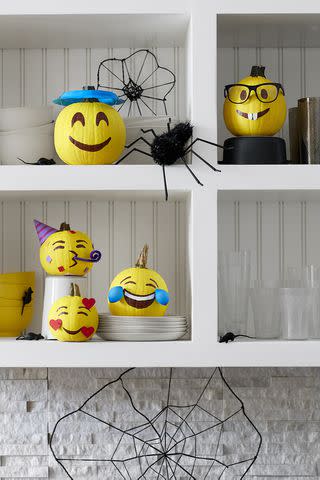
Emoji party
Paint as many 4”-to-6” pumpkins as you'd like with yellow acrylic paint and let dry. You'll want to paint on facial features with white and dark brown or black paint. Pick your favorite emoji from below to personalize your pumpkin:
Smiling face with hearts: Cut three hearts out of red cardstock. Attach to your emoji with red ball pins so they are floating off from the surface of the pumpkin.
Nerd face: Cut two teeth from white craft foam and glue to mouth. Place black glasses over the emoji’s eyes.
Smiling face with halo: Cut out the center of a small paper plate and discard. Paint the ring of the plate blue and let dry. Push blue ball pins into the sides of the plate to make it stand up from the emoji’s head. (A pumpkin closer to 6 inches or larger works best.)
Party face: Cut a semicircle of purple cardstock with a radius of 3”; draw on arched lines with a marker to create the stripes. Twist into a cone and secure ends together with clear tape; glue onto the top side of the emoji. Cut small squares of cardstock and glue onto the face as confetti. Cut a 1” piece of a plastic straw; curl a pipe cleaner into a spiral and insert into the straw. Glue the party blower to the side of the face.
Laughing face: Blow up blue water balloons (these are significantly smaller than normal party balloons) just a bit until you get a teardrop shape that fits your emoji’s face. Use glue dots to attach to the emoji.
false

