The Easiest Way to Cornrow Your Own Hair
"Learn a new skill," they say. "It will be easy," they promise. The resounding refrain from the internet has been that you can make it through the COVID-19 stay-at-home orders if you just pick up a new — and possibly frivolous — hobby. Yet, for many Americans, developing a random skill has fallen by the wayside in favor of more pressing matters such as homeschooling their kids, wiping everything down, and learning the endless new dance crazes TikTok throws at us. But here's something you could try to master while on lockdown: cornrowing your own hair.
Daily activities for survival already take a lot out of us. Some are even taxing on our hair. Whether you're busy doing at-home workouts or practicing the "Savage" choreography, "all of that activity may call for a protective hairstyle," says Ashlee Stevens, Washington D.C.-based hairstylist, and owner of Fifa Organics. "Sweating out your hair from dancing or laying in bed for hours can cause lots of dryness and friction that leaves your hair vulnerable to damage."
Many Black women (and men!) have long mastered the protective hairstyling in one way or another, be it twists, braids, or locs. When done correctly, these styles quite literally protect Afro-textured hair in conditions that could cause stress to their strands (i.e., winter brittleness or beach vacation activities that lead to excessive dryness).

Woman Wearing Earring That Spells "Love", Black and White
Brasil2One of the culture’s most popular and trusted protective styles is cornrows. And it's easy to see why: They can be arranged in gorgeous patterns and be done in different lengths. You can add beads and other adornments to them, plus, they're easy to maintain. To keep them from getting too fuzzy, all you need to do just slap on a durag or silk scarf when you sleep at night. Conrows have a place in African-descended cultures across the diaspora, and while it's a common braiding style, it is still one that plenty of people struggle with executing.
As the shelter-in-place lifestyle requires us to turn to more dependable styles like these, one question remains: "How the hell do I learn to get good at cornrowing my own hair?" It is not a seemingly easy skill to pick up; in fact, it threatens to be more confusing than solving a Rubik's cube.
But don't worry — you've got time and we've got you. We chatted with some of our favorite hairstylists to tell us how they've mastered cornrows. Heed these tips and you'll be doing cornrows that rival Sean Paul's in the 2000s in no time.
Practice and Have Patience
The good news is, you can totally create the perfect cornrowed look at home. The less good news? It’s going to cost you in time and temperament. Helena Koudou, a Brooklyn-based Ivorian-American model and hair artist whose work has appeared in Vogue, optimistically promises that anyone can execute perfect cornrows at home.
"It is very possible to achieve cornrows by yourself if you have the patience for it," Koudou explains. "You’ll have to make sure your hair is at a manageable length for you to braid. Personally, a client’s hair would have to be more than three inches for me to braid." Koudou’s New York City-based braiding company, "Slayed in Braids," is known for churning out intricate and elaborate cornrow styles that range from straight backs to elaborate, undulating patterns.

Smiling young woman wearing sunglasses and denim jacket standing by white wall
Alexandra C. RibeiroHowever, if you’re brand new to cornrows, Koudou suggests keeping it simple and bare-bones for your first few attempts. "For beginners, the easiest cornrow style [to] do is two French braids. All you have to do is part your hair in the middle and braid two braids going downwards. This style is easier to do and take out since it’s only two braids."
Before Touching a Comb, Make Sure Your Hair is in "Braiding Condition"
Over the years, hairstylist Davonte Blanton, who's worked with the likes of Laverne Cox and Halle Berry has learned how critical it is to ensure his clients' natural hair is meticulously cared for and protected no matter what look he's aiming to achieve. "For any hairstyle, you always want to start with freshly-washed, conditioned, and detangled hair." he says. After all, you'll be adding product later, so it's best to start with a blank canvas.
Blanton suggests spraying a detangling leave-in conditioner in your hair immediately after washing and conditioning (his fave: Unite 7 Seconds Detangler) and following up with a cream leave-in conditioner immediately after. We like the Mielle Moisture RX Hawaiian Ginger Moisturizing Leave-in Conditioner. "It is true that your hair has to be well-conditioned before any protective style to ensure it retains moisture. Conditioning is critical for healthy hair maintenance and growth anyway, but especially for braiding," Stevens advises.
Then, you may want to blow-dry your hair, especially if you've got a kinky or coiled texture. It's not a requirement, of course, but it will make your texture smoother and keep your hair from curling in on itself. For kinky textures, after you blow-dry your hair, you’re not quite done yet with the conditioning process. "Add a small amount of your favorite hair butter or oil," Blanton suggests.
Assemble Your Toolkit… Yes, You’ll Need a Whole Kit
While the most skilled braider may be able to pull off the neatest cornrows with a comb and gel, you may want to assemble a bit more support for your first foray into at-home braids. Blanton recommends curating a cornrow kit to have at your fingertips: "Edge silk, setting or styling foam, a detangling brush or wide tooth comb, a parting comb, clips, and elastics," he suggests.

Hair extension.
As you stock up on supplies, remember that while some beauty supply stores in states like Ohio and Indiana are open, many across the country have been deemed non-essential and forced to close. You can still order your necessities on sites like Ulta, Sally Beauty, or Amazon, though.
Not to mention, even the best kit will not help much without one essential item, according to Koudou. "You’ll need to have a mirror," she implores, "so you can track your progress." We recommend setting up two — one in front of you and one behind you to help you check out all angles of your work.
Prep Your Cornrows, Part by Part
According to Kari Williams, the Beverly Hills stylist responsible for hairstyles worn by Brandy Norwood, Ava Duvernay, and Willow Smith, perfecting cornrows comes down to two things: parting and product. "Using enough product helps with gripping the hair, reduces frizz, and creates a neat cornrow that will last," she explains. "Straight, even parts are what bring artistry to the cornrows."
All of this considered, Branton breaks down how the best braids come to life. "Using your parting comb, part the hair down the center of your the head," he says. "Once your part is nice and straight, add a small amount of edge control down your part and part it one last time. This will ensure your parts are nice and neat. Using clips, section the left side from the right side." In other words, part, then APPLY? product, then clip. This is how you will create your sections to be braided. You can add the other parts as you go along, using the middle one as a guide.
Oh, and for now, stick to the simple parting styles — don’t aim for a zig-zag or swirling design on your first go-round. "The easiest parting for cornrows are your good 'ol straight backs," Blanton says. "You can do either two, four, six, or eight."
Tuck It In
While every braider has their own style, there are standard cornrowing techniques that must be mastered before you can get fancy with it. "Section the top [of your first braid] in three sections," Koudou begins. "The two outer sections will be your starting point and guide throughout this process."
You should be holding three pieces of hair — that will create the first braid. It is important to consider making sure the section is in the shape of a triangle that is divided equally into three parts, according to Blanton. Now, it’s go-time. Blanton breaks down the next few steps to create the perfect cornrowed braid: "Find a comfortable hand position, where you have a good grip on the strands but it’s not too tight. Then, begin braiding by passing the right strand of hair under the middle strand to your left hand," he explains. "Hold the middle strand with the right hand, then pass the left strand under the middle strand to your right hand. Now, hold the middle strand with the left hand."
At this point, you should have started a braid pattern. Here, Blanton notes that it’s important to keep your hand as close to the scalp as possible to ensure the braid stays tight. "Continue the same motion passing right strand under the middle, then left strand under the middle, adding small bits of hair to the middle strand as you continue braiding. Repeat this until you complete the braid."
If you have extra hair at the end (most people with hair longer than four inches will), Koudou says to braid it off as you would a regular braid to finish.
Secure Those Hard-Earned Braids
Are you sweating yet? If so, you’ve likely completed the first cornrow, and you don’t want to miss these critical final steps.
"Finish by adding elastic to secure ends," Blanton says. For those with looser textures, it will be important to secure the braid to avoid it from slipping out and ruining your hard work. More tightly-wound textures may be able to get away with just braiding to the ends and leaving them be.
Then, to ensure the look is extra neat and your stray baby hairs don’t distract from the look, lay your edges. Koudou relies on an age-old staple: Softsheen-Carson's Let's Jam. (Affectionately, it’s often simply referred to as "jam.")
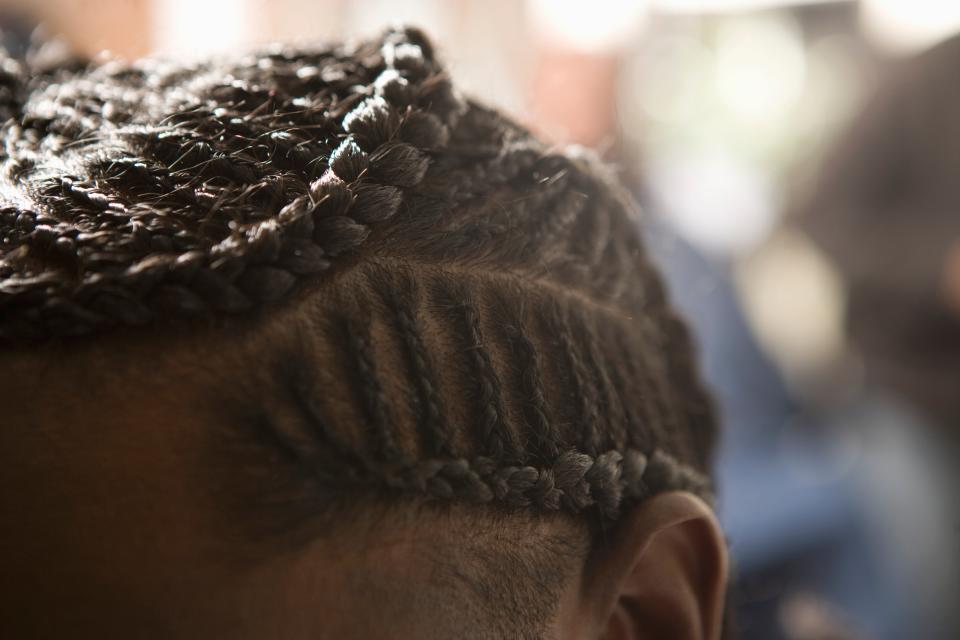
The top of a mans head with cornrows
Getty ImagesFinally, and most importantly, if you want the look to last (as protective styles should), you’ll need to quite literally wrap it up. "The key to having lasting braids is good maintenance, which [in this case means tying] your hair up at night with a silk scarf. If you're braiding your hair with extensions, it can last up to two to three weeks. If you are braiding your hair with your natural hair, it can last up to two weeks," Koudou says.
In the beginning, larger cornrows may be the way to go, but as you get better, creating smaller ones will have a much longer payoff, Williams assures us.
Don’t Get Worked Up
The most important trick in the book, according to all the experts, is having patience with yourself. "You may or may not get it perfectly the first time doing cornrows and that’s okay," Koudou emphatically reassures. Blanton agrees, re-emphasizing that the most important trick is "taking your time." How much time exactly? Williams tells us that a simple cornrow style can actually take hours.
"The amount of time it will take to complete the cornrows on yourself depends on the size of the braids, the type of cornrow style you are creating, and your skill level. It could take an hour up to 3 hours!"
Once you’ve committed to mastering this look, settle in. You’ve got nothing but time, and time is all you truly need.
Now, check out more tips for styling your hair at home:
The Ultimate Guide to Making Your Hair Color Last for as Long as Possible
How to Take Out Your Protective Styles Without Damaging Your Hair
Now, watch this fitness instructor's quarantine routine:
Originally Appeared on Allure

