Get It Done: 15 DIY Projects To Upgrade Your Home on a Budget
Genius ideas from some of our favorite designers and DIYers.

Johnny Miller
All those amazing projects you’ve been saving on Instagram and Pinterest? It’s time to start crossing them off your list! We rounded up some popular home and life improvements, with how-tos from the people who, y’know, got them done.
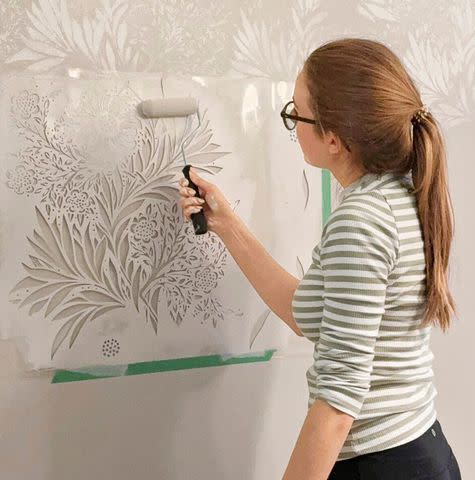
Stencil Your Walls
COURTESY OF EMMA COURTNEY
Wallpaper can be spendy and hard to hang. Understatement of the year? Enter: this idea from Emma Courtney, a DIYer based in Toronto. She faked the luxe look of real paper using paint and a stencil from Etsy ($77; stenciledup.etsy.com). According to Courtney—and the crew who prepped the set for our cover shoot—the key here is patience. “You also want a stencil with a registration mark,” Courtney says. These marks are small design elements cut into the edge of the stencil that help you repeat the pattern evenly. Carve out a few hours per wall, gather your supplies, and follow these steps.
Clean and prep your walls as you normally would before painting, sanding down imperfections and making sure they’re free of grease, dust, and schmutz.
Position your stencil either in a corner or at a focal point (say, the middle of the wall over a fireplace) and start from there.
Use a level to confirm that the stencil is straight and secure it with painter’s tape around the edges.
Dip a foam roller or foam brush in paint and remove any excess. Roll or dab it over the stencil—gently! It’s better to use a light touch and apply multiple layers than to go super heavy on the first stab and risk bleeding. Add more coats as needed.
Once you’re finished with that spot, carefully remove the stencil and place it next to the section you just completed, lining it up evenly. Secure it with painter’s tape and repeat! Keep repeating until the entire wall has been stenciled.
Finish with touch-ups. Go in with a small paint-brush to clean up edges or fill in any spots.
Find more inspiration for your next paint project
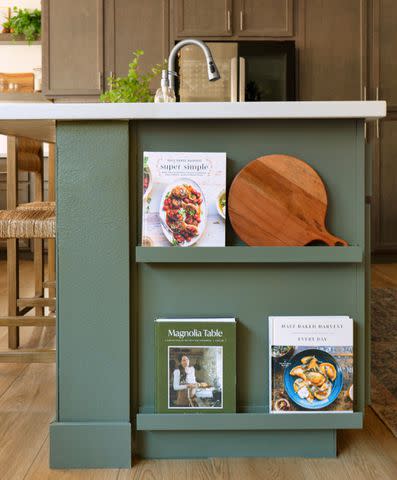
Add Cookbook Storage to Your Kitchen Island
COURTESY OF DANIELLE GUERRERO
“I’d been looking for a place to store my cookbooks that wasn’t on my limited counter space,” says DIYer Danielle Guerrero of Corona, California. Eventually, she came up with the idea to add picture ledges to the side of her kitchen island—real estate that had been going to waste.
Danielle made her own shelves, but you don’t have to! These ready-to-hang options should work great: Wave 32-Inch Shelf, from $69; westelm.com; Pop Color 24-InchPhoto Ledge,
$79; potterybarnkids.com; Syler ModernMetal Wall Shelf, $110; wayfair.com.
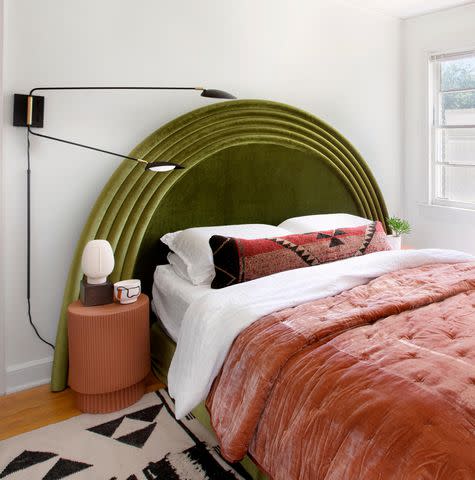
DIY a Headboard
COURTESY OF MARGARET WRIGHT
Any guesses as to what this headboard is made out of? Hint: The answer rhymes with schmool boodles. That’s right—pool noodles! Margaret Wright, an interior photographer in Charleston, South Carolina, used them for this splashy design. “I wanted a large arch, and when I saw a different DIY involving stacked noodles, I realized it was a great solution. I could bend them to create what I wanted,” she says.
First, she measured her space and mapped out the dimensions. Then she wrapped a bunch of pool noodles in fabric using hot glue, and glued some noodles together to make long-enough pieces. She attached the noodles to a foam-board backing, which she had cut out in an arch shape and covered with that same fabric. Row after row, she repeated until she had a nice border. She really used her noodle!
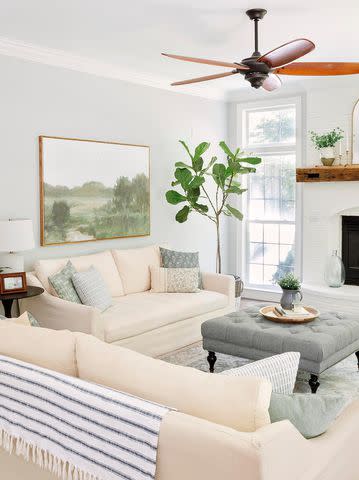
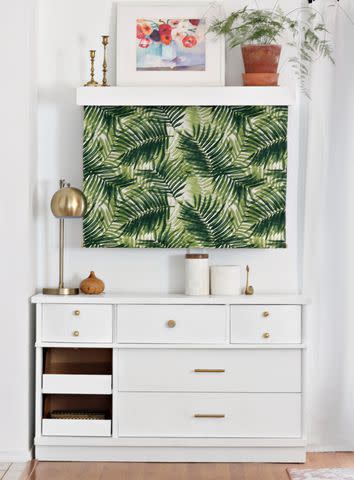
Fake a Giant Piece of Art
AMELIA LAWRENCE
What is art? If you ask Amelia Lawrence, a Jonesborough, Tennessee–based designer, it can be a shower curtain! And we don’t disagree. Most curtains measure around 72 by 72 inches, and Lawrence is a fan of the two-thirds rule: If you’re hanging art over a sofa or buffet, the frame should be two-thirds the width of the furniture. So for the above design, she pulled out the scissors to create a 62-inch-wide piece.
She built the frame out of narrow wood boards, cutting them with a miter saw and screwing them together. Next, she added a “base” layer—a flat white sheet stapled tightly onto the frame (you’ll need a buddy to help). Then, she placed her shower curtain on top, stapling it to the back of the frame at all four corners. She snipped off excess fabric and hung up her new custom piece. Looking for your own frame-worthy shower curtain? Check out society6.com, quiettownhome.com, or westelm.com for artistic designs.
Replace Pantry Doors With Something Unique
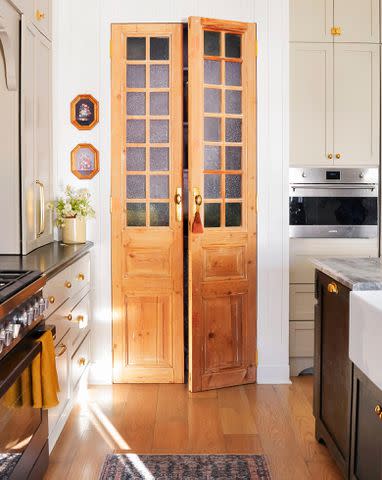
COURTESY OF RYIA JOSE
Houston-based DIYer and designer Ryia Jose could have bought brand-new doors for her pantry but decided on a more original approach. She found banged-up European double doors on Facebook Marketplace for $500 and got to work. First she sanded down the rough spots and applied wax polish to help protect the wood. Then she gave the glass a major scrub with MeanGreen Degreaser ($14.50; amazon.com) to remove decades of dirt. She replaced missing panes with green stained glass from a wholesaler, using a bit of silicone sealant (a.k.a. glue). The final steps were adding brass hinges, a magnetic door closure, and vintage brass doorknobs from Etsy. “All in all, these doors were a project, but I’m stoked with how they turned out,” Jose says. “They make such a statement in my kitchen.” Adoorable!
Hide the TV
COURTESY OF AMANDA WALKER
Amanda Walker came up with a cute and easy way to hide her big screen when it’s not in use. First, the Dallas blogger made a shelf a couple of inches wider than her TV, with a lip at the bottom deep enough to house a rolled-up shade. (If you buy a shelf, get one with an apron trim on the bottom.) Then she mounted the shelf above the TV. For the curtain, she sewed small elastic loops onto the top of a piece of fabric, which could hang from screws inside the shelf. She also sewed a dowel into a bottom pouch to add weight to the curtain—and make it easier to roll up for movie night.
Get Playful With Your Cords
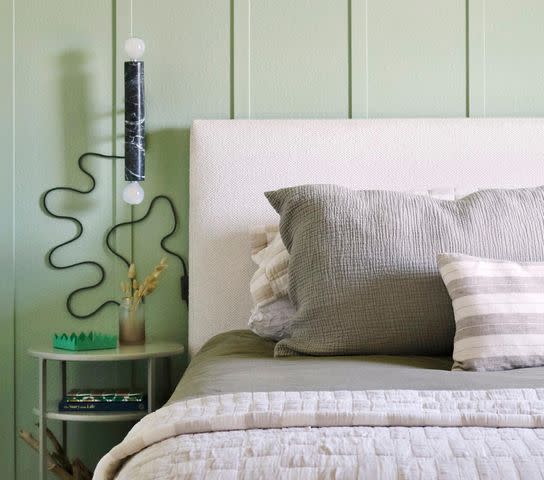
COURTESY OF KRYSTLE PERKINS
Blogger Krystle Perkins, who lives in Dallas, bought two bedside sconces with thick black cords. She didn’t want to pay an electrician to wire them, so she got creative. “I had an aha moment,” she says. “What if I viewed the cords as an extension of the fixture itself and had fun with it? ”She used heavy-duty double-sided tape to adhere the cords to the wall in squiggly lines, hot-gluing the switches right to the headboard so she could easily access them. Now the cords look intentional! Oh, and the whole project took less than 30 minutes.
Spice Up Your Grout
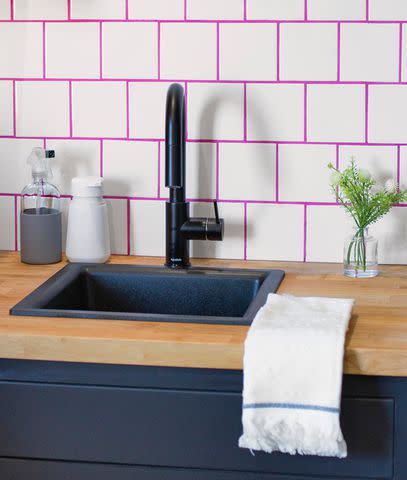
COURTESY OF ALLANN ARNOLD
Grout is not the sexiest thing in your home. (That’d be you!) But people have been playing around with it lately, swapping out the typical white or gray stuff for colorful or sparkly grout. Allann Arnold, owner and principal designer at Hollace Homes (@hollacehomes) in Wimberley, Texas, went with bold magenta around the simple white tiles in this laundry room. While she had hers custom made to match the paint color on an accent wall (Exuberant Pink 6840 by Sherwin-Williams), you can shop for ready-to-go options at hemway.com.
Paint an Outdoor Mural

COURTESY OF LIZ RISHEL
Fact: Even if you’re not all that artistic, you’re still capable of painting a mural! Liz Rishel projected a design onto an exterior wall of her home in Orlando, Florida. Then she traced each section with chalk in colors similar to the paint colors she’d ultimately use—to remember which was going where. She suggests applying two coats of outdoor paint and grabbing a one-inch brush for crisp edges. A three- or four-inch brush is good for filling in the larger areas. Now go forth and release your inner Keith Haring!
Limewash Your Walls
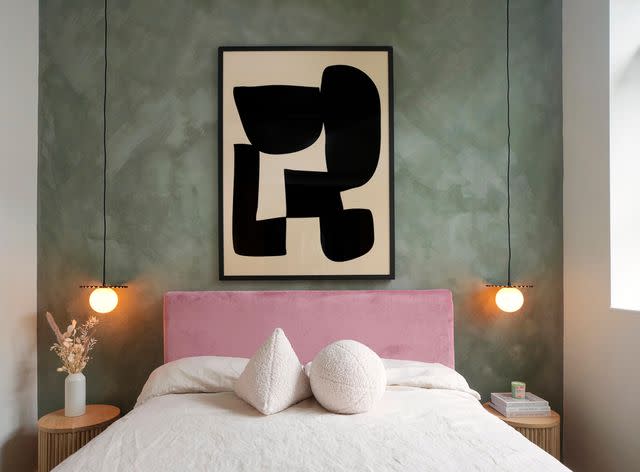
COURTESY OF ALEXANDRA GATER
For walls that give off old-money vibes, try a mineral paint limewash. Alexandra Gater used the technique to create a textured feature wall behind the bed in this Toronto home. “I love using limewash paint because you don’t need to be precise, which makes it super easy,” she says. Here’s what she thinks you need to know:
Limewash can come ready-to-use or as a formula that needs water mixed in. Go for the latter. “Adding water will alter the color of the limewash, but it gives it a beautiful watercolor look, and I like having control of the dilution,” Gater says. She chose a cool teal shade called Moonstone from the paint brand Pure & Original (FrescoLime Paint, from $26; umarisoul.com). Another suggestion: Portola Paints.
Use a limewash block brush, which has denser bristles than a regular paintbrush. Because limewash is on the watery side, you need a brush that will hold a significant amount of it. The Limewash Block Brush ($25; bauwerkcolour.com) is a good one.
Gater says that applying limewash is like painting a giant piece of freehand art. Use an X motion to create organic strokes. And don’t worry about making your strokes uniform, she adds. Limewash is meant to look imperfect.
Two coats should do the trick—if you add more than that, you’ll lose the variation in shades, and the wall will look less textured.
Don’t panic if your wet paint looks much darker than you were expecting. Limewash lightens as it dries!
Add Crown Molding
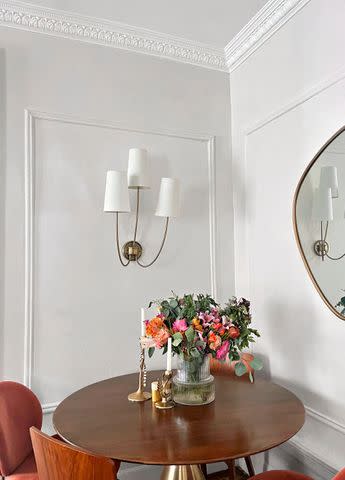
COURTESY OF HATTIE KOLP
Though her 1890s New York City apartment had tons of character, Hattie Kolp felt it was sorely lacking in the crown molding department.
So she ordered lightweight urethane trim with a leafy pattern (Palmetto 3 3/4" Crown Moulding, from $49.50; ekenamillwork.com), rented a 12-inch miter saw and an 18-gauge brad nailer from The Home Depot, and brought in a helper from TaskRabbit to handle the tricky cuts (old buildings tend not to have straight walls). There were some tense moments, but Kolp remembered the mantra, “A little caulk and paint make it what it ain’t.” Once the final touches were done, everything blended in seamlessly. “The molding is the icing on the cake of my Parisian-inspired apartment,” she says.
Build Some Wine Storage
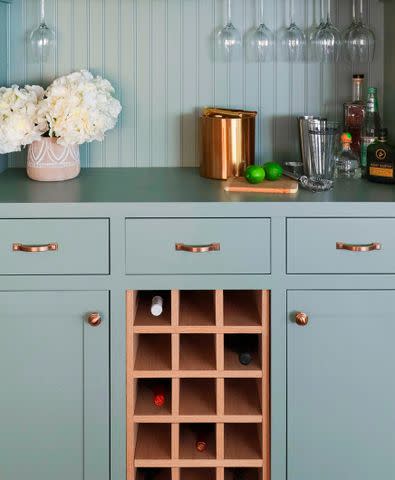
COURTESY OF ZOE HUNT
No wine cellar? No problem! Zoe Hunt turned an empty cabinet in her Durham, North Carolina, kitchen into a wine rack using oak plywood. She cut boards to fit her cabinet’s dimensions and ironed on edge banding (wood tape) to cover outer facing sides and make the pieces look like solid wood. Next, she used a jigsaw to cut grooves halfway through the boards, allowing her to slide them together like a 3D puzzle. After that, she nailed more boards to the back and sides of the gridded pieces to create a box. To finish her project, she coated the wood with Minwax Rustic Beige Stain ($13 for 1 qt.; lowes.com), placed the rack in the empty cabinet—and opened a bottle.
Update Builder-Grade Doors
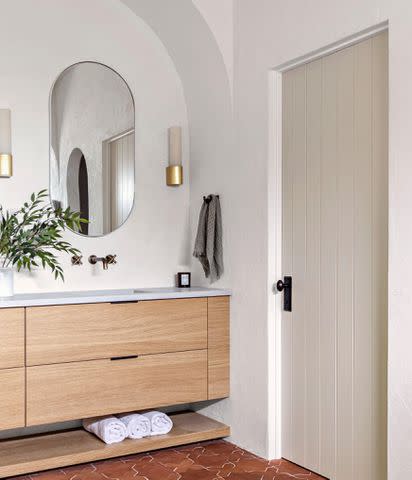
COURTESY OF JENNA LEBLANC
Jenna LeBlanc of Jenna Sue Design Co. found a way to upgrade the basic hollow doors in her Tampa, Florida, home without breaking the bank—or wasting the old ones. How? She covered both sides with shiplap panels from The Home Depot! She took the doors off their hinges, measured them, and cut matching pieces of shiplap with a table saw. (Shiplap is thin and fairly easy to cut.) She glued the panels to each side of the door with Liquid Nails ($3; lowes.com) and held each “door sandwich” together with clamps until it was dry. After rehanging the doors, she applied an oil-based primer and painted them. The adoorableness continues!
Build Raised Garden Beds
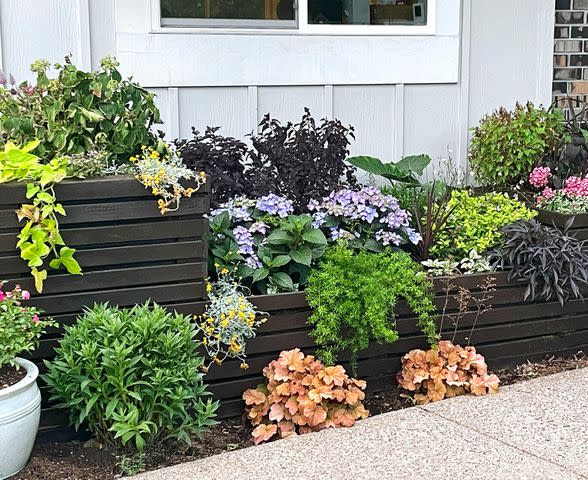
COURTESY OF RYAN MCENANEY
After Ryan McEnaney and his husband closed on their home in Woodbury, Minnesota, they wanted to boost its curb appeal quickly while they figured out the more major renovations. “I built four-foot flower boxes to line the main walkway, elevate plants, and add lots of color and texture to the front landscape,” he says. It took a bit of time and a whole lot of two-by-fours, but it was just the fix for their work-in-progress yard.
Install Faux Beams

COURTESY OF JENNI YOLO
It’s hard not to gasp at a room with beams across the ceiling. That’s partly why DIYer Jenni Yolo of I SPY DIY added them to her 1875 Milwaukee home. The kitchen ceiling had joists, which could support the planks, so she went to her local home supply store and bought two-by-six-inch cedar boards in 12-foot-long pieces. “A lot of people think they have to do the big, heavier beams. I love that, but these smaller beams were much simpler to install,” she says. She and her husband cut them to fit the ceiling length and screwed them into the joists. To finish the job, you can add caulk where the beam meets the ceiling to give the illusion that the wood is recessed into the ceiling.
Call In Professional Help
The REAL SIMPLE crowd is a handy crowd. Sometimes, though, an expert knows best. If you’re hanging new siding, adding a deck, or installing new windows, for example, you may need a pro. We asked Angie Hicks, chief customer officer at our affiliate brand Angi, a home project and repair referral site, for tips on how to find the right one.
Ask for references—and call them! Talk to people who’ve had a project completed and
people who have a project underway to get the full picture, Hicks says.
Confirm your contractor is licensed and insured. You can use Angi’s search tool (angi.com) to figure out your state’s requirements.
Have the contractor walk you through the expected timeline. “Find out if there’s anything that could derail the schedule,” Hicks says. “You don’t want to be surprised.”
For more Real Simple news, make sure to sign up for our newsletter!
Read the original article on Real Simple.

