DIY Halloween Costume Ideas for Busy Parents
With just a few store-bought supplies and no-sew tricks, you can win Halloween. Get simple instructions on how to craft our costumes for kids and parents.
Fact checked by Karen Cilli
What are you dressing up as for Halloween?
If that question prompts panic, take a breath and know it's not too late. With just a few store-bought supplies and some simple, no-sew tricks, you can win Halloween—even last minute.
Here are some tips and tricks for how to craft homemade Halloween costumes for kids and parents, plus a few brilliant tips from craft blogger Amber Kemp-Gerstel for making costumes with her "doable DIY" approach.
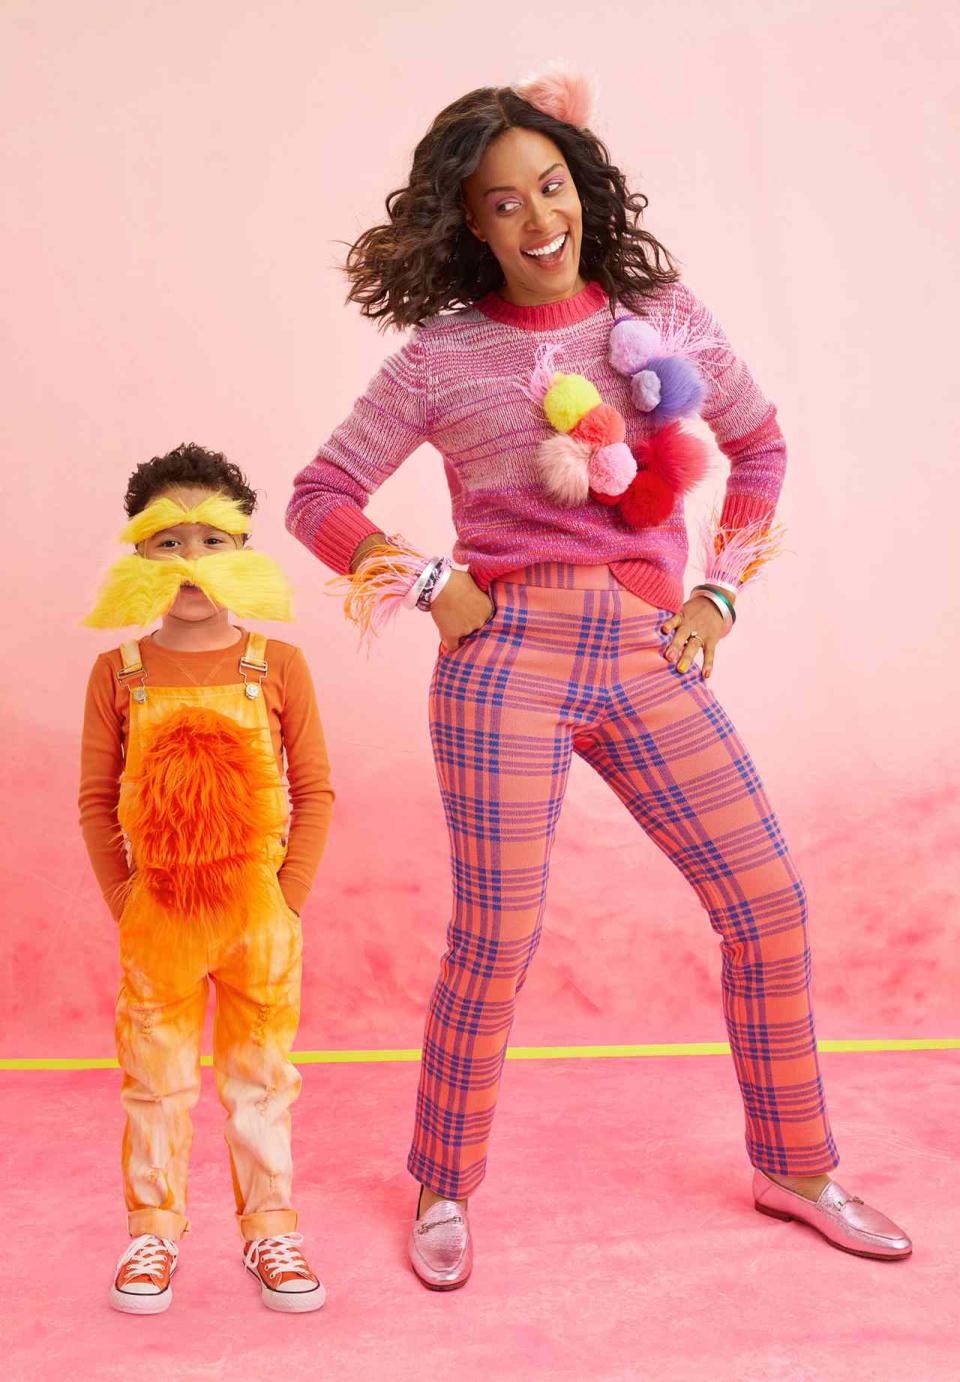
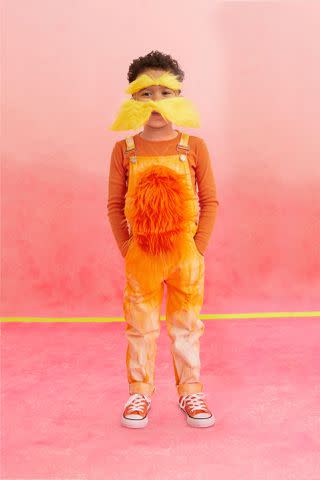
The Lorax Costume
Most kids want to dress up as a familiar personality. Kemp-Gerstel suggests a favorite storybook character. "It's a nice compromise," she says. "Your kid gets the joy of playing a part, and you get the satisfaction of making something unique."
What you need: Plain molded paper mask; Scissors; Yellow faux fur; Hot glue sticks and gun; Skin-tone paint; Paintbrush
How to make it:
Cut out the center of the paper mask; this will act as the base for the Lorax's eyebrows and mustache.
Cut out two 3"x6" diamond-shaped pieces of yellow faux fur for the mustache. Glue each to the bottom of the mask, so the fur points outwards in opposite directions. To shape the mustache, trim down the fabric by cutting the backing under the fur (to retain the furriness).
Cut out two 1.5"x3" faux fur ovals for eyebrows. Hot glue to the top of the mask, also placing the fur in opposite directions.
Paint any part of the mask still showing with paint to match your child's skin tone.
Truffula Tree Costume
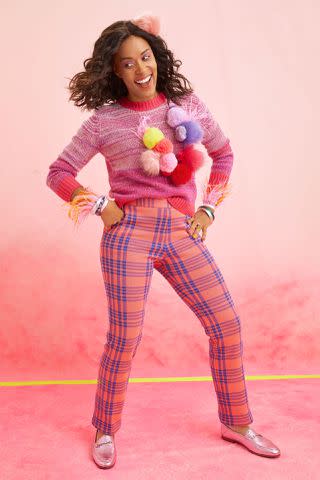
What you need: Faux fur pom-poms; Regular pom-poms; Embroidery needle; Embroidery floss or beading cord; Hot glue sticks and gun; Plain headband
How to make the necklace: Arrange a mix of faux fur and regular pom-poms on a flat surface in your desired necklace pattern. Thread the needle with floss or cord to your desired necklace length, plus a few inches for a knot, and tie a knot at one end. Sew through the centers of the pom-poms. For double pom-poms, push your needle through the one you want to hang down, go back through it and back through the previous pom-pom. When the necklace is the right length knot it closed.
How to make the headband: Hot glue an arrangement of pom-poms to the top of the headband.
The "Wonderful" Baby Costume
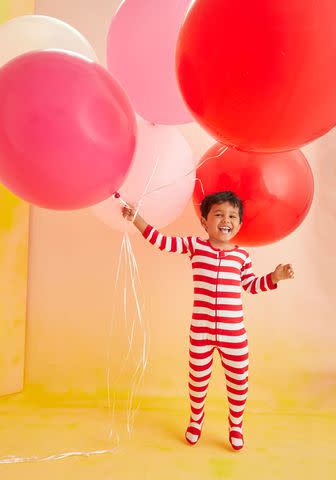
How to make it: Pair a bunch of balloons with the Leveret Striped Footed Pajamas Sleeper to create the baby from the beloved picture book The Wonderful Things You Will Be, by Emily Winfield Martin.
Related: 5 Creative DIY Animal Halloween Costumes You Can Make With Stuff From Home
Baby Shark Baby Costume
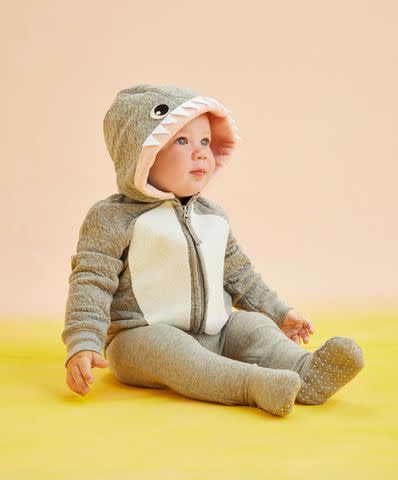
Infants in Halloween costumes are cuuuute, but they rarely enjoy being dressed up. This simply DIY baby shark Halloween costume will pass the test thanks to a soft hood and simple zipper.
What you need: Grey hoodie; Pink, white, and black felt; Hot glue sticks and gun; Grey footie pajamas
How to make it:
To create the shark gums, measure around the hood opening and cut a piece of pink felt that same length and approximately 5-inches wide.
Position the felt so it folds over the edge of the hood and hot glue the middle of the long edge of the felt to the outside of the hood. Glue along the whole edge of the hood. Secure the other side into the inside of the hood with hot glue.
Cut 12 3/4" x 1 1/4" white felt triangles for teeth and glue them to the pink felt gums.
To make eyes, cut out two small white circles and smaller black circles of felt; hot glue them together and glue onto the hood above the gum.
Donut Costume

The secret to a homemade costume is not to make the whole thing from scratch. Instead, opt for a foundation of simple, solid-color pajamas or sweats, like these from Primary.com, which come in a full range of colors. "For years, I avoided making Halloween costumes because they seemed too difficult and involved," says Kemp-Gerstel, who used pajamas as the base for her family's superhero costumes last year and employed the same tactic for this collaboration with Parents.
What you need: Round objects to trace; Cardboard; Pencil; Scissors; Craft knife; Tan or brown felt; Hot glue sticks and gun; Batting; 1-inch grosgrain ribbon; Self-adhesive Velcro squares; Pink felt, optional; Fabric glue and paintbrush (optional); Captain Creative Magic Nuudles (optional); Pink puffy paint (optional)
How to make it:
Trace a 16-inch circle onto cardboard (use a tray, large bowl, or garbage can lid) and cut it out with scissors or a craft knife. To create the donut's hole, trace a roll of tape or small bowl in the center of the circle; cut it out with the craft knife.
Lay the cardboard donut onto a large piece of felt. Trace around the outside circumference of the donut, then trace a second circle about 1 1/2-inch wider all around, so you'll have extra felt to fold over the cardboard. Cut out the circle.
Center the cardboard donut back on top of the felt circle. Stretch the felt so it folds over the cardboard and hot glue it into place at four opposing spots around the circle. Stuff a thin layer of batting between the felt and the cardboard. Continue to glue the edge down, working your way around the circle. Tip! You can cut small 'V' notches in the felt, as needed, to pull it around without bunching up.
Carefully use your scissors to poke a hole in the center of the felt. Cut the hole into a slightly larger hole but leave enough felt to fold over the inside edge of the cardboard donut. Cut some slits in the felt to help you fold it down, and glue them to the backside of the donut.
To create a neck strap, hot glue one end of a 20-inch piece of ribbon to the back of the donut. Determine the best placement for the other side by testing it on your child, and then attach the other end with self-stick Velcro.
Pink sprinkled donut: Cut out a piece of pink felt "frosting." Brush fabric glue on one side and adhere it to the donut. Cut craft noodles in half lengthwise to create sprinkles. Adhere them to the donut with hot glue.
Chocolate donut: To "frost" the donut, snip a slightly larger hole at the opening of the puff paint bottle. Place the donut on top of scrap paper or newspaper and squeeze the paint out in lines in a quick back-and-forth motion.
Make-it-Yourself Medusa Costume
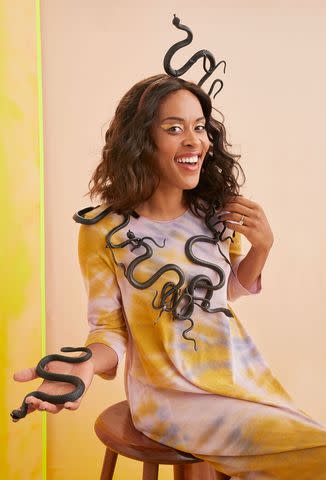
It's 3 p.m. on October 31, and your kid is begging you to dress up (and you're wishing you'd planned something). Follow Kemp-Gerstel's lead and use generic Halloween decorations to your advantage to make yourself into a mom medusa.
How to make it: Hit up the Halloween aisle at a big-box store for plastic snakes and zip ties. Use the zip ties to attach one snake to a headband. For the necklace, zip-tie the snakes together head to tail to create a large ring. Use heavy-duty scissors to trim off the ends of the zip ties. Bonus points for exaggerated gold bat-wing eyeliner!
Other ideas to try with drugstore finds: Stretch fake cobwebs into a makeshift cape, make monster hands by pressing stick-on nails onto woolly gloves, zip-tie plastic spiders together to make a necklace or a crown, or hot-glue a toy rat onto an old hat.
Dragon Costume
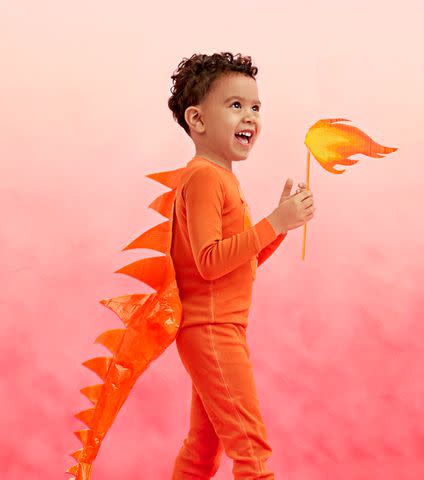
What you need: Bubble wrap (approximately 1 yard); Orange duct tape; Scissors, Wax paper; Self-adhesive Velcro; Orange pajama top and pants
How to make it:
Roll and tape bubble wrap into a tapered tail shape, measuring about 22-inches long.
Cover with orange duct tape.
Tape over both sides of pieces of wax paper to create duct tape "fabric," from which you will cut triangles to make dragon spikes.
Cut approximately 4 medium to large triangles for the shirt, and 10 triangles ranging from large to small for the tail. Then tape the spikes in place with more duct tape. Tip: Non-stick scissors are great for cutting duct tape!
Use a 2"x 3" piece of self-stick Velcro to attach tail to the back of the shirt and add duct tape for added strength.
Related:
Unicorn Costume

All this magical mom getup takes is an all-white outfit from your closet and a unicorn horn from Brooklyn Owl. Genius.
Organic Fruit Costumes
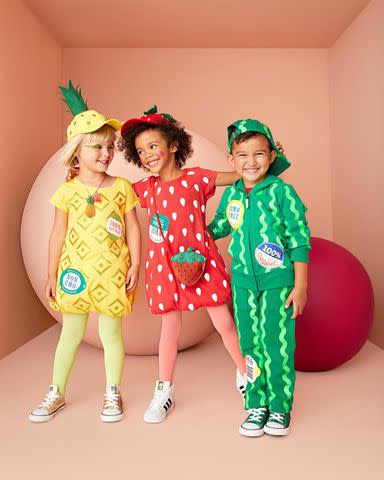
Your Whole Foods Market–obsessed pal will approve of these fresh fruits that use solid-colored basics as their base. The fruit details are made from iron-on vinyl and the stickers are printed on iron-on inkjet transfer paper.
What you need: A-line dress or sweatsuit; Iron-on vinyl; Scissors; Iron; Inkjet transfer paper for dark T-shirts; Printable sticker designs; 1 yard of elastic cord (optional); Safety pin (optional); Coordinating baseball cap; Green felt (optional); Hot-glue gun and sticks; Toilet-paper tube (optional), Teardrop-shaped rhinestones or gold metal studs (optional). Fruit-shaped paper cut-outs.
How to make the body:
Cut out fruit-detail shapes from iron-on vinyl.
Lay out dress or sweatsuit on a soft, ironable surface (a folded blanket on a table, for example), so it lies flat with no wrinkles. Place fruit details on garment and follow instructions included with vinyl to iron on. Repeat on back of garment.
Print out the fruit-sticker template designs on transfer paper and cut them out.
Place cut-out stickers on garment and follow instructions included with transfer paper to iron them on.
To make the dress hem, snip a small hole in the back hem of the dress, cutting through only one layer of the hem´s folded over fabric.
Attach the elastic cord to the safety pin and use it to thread the elastic through the hem of the dress. Once the elastic is all the way through the hem, pull both ends out and cinch to create a bubble shape that's not too tight. Secure the elastic cord in a knot.
How to make the hats:
Strawberry: Use the template to trace and cut out strawberry leaf shapes from green felt and attach to the top of the hat with hot glue. Hot-glue rhinestone "seeds" to hat.
Pineapple: Use the template to cut out pineapple leaf shapes from the green felt and wrap around a toilet-paper tube; secure with hot glue. Hot-glue to top of hat. Hot-glue studs to hat.
Watermelon: Stuff hat with a towel, so it holds its shape. Cut out and iron the green vinyl squiggles template onto hat.
Avocado Toast Costume
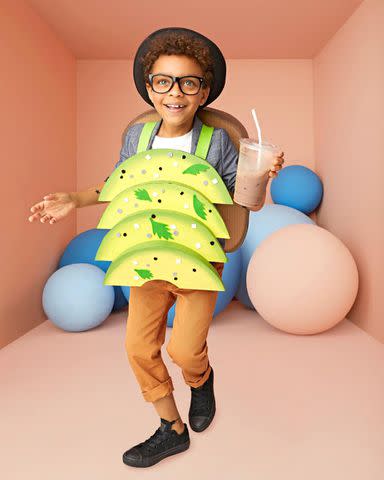
He'll be the hippest kid at the Halloween parade with this trendy breakfast staple. Made from cardboard, the toast and avocado slices are painted and topped with felt salt, pepper, and herbs. Finish off the getup with a cup of "cold brew" (chocolate milk over ice).
What you need: Cardboard; Brown kraft cardstock; Ruler; Pencil; Craft knife; Hot-glue gun and sticks; Brown, green, and yellow craft paint; Paintbrushes; Scissors; Green, white, gray, and black felt; Green ribbon
How to make the bread:
Draw a bread-slice shape on the cardboard large enough for your child to wear.
Cut out shape and then use it to trace another piece.
Cut out this piece so you have two bread-slice shapes.
Cut out 2.5"-wide strips of cardstock.
Holding the two bread-slice shapes together, put a small section of hot glue along the cut edges of each slice (gluing along the depth of the cardboard where you can see inside the layers). Separate toast slices, and place a strip of cardstock on the glued edges so that the edges line up. (You're basically making a giant toast-shaped 3-D box.) Continue around edges of the bread slices, bending the cardstock to create the toast's sides.
Paint around the outside of the bread slice with brown paint to make the crust.
How to make the avocado:
Draw avocado slices on cardboard so that they will fit on the bread slice. Follow the process for steps 2 to 5 (above) to make them dimensional. The avocado slices can be thinner than the bread, about 1.5" wide.
Paint avocado slices green. Add yellow paint while still wet, blending the two colors together to create a gradient.
Cut a rectangular piece of cardboard large enough to make a base for the avocado slices but small enough not to be seen beneath them.
Hot-glue overlapping avocado slices to the base.
Cut parsley, salt, and pepper shapes out of felt. Hot-glue to avocado slices.
Cut two lengths of ribbon or webbing long enough to hang the avocado toast over your child's shoulders. Hot-glue to the undersides of the bread and avocado slices.
Slime Costume
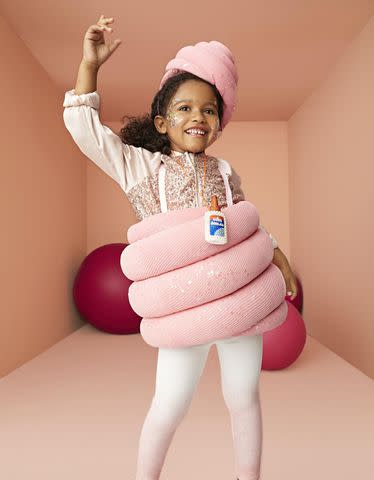
Bring the ooey-gooey craze to life with this adorable disguise. Tights stuffed with pool noodles and batting form the coil of slime. Bonus points for a bedazzled Elmer's glue bottle as a necklace pendant.
What you need: 6 pairs of pink ribbed tights, size large; Approximately 12' of pool noodles; Measuring tape; Serrated (bread) knife; Scissors; Quilt batting; Straight pins; Hot-glue gun and sticks; Spray adhesive; Chunky pink glitter; Glitter spray; Pink elastic cord; 1.25-oz. bottle of Elmer's glue; Adhesive rhinestone embellishments; Adhesive pearl embellishments; Tweezers; Orange twine
How to make the body:
Slice pool noodles in half lengthwise with bread knife.
Hot-glue pool noodles together end-to-end to make an 18'-long piece.
Wrap the glued-together length of noodle with a layer of quilt batting, leaving 3' unwrapped at each end.
Cut the 3' exposed ends so that they taper to 1" wide at the tips. Wrap in a layer of batting.
Cut the legs off 5 pairs of tights. Cut the toe sections off all the legs except for 2.
Put a leg with the toe section over one end of the batting-covered noodle. Cover the rest of the noodle with the cut pieces of tights, securing with glue where they overlap. Cover the other end with the second tight leg with a toe section.
Coil the tights-covered noodle into a swirl shape so that the rounded part of the noodle faces outward. Secure with straight pins and make sure it will fit over your child's shoulders. 8. Hot-glue the swirl together. Once cooled, remove pins.
How to make the hat:
Cut a 4' length of pool noodle lengthwise again so that it is about a quarter of the original diameter.
Cut each end of the 4' noodle into an angled taper.
Cut the legs off the last pair of tights.
Put tight legs over the 4' long noodle so that the foot part covers each end. Secure tights where they overlap with hot glue.
Create a swirl shape for the hat, pin to hold its shape, and secure with hot glue. Remove pins.
Glue on a piece of elastic cord to use as a chin strap.
Working in a well-ventilated space, apply the spray adhesive over the costume one small section at a time and then quickly sprinkle with chunky glitter to the sprayed section. 8. Spray the costume and hat with spray glitter to finish.
How to make the necklace:
Dump out the glue in the Elmer's bottle (use it to make slime!).
Cover the bottle with the adhesive embellishments, using tweezers to pick up each embellishment and place it on the bottle.
Tie the bedazzled glue bottle to orange twine to make a necklace.
Rainbow Emoji Costume (With a Unicorn Pup)
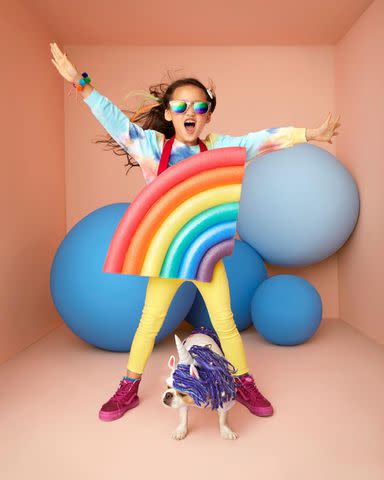
For major Insta-sensation, have your kid and your pup be a pair of popular emojis. A rainbow pack of pool noodles is the secret to the kid costume, while a dog hooded sweatshirt gets embellishment love with a sparkly horn, mane, and tail.
What you need: Rainbow-colored pool noodles; Serrated (bread) knife; White foam board (at least 20"x30"); Hot-glue gun and sticks; Craft knife; Red ribbon or webbing
How to make it:
Use the serrated knife to slice pool noodles in half lengthwise.
Starting with the purple pool noodle, hot-glue it to the foam board so that it forms the smallest curve possible in one corner of the foam board.
Continue gluing pool noodles to the foam board in color order, following the curve set by the purple noodle.
Use the serrated knife to trim the excess from the noodles, following the edges of the foam board.
Use the craft knife to trim off any excess foam board along the outer edge of the red and purple noodles.
Make a loop out of red ribbon or webbing long enough to slip over child's head. Hot-glue it to back of rainbow.
Nachos Costume
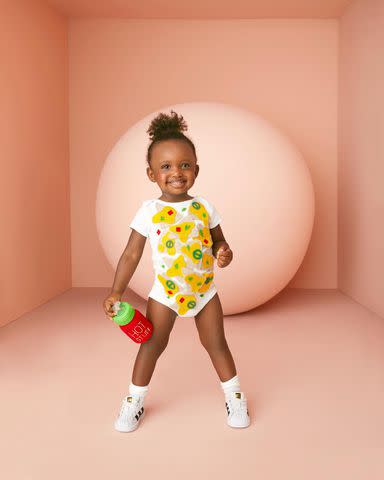
Serve up your little one as a nacho platter complete with chips—and don't forget the hot sauce! To make, cut chips and toppings out of felt and hot-glue to a plain white bodysuit. To make the hot-sauce baby bottle, we wrapped a green-capped bottle in red felt with "hot stuff" stitched in white embroidery floss.
What you need: White bodysuit; Felt (various colors); Scissors; Hot-glue gun and sticks
How to make it:
Cut tortilla chip and topping shapes out of felt.
Lay out the design on the front of the bodysuit and hot-glue down.
Related: 30 Fun Family Halloween Costume Ideas
For more Parents news, make sure to sign up for our newsletter!
Read the original article on Parents.

