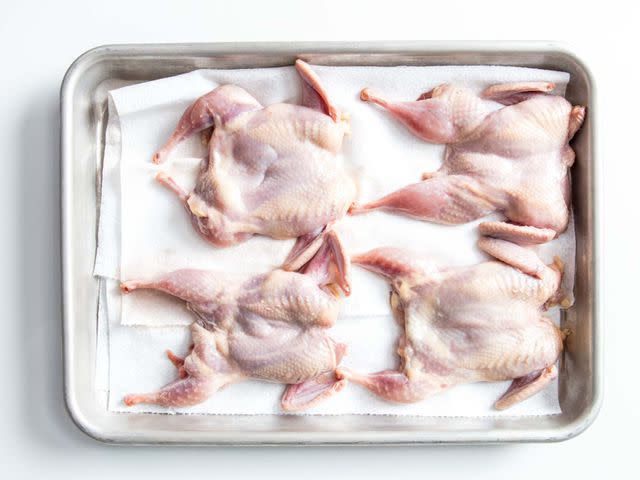
How to Debone and Spatchcock Quail
Small, delicious quail are best deboned. Here are step-by-step instructions for spatchcocking and deboning them for easier cooking and eating.
Americans eat a lot of chicken—significantly more than any other one protein source, according to the USDA. All that chicken consumption drives prices down relative to other birds, making chicken the singular poultry most home cooks can easily find, afford to buy, and are comfortable cooking. Yes, turkey makes its annual appearance, but duck is a rarity, and the rest of the flock? You're lucky to spot them on a restaurant menu, let alone on a home dinner table. Let's change that.
Serious Eats / Vicky Wasik
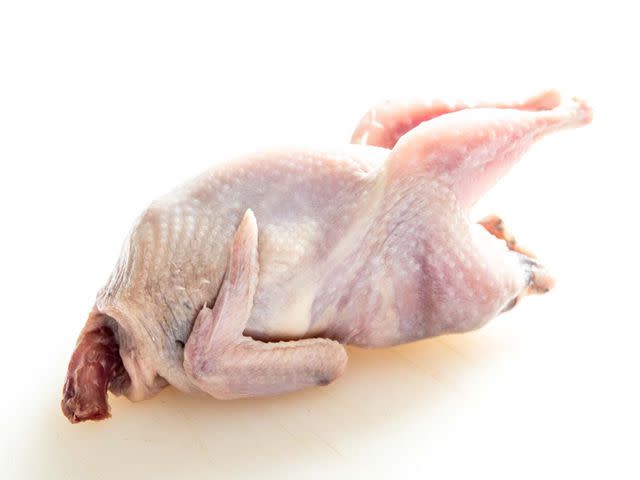
Quail is one of the few game birds you still have a shot at finding at your local butcher, and if not, there are online sources like D'Artagnan that can deliver them right to your door. If you like to hunt, you may eat more quail than most.
What's great about quail is that it's one of the easiest birds to cook. You have to try really hard to mess them up. In classic French cooking, they're often served with the meat still pink, but that meat, like duck, remains delicious even when it's fully cooked through. This means you have a wide margin of error.
Serious Eats / Vicky Wasik
Quail are also small enough that no matter your cooking method—whether you grill them, roast them, or sear them in a pan—the meat will be perfect as soon as the skin has browned and crisped properly. And that doesn't take very long, making quail one of the fastest cooking birds you can serve.
The main question you have to answer with quail is whether you want to frontload or backload the work involved. Either you spend prep time removing the bones (or, at the very least, spatchcocking the birds by removing their spines), or you let your guests pick at them on their plates.
There's nothing wrong with leaving the picking for the diners—lord knows I love to pick—but there's a visceral pleasure to being able to sink your teeth right into a quail breast with nary a bone to contend with. Even if you don't debone the quail, it's often helpful to at least spatchcock them—flattening the birds makes cooking quicker and easier.
Some companies and butchers (including D'Artagnan) sell the quail already deboned. But it's easy enough to do yourself. It's a strange process that involves turning the bird inside out as you work the meat from the bones. It can be disorienting, but once you do it once or twice you'll get the hang of it. Or, in a pinch, you can just spatchcock them instead. Below, I show both methods.
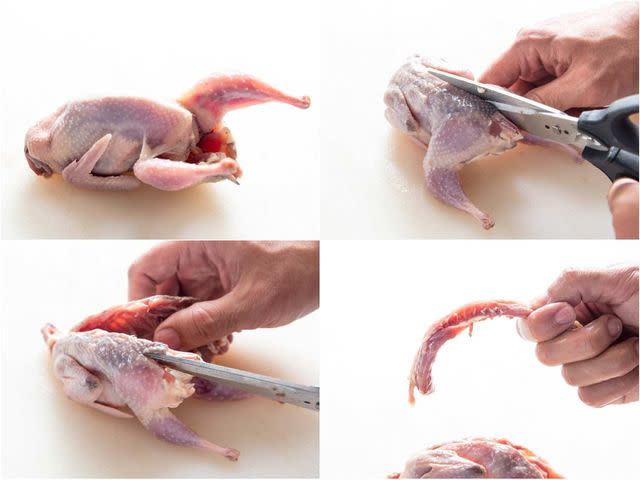
The Easy Way: How to Spatchcock Quail
Spatchcocking a quail is as simple as snipping out the backbone, then pressing the bird flat. It compresses the bird into a single plane, making grilling, broiling, and pan-roasting easier and quicker.
Serious Eats / Vicky Wasik
You'll need a pair of kitchen shears to do it. Working from the tail end of the bird, snip along one side of the spine all the way up to the neck.
Next, snip along the other side of the spine—a quail is a small bird, so these two lines will be very close to each other.

Serious Eats / Vicky Wasik
Turn the quail over and press down on the breastbone to crack it flat. If you want, you can also trim off the wing tips. (The backbones and wing tips can be saved for a quick jus or quail stock.)
The Harder (But Still Easy) Way: How to Debone Quail
For the full deboned experience, you need to do more than just spatchcock the birds. Well, the quail aren't technically 100 percent deboned—the drumstick and wing bones remain to offer just a little structure— but it's close enough. Most of the process is done with your fingers, but you will need a paring knife and a chef's knife for just a couple of steps.
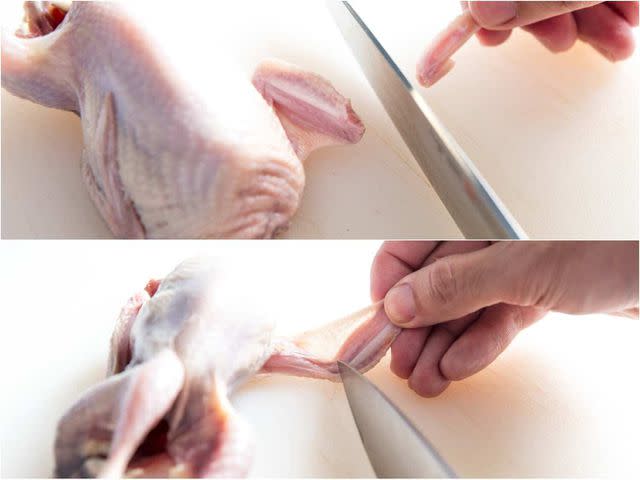
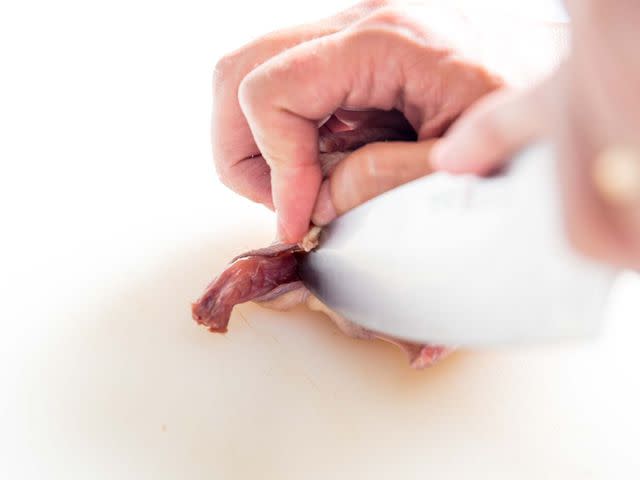
Step 1: Trim Wing Tips
Serious Eats / Vicky Wasik
Start by trimming the wing tips. This is just for presentation. You can cut the joint right at the wing tip, or the "elbow" joint—the one that connects the drumette with the wingette/flat.
Save these parts if you plan to make a quick quail jus.
Step 2: Trim Neck
Serious Eats / Vicky Wasik
If there's a portion of the neck still attached, it's helpful to cut it off near where it meets the body with a chef's knife. You can also trim any excess skin around the neck opening at this time.
Save the neck for that stock or jus.
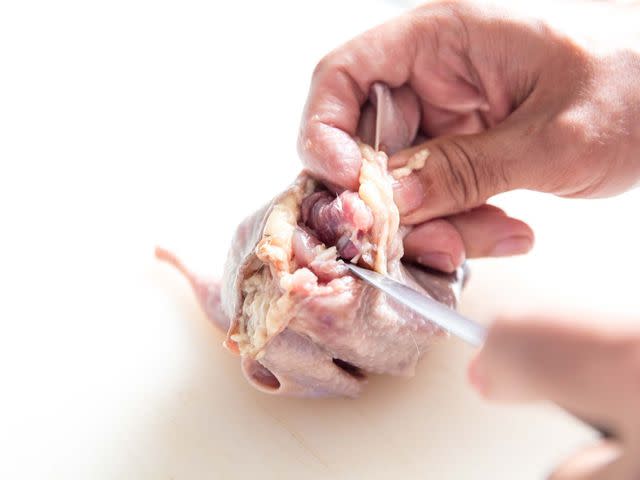
Step 3: Remove Wishbone
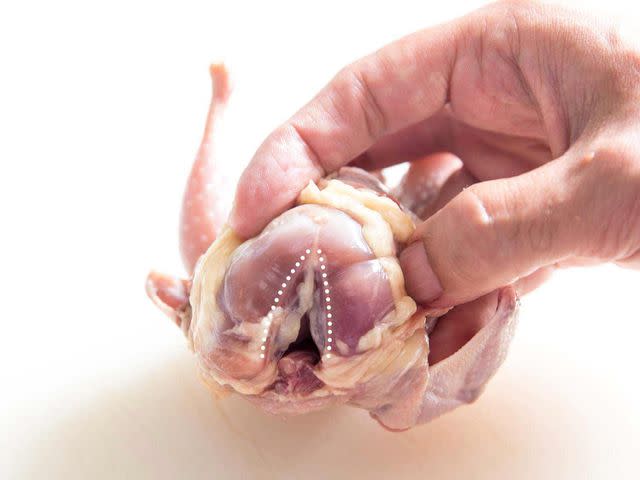
Serious Eats / Vicky Wasik
Now it's time to remove the wishbone, which is located at the neck opening. The image above shows where the wishbone is.

Serious Eats / Vicky Wasik
Using a paring knife, make a cut along each arm of the wishbone to detach it from the breast meat.
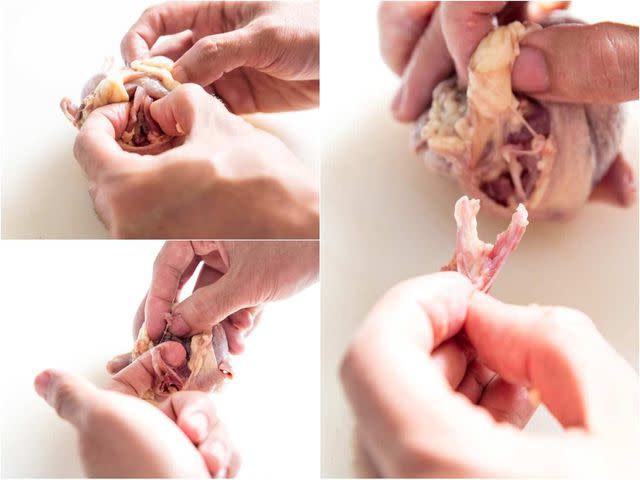
Serious Eats / Vicky Wasik
Work your fingers behind the wishbone, separating it from any flesh that's still attached. Slide your fingers up toward the apex of the wishbone until you can hook your finger behind the part where the two arms join. Pull it out, and free the wishbone fully from the flesh.
Save the wishbone for stock or jus.
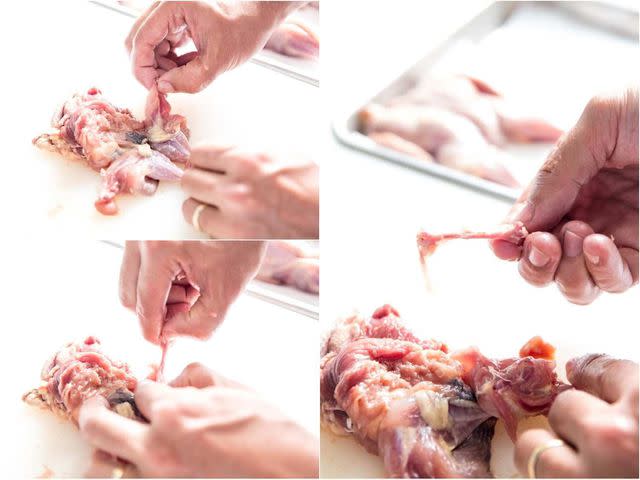
Step 4: Expose Shoulder Joints and Disconnect Them
The next goal is to fully remove the breastbone and rib cage from the bird. There are four joints that connect to it—the two shoulder joints and the two hip joints—and all four will need to be severed for the rib cage to come out. The first two to tackle are the shoulder joints.
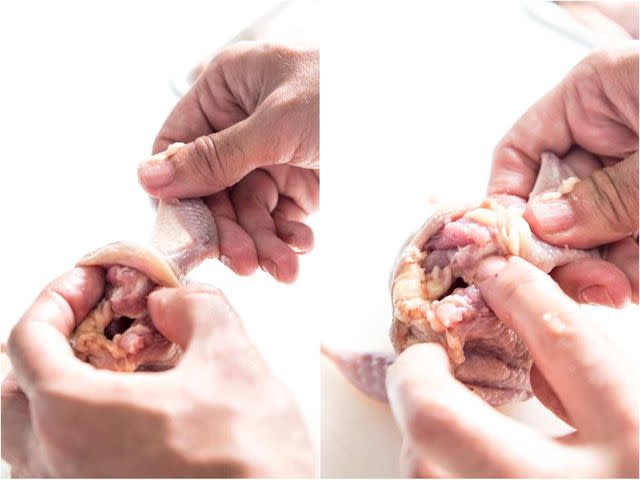
Serious Eats / Vicky Wasik
Begin by sliding your fingers under the breast meat where you just removed the wishbone, working the breast meat free of the breastbone below. Once you get just a little way in, you'll find the shoulder joints are accessible.
Serious Eats / Vicky Wasik
Wiggle one of the quail wings to help you locate the exact location of the joint, then, using a paring knife, cut through the joint to disconnect it. You'll know you've got it right when the knife slides cleanly through; this may take a few tries as the joint is small and it's easy to hit the ends of the bones on either side. Don't force it, the knife will pass through when you hit the right spot.
Repeat with the other shoulder joint.
Step 5: Separate Flesh From Breastbone and Back
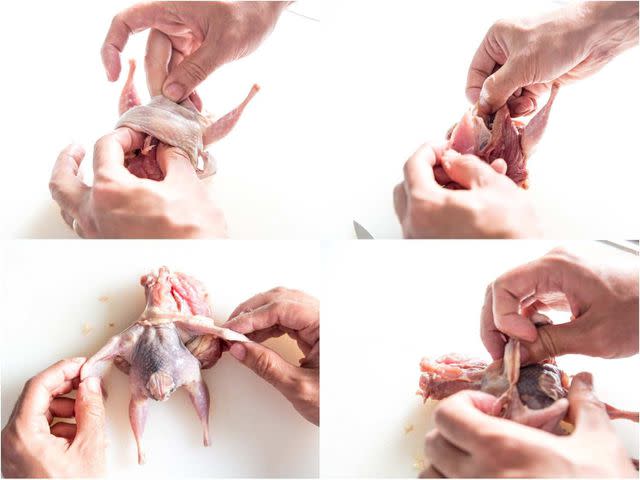
Serious Eats / Vicky Wasik
With the shoulder joints disconnected, you can now continue to use your fingers to work even more of the breast meat off the breastbone. Keep going as far as you can, including on the back side of the quail, until you get down to where the thighs connect with the rib cage.
As you do this, the quail will begin to fold over itself, turning inside out, much the way a sock doubles over itself when you roll it down your ankle.
Step 6: Find Thigh Joints and Dislocate Them
Serious Eats / Vicky Wasik
The thigh joints are the last two that need to be dislocated. You don't need a knife for these. Simply turn the quail over and bend each leg backwards, folding it towards the spine to pop the joint out of its socket. Repeat with the other leg.
You have now disconnected the breastbone and rib cage from the joints that link to it. It's ready to be fully removed.
Step 7: Remove Breastbone/Rib Cage
Serious Eats / Vicky Wasik
Resume what you were doing before—separating the quail flesh from the breastbone and ribcage as you roll it down over itself, turning it inside out. Work all around the quail to free the meat from the bone, including on the back side.
The most difficult spot is where the skin covers the spine, near the tail; unlike most of the other areas, there's no muscle between the skin and bone here, so it's more tightly fused. Take your time and make sure not to tear the skin. It'll come free if you're patient and careful.
Now you can fully pull the rib cage and breastbone free of the quail. What you should be left with is a mostly inside-out quail. This can be a little disorienting the first couple of times you do it, but you'll get your bearings with just a little practice.
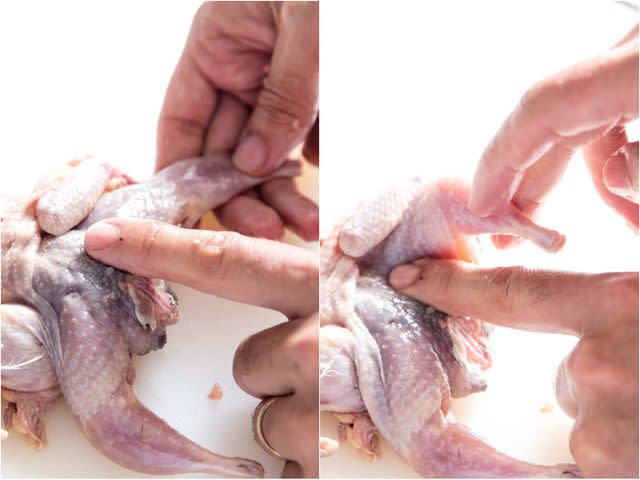
Step 8: Find Thigh Bones and Remove Them
Serious Eats / Vicky Wasik
Only two more bones need to come out to complete the process: the thigh bones. They're easy to find if you grab ahold of the drumsticks, and then trace your way up each to the thighs.
Once you find the thigh bone, stripping the flesh off of it is easy. Just use your fingers to push the meat off, then twist the thigh bone free at the joint where it connects to the drumstick.
Repeat with the other thigh bone.
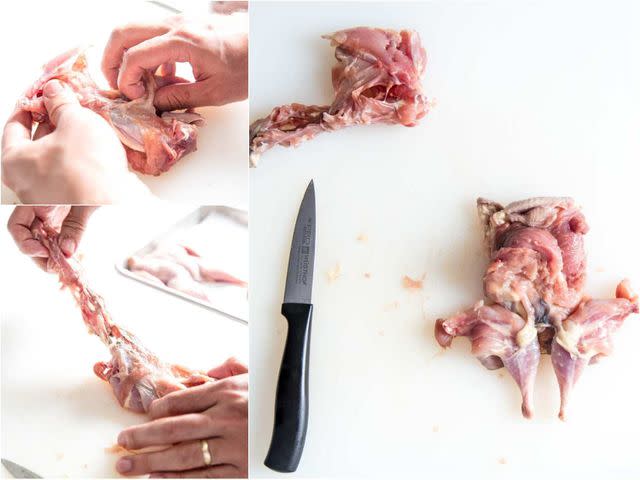
Step 9: Turn Bird Right-Side Out
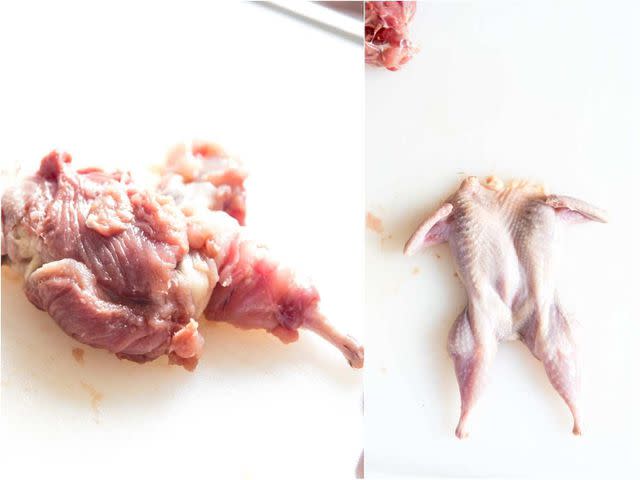
Serious Eats / Vicky Wasik
With your quail deboned, it's time to turn it right side out. Voilà! A funny little boneless quail.
Step 10: If Necessary, Pull Fillets From Breastbone and Stuff Into Bird
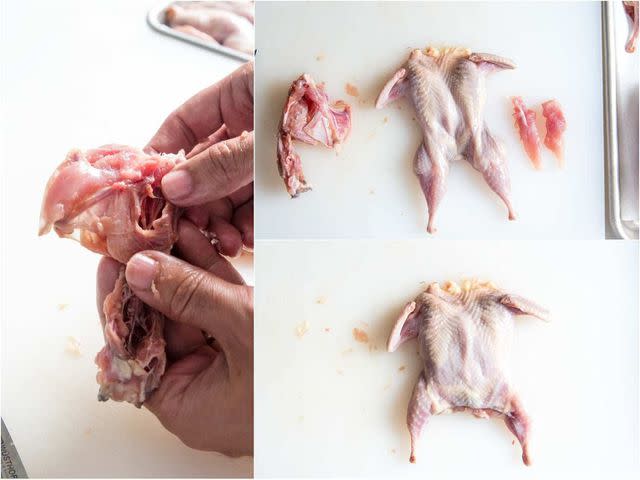
Serious Eats / Vicky Wasik
There's a possibility that the fillets (or the tenders, as they're sometimes called) will still be attached to the breastbone. If they are, work them free of the breastbone, then slide the tenders back inside the bird. Their placement doesn't have to be perfect, as long as they're in there and the quail looks even and not lumpy.
Make sure to save the breastbone for stock, too!
Now your quails are ready for cooking, whether you toss them on a grill, slap them into a hot pan, or slide them under a blazing broiler. So little, but so, so good.
September 2018
Read the original article on Serious Eats.

