How to create a stylised 3D portrait
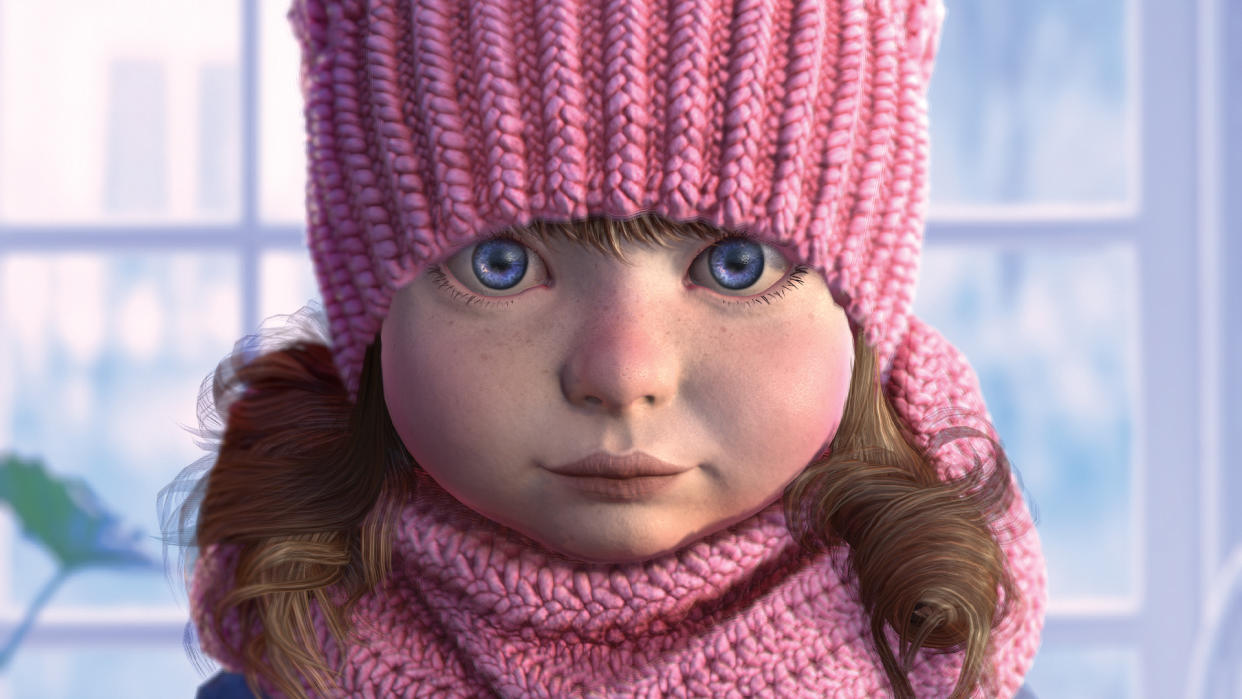
This tutorial will demonstrate how to create a stylised portrait from a concept illustration (concept art by Nutsa Avaliani). The goal is to create something that is stylised in nature while utilising PBR materials to give it a realistic feel. The real challenge is to add a fluffy look to the softer materials, without having to rely on actual fur strand geometry like in film or offline rendered pieces.
So we will focus on how to accomplish this using techniques applicable in a real-time setting. We will begin in ZBrush to sculpt something that will work well with our low-poly techniques in Substance Painter and Marmoset. (If you're new to 3D modelling, check out our collection of the best 3D modelling software to get you started).
01. Block out the basic shapes
(Image: © Satoshi Arakawa)
The first step is to block in your shapes to get a feeling for how you will translate the concept into 3D. Before even tackling the details, it’s important to establish your forms or the details won’t really be effective. In order to match the forms you see in the illustration, use DynaMesh or the move tool – these will prove to be the most useful tools at this stage of sculpting. Now you need to block in very basic shapes of all the elements; try not to match the concept too closely at this juncture.
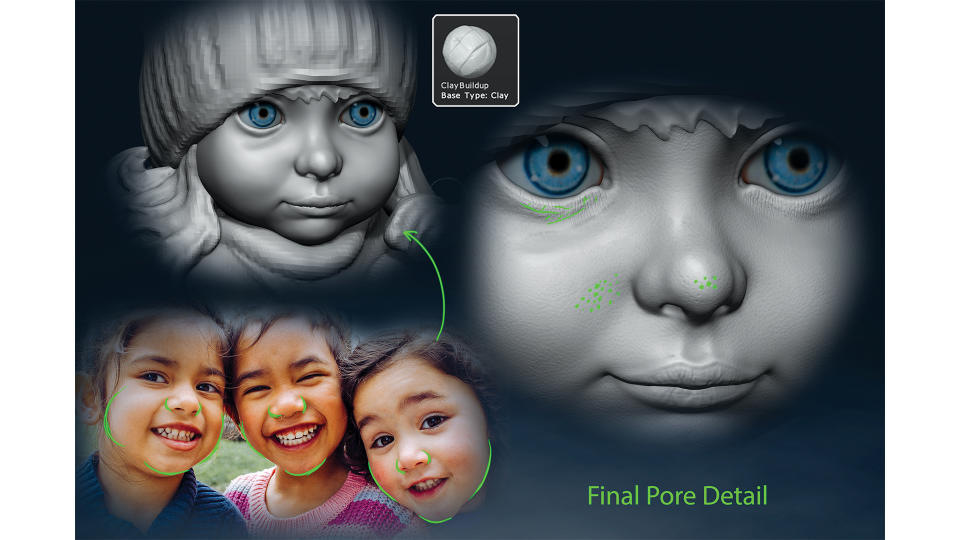
02. Begin to sculpt the face

(Image: © Satoshi Arakawa)
Although the focus for this tutorial will be the soft materials, the face is still the focal point. In this case achieving a cute, adolescent face can be quite challenging. Make sure you have a lot of reference on the age group you are trying to achieve. With a young face, you will want to keep details rather soft and the anatomy more round to really sell the youthful vibe. Slowly build up your forms using a brush like Clay Buildup. You can add some subtle details like pores at the end.
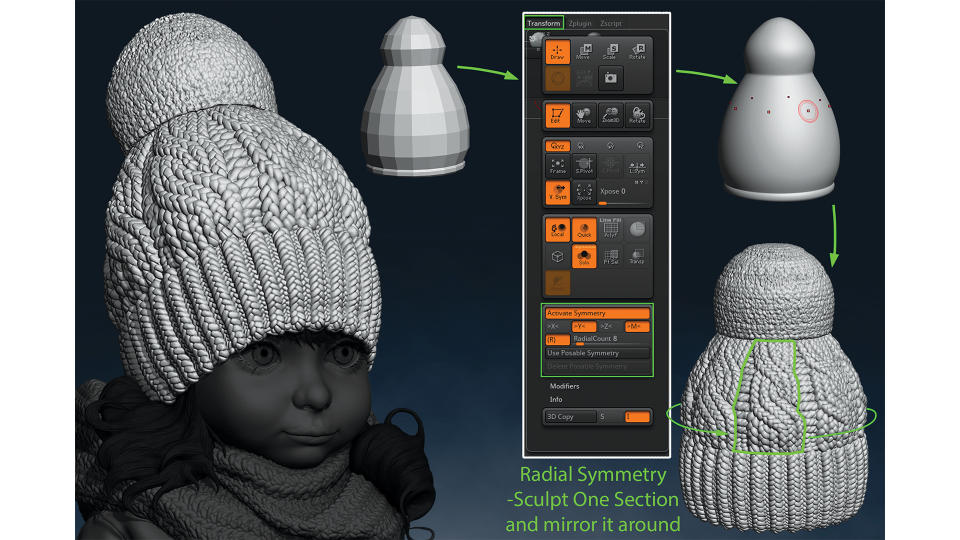
03. Proceed to model the cap
(Image: © Satoshi Arakawa)
The easiest way to accomplish this is to create a basic shape of the cap that is perfectly round. Use Maya or 3ds Max to model something like this. Once you have your round cap geo, you’ll want to use radial symmetry in ZBrush. Because the pattern on the cap is complicated, we want to take a shortcut here and only sculpt a section of it.
Using radial symmetry set to something like 8, we can accomplish this by only sculpting 1/8th of the cap. For the fluffy ball at the top, you can up the symmetry number and only sculpt a fraction of the surface.
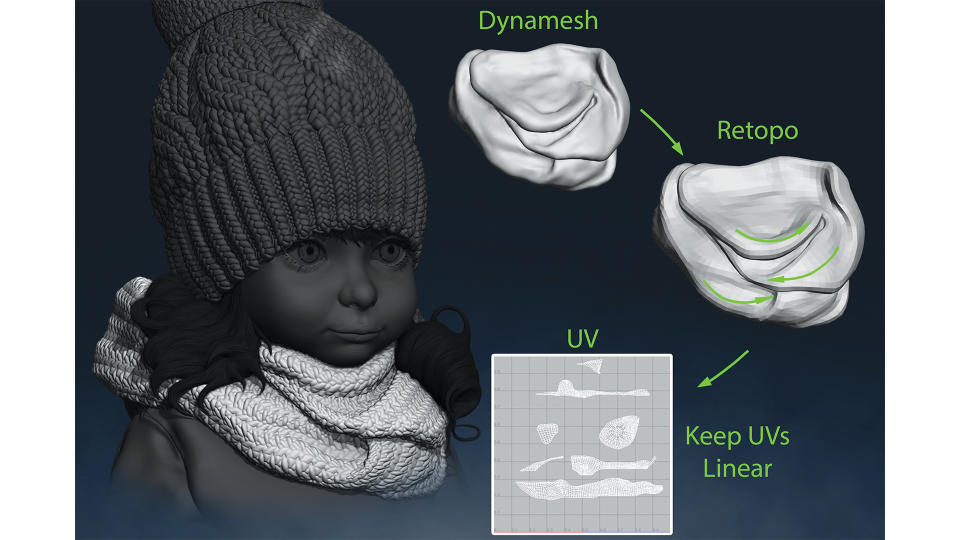
04. Sculpt the scarf
(Image: © Satoshi Arakawa)
For something like a scarf where you don’t necessarily see the entire flow in an illustration, it is a balance of matching what you see while filling in the areas that aren’t visible in the concept with a cloth flow that makes sense. Having a lot of references at this stage will help immensely. Once you are happy with your foundational sculpt, you will want to retopo your mesh to give you a cleaner geometry to work with, while also being able to lay out some quick UVs on your mesh. This is important for the next step.
05. Sculpt the knitted detials on the scarf
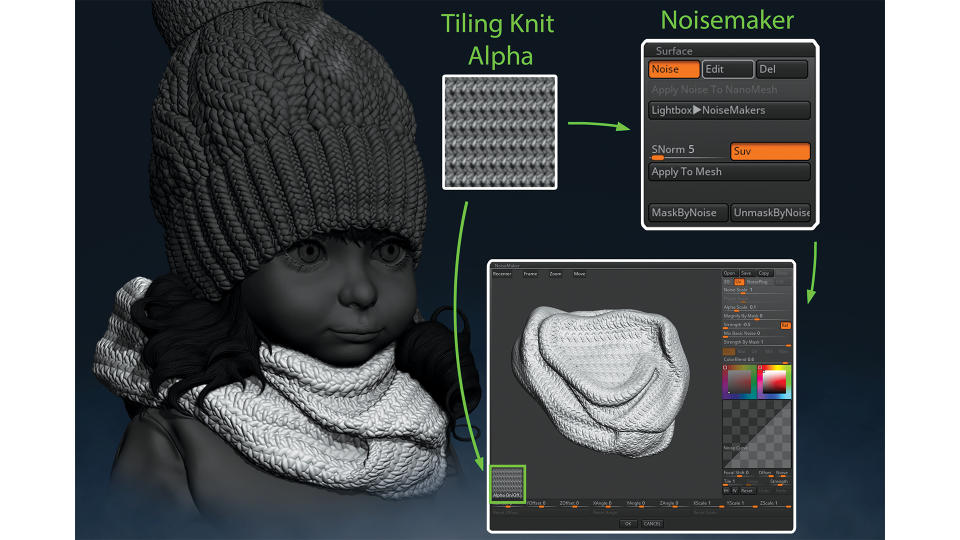
(Image: © Satoshi Arakawa)
Lay out your scarf UVs in a relatively straight manner so you can apply a pattern in ZBrush that will follow the folds of the scarf. You’ll want to create a tiling knit alpha in Photoshop that can be used in ZBrush. Once your alpha is ready, use Noisemaker under the Surface menu and select your alpha. Using the sliders, you can adjust the tile rate and the strength of your alpha.
When you are ready to apply it to the mesh, make sure you have enough subdivisions and that you apply it on a layer so you can easily adjust the strength afterwards.
06. Begin creating the hair
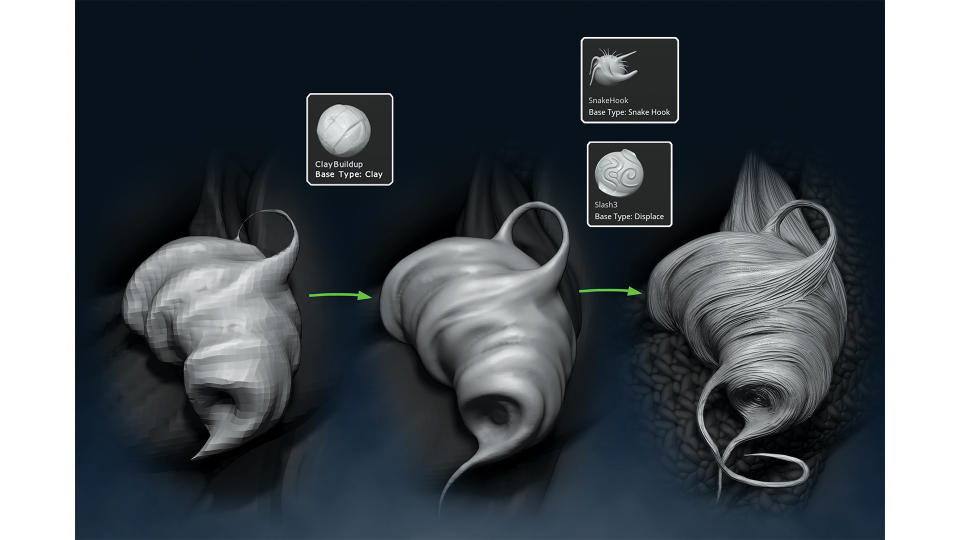
(Image: © Satoshi Arakawa)
We will redo the hair later at the low-poly stage, but this can be an effective precursor to knowing how the hair will flow and to give you an easier frame of reference to match your concept illustration. Block in major forms with DynaMesh and once you have that established, sculpt in medium chunk volumes. Finish with some fine detail strands using either Dam standard or Slash3.
07. Sculpt the sweater
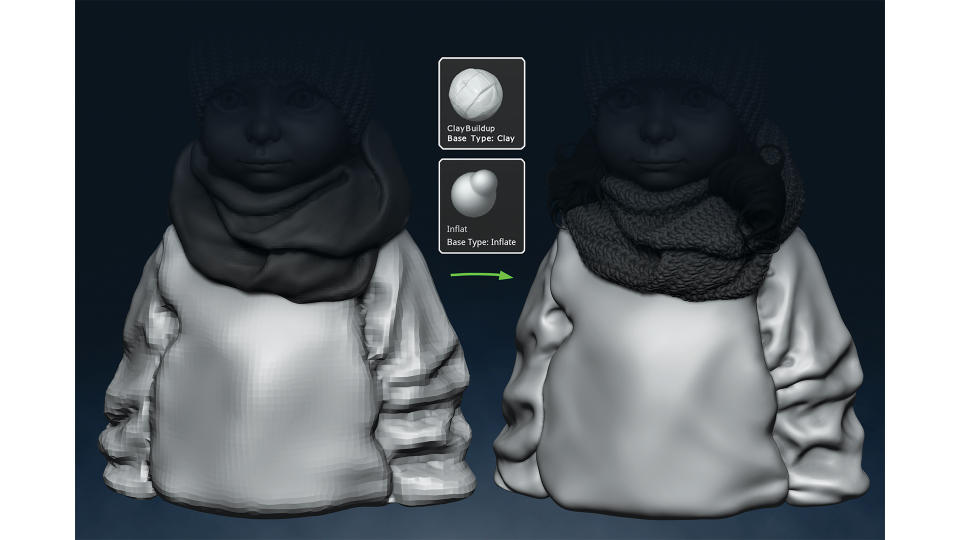
(Image: © Satoshi Arakawa)
Sculpting the sweater is relatively straight forward. The main challenge of the sweater is to match what you see in the concept. The sweater also serves as a good frame of reference for matching other elements better. Sculpting actual folds comes with practice; having good reference images helps immensely too. You still want to make sure you sculpt the main folds at a low density to easily get more depth. Once you get your main folds in, you can refine and move on. In a lot of cases too much detail is not necessary as you can easily add micro-details in Substance Painter later.
08. Stay consistent with the concept
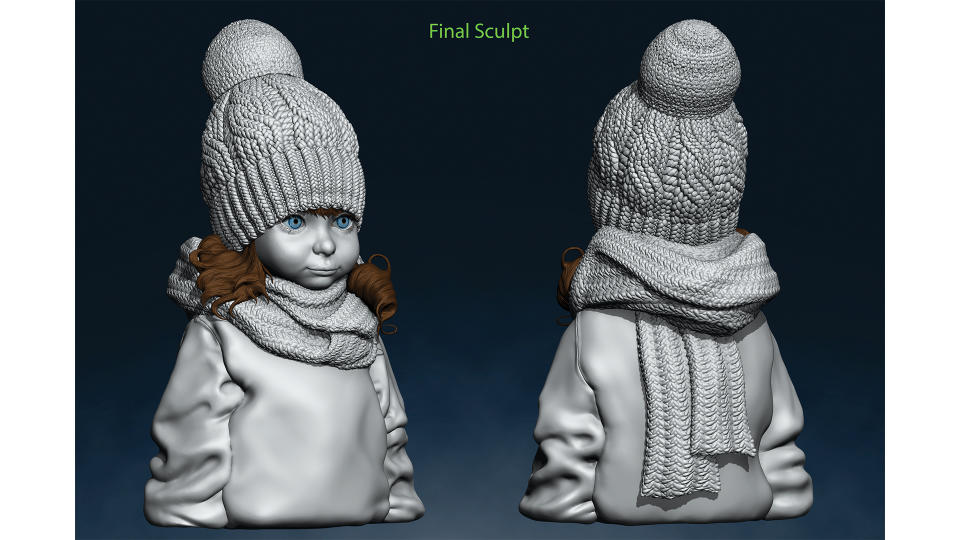
(Image: © Satoshi Arakawa)
Once you have all of your elements detailed in, it’s a good time to make adjustments to match the concept. Inevitably you will have some deviation from the concept. Some details just won’t translate well from 2D to 3D because the illustrator wouldn’t be able to forsee certain issues. The key is to make sure you are maintaining the proper proportion and focal points established by the concept. In fact, this is something you always want to do as you are refining all the elements. Constantly having the sculpt next to the concept and comparing the differences is vital.
09. Utilise the layering technique
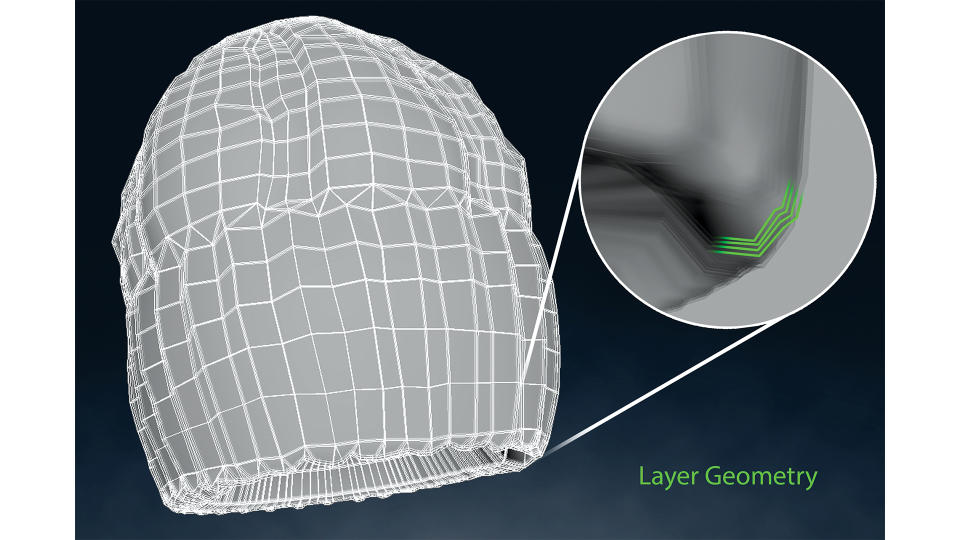
(Image: © Satoshi Arakawa)
This is the main technique you will use to achieve the soft feeling of the knit materials. It is a commonly used method in games. The idea is to duplicate the knit geo and to expand it out slightly. Pushing the duplicate geo using vert normal in Maya is an easy way to expand the mesh evenly across the entire surface. You will want to do this a number of times to get a layering of duplicate meshes that incrementally expand away from the base geometry.
10. Texture your layering
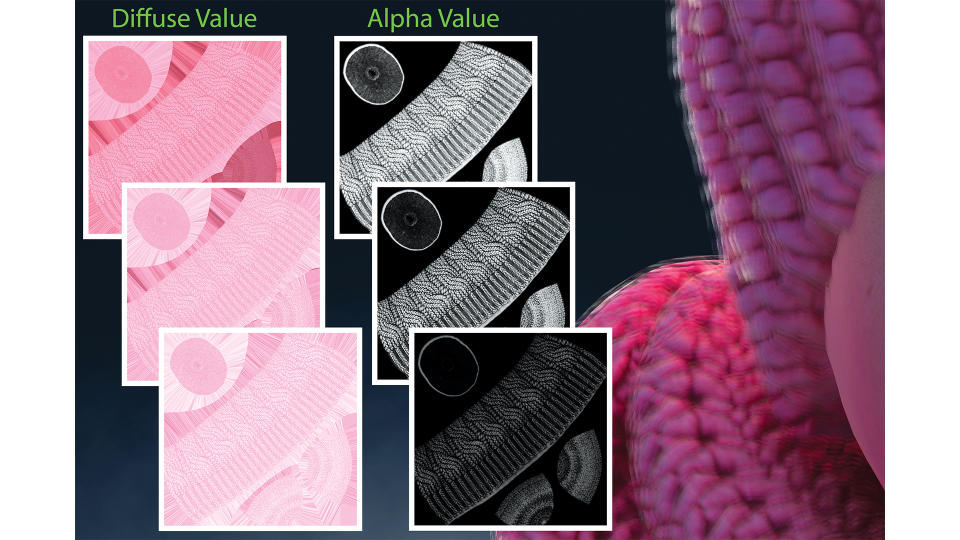
(Image: © Satoshi Arakawa)
Layering the geometry gets you about halfway to your goal. There are two keys to texturing the layers: alpha and value. You will want to alpha more heavily as you go outward and you will want the texture value to become brighter as well. By using an AO or cavity map generated from your knit normal map, you can create an alpha map for the knit areas. As you create new textures for each layer, simply increase the levels in your alpha to mask more out. And for the albedo, simply increase the brightness subtly.
11. Begin adding texture to the face
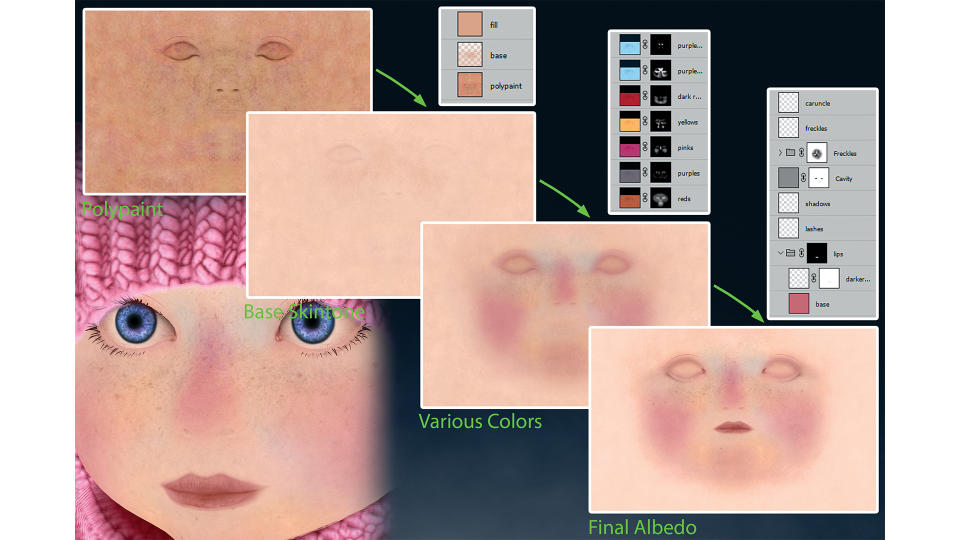
(Image: © Satoshi Arakawa)
You can texture the face in Substance Painter or Photoshop. While it might be easy to get carried away with details for a realistic face, for a stylised portrait focusing on colours is more effective. Using references that give you a good example of colour zones of the face is best practise and will give you a good result. Layer reds, blues, purples, pinks, and whites to give a good variation to the skin. Using splatter shaped brushes to add these colours can work very well. Finish with some details like freckles for some
12. Use the skin shader to add detail
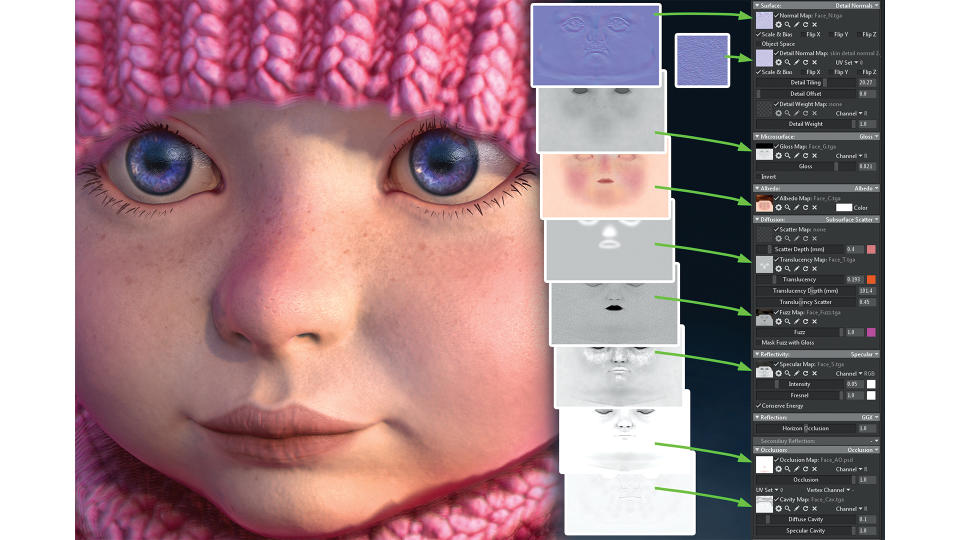
(Image: © Satoshi Arakawa)
In Marmoset use the skin shader to mimic subsurface scattering. You can soften the details on the face along with assigning a colour, which you will see in the transition from light to dark on the face. A translucency map can be used to show where the skin is the thinnest and where light would penetrate more easily. Utilise a detailed normal texture to add a bit more pore information, and use a fuzz map in order to imitate the small hairs on the surface of the skin. You can also add occlusion and cavity maps to break up the surface values and specularity.
13. Create the eyes
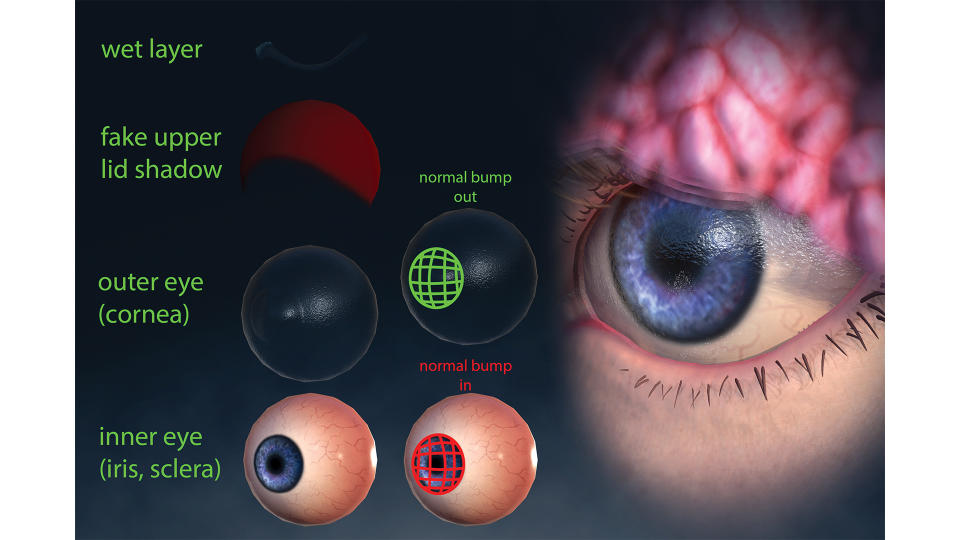
(Image: © Satoshi Arakawa)
For our next step, creating the eye, you want the eyeball and two duplicate meshes layered on the eye. The second ball will become the cornea. The third ball will be where you can texture a shadow from the upper eyelid. You want to create normals for the eye to have the iris bump in, and a normal for the cornea to bump out. You can also create a thin layer of geo to mimic the surface between the eye and the surrounding eyelid skin.
14. Use tools to help you detail the hair
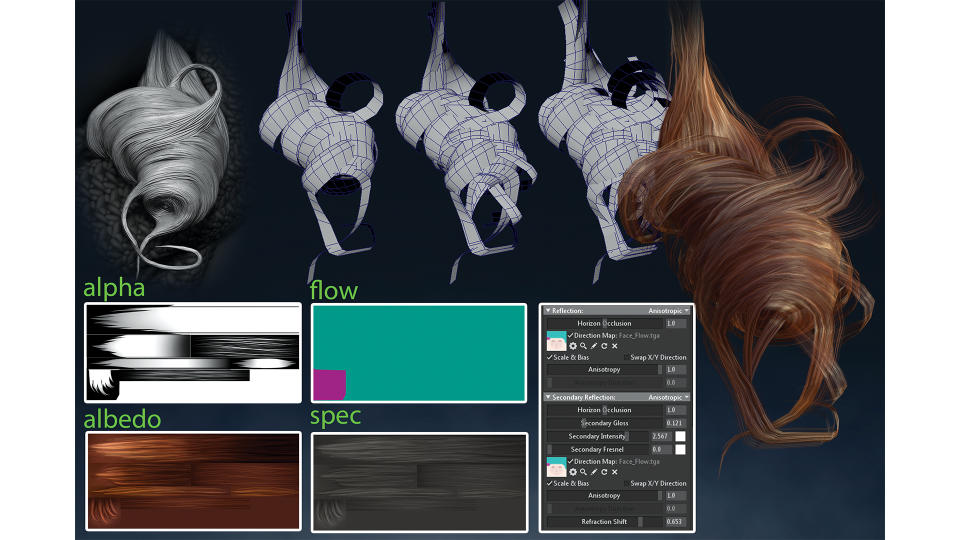
(Image: © Satoshi Arakawa)
Hair can be done using cards. Use your decimated ZBrush geo as a guide to place your cards. Texture a few strands by painting them in Photoshop. Using a brush with a few dots as the shape can work wonders when painting hair. In Marmoset, set your hair shader’s reflection model to Anisotropic. This will give you that halo-type highlight in your hair. If you texture all your cards in the same direction, you can set the Anisotropic angle; or if you have unique flow or differing card directions, you can paint a flow map using Substance Painter
15. Create depth with lighting and final touches
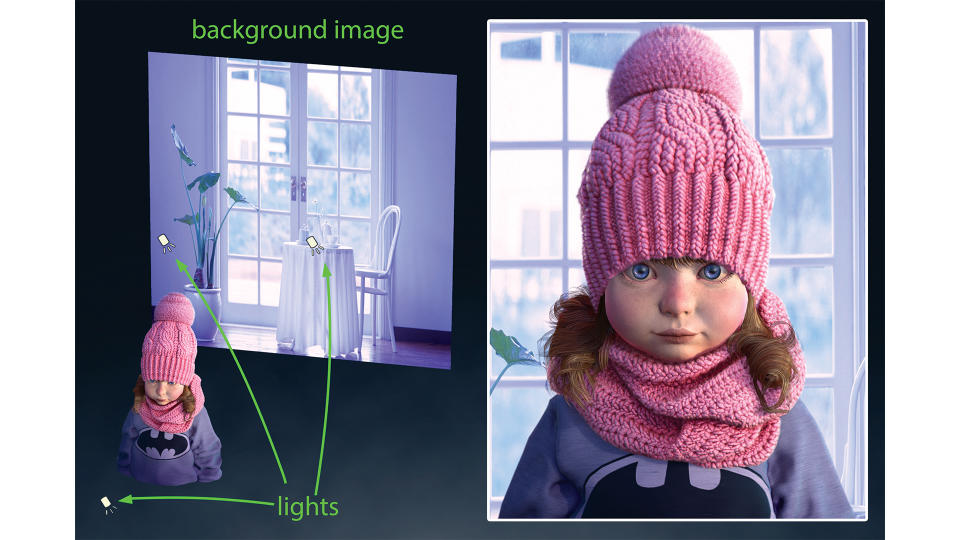
(Image: © Satoshi Arakawa)
Lighting will make a huge difference in your attempt to match a concept. Still, it’s best not to overcomplicate it. The foundation to most strong lighting scenarios is a basic three-point composition. A key light to create your main focus, a fill light to soften the shadows, and a rim light to enhance the shadowed side from the back. You can add a couple of extra lights to enhance specific focal points such as the eyes or hair. Utilising Marmoset’s depth of field and a well-placed background image can help finalise your render. •
This content originally appeared in 3D World magazine. Subscribe to 3D World at Magazines Direct.

