Creality K1 Review: A Speedy New Flagship
Creality’s new flagship 3D printer is an enclosed Core XY speedster that is neither an Ender nor a CR something. Like Cher, Madonna and Bono, this printer only needs one name: K1.
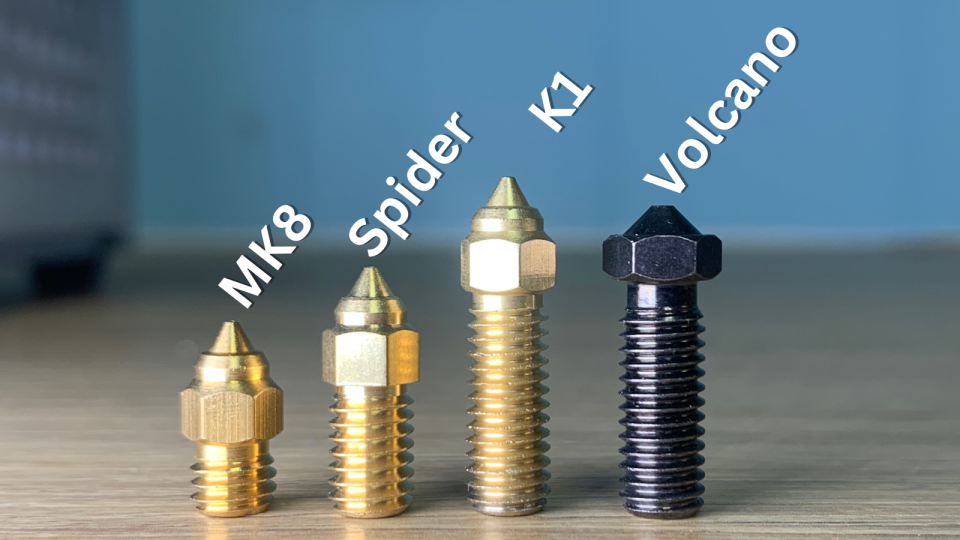
The K1 is being dubbed a Bambu clone due to its similarities to the groundbreaking Bambu Lab X1 Carbon. But it’s not really a clone, even if it shares speed and style points. The K1 uses a Creality Sprite hotend, a Volcano inspired nozzle first seen on the massive CR-M4 and a notched build plate the same size as an Ender 5 S1. It’s also running a limited version of Klipper firmware.
The K1 is retailing at $599, half the price of a Bambu Lab X1 Carbon and $100 cheaper than the open frame P1P. How does it compare? In our testing, the K1 is every bit as fast as the P1P, with a better interface and the ability to avoid unreliable cloud printing by using a USB stick or your private LAN. Its prints were fast, smooth and clean with frictionless joints. This makes it one of the best 3D printers you can buy.
Specifications: Creality K1
Creality K1: Included in the Box

The Creality K1 comes with everything you need to get your printer set up. You get tools to maintain the printer, side cutters, a plastic scraper, and a USB stick. There’s also a small spool of white Creality Hyper PLA to print your first model.
You also get a PDF copy of the manual, a copy of Creality Slicer and sample models in both pre-sliced .gcode and .stl format. There’s also a very helpful video to help you operate your machine.
Design of the Creality K1
The Creality K1 is a modern looking, fully enclosed Core XY printer. Though detractors point out its similar appearance to last summer’s groundbreaking Bambu Labs Carbon X1, I’d like to direct your attention to the fully enclosed Sermoon V1 Pro. The K1 may be Creality’s first Core XY, but it’s not its first enclosed machine or its first “bed dropper.”
It has a standard Ender 3 size, with a 220 x 220 mm build plate and 250 mm build height. The plate has notches on the back like the Ender 5 S1, which should make it easy to replace if you don’t like the stock smooth plate which needs a good slathering of glue stick.

The K1 uses a limited variation of Klipper modded by Creality. Though users new to Klipper may not notice the missing functions. For example, users must log into Creality’s cloud service at least once to “bind” the printer to the internet to access WiFi and LAN. You also can not access the console, config files or set the Z offset. Also the camera is limited to one you must purchase directly from Creality. Creality has said that they do support Open Source systems like Klipper and will be releasing a more open version of the operating system at a later date.
I am going to take issue with the nozzle, which is so similar and yet not quite the same as an E3D Volcano. There’s no need to keep inventing new nozzles when reputable 3rd party suppliers already have what you need.
I did test out a proper Volcano, and the K1’s sensors were able to compensate for the extra tip length. However, if you want to keep it in the family, Creality has stocked their store with hardened steel upgrades. Perhaps they can stick with this size for more machines that need high flow?
I’m not a big fan of the rear mounted spool holder, which requires setting up the printer where it can be spun around in order to access the rack and the filament runout sensor when you need to load materials. I fear this was copied from Bambu’s design, which also has terrible placement. However, in Bambu’s case, a top mounted filament multi spool feeder is a popular add-on – something Creality hasn’t shown interest in offering yet.
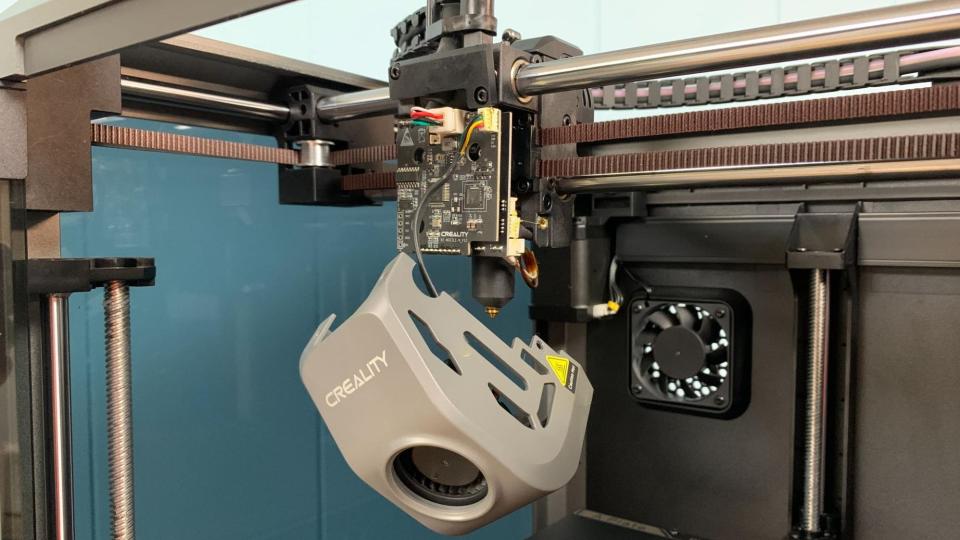
The machine has plenty of good points – cooling from both the hotend and the extra cabin fan are excellent and allow for perfect overhangs and smooth prints. The enclosed frame makes printing ABS and ASA very easy. Bed leveling and input shaping are automatic and worry free. There’s no ringing and no need to tune the printer. In fact, the machine is so precise and tightly tuned that print in place hinges and joints are completely frictionless.
The motion system appears very solid, and is made of ordinary polished metal so there’s little fear of these wearing out. Rubber feet are included, which help dampen vibrations, though it still jiggles like crazy on some fast prints.
It’s a little loud from all the cooling fans, but I’ve heard worse.
The screen and menu system is very easy to use. When paired with Creality Slicer, you get wonderful little thumbnails of your prints, which make it easy to select jobs. Furthermore, the K1 is running a form of Klipper and therefore remembers everything it has printed. We took the K1 on the road to a 3D printing festival and I was happy to find all the prints from home stored in its internal memory.
Speaking of WiFi, that’s just one of three ways you can send files to the K1. It can take files from a USB stick, through WiFi over your home or office LAN and also through the Creality Cloud. I’m not a big fan of the Cloud – it’s overly busy and gamified for my tastes – so it’s good to have options.
Assembling the Creality K1
The Creality K1 is 99% assembled and only needs to be uncrated - yes, uncrated – and unpacked. To protect the glass sides of this printer, Creality is shipping K1’s in a wooden crate with a standard cardboard packing inside. You’ll need to remove all the packing foam, unscrew three screws holding the build plate on, plug in the touch screen and screw on the filament holder.
Leveling the Creality K1
The Creality K1 has a fully auto leveling program that includes input shaping with the help of built-in sensors. Just push the button and the machine does the rest. It will also recheck the level before each print, but you can turn that feature off during slicing if you’re comfortable skipping the step.
Loading Filament on the Creality K1
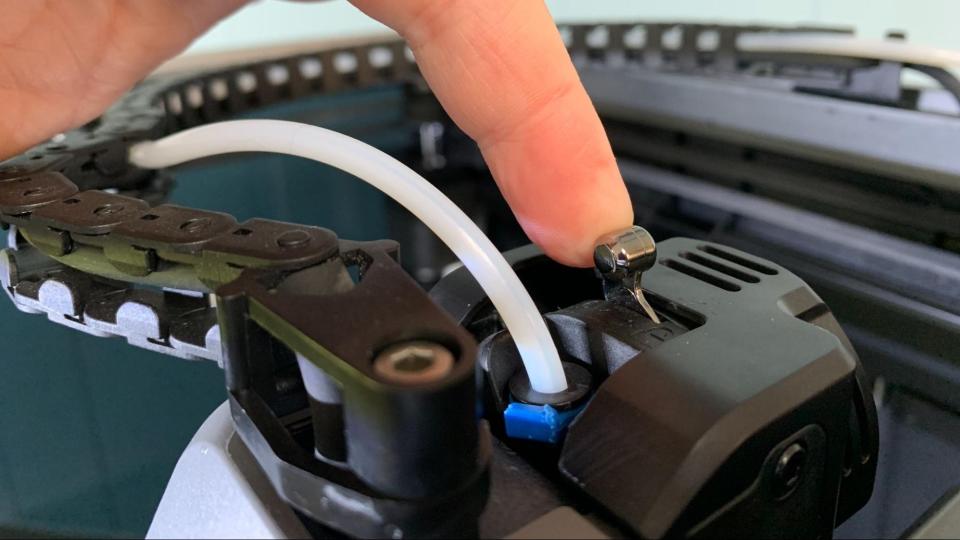
Loading filament is a little awkward, as Creality chose a back-mounted spool holder. I would have much preferred the side mounted style of their Sermoon V1 Pro.
The K1 has a reverse Bowden, with a tube that guides the filament from the runout sensor near the spool holder, up the side of the frame and across the top to the extruder. A silver latch on top releases the gear tension so you can push filament into the tool head. Be sure to return the latch to the locked position once the filament is in place.
Tap the control screen and select Extrude/Retract from the Control menu. Tap Extrude and then he machine will automatically warm up and then pull the filament through the hotend.
Reverse the process to remove the filament.
Preparing Files / Software for Creality K1
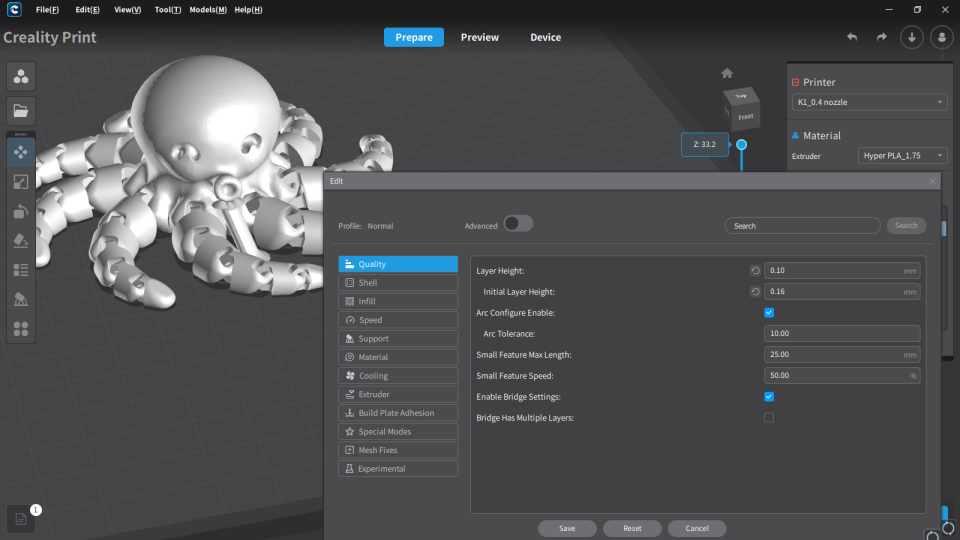
Creality included a copy of Creality Slicer, a newer slicer they’ve been working on. The program is easy-to-use with lots of presets for filaments. It’s arranged a little differently than Cura or PrusaSlicer, but all the same functions are there.
Creality Print also gives you access to your printer remotely via LAN or Creality Cloud. When you select “device” from the top menu you will see the printer interface. The K1 is using a variation of Klipper that Creality modded, and doesn’t have all the features you would get with a vanilla install. This one is kept simple, and is easy to understand for new users. Klipper veterans will no doubt be hunting for a way to jailbreak the interface and restore its features.
There are no built-in profiles for Cura or PrusaSlicer at this time.
Printing on the Creality K1
The Creality K1 comes with a small sample spool of Hyper PLA, Creality’s newest high-speed filament, which promises high strength and smooth prints while running at speeds up to 600mm/s. If you want more colors and materials like silks and multicolor filaments, you should check out our guide to the best filaments for 3D printing for suggestions.
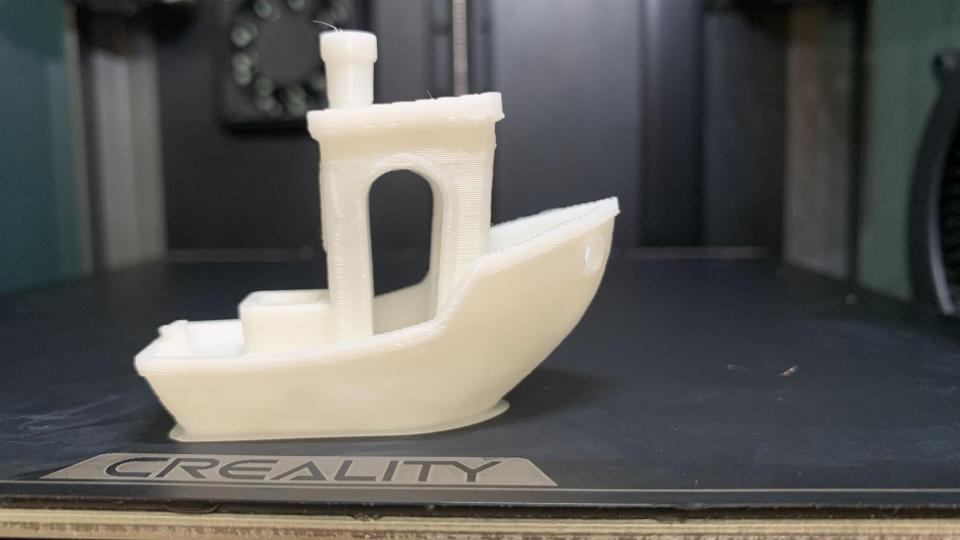
The presliced test Benchy printed in Hyper PLA printed in 25 minutes. It’s smooth and string free, though I question the unnecessary brim.
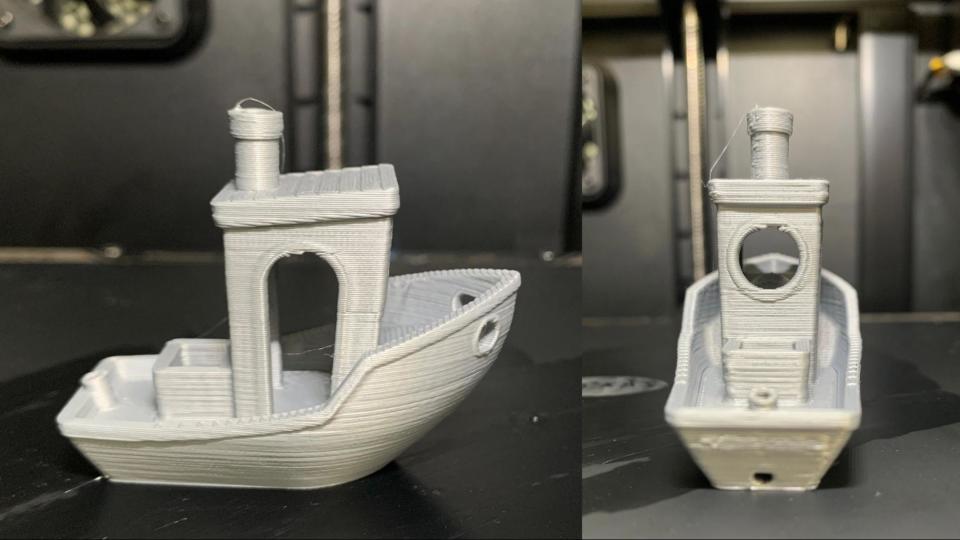
I wanted to slice up my own Benchy, so I ran it again, this time using “speed benchy” rules: .25 layer height, 2 walls, 3 top & bottom layers, 10% infill. I also turned off combing and z hop, and let her rip using the default speed of 300 mm/s. I picked out a spool of matte gray PolyTerra PLA, which shows every flaw and layer line on camera, and has no high flow additives.
The Benchy actually looks better in person – but you can see that the layers are fairly even, the curves are nice and the overhangs are perfect. The only thing missing is the details on the stern signage. This Benchy printed in an impressive 22 minutes and 58 secs. An Ender 3 S1 running at its top speed of 100mm/s would take 55 minutes to print this using similar settings.
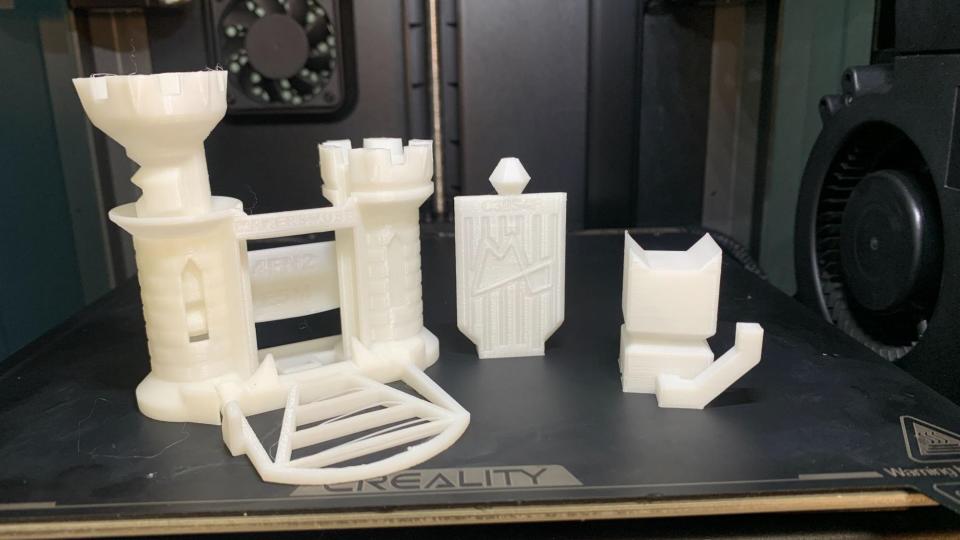
I also ran Maker’s Muse Clearance Castle and a Calibration Cat in the sample of Hyper PLA and it turned out clean and near perfect with loose fitting parts. The Cat’s tale was absolutely perfect, a sign of abundant cooling. The castle and cat were both printed at .2 mm layer heights, using default settings. The castle took 1 hour and 5 minutes, while the cat took 13 minutes.
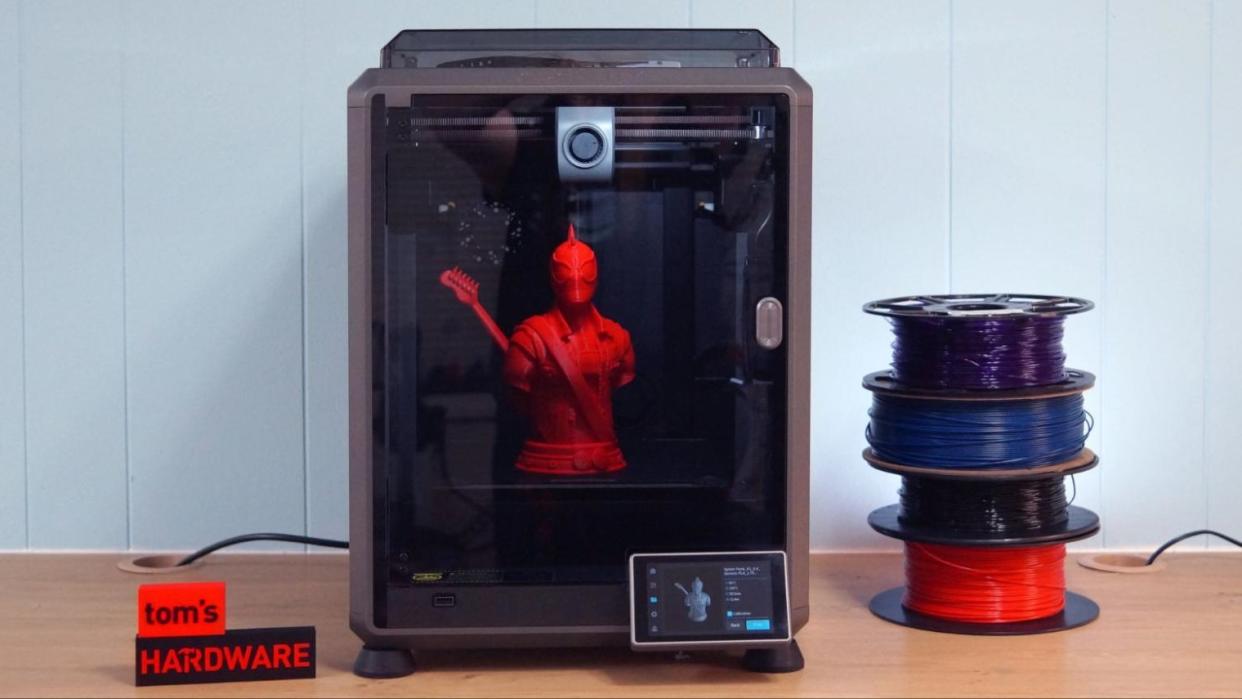
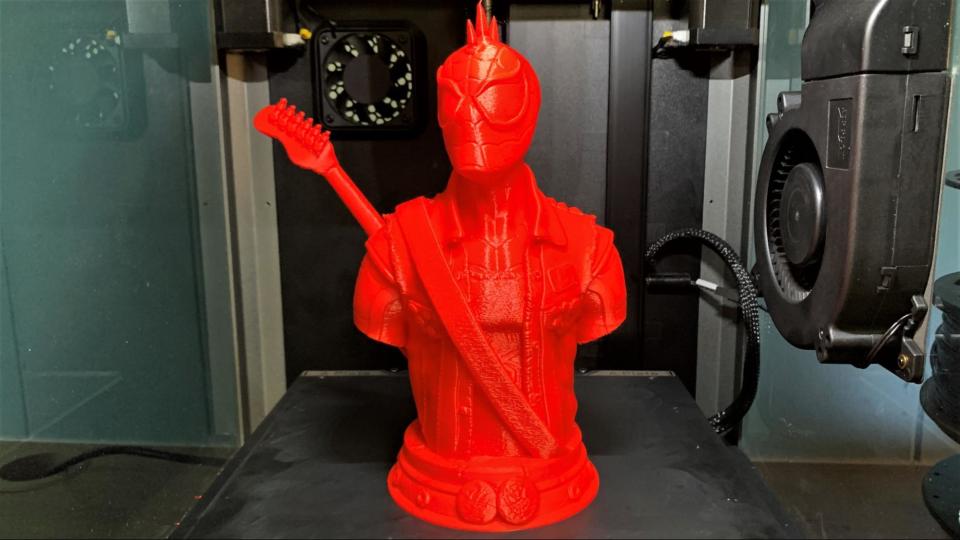
For normal PLA I printed a bust of Spider-Punk from Wekster, at 125%, in Amazon Basics Red PLA. This printed in 7 hours and 46 minutes at 300mm/s, with a .2 mm layer height and no supports. For comparison, an Ender 3 S1 Pro running at its top speed of 100 mm/s and using the exact same setting would take twice as long: 16 hours and 11 minutes. The print is smooth with crisp lines. Some details on the buttons were soft, but a higher resolution print would pick those up.
I tested Inland’s black ABS with a drink holder found on Printables. ABS requires a controlled environment and high temperatures – enclosed printers like the K1 are almost a necessity to make this filament work. The flat parts of the drink holder printed without warping and practically no layers lines with .2mm layers. There was some scarring across the top of the prints which can be corrected with better slicer settings. The screw has a great fit without binding. This took 2 hours and 7 minutes to print with all the pieces laying flat on the bed.

Since ABS printed so well, I also gave it a spool of Polymaker’s glittery Galaxy Blue ASA. This filament is the best of both worlds, with the sparkle normally reserved for PLA and the ABS like strength of ASA. ASA also requires a controlled environment and high temperatures, but is a little less prone to warping. Once again, the K1 impressed me with its ability to print quality at speed with this new vase mode skull by Clockspring. This was printed with a .2 mm layer height, using vase mode and took 2 hours and 32 minutes to print.

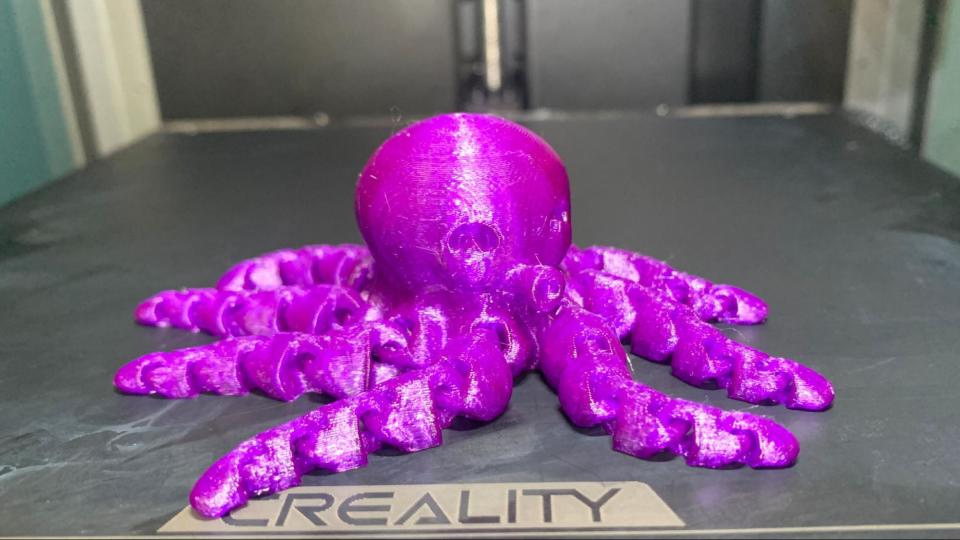
I did a quick test of PETG, with a spool of Greengate’s purple recycled PETG. The K1’s profile for PETG worked brilliantly, resulting in a nice smooth flexi octopus with no strings and joints that wiggle freely. This was printed with a .2mm layer height using default setting and took 1 hour and 8 minutes to print.
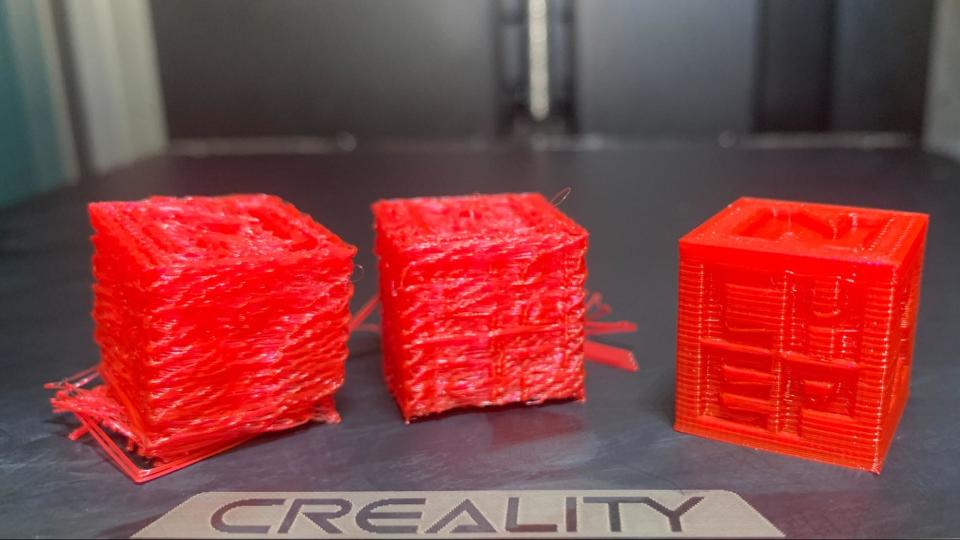
The only filament to disappoint me was TPU, which is shocking considering that the K1 uses a direct drive. This could be a flaw in the slicer, but the only way I could get it to print was to double the flow rate. The samples below are normal flow rate, 150% flow and 200% flow. These were each printed at 35mm/s with a .2 mm layer height in NinjaTek Cheetah Fire Red. Each cube took 17 minutes to print.
Bottom Line
The Creality K1 is an excellent printer for makers who favor speed and ease of use, but still want to watch their bottom line. It’s another step away from Creality’s reputation as a budget manufacturer, while still being friendly to both beginners and expert makers.
It’s disappointing that an industry leader like Creality feels the need to rebrand and rework Open Source hardware and software and bring it in house. It would be easier on both their own engineering team and customers to use things like Klipper and Volcano nozzles that already exist. They could still focus on adapting and improving hardware, while gaining trust from the community.
During testing, the machine showed a few flaws that aren’t surprising with a printer rushed to market. It had a few mysterious jams, and after a weekend of running ABS started to drift out of level, requiring a full factory reset to clear its sensors. Still, the K1 is impressive, and sure to replace a few Ender 3s on workbenches around the world. The only reason to not buy a K1 right now is that the bigger K1 Max is just around the corner and looks even more interesting as it promises a built-in camera and LiDAR sensors.
Currently on sale for $599, the K1 is a bargain compared to the competition. If you’re more interested in getting a fast machine that can also do four color (after an upgrade) but isn’t enclosed (which is useful for ABS), then check out the Bambu Lab P1P, which recently price matched the K1 and is on sale for $599. The Ender 3 S1 Pro is still an amazing machine for $439, and quite speedy when you upgrade it with a Sonic Pad.
MORE: Best 3D Printers
MORE: Best Budget 3D Printers
MORE: Best Resin 3D Printers
