How to Use a Compost Tumbler
Quickly turn your kitchen waste into valuable organic matter for your plants.
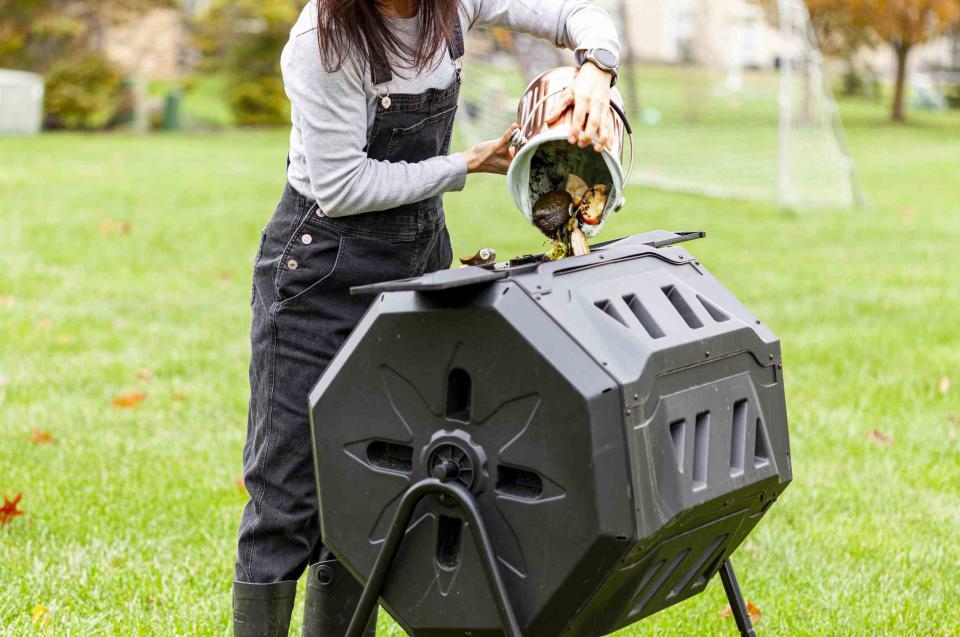
Grandbrothers / Getty Images
When you know how to use a compost tumbler correctly, you can make compost a little faster than with stationary compost bins. I found that out when I downsized from a mountain farm to a home in suburbia, which didn't have space for the large, open-to-the-air compost bins I was used to. I liked having my big bins to make lots of nutritious compost for my extensive gardens, and any occasional critters that were attracted to them didn’t bother me since the bins were well away from the house. But new situations require adaptations. My current composting system is a dual chambered tumbler. It recycles my kitchen wastes quicker than my open compost piles ever did—and without attracting critters, which is a good thing since it’s just a few yards from the house.
Compost bins and tumblers work in the same way. They allow microorganisms to transform kitchen scraps and garden wastes into a nutrient rich soil amendment. They require both “brown matter” (high in carbon), such as straw, shredded paper, sawdust, and pine needles, and “green matter” (high in nitrogen), which includes vegetable and fruit waste from the kitchen, fresh seed-free weeds, and fresh grass clippings. The ideal ratio is about three to four parts brown to one part green. If you add too much green material, composting slows down and you end up with a soggy mess. I’ve found that my paper shredder is just the ticket for adding lots of brown matter. I used to shred paper for security, now I shred to feed my compost.
:
Compost Tumbler vs. Compost Bin
There are a few major differences between the a tumbling composter and compost bins that don't move. The biggest benefit to a compost tumbler is how easy it is to turn your compost. Turning helps speed up composting by adding oxygen—another requirement for those hardworking microorganisms—to the mix. Turning compost in a bin is strenuous work, usually done with a garden fork and/or shovel. It can take a lot of time and result in a tired or sore back if you get too carried away.
In contrast, a compost tumbler is built to be turned. The drum sits on an axis—either vertically or horizontally—with handles that allow you to turn the drum with a lot less effort. Turning it a couple times a week really keeps the process moving along. That said, the fuller the drum, the harder it becomes to turn. But it’s still a breeze compared to turning compost in a bin with a garden fork, and only takes a minute. Literally.
And compared to the open compost bin systems I once had, compost tumblers are closed systems that offer several advantages. While tumblers do have ventilation holes that allow air in and excess moisture out, these are small enough to keep out unwanted critters. In general, compost tumblers are easier to keep tidy and have a small footprint, which suits them well to smaller suburban/urban yards.
Types of Compost Tumblers
While most tumblers sit on an axis or within a frame, some sit on the ground where they can be rolled. The drum of a tumbler on an axis may be oriented vertically or horizontally. They come in a variety of sizes, you will want to consider how much kitchen waste you generate and the space available when making your choice.
The most important feature to consider in a compost tumbler is the benefit of a dual chamber. If you have a single chamber compost tumbler, you must wait once that chamber is full to add more scraps until the compost in it has matured. This takes about two months, and unless you have a second tumbler, a lot of kitchen scraps will be sent to the landfill.
:
If you have a dual chambered tumbler, you can start the process again in the second chamber as soon as you’ve filled the first. I’ve found that the time it takes me to fill the second chamber is about the same time it takes for the first chamber to become usable.
Using Your Compost Tumbler
Place your tumbler in a sunny location in your yard. This helps add heat to the drum for speeding up decomposition. Add brown and green waste material you want to compost. You can add this material to your tumbling composter either all at once or over time. I add mine as I generate kitchen waste, adding sufficient shredded paper to keep it in balance. To speed the process, I like to cut up my kitchen waste into small pieces.
Turn the tumbler every three to five days. If it seems dry, add a bit of water. When the tumbler is about three quarters full, stop adding new material but keep turning it regularly. Depending on the temperature, your compost should be finished in six to eight weeks (maybe a little longer in the winter).
How you remove the finished compost depends on the design of your tumbler. For some models, you can roll a wheelbarrow directly under the opening and turn it so the compost spills out. I can’t do that with mine, so I use a narrow shovel to scoop out the finished compost. If you find a few bits that are not completely composted, just leave them; they’ll finish breaking down in the next cycle. Using a compost sifter will help remove larger pieces that need more time. It’s also a good idea to leave a little of the finished compost in the chamber for the next batch to be sure you have a starter supply of good microbes.
false

