How To Clean A Bagless Vacuum
"Sorry, I can't. I'm cleaning my vacuum." Here's how to make sure your bagless vacuum is clean.
Of course, we empty the canister when it's full, remove any brush-rotation interference, and even occasionally bang the filter against the side of the trash can, but could we be doing more for the machine that works so hard for us? Probably so. Day in and day out, our bagless vacuum hits the ground cleaning, sucking up every last bit of dog fur, dirt, grime, and even random Cheerios the baby hid under the couch for later. It's only right that we keep things running smoothly by giving our bagless vacuum a good clean. If you're doing a little research on maintenance before choosing between a bag vs. a bagless vacuum, let us applaud you for your forethought and initiative. We've outlined exactly what kind of routine cleaning a bagless vacuum needs to run most efficiently—whether you already have one or are thinking of making the switch.
How Often to Clean a Bagless Vacuum
Give your bagless vacuum a thorough cleaning every six months, or more frequently if you're a member of the frequent vacuumer club (having shedding pets automatically makes you a member!).
Considerations Before Getting Started
Always remember to turn off and unplug your vacuum before you start the cleaning process. Read your instruction manual and defer to its instructions. Some canisters can be washed with water, others shouldn't get wet, and different brands have different filter replacement guidelines. Put on a mask before starting—this is a dusty job!—and lay down a tarp or other protection on your floor so you're not left with an annoying mess.
What You Need:
Dish soap
Microfiber cleaning cloth
Small cleaning brush or toothbrush
Can of compressed air
Scissors
Screwdriver
Dryer vent brush
Mask
How to Clean a Bagless Vacuum
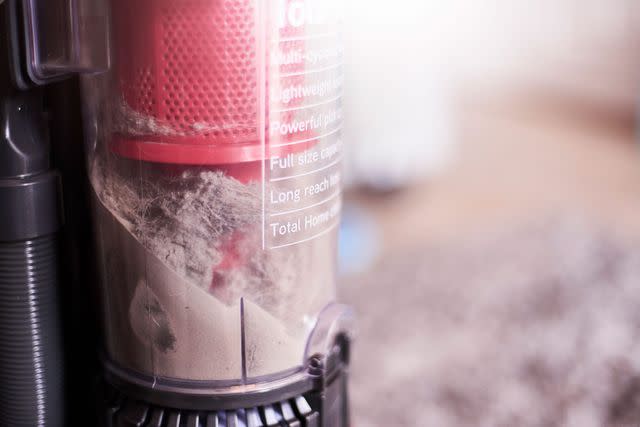
Clean the Canister: Empty the canister, then wipe the interior down with a microfiber cloth. The best-case scenario is washing the entire canister in warm soapy water. It will remove all remaining dirt, dust, grime, and hair most efficiently. Let it air dry completely before returning to your machine—remember we're dealing with an electrical appliance here! If your owner's manual recommends not submerging or getting the canister wet, thoroughly wipe down both the interior and exterior using a microfiber cloth. This should work just as well as a full soak, though it might take more time and elbow grease. A can of compressed air can help force out any dirt or debris that's stuck within grooves or crevices.
Clean the Filter: Your vacuum will most likely have a number of filters, including a HEPA filter, which should typically be replaced every six months. Some filters are washable while others just need to be replaced when showing signs of buildup. Refer to your owner's manual for best practices. When washing a filter, first remove any debris by gently knocking it against the trash bin. Rinse the filter under water until the water starts to run clean.
Clean the Floor Brush: Remove the floor brush from the machine using a screwdriver if necessary. Using scissors, cut any caught string or hair. Wipe out the area behind where the brush lives before reattaching the brush.
Look for Clogs: Check behind the brush for the opening to the vacuum's canister, and make sure it's clear of hair and lint. Again, use the can of compressed air to blow out any hard-to-reach dust.
Clean the Attachments: Remove the hose from the vacuum. Gently insert a dryer vent brush into the tube to clear out debris (push the tube together to make it shorter and make the job easier). Take special care not to damage the hose in the process. To clean brush and tool attachments, wipe them clean and remove any trapped dust or hair from the bristles. You can use the same dryer vent brush to clean longer attachments like the extended crevice tool.
How to Keep Your Bagless Vacuum Cleaner Longer
And before you pat yourself on the back for emptying the canister every time it looks full, let us leave you with this little tidbit: It actually should be emptied when it's only halfway full in order to maintain maximum suction. Regular cleaning of your vacuum is crucial for keeping it running well, say the vacuum pros at Bissell. Skipping upkeep tasks like removing hair stuck on the roller brush can shorten the life of the vacuum cleaner belt. If parts such as filters, attachments, the belt, or the rotating brush are worn or not working properly even after cleaning, it may be time to replace them. Check the manufacturer’s website for new parts.
How to Get Rid of and Prevent Smells in a Bagless Vacuum
The experts at Home Depot say the first step in tackling an odor issue in your vacuum is to wipe the canister with an anti-bacterial wipe and then wash the canister. Check the hose and valves for any debris or clogs, and make sure the belt isn't worn out (one that's past its prime can give off a burnt-rubber odor when the vacuum is on).
When to Call a Professional
Some odors are warning signs, say the pros. A sharp mechanical odor could mean problems with the cord or plug. Take the vacuum to be serviced.
When to Replace Your Vacuum
If your vacuum has lost suction power and cleaning or replacing the filter and checking for blockages has not been effective, it may be time for a new one. When your vacuum is no longer performing well enough to do its job, it’s time to start shopping.
Now that your vacuum is primed and ready to suck up anything in its way, keep up the cleaning momentum by making your dust and hair-free wood floors shine with this easy technique.
For more Southern Living news, make sure to sign up for our newsletter!
Read the original article on Southern Living.

