How To Choose, Fit And Break In Rock Shoes
- Oops!Something went wrong.Please try again later.
This article originally appeared on Climbing
At last count there were over 200 models of rock-climbingshoes with prices from $40 to over $200 and in as many shapes and levels of stiffness as there are stars in the sky, or nearly. Picking the climbing shoe that works best for you daunting, a case of sifting through information overload, and what, if after narrowing down your purchase to one model you get it wrong? Now you’re stuck with inferior shoes until they wear out and need replaced, and then you start the confounding cycle all over again. What follows are expert tips to help you get the right shoe in the correct size and break ’em in properly. If even this seems like too much, don’t fret, it’s actually hard to go wrong--as long as you get a good fit, just about any rock shoe will perform wonders and you may even find that you need more than one pair, or three.
How the Big Toe Affects Rock Shoe Sizing and Footwork
As the saying goes, "The key to climbing better is good footwork." But what makes footwork "good," and how does it improve your climbing? Kevin Jorgeson is a powerhouse boulderer, highball specialist, and big-wall free climber who in 2009 made the first ascent of the 45-foot V11 Ambrosia outside Bishop, California. And, of course, in 2015 made the first free ascent of the Dawn Wall (VI 5.14d) with Tommy Caldwell.
Jorgeson has put a lot of thought into the nuances of footwork. You've probably heard another truism: that your leg muscles, since they are larger, are slower to tire than your arms and hence should be your main weight-bearing points. But as Jorgeson frames it, footwork is simply one facet of being an active instead of a reactive climber. By using your feet and legs to propel you in the desired direction as part of a deliberate sequence, you become the architect of your climbing motion.
Precise footwork begins in your big toe, the point of power or pivot point for your entire foot. Our big toes stick out the farthest, are our strongest toes, and cue our other piggies kinesthetically. They are action points for move initiation, transferring tension across our feet, up through our ankles and heels, and along our legs to the rest of our body. We rotate around them to complete a move, like the tip of a spinning dreidel. So much hinges on such a small body part!
Your big toe, however, cannot do its job unless it is partnered with a properly sized climbing shoe. If your shoes are too tight, you'll barely weight your feet for the pain. But if they’re too loose, you'll roll off small footholds and edges. To find your match, attend a shoe demo, borrow friends’ shoes to check them out, or visit an equipment shop with a demo wall. Don't just buy the latest, hottest shoe or any old pair sight unseen and assume it will meet your needs.
Climbing Shoe-Buying And Sizing Tips
Here are some buying and sizing tips gleaned from my own experience as well as that of Kevin Jorgeson and Lisa Aquino, who worked at La Sportiva USA and sold shoes in a Denver outdoor shop for years:
* Ask the salesperson what type of climbing he's into to get a sense of which shoes he'll recommend and why. Make sure you discuss what type of climbing you are into (gym, sport, trad, bouldering, etc.) and what you are looking for in a shoe. Are you looking for a specific shoe for a specific genre of climbing, to fill out your quiver? Or a gym-only/training shoe? Or a generalist that can handle just about everything you throw at it?
* Be aware of your personal foot shape. Some brands or shoe lines within brands fit wider, high-volume feet better, while others cater to people with narrow, low-volume feet--and, these days, many shoes come in regular and low-volume versions (sometimes sold as “men’s” and “women’s” versions). Have the salesperson assess your bare feet, and ask him which brands or models he'd start with for your foot.
For example, I have wide, high-volume feet that work very well with certain brands--I can size almost perfectly. But with other brands, I almost always feel like I’m a “half size off.” In other words, at the size in which my foot is actually comfortable, I usually end up with dead space in the big toe--the toe feels too long. And if I go down a half-size, the shoe is painfully tight and I don’t want to weight my foot. This tells me that either this shoe or brand is not for me--it may be a good climbing shoe, but it’s probably never going to work for me.
* Don't buy the tightest pair you can squeeze into, especially if you're new to the sport. Shoes don't need to be ultra-painful to perform. If your toes are scrunched up, you're cramping across your foot or arch, your feet are quickly going numb (pins and needles), or you can’t get your heel all the way down in the heelcup, try a half-size larger until you have a snug fit that’s also comfortable, or close to comfortable. Many modern shoes, especially ones with synthetic (vs. leather) uppers, barely stretch, so you might never break in those foot-binding-torture shoe enough that you’ll actually want to use them.
That said, certain performance shoes (e.g., those with built-up heels and/or narrow, asymmetrical lasts) do take some wrangling to get into, and your foot may not drop all the way into the heelcup during initial break-in. For those pairs, you can use the plastic sheets that come in the shoebox: Spread them out flat and thin in the heelcup, and then use them as “lubrication” to drop your heel down and in. This will help you stretch the shoe to your foot, whether chilling on the couch at home to stretch them out before you climb in them or doing break-in laps at the gym.
* Your big toe should reach the very end of the toebox, but it and your other toes shouldn't curl under unless you're in an aggressively downturned shoe meant to put your foot in that “talon” position. Ideally, your toe and the shoe should become one; when standing on an edge (not a ledge), your foot shouldn't separate from the end of the shoe, which happens if the shoe's too loose.
* There should not be air pockets where the shoe sags or bags--anywhere--and the heelcup shouldn't pop or slide in heel hooks.
* Consider entry-level shoes when starting out. With flat lasts and rounded, symmetrical toe boxes, these shoes are more comfortable and supportive than high-end rock shoes. They aren't as precise or sensitive, but they get you up and running while your feet are still building the necessary flexibility and musculature.
* Upgrade to a shoe with an asymmetrical toebox and/or moderate downturn for greater control and sensitivity if you progress to 5.10 and above. You need to feel those smaller footholds. Such genre-spanners are also great if you're an intermediate or advanced climber (5.10-5.13) looking for a single, all-around performance shoe. They fit precisely but, unlike a downcambered shoe, aren't so aggressive that you have to yank them off after one pitch.
* Shoes without laces (e.g., slippers of Velcro-closure shoes), or with laces that don't come low over the toebox, are best for crack climbing; all that twisting and torqueing will chew your laces up. Hard-crack master Rob Pizem recommends shoes with a high toe-box rand that extends back past the point where your toes meet your foot. Size them so that your feet sit flat in a natural way and aren't curled--"tight enough so you could wear a thin pair of socks if you wanted," says Pizem.
Helpful terms for Rock Shoes
You’ll see these terms used in shoe manufacturers’ ad and marketing copy, shoe reviews, and from salespeople. Here’s what you need to know:
Asymmetrical: Instead of being laterally symmetrical across the toebox, the shoe follows the foot's natural, irregular curve. This design's good for performance climbing and for focusing power through your big toe.
Downcambered: The shoe has a banana-like underfoot swoop shape, beveled high through the arch. This aggressive last is best for overhanging rock, steep gym climbing, bouldering, and redpoint climbing.
Downturned: The shoe's forefoot droops in a hook or talon shape, driving the big toe hard into the tip. This design is best for overhanging climbing, where you need to dig and pull, but it can be painful on slabby or vertical rock.
Flat lasted: A shoe that's flat along the sole from heel to toe is good for edging, trad climbing, cracks, slabs, and all-day wear.
Footbed: The interior of the shoe, which your foot slides into, might be lined or unlined. A footbed lining can reduce both odor and stretch.
Last: This is the three-dimensional shape around which the shoe is constructed, i.e., the negative space contained by the shoe. Most modern shoes are slip lasted, with the shoe built around a slipper-like or sock-like form.
Midsole: The subsole made of cardboard, leather, plastic, etc., situated between the footbed and outsole, imparts form and edging stiffness to the shoe. The thicker or harder the midsole, the stiffer the shoe.
Outsole/sole: The sticky-rubber sole on the bottom of the shoe, where you contact the rock. Some shoes have a full sole that runs from toe to heel, while others have a half-sole--just the forefoot. For thin-face/edging/trad climbing, you typically want a harder rubber like Vibram XS Edge, Stealth Onyxx, etc. For steep sport, gym climbing, and bouldering, you typically want a softer compound like Vibram XS Grip (or the even-softer XS Grip 2) or Stealth C4. Performance shoes these days usually come with 3.5 mm-4 mm thick soles, while all-arounders/trad shoes and beginner shoes are in the 4 mm-5mm range.
Rand: The band of sticky rubber wrapped around the shoe above the sole that links it to the upper. It provides contact for heel hooking and toe scumming, as well as grip and protection in cracks. These days, most rands are tension rands, meaning they come high over the heel/Achilles tendon to drive the foot down into the toebox.
Symmetrical: Lateral symmetry across the toe box produces a rounded look. Symmetrical shoes are comfortable and best for moderate or crack climbing.
Upper: The upper part of the shoe enclosing the footbed is usually leather or a synthetic material. Shoes with leather uppers might stretch a half to a full size, while shoes with synthetic uppers stretch very little.
Rocking a Quiver
The longer you climb, the more you accrue rock shoes, and the more you’ll come to realize there are specific shoes for specific jobs--shoes custom-made to perform on certain angles and genres of climbing. We’re lucky to live in a time when there are so many options on the market. When I started climbing in the mid-1980s, the local outdoor shop had maybe four or five options for sale, almost all of them stiff, clunky, and high-topped. When low-topped performance shoes like the Asolo Runout and La Sportiva Mega then Kendo came along, we were over the moon!
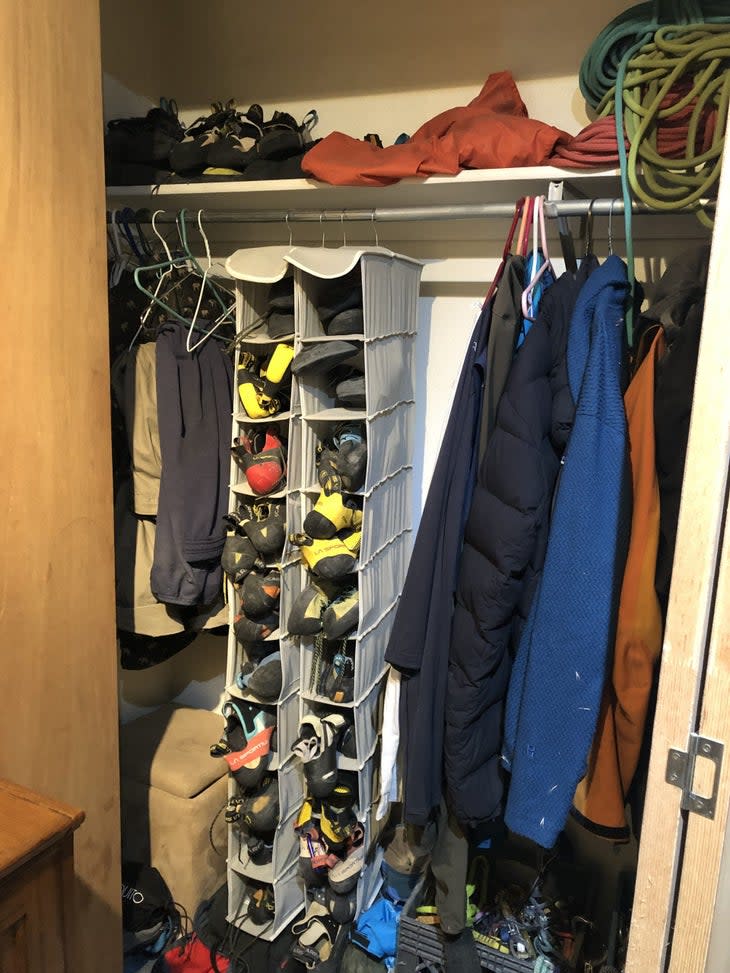
Because I’m always testing new shoes for my job, I have an absurd amount of rock shoes (see photo). But even if I weren’t always testing, my gear closet would be just as full of rock shoes. Like most obsessive climbers, I’m a shoe nerd, and I love always having multiple tools for different jobs--there are usually three or four different pairs in my pack for a day out cragging.
If you want to build a quiver, I recommend ticking a few boxes. You may just want one pair in each genre described below, or you may want multiple pairs to fill the category out.
* Stiff or semi-stiff edging shoes: Make sure you always have a pair of shoes with a stiff or semi-stiff midsole, and a full or close-to-full outsole, so you get that crisp, razor-sharp bite on small edges and micro holds, for techy routes 10deg or 15deg to either side of vertical. Shoes like this are also good for kneebar-intensive climbs where you’re putting a lot of weight on your feet in kneebars or kneescums; a stiffer shoe will keep your calf muscle from tiring as quickly.
* A softer bouldering/gym shoe: A soft, downturned, asymmetrical shoe is perfect for gym bouldering, steep gym climbs, and bouldering outdoors. These days, with the explosion of comp climbing and climbing’s debut in the Olympics, manufacturers are also offering “comp shoes” or “comp” versions of their existing shoes, further softened for the parkour-like, comp-style problems on sloping volumes and big features. You can generally size these shoes somewhat smaller than stiffer/all-around models, for max bite on small holds and also because softer shoes tend to stretch more.
* A tightly sized, favorite redpoint shoe: We all have them--that one, go-to pair or model that just seems to work the best for us at our limit on most or all genres of rock. I have at least two models that fit the bill, and I make sure to have at least one pair in tip-top shape (newly broken in or freshly resoled) and ready to go at any given moment. Only use these shoes for redpoint burns! Don’t burn through the precious sole rubber or soften up the midsole on warmup or hangdog burns.
* “Banana shoes”: Here, we’re talking radically asymmetrical, radically downcambered, radically downturned performance shoes. While these fill a very specific niche--super-steep, technical climbing--they are extremely good at what they do. For angles of 20deg or more past vertical--on rock or plastic--these are your kicks.
* Comfy shoes: I’ll sometimes buy a pair of favorite shoes a half-size larger than my usual fit, for comfortable, long-term wear like when working the beta on a route, climbing multi-pitch routes, or climbing in the heat when my feet swell up. Usually shoes on their second or third resole fit the bill, too--they’re stretched out and well broken-in. Meanwhile, a pair of flat-lasted, comfy shoes or slippers is also great for crack climbing.
* Performance all-arounders: It’s good to have a snugly sized, performance all-arounder in your quiver, usually a shoe with mild asymmetry, a mild downturn, and a semi-stiff midsole for edging bite. On long, varied pitches that throw lots of different types of moves and footholds at you, these shoes are perfect. If you’re big on trad climbing or big-wall free climbing, then a performance trad shoe (e.g., the Evolv General, the La Sportiva TC Pro, Five Ten Grandstone, the Acopa JB, the Scarpa Maestro, etc.) that has these attributes plus an eye toward crack climbing is a sure bet as well.
* Slippers: Easy-on, easy-off--great for training, gym routes, and bouldering, plus slippers help strengthen your feet and that crucial big toe. They also tend to be sensitive, giving good “feedback” on tiny footholds. Typically you want to size slippers more tightly than lace-ups or Velcro shoes, since there’s no way to tighten them down one they’re on your foot.
* Lines of shoes: Finally, take a look at lines of shoes made by brands--for example, slipper, lace-up, Velcro, low-volume, and high-volume versions of the same shoe, each with its own attributes (outsole, midsole, closure system, etc.) that make it best for different genres of climbing. Chances are, if you fit one shoe in the line well, you’ll fit all of them well, generally at the same size.
Break-In Tips
Now that you have your shoes, it’s time to break them in--to stretch them out, get used to them, and get them to conform to your foot. Here are some tried-and-true methods:
Wear them at home in front of the TV for a night or two. With tight shoes, pull them on in a handful 5- or 10-minute stints for a couple of nights, so the shoe begins to take the shape of your foot.
If the shoe is still extremely tight and you’re having trouble getting your foot all the way in, use the plastic sheet that came in the shoebox as a “shoehorn”--spread it flat and thin in the heelcup then drop your foot in, using the heeltabs to pull the shoe on.
If you’re still having issues, you might consider getting the shoes slightly damp or putting them in the oven, then wearing them to stretch them out. However, most manufacturers recommend against these practices--you risk permanently deforming or delaminating your shoe (separating the sole from the rand/midsole by overheating the glue).
When you’re ready to climb in them, first try them out in the gym or on toprope for a day or two. Until shoes are broken in or you get used to them, you just don’t know how they’re going to perform. Being up on lead in an unknown or untested pair of boots can be sketchy--or at least feel that way!
If the sole feels too thick for your needs, you can take it to a cobbler to grind it down or try sanding away the rubber y0urself--just do so in a uniform fashion across the forefoot so that it wears equally later. Some climbers also like a roughened-up sole, not the monolithic rubber of a new sole, and so will sand or scuff up the big-toe area to increase friction.
Finally, be attentive to if and when your shoes need a resole, post-break-in. Click here for shoe-care and resoling tips.
This article, adapted from the Crag Survival Handbook, is free. Sign up with an Outside+ membership and you get unlimited access to thousands of stories and articles on climbing.com and rockandice.com, plus you’ll enjoy a print subscription to Climbing and receive our annual coffee-table edition of Ascent. Outside+ members also receive a Gaia GPS Premium membership, and more. Please join the Climbing team today.
(c) 2013. Parts of this article are reprinted with permission of the publisher from Crag Survival Handbook by Matt Samet, Mountaineers Books, Seattle.
For exclusive access to all of our fitness, gear, adventure, and travel stories, plus discounts on trips, events, and gear, sign up for Outside+ today.

